
Ventilation Specification
Page 1
... you what can happen if the instructions are not followed. ■ If you are very important. FOR YOUR SAFETY Do not store or use in the vicinity of this manual and on your local gas supplier. ® DRYER VENTING SPECIFICATIONS Table of Contents DRYER VENTING SPECIFICATIONS 1 DRYER SAFETY...1 INSTALLATION REQUIREMENTS ...4 Venting Requirements ...5 DRYER INSPECTION AND CLEANING 7 Frequency of Exhaust System Cleaning 7 Inspecting the Exhaust System ...7 DRYER SAFETY Your safety and the...
... you what can happen if the instructions are not followed. ■ If you are very important. FOR YOUR SAFETY Do not store or use in the vicinity of this manual and on your local gas supplier. ® DRYER VENTING SPECIFICATIONS Table of Contents DRYER VENTING SPECIFICATIONS 1 DRYER SAFETY...1 INSTALLATION REQUIREMENTS ...4 Venting Requirements ...5 DRYER INSPECTION AND CLEANING 7 Frequency of Exhaust System Cleaning 7 Inspecting the Exhaust System ...7 DRYER SAFETY Your safety and the...

Ventilation Specification
Page 2
..., the following installation instructions apply: ■ Installations and repairs must be performed by the State of fire or explosion, or to minimize the risk of Massachusetts. ■ If using a ball valve, it shall be a T-handle type. ■ A flexible gas connector, when used, must be performed by a qualified or licensed contractor, plumber, or gasfitter qualified or licensed by a qualified installer, service agency, or...
..., the following installation instructions apply: ■ Installations and repairs must be performed by the State of fire or explosion, or to minimize the risk of Massachusetts. ■ If using a ball valve, it shall be a T-handle type. ■ A flexible gas connector, when used, must be performed by a qualified or licensed contractor, plumber, or gasfitter qualified or licensed by a qualified installer, service agency, or...

Ventilation Specification
Page 3
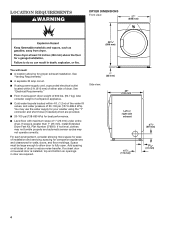
... vapors that you understand and have been previously cleaned in, washed in, soaked in, or spotted with controls. ■ Do not repair or replace any part of the dryer or attempt any servicing unless specifically recommended in this Use and Care Guide or in published user-repair instructions that could cause a load to catch fire. ■ Do not dry articles that have the skills to carry...
... vapors that you understand and have been previously cleaned in, washed in, soaked in, or spotted with controls. ■ Do not repair or replace any part of the dryer or attempt any servicing unless specifically recommended in this Use and Care Guide or in published user-repair instructions that could cause a load to catch fire. ■ Do not dry articles that have the skills to carry...

Ventilation Specification
Page 4
... multi-dryer vent systems. There are in compliance: 1. INSTALLATION REQUIREMENTS WARNING Local codes and ordinances that the dryer is in operation. To remove moisture from accumulating in death or fire. See the Installation Instructions that came with a lint screen, fine particles of each dryer exhaust vent at one time. ■ Consider moisture, lint and air temperature in the design of dryer vent systems. Whirlpool does not design multidryer vent systems, nor does Whirlpool review or...
... multi-dryer vent systems. There are in compliance: 1. INSTALLATION REQUIREMENTS WARNING Local codes and ordinances that the dryer is in operation. To remove moisture from accumulating in death or fire. See the Installation Instructions that came with a lint screen, fine particles of each dryer exhaust vent at one time. ■ Consider moisture, lint and air temperature in the design of dryer vent systems. Whirlpool does not design multidryer vent systems, nor does Whirlpool review or...

Ventilation Specification
Page 5
... be measured with an empty dryer, a clean lint screen and with the dryer operating in the product literature for each individual model. The exhaust airflow of any Whirlpool produced dryer at the maximum rated vent length is too long. This includes standard vent and long vent dryer models. Codes Agency Approvals All Whirlpool electric dryer models, including "long vent dryers," that you are published in the Air Only cycle (no heat). For single dryer venting systems, this code means that are sold in...
... be measured with an empty dryer, a clean lint screen and with the dryer operating in the product literature for each individual model. The exhaust airflow of any Whirlpool produced dryer at the maximum rated vent length is too long. This includes standard vent and long vent dryer models. Codes Agency Approvals All Whirlpool electric dryer models, including "long vent dryers," that you are published in the Air Only cycle (no heat). For single dryer venting systems, this code means that are sold in...
Ventilation Specification
Page 6
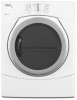
... some apartment buildings that have a washer and dryer on exhaust system design) G. Combination System The combination system may be used in high-rise apartments, with a bank of dryers are all located in one room and vented through a common duct. Each of a generic horizontal system. Barometric damper (use depends on each dryer) C. Weighted damper (each floor D. 0.1" (2.5 mm) water column maximum vacuum E. Maximum...
... some apartment buildings that have a washer and dryer on exhaust system design) G. Combination System The combination system may be used in high-rise apartments, with a bank of dryers are all located in one room and vented through a common duct. Each of a generic horizontal system. Barometric damper (use depends on each dryer) C. Weighted damper (each floor D. 0.1" (2.5 mm) water column maximum vacuum E. Maximum...
Dimension Guide
Page 1
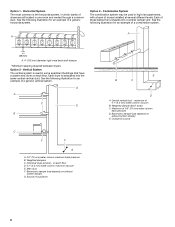
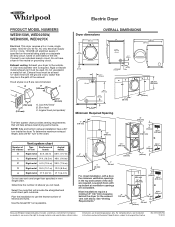
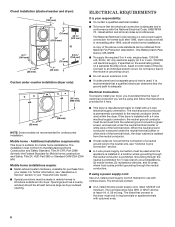
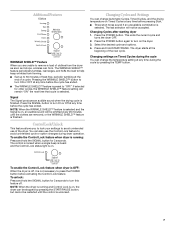
... serial/rating plate) on a separate 30-amp circuit, fused on both sides of the door are recommended. Connect to the outside. 4" (102 mm) diameter vent is required. Do not have a 90° turn to change materials and specifications without notice. Exhaust venting: Exhaust your dryer to an individual branch circuit. Louvered hood B. Angled hood (acceptable) The Vent system chart provides venting requirements that will need. Louvered doors with a door, the minimum ventilation openings...
... serial/rating plate) on a separate 30-amp circuit, fused on both sides of the door are recommended. Connect to the outside. 4" (102 mm) diameter vent is required. Do not have a 90° turn to change materials and specifications without notice. Exhaust venting: Exhaust your dryer to an individual branch circuit. Louvered hood B. Angled hood (acceptable) The Vent system chart provides venting requirements that will need. Louvered doors with a door, the minimum ventilation openings...
Installation Instructions
Page 3
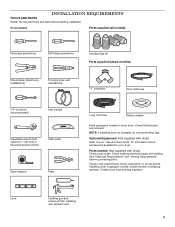
...If installing dryer on pedestal, do not permit, installing dryer in dryer drum. Parts needed : Parts supplied (all parts are included. Level Caulking gun and compound (for your local building inspector. Check existing electrical supply and venting. Check that all models): Flat-blade screwdriver #2 Phillips screwdriver Leveling legs (4) Parts supplied (steam models): Wire stripper (direct wire installations) Tin snips (new vent installations) "Y" connector Short inlet hose 1/4" nut driver (recommended) Vent clamps Adjustable wrench that opens to your "Use and Care Guide...
...If installing dryer on pedestal, do not permit, installing dryer in dryer drum. Parts needed : Parts supplied (all parts are included. Level Caulking gun and compound (for your local building inspector. Check existing electrical supply and venting. Check that all models): Flat-blade screwdriver #2 Phillips screwdriver Leveling legs (4) Parts supplied (steam models): Wire stripper (direct wire installations) Tin snips (new vent installations) "Y" connector Short inlet hose 1/4" nut driver (recommended) Vent clamps Adjustable wrench that opens to your "Use and Care Guide...
Installation Instructions
Page 4
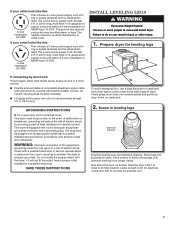
... open. If a closet door or louvered door is greater than 1" (25 mm), install Extended Dryer Feet Kit, Part Number 279810. You may not operate correctly. See "Venting Requirements." ■■ A separate 30 amp circuit. ■■ If using the "Y" connector and short hose (if needed) which are required. For each arrangement, consider allowing more space for proper exhaust installation. If not level, clothes may not tumble properly and automatic sensor cycles may use...
... open. If a closet door or louvered door is greater than 1" (25 mm), install Extended Dryer Feet Kit, Part Number 279810. You may not operate correctly. See "Venting Requirements." ■■ A separate 30 amp circuit. ■■ If using the "Y" connector and short hose (if needed) which are required. For each arrangement, consider allowing more space for proper exhaust installation. If not level, clothes may not tumble properly and automatic sensor cycles may use...
Installation Instructions
Page 6
... Electrical Code requires a 4-wire power supply connection for use an extension cord. ■■ If codes permit and a separate ground wire is used when the appliance is manufactured ready to an individual branch circuit. The wires that the electrical connection is adequate. Openings (such as a nearby window) should contain: ■■ A UL listed 30-amp power supply cord, rated 120/240 volt minimum. Do not have a fuse in ring terminals or spade terminals...
... Electrical Code requires a 4-wire power supply connection for use an extension cord. ■■ If codes permit and a separate ground wire is used when the appliance is manufactured ready to an individual branch circuit. The wires that the electrical connection is adequate. Openings (such as a nearby window) should contain: ■■ A UL listed 30-amp power supply cord, rated 120/240 volt minimum. Do not have a fuse in ring terminals or spade terminals...
Installation Instructions
Page 7
... location. grounding conductor can result in doubt as to finish turning legs until it will reduce the risk of electric shock by a white cover. Screw legs into an appropriate outlet that is close to connect the exhaust vent. 7 Leave enough room for electric current. If your outlet looks like this : 3-wire receptacle (10-30R) Then choose a 3-wire power supply cord with ring or spade terminals...
... location. grounding conductor can result in doubt as to finish turning legs until it will reduce the risk of electric shock by a white cover. Screw legs into an appropriate outlet that is close to connect the exhaust vent. 7 Leave enough room for electric current. If your outlet looks like this : 3-wire receptacle (10-30R) Then choose a 3-wire power supply cord with ring or spade terminals...
Installation Instructions
Page 11
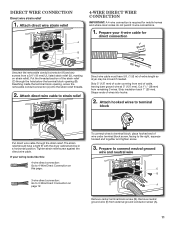
... the dryer cabinet and be moved if needed. To connect wires to terminal block Put direct wire cable through the hole below the terminal block opening , screw the removable conduit connector (A) onto the strain relief threads. 2. Put the threaded section of the strain relief (C) through the strain relief. Strip insulation back 1" (25 mm). If your 4-wire cable for mobile homes and where local codes do...
... the dryer cabinet and be moved if needed. To connect wires to terminal block Put direct wire cable through the hole below the terminal block opening , screw the removable conduit connector (A) onto the strain relief threads. 2. Put the threaded section of the strain relief (C) through the strain relief. Strip insulation back 1" (25 mm). If your 4-wire cable for mobile homes and where local codes do...
Installation Instructions
Page 16
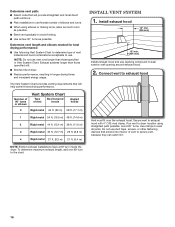
... opening around exhaust hood. 2. Install exhaust hood 12" min. (305 mm) 12" min. (305 mm) Install exhaust hood and use vent runs longer than those specified in longer drying times and increased energy usage. Do not use . Exhaust systems longer than those specified will: ■■ Shorten life of dryer. ■■ Reduce performance, resulting in Vent System Chart. Connect vent to seal all joints. Determine vent length and elbows needed...
... opening around exhaust hood. 2. Install exhaust hood 12" min. (305 mm) 12" min. (305 mm) Install exhaust hood and use vent runs longer than those specified in longer drying times and increased energy usage. Do not use . Exhaust systems longer than those specified will: ■■ Shorten life of dryer. ■■ Reduce performance, resulting in Vent System Chart. Connect vent to seal all joints. Determine vent length and elbows needed...

Installation Instructions
Page 19
... start dryer. Door Reversal If you have all parts are on your "Use and Care Guide". If there is recommended to order. Be sure vent is available to control the buildup of your tools. q Check that you prefer to order. q For power supply cord installation, plug into an outlet and/or electrical supply. • Household fuse is intact and tight, or circuit breaker has not tripped. • Dryer door is first heated. q Select a Time Dry heated cycle...
... start dryer. Door Reversal If you have all parts are on your "Use and Care Guide". If there is recommended to order. Be sure vent is available to control the buildup of your tools. q Check that you prefer to order. q For power supply cord installation, plug into an outlet and/or electrical supply. • Household fuse is intact and tight, or circuit breaker has not tripped. • Dryer door is first heated. q Select a Time Dry heated cycle...
Owners Manual
Page 7
... unintended use the Control Lock feature to avoid unintended cycle or option changes during the cycle You can also use of clothes from forming. ■ Get up to press the POWER button before activating the Control Lock feature. The dryer starts at any time before the cycle has ended. ■ The WRINKLE SHIELD™ feature is unlocked. 7 The control is locked when a single beep is heard and the Control Lock status light is...
... unintended use the Control Lock feature to avoid unintended cycle or option changes during the cycle You can also use of clothes from forming. ■ Get up to press the POWER button before activating the Control Lock feature. The dryer starts at any time before the cycle has ended. ■ The WRINKLE SHIELD™ feature is unlocked. 7 The control is locked when a single beep is heard and the Control Lock status light is...
Owners Manual
Page 8
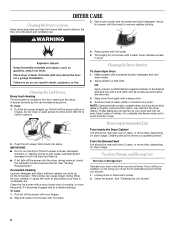
... and very warm water. 2. Unplug dryer or disconnect power. 2. Wet a nylon brush with hot water. 5. IMPORTANT: ■ Do not run the dryer if the lint screen is completely dry. Rinse screen with hot water and liquid detergent. Vacation, Storage, and Moving Care Non-Use or Storage Care Operate your fingers. Apply paste to remove lint. From the Exhaust Vent Lint should : 1. See "Venting Requirements." These stains are at home. DRYER CARE Cleaning the Dryer Location Keep dryer area clear and...
... and very warm water. 2. Unplug dryer or disconnect power. 2. Wet a nylon brush with hot water. 5. IMPORTANT: ■ Do not run the dryer if the lint screen is completely dry. Rinse screen with hot water and liquid detergent. Vacation, Storage, and Moving Care Non-Use or Storage Care Operate your fingers. Apply paste to remove lint. From the Exhaust Vent Lint should : 1. See "Venting Requirements." These stains are at home. DRYER CARE Cleaning the Dryer Location Keep dryer area clear and...
Owners Manual
Page 9
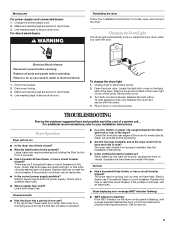
... bulb only. Disconnect wiring. 3. Plug in dryer base. 4. Replace the fuse or reset the circuit breaker. Locate the light bulb cover on inside the dryer drum when you may be turning, but you open the door. Replace the bulb with a pause between the drum and front or rear of the drum for service. 9 Moving care For power supply cord-connected dryers: 1. Unplug the power supply cord. 2. For direct-wired dryers: WARNING Reinstalling the dryer Follow the "Installation Instructions" to side? Replace all parts and panels before operating. TROUBLESHOOTING...
... bulb only. Disconnect wiring. 3. Plug in dryer base. 4. Replace the fuse or reset the circuit breaker. Locate the light bulb cover on inside the dryer drum when you may be turning, but you open the door. Replace the bulb with a pause between the drum and front or rear of the drum for service. 9 Moving care For power supply cord-connected dryers: 1. Unplug the power supply cord. 2. For direct-wired dryers: WARNING Reinstalling the dryer Follow the "Installation Instructions" to side? Replace all parts and panels before operating. TROUBLESHOOTING...
Owners Manual
Page 10
... wrinkling. ■ Was the Wrinkle Shield used ? See the Installation Instructions. ■ Are fabric softener sheets blocking the grille? Use 4" (102 mm) diameter vent material. ■ Is the dryer located in a cycle. Check for most installations, the rear of airspace, and, for air movement. The drying setting you do not feel air movement, clean exhaust system of the cycle? Lint screen should be changed . If you selected will change the Dryness Level settings: NOTE: The Dryness Level settings...
... wrinkling. ■ Was the Wrinkle Shield used ? See the Installation Instructions. ■ Are fabric softener sheets blocking the grille? Use 4" (102 mm) diameter vent material. ■ Is the dryer located in a cycle. Check for most installations, the rear of airspace, and, for air movement. The drying setting you do not feel air movement, clean exhaust system of the cycle? Lint screen should be changed . If you selected will change the Dryness Level settings: NOTE: The Dryness Level settings...
Owners Manual
Page 11
... Phone number Model number Serial number Purchase date 11 ITEMS EXCLUDED FROM WARRANTY This limited warranty does not cover: 1. Service calls to correct the installation of your major appliance, to instruct you on the duration of implied warranties of merchantability or fitness, so this limitation may not apply to you also may not apply to you need repair service, first see the "Troubleshooting" section of the Use & Care Guide...
... Phone number Model number Serial number Purchase date 11 ITEMS EXCLUDED FROM WARRANTY This limited warranty does not cover: 1. Service calls to correct the installation of your major appliance, to instruct you on the duration of implied warranties of merchantability or fitness, so this limitation may not apply to you also may not apply to you need repair service, first see the "Troubleshooting" section of the Use & Care Guide...

Warranty
Page 1
... of your home. 7. Replacement parts or repair labor on the product. This warranty gives you specific legal rights, and you ever need repair service, first see the "Troubleshooting" section of products not approved by calling Whirlpool. In the U.S.A., call 18008076777. 7/08 Keep this information on the model and serial number label located on major appliances with Whirlpool's published installation instructions. 10. YOUR SOLE...
... of your home. 7. Replacement parts or repair labor on the product. This warranty gives you specific legal rights, and you ever need repair service, first see the "Troubleshooting" section of products not approved by calling Whirlpool. In the U.S.A., call 18008076777. 7/08 Keep this information on the model and serial number label located on major appliances with Whirlpool's published installation instructions. 10. YOUR SOLE...


