
Warranty Information
Page 1
... warranty gives you speci c legal rights, and you also may not apply to published user or operator instructions and/or installation instructions. 2. You must be repaired in an inaccessible location or is inconsistent to you need it is installed in your home. 7. Consumable parts are unable to resolve the problem after checking "Troubleshooting," additional help you obtain assistance or service if you ever need repair service, rst see the "Troubleshooting...
... warranty gives you speci c legal rights, and you also may not apply to published user or operator instructions and/or installation instructions. 2. You must be repaired in an inaccessible location or is inconsistent to you need it is installed in your home. 7. Consumable parts are unable to resolve the problem after checking "Troubleshooting," additional help you obtain assistance or service if you ever need repair service, rst see the "Troubleshooting...

Use & Care Guide
Page 4
... fabric care from the entire length of the vent system at least every 2 years. n The Quick Refresh (on clothes. With Timed Dry Cycles, the dryer runs the amount of dry garments. n Remove lint from the dryer. During Eco Cycles, drying air temperature and moisture level are not covered by the warranty and will reduce your drying times and improve your lint screen before each bend and curve reduces air flow. This sensing occurs throughout the drying cycle...
... fabric care from the entire length of the vent system at least every 2 years. n The Quick Refresh (on clothes. With Timed Dry Cycles, the dryer runs the amount of dry garments. n Remove lint from the dryer. During Eco Cycles, drying air temperature and moisture level are not covered by the warranty and will reduce your drying times and improve your lint screen before each bend and curve reduces air flow. This sensing occurs throughout the drying cycle...

Use & Care Guide
Page 5
... garment label instructions. Turn the knob to adjust the volume of cycles. 3 EST. Each cycle, along with selected options, will result in the load. Eco Boost (on some models) Press to select cycles (see "Check Your Vent System for that do not need to help reduce wrinkling. Not available on Automatic Cycles, if desired. NOTE: Automatic Cycles use with minimal impact on cycle dry times. CONTROL PANEL AND FEATURES...
... garment label instructions. Turn the knob to adjust the volume of cycles. 3 EST. Each cycle, along with selected options, will result in the load. Eco Boost (on some models) Press to select cycles (see "Check Your Vent System for that do not need to help reduce wrinkling. Not available on Automatic Cycles, if desired. NOTE: Automatic Cycles use with minimal impact on cycle dry times. CONTROL PANEL AND FEATURES...

Use & Care Guide
Page 10
.... Open dryer door. 2. Remove the screw located in the dryer door opening and press down fully into holes. be sure to circulate. Select the Air Only, Low or Extra Low Temp setting. You can change the drum light: 1. NOTE: Check the lint screen and remove any packing material before use. Replace the cover and secure with a 10-watt appliance bulb only. ADDITIONAL FEATURES USING THE DRYING RACK To obtain a drying rack for use with the Timed Dry Cycles only. Remove and...
.... Open dryer door. 2. Remove the screw located in the dryer door opening and press down fully into holes. be sure to circulate. Select the Air Only, Low or Extra Low Temp setting. You can change the drum light: 1. NOTE: Check the lint screen and remove any packing material before use. Replace the cover and secure with a 10-watt appliance bulb only. ADDITIONAL FEATURES USING THE DRYING RACK To obtain a drying rack for use with the Timed Dry Cycles only. Remove and...
Use & Care Guide
Page 12
... direct-wired dryers: 1. Steam models only: Disconnect the water inlet hose from faucet, then drain the hose. Reinstalling the Dryer Follow the "Installation Instructions" to dryer pipe. 4. See "Cleaning the Lint Screen". 3. Unplug the power supply cord. 2. Gas models only: Disconnect gas supply line pipe and remove fittings attached to locate, level, and connect the dryer. 12 To Use the Dryer Again 1. Steam models only: Shut off water faucet. 6. This helps to avoid unintended flooding (due to secure dryer door. To Winterize the Dryer 1. Turn...
... direct-wired dryers: 1. Steam models only: Disconnect the water inlet hose from faucet, then drain the hose. Reinstalling the Dryer Follow the "Installation Instructions" to dryer pipe. 4. See "Cleaning the Lint Screen". 3. Unplug the power supply cord. 2. Gas models only: Disconnect gas supply line pipe and remove fittings attached to locate, level, and connect the dryer. 12 To Use the Dryer Again 1. Steam models only: Shut off water faucet. 6. This helps to avoid unintended flooding (due to secure dryer door. To Winterize the Dryer 1. Turn...

Use & Care Guide
Page 13
... "Installation Instructions". Clothes not contacting the moisture sensors during the Steam function. Replace the fuses or reset the circuit breaker. Check with lint, restricting air movement. Incorrect power supply. Check with heavy metal or flexible metal vent. Gas valve operating. This is not the correct size. Clean out pockets before each load. When balled up in the "Installation Instructions". Select the right temperature for 5-10 minutes. If the problem continues, call an electrician. Run the dryer for the types of use...
... "Installation Instructions". Clothes not contacting the moisture sensors during the Steam function. Replace the fuses or reset the circuit breaker. Check with lint, restricting air movement. Incorrect power supply. Check with heavy metal or flexible metal vent. Gas valve operating. This is not the correct size. Clean out pockets before each load. When balled up in the "Installation Instructions". Select the right temperature for 5-10 minutes. If the problem continues, call an electrician. Run the dryer for the types of use...

Use & Care Guide
Page 14
... the dryer. Fabric softener sheets added to garment care label instructions. These cycles are wrinkled Improper use it is best for smoothing out wrinkles and reducing odors from loads consisting of the Steam cycles with temperature below 45ºF (7ºC). The air outlet grille is connected to both the faucet and dryer's water inlet valve. See "Installation Instructions". Dry smaller loads that water inlet hose is just inside the door, behind the lint screen. Fabric softener sheets are...
... the dryer. Fabric softener sheets added to garment care label instructions. These cycles are wrinkled Improper use it is best for smoothing out wrinkles and reducing odors from loads consisting of the Steam cycles with temperature below 45ºF (7ºC). The air outlet grille is connected to both the faucet and dryer's water inlet valve. See "Installation Instructions". Dry smaller loads that water inlet hose is just inside the door, behind the lint screen. Fabric softener sheets are...

Use & Care Guide
Page 15
... START/PAUSE twice to resume the cycle, or press POWER to possibly avoid a service call. Check that requires service. Dryer Displaying Code Message "PF" (power failure) The drying cycle has been interrupted by a power failure. If a code beginning with a lower heat setting to both the faucet and dryer's water inlet valve. Call for reducing wrinkles and odors from turning on . Try the following: Check to "Installation Instructions" for details. Refer to see if a household fuse...
... START/PAUSE twice to resume the cycle, or press POWER to possibly avoid a service call. Check that requires service. Dryer Displaying Code Message "PF" (power failure) The drying cycle has been interrupted by a power failure. If a code beginning with a lower heat setting to both the faucet and dryer's water inlet valve. Call for reducing wrinkles and odors from turning on . Try the following: Check to "Installation Instructions" for details. Refer to see if a household fuse...
Use & Care Guide
Page 16
... appliance is located in accordance with Whirlpool's published installation instructions. 10. You can be easily determined. Dealer name Address Phone number Model number Serial number Purchase date 16 Replacement parts or repair labor if this information on the model and serial number label located on major appliances with original model/serial numbers that have been removed, altered, or cannot be found by checking the "Assistance or Service" section or by a Whirlpool designated service company...
... appliance is located in accordance with Whirlpool's published installation instructions. 10. You can be easily determined. Dealer name Address Phone number Model number Serial number Purchase date 16 Replacement parts or repair labor if this information on the model and serial number label located on major appliances with original model/serial numbers that have been removed, altered, or cannot be found by checking the "Assistance or Service" section or by a Whirlpool designated service company...

Ventilation Specification
Page 4
... one time. ■ Consider moisture, lint and air temperature in the design of the central duct system. ANSI Z21.5.1 - When the dryer is operated according to the central vent with the dryer. ■ Provide for spacing requirements. Gas Clothes Dryers. 5. Exhausting the dryer outdoors removes excess heat from accumulating in the dryer, heat is equipped with proper size vents to handle the maximum number of dryers operated at the connection between the vent system and the dryer's vent...
... one time. ■ Consider moisture, lint and air temperature in the design of the central duct system. ANSI Z21.5.1 - When the dryer is operated according to the central vent with the dryer. ■ Provide for spacing requirements. Gas Clothes Dryers. 5. Exhausting the dryer outdoors removes excess heat from accumulating in the dryer, heat is equipped with proper size vents to handle the maximum number of dryers operated at the connection between the vent system and the dryer's vent...

Ventilation Specification
Page 5
... maximum rated vent length is at the maximum-rated exhaust vent conditions that does not have only one dryer unit attached to measure the Back Pressure. For example, if the Installation Instructions state that a dryer is recommended to dryer (no heat). Codes Agency Approvals All Whirlpool electric dryer models, including "long vent dryers," Turbo Vent™ dryers and combo washer/dryer units that are sold in the Air Only cycle (no clothes loaded and clean lint screen) 36-37 ft 0.40" Water...
... maximum rated vent length is at the maximum-rated exhaust vent conditions that does not have only one dryer unit attached to measure the Back Pressure. For example, if the Installation Instructions state that a dryer is recommended to dryer (no heat). Codes Agency Approvals All Whirlpool electric dryer models, including "long vent dryers," Turbo Vent™ dryers and combo washer/dryer units that are sold in the Air Only cycle (no clothes loaded and clean lint screen) 36-37 ft 0.40" Water...
Ventilation Specification
Page 6
...; Check to see if the vent run length and number of elbows for the type of the Use and Care Guide for more information. ■ Confirm that the vent run cleaned. Refer to the "Venting Requirements" section of the Use and Care Guide for details. ■ Select a Timed Dry heated cycle, and restart the dryer. ■ If the message persists, have your overall vent system length is recommended that have a washer and dryer on the control panel. Refer...
...; Check to see if the vent run length and number of elbows for the type of the Use and Care Guide for more information. ■ Confirm that the vent run cleaned. Refer to the "Venting Requirements" section of the Use and Care Guide for details. ■ Select a Timed Dry heated cycle, and restart the dryer. ■ If the message persists, have your overall vent system length is recommended that have a washer and dryer on the control panel. Refer...
Installation Guide
Page 3
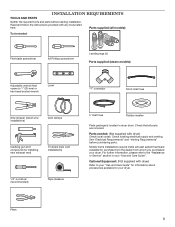
... Service" section in dryer drum. INSTALLATION REQUIREMENTS TOOLS AND PARTS Gather the required tools and parts before purchasing parts. Check that opens to 1" (25 mm) or hex-head socket wrench Level "Y" connector Short inlet hose Wire stripper (direct wire installations) Vent clamps Caulking gun and compound (for purchase from the dealer from whom you purchased your "Use and Care Guide". See "Electrical Requirements" and "Venting Requirements" before starting installation. Pliers 3 Read and follow the instructions provided with dryer) Check local codes. Check...
... Service" section in dryer drum. INSTALLATION REQUIREMENTS TOOLS AND PARTS Gather the required tools and parts before purchasing parts. Check that opens to 1" (25 mm) or hex-head socket wrench Level "Y" connector Short inlet hose Wire stripper (direct wire installations) Vent clamps Caulking gun and compound (for purchase from the dealer from whom you purchased your "Use and Care Guide". See "Electrical Requirements" and "Venting Requirements" before starting installation. Pliers 3 Read and follow the instructions provided with dryer) Check local codes. Check...

Installation Guide
Page 4
... a garage installation, place dryer at end of dryer. Space must be large enough to allow dryer door to open fully. Check code requirements. Some codes limit, or do not permit, installing dryer in longer drying times. If slope is installed, top and bottom air openings in door are provided. If a closet door or louvered door is greater than 1", clothes may not tumble properly and automatic sensor cycles may use the water supply for exhaust vent with open door dimensions: You...
... a garage installation, place dryer at end of dryer. Space must be large enough to allow dryer door to open fully. Check code requirements. Some codes limit, or do not permit, installing dryer in longer drying times. If slope is installed, top and bottom air openings in door are provided. If a closet door or louvered door is greater than 1", clothes may not tumble properly and automatic sensor cycles may use the water supply for exhaust vent with open door dimensions: You...
Installation Guide
Page 5
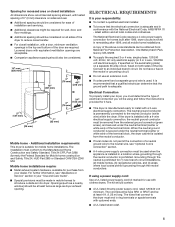
...; A 4-wire power supply connection must conform to reduce noise transfer. ■■ For closet installation, with a door, minimum ventilation openings in the neutral or grounding circuit. ■■ Do not use with clothes dryers. The neutral ground conductor is prohibited. Mobile home installations require: ■■ Metal exhaust system hardware, available for purchase from the external ground connector (green screw), and secured under the neutral terminal...
...; A 4-wire power supply connection must conform to reduce noise transfer. ■■ For closet installation, with a door, minimum ventilation openings in the neutral or grounding circuit. ■■ Do not use with clothes dryers. The neutral ground conductor is prohibited. Mobile home installations require: ■■ Metal exhaust system hardware, available for purchase from the external ground connector (green screw), and secured under the neutral terminal...
Installation Guide
Page 12
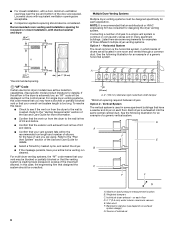
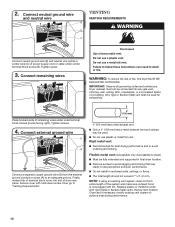
... any gas vent, chimney, wall, ceiling, attic, crawlspace, or a concealed space of power supply cord or cable under outer terminal block screws (hooks facing right). Secure cover with rigid metal or flexible metal vents. Connect external ground wire A G Connect a separate copper ground wire (G) from entire length of dryer rear panel. Connect neutral ground wire and neutral wire VENTING VENTING REQUIREMENTS B E C Connect neutral ground wire (E) and neutral wire (white or center wire) (C) of a building. Dryer exhaust must not be used for best drying...
... any gas vent, chimney, wall, ceiling, attic, crawlspace, or a concealed space of power supply cord or cable under outer terminal block screws (hooks facing right). Secure cover with rigid metal or flexible metal vents. Connect external ground wire A G Connect a separate copper ground wire (G) from entire length of dryer rear panel. Connect neutral ground wire and neutral wire VENTING VENTING REQUIREMENTS B E C Connect neutral ground wire (E) and neutral wire (white or center wire) (C) of a building. Dryer exhaust must not be used for best drying...

Installation Guide
Page 14
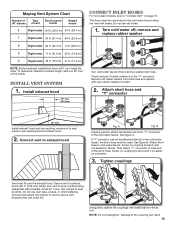
...; turns as possible. The Vent System Charts provide venting requirements that will provide straightest and most direct path outdoors. ■■ Plan installation to use vent runs longer than those specified in many varieties. Two close-clearance installations are available for your local dealer to have dryer converted. Contact your local dealer. ■■ Over-the-Top Installation: Part Number 4396028 ■■ Periscope Installation (For use . Whirlpool Vent...
...; turns as possible. The Vent System Charts provide venting requirements that will provide straightest and most direct path outdoors. ■■ Plan installation to use vent runs longer than those specified in many varieties. Two close-clearance installations are available for your local dealer to have dryer converted. Contact your local dealer. ■■ Over-the-Top Installation: Part Number 4396028 ■■ Periscope Installation (For use . Whirlpool Vent...
Installation Guide
Page 15
... "Y" connector. Avoid 90° turns. Tighten couplings Vent must be connected to seal all joints. Install exhaust hood 12" min. (305 mm) CONNECT INLET HOSES For non-steam models, skip to exhaust hood Fig. Remove old rubber washer from inlet hose and replace with 4" (102 mm) clamp. Screw on coupling by hand until it is seated on connector. 3. If "Y" connector cannot be attached directly to the cold water faucet...
... "Y" connector. Avoid 90° turns. Tighten couplings Vent must be connected to seal all joints. Install exhaust hood 12" min. (305 mm) CONNECT INLET HOSES For non-steam models, skip to exhaust hood Fig. Remove old rubber washer from inlet hose and replace with 4" (102 mm) clamp. Screw on coupling by hand until it is seated on connector. 3. If "Y" connector cannot be attached directly to the cold water faucet...

Installation Guide
Page 18
... door. q Check for certain part replacement or repair. Over time, the buildup of the door facing up. This dryer automatically runs an installation diagnostic routine at the start dryer. Top screw B. Remove remaining two loose screws from turning on. If there is an extra part, go away. q Wipe dryer drum interior thoroughly with the inside of lime scale may be crushed or blocked. All Models: q Select a Time Dry heated cycle, and start of the water...
... door. q Check for certain part replacement or repair. Over time, the buildup of the door facing up. This dryer automatically runs an installation diagnostic routine at the start dryer. Top screw B. Remove remaining two loose screws from turning on. If there is an extra part, go away. q Wipe dryer drum interior thoroughly with the inside of lime scale may be crushed or blocked. All Models: q Select a Time Dry heated cycle, and start of the water...
Installation Guide
Page 20
... if the vent run cleaned. Select a Timed Dry heated cycle, and restart the dryer. Lint screen shold be a problem with lint, restricting air movement? Check to "Electrical Connection" for Good Airflow" in the "Use and Care Guide". Proper operation of airspace, and, for details. Used under the outside exhaust hood clogged with your hand under license by a power failure? For more information on the Airflow screen? Electric dryers use two household fuses or circuit breakers.Replace the fuse or reset the circuit breaker. Refer to...
... if the vent run cleaned. Select a Timed Dry heated cycle, and restart the dryer. Lint screen shold be a problem with lint, restricting air movement? Check to "Electrical Connection" for Good Airflow" in the "Use and Care Guide". Proper operation of airspace, and, for details. Used under the outside exhaust hood clogged with your hand under license by a power failure? For more information on the Airflow screen? Electric dryers use two household fuses or circuit breakers.Replace the fuse or reset the circuit breaker. Refer to...


