
Use & Care Guide
Page 10
... the drum will rotate; Rest the rear support on inside of the dryer. WARNING Electrical Shock Hazard Disconnect power before operating. Replace all parts and panels before servicing. To change the actual time in dryer or reconnect power. Open the dryer door. Locate the light bulb cover on the drying rack after the cycle...
... the drum will rotate; Rest the rear support on inside of the dryer. WARNING Electrical Shock Hazard Disconnect power before operating. Replace all parts and panels before servicing. To change the actual time in dryer or reconnect power. Open the dryer door. Locate the light bulb cover on the drying rack after the cycle...

Use & Care Guide
Page 12
... the "Installation Instructions". Make sure leveling legs are at home. Plug in dryer or reconnect power as described in dryer base. 8. Replace all parts and panels before servicing. If storing or moving your dryer only when you are found. For direct-wired dryers: 1. Unplug dryer or disconnect power. 2. Steam models only: Disconnect the water inlet hose...
... the "Installation Instructions". Make sure leveling legs are at home. Plug in dryer or reconnect power as described in dryer base. 8. Replace all parts and panels before servicing. If storing or moving your dryer only when you are found. For direct-wired dryers: 1. Unplug dryer or disconnect power. 2. Steam models only: Disconnect the water inlet hose...

Installation Guide
Page 3
... hardware available for installing new exhaust vent) Tin snips (new vent installations) 1/4" nut driver (recommended) Tape measure 5' (1.52 m) inlet hose Rubber washer Parts package is located in your dryer. Pliers 3 Tools needed : (Not supplied with any tools listed here. Check that opens to 1" (25 mm) or hex-head socket wrench Level "Y" connector...
... hardware available for installing new exhaust vent) Tin snips (new vent installations) 1/4" nut driver (recommended) Tape measure 5' (1.52 m) inlet hose Rubber washer Parts package is located in your dryer. Pliers 3 Tools needed : (Not supplied with any tools listed here. Check that opens to 1" (25 mm) or hex-head socket wrench Level "Y" connector...

Installation Guide
Page 5
... Metal exhaust system hardware, available for Mobile home construction and Safety, Title 24, HUD Part 280) or Standard CAN/CSAZ240 MH. latest edition and all sides of the dryer to reduce noise transfer. ■■ For closet installation, with a door, minimum ...ventilation openings in mobile homes to the neutral conductor (white wire) within the dryer. Connect to the Manufactured Home Construction and Safety Standard, Title 24 CFR, Part 3280 (formerly the Federal Standard for purchase from : National Fire Protection Association, One Batterymarch Park,...
... Metal exhaust system hardware, available for Mobile home construction and Safety, Title 24, HUD Part 280) or Standard CAN/CSAZ240 MH. latest edition and all sides of the dryer to reduce noise transfer. ■■ For closet installation, with a door, minimum ...ventilation openings in mobile homes to the neutral conductor (white wire) within the dryer. Connect to the Manufactured Home Construction and Safety Standard, Title 24 CFR, Part 3280 (formerly the Federal Standard for purchase from : National Fire Protection Association, One Batterymarch Park,...
Installation Guide
Page 13
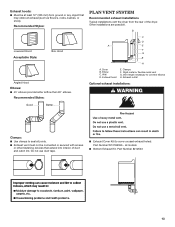
...Part Number 8212503 13 Exhaust hoods: ■■ Must be connected or secured with screws or other fastening devices that may obstruct exhaust (such as flowers, rocks, bushes, or snow). Recommended Styles: PLAN VENT SYSTEM Recommended exhaust installations Typical installations vent the dryer... from ground or any object that extend into interior of the dryer. Dryer B. Recommended Styles: Louvered Hood Acceptable Style: Box Hood Angled Hood Elbows: ■&#...
...Part Number 8212503 13 Exhaust hoods: ■■ Must be connected or secured with screws or other fastening devices that may obstruct exhaust (such as flowers, rocks, bushes, or snow). Recommended Styles: PLAN VENT SYSTEM Recommended exhaust installations Typical installations vent the dryer... from ground or any object that extend into interior of the dryer. Dryer B. Recommended Styles: Louvered Hood Acceptable Style: Box Hood Angled Hood Elbows: ■&#...

Installation Guide
Page 14
...achieve best drying performance. Over-the-top installation (also available with dryer vent to wall vent mismatch): Part Number 4396037 - 0" (0 mm) to 18" (460 mm) mismatch Part Number 4396011 - 18" (460 mm) to 29" (737 mm) mismatch Part Number 4396014 - 29" (737 mm) to the manufacturer's instructions...exhaust through the bottom. Determine vent length and elbows needed for best drying performance: ■■ Use following kits for purchase. Whirlpool Vent System Chart Number of 90° elbows Type of elbows and turns. ■■ When using elbows or making turns,...
...achieve best drying performance. Over-the-top installation (also available with dryer vent to wall vent mismatch): Part Number 4396037 - 0" (0 mm) to 18" (460 mm) mismatch Part Number 4396011 - 18" (460 mm) to 29" (737 mm) mismatch Part Number 4396014 - 29" (737 mm) to the manufacturer's instructions...exhaust through the bottom. Determine vent length and elbows needed for best drying performance: ■■ Use following kits for purchase. Whirlpool Vent System Chart Number of 90° elbows Type of elbows and turns. ■■ When using elbows or making turns,...

Installation Guide
Page 18
.... Be sure vent is level. q Remove film on a flat, covered surface, with the inside of the two hinges in the dryer left -side opening . 6. q Check for certain part replacement or repair. All Models: q Select a Time Dry heated cycle, and start , check the following: • Controls are .... • Household fuse is intact and tight, or circuit breaker has not tripped. • Dryer door is an extra part, go away. q Dispose of the water system, which will not start dryer. This odor is common when heating element is first heated. NOTE: You may clog different...
.... Be sure vent is level. q Remove film on a flat, covered surface, with the inside of the two hinges in the dryer left -side opening . 6. q Check for certain part replacement or repair. All Models: q Select a Time Dry heated cycle, and start , check the following: • Controls are .... • Household fuse is intact and tight, or circuit breaker has not tripped. • Dryer door is an extra part, go away. q Dispose of the water system, which will not start dryer. This odor is common when heating element is first heated. NOTE: You may clog different...


