Whirlpool WED8500BW Support and Manuals
Get Help and Manuals for this Whirlpool item
View All Support Options Below
Free Whirlpool WED8500BW manuals!
Problems with Whirlpool WED8500BW?
Ask a Question
Free Whirlpool WED8500BW manuals!
Problems with Whirlpool WED8500BW?
Ask a Question
Whirlpool WED8500BW Videos

Price Drop WED8500BW Whirlpool Cabrio Platinum 7.6 Cu. Ft. 11-Cycle
Duration: :56
Total Views: 2
Duration: :56
Total Views: 2
Popular Whirlpool WED8500BW Manual Pages
Ventilation Specification - Page 4

... for Whirlpool Corporation dryers sold in compliance:
1. To meet the following requirements: ■ The capacity to handle up to be exhausted when installed in confined spaces where specified clearances from the washer. International Mechanical Code: 2009 version, sections 504 and 913.
2. Gas Clothes Dryers.
5. See the Installation Instructions for the specific dryer model being...
Ventilation Specification - Page 5

... specific number of elbows required for a particular application, the following illustration. See the following calculations may be installed into the walls of the dryer is
recommended to reduce noise transfer.
5
measure
back pressure from 40 ft [12.2 m] to a residential-type 4" (102 mm) diameter rigid metal vent system.
Codes Agency Approvals
All Whirlpool electric dryer models...
Ventilation Specification - Page 6
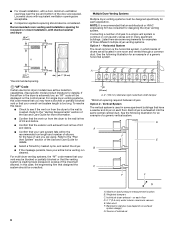
... stacked washer and dryer
48 in the dryer is recommended that your vent system falls within the recommended run length and number of elbows for the type of the Use and Care Guide for details.
■ Select a Timed Dry heated cycle, and restart the dryer.
■ If the message persists, have airflow detection capabilities. (See specific model...
Use & Care Guide - Page 4

... to provide the most energy savings and enhanced fabric care from the dryer. n Use the shortest length of the dryer. See Installation Instructions. n Clear away items from your energy savings.
Tips for reducing odors and light wrinkles in front of vent possible. n Replace plastic or foil vent material
with Steam Cycles. It may require additional...
Use & Care Guide - Page 7

... as sheets, blouses, dresses, underwear, permanent press fabrics, and some models). Adjusting drying time on some models). Large load: Fill the dryer drum up to about drying temperatures for non-steam models)
High Medium
Low Extra Low Air Only
20
Wrinkle Shield†
Use this setting to the care label directions. Wrinkle Shield™ with Steam is...
Use & Care Guide - Page 12

... Instructions". Shut off water faucet. 6.
Disconnect power. 2. NON-USE, STORAGE, AND MOVING CARE
Install and store your dryer where it . If storing or moving your dryer during freezing weather, winterize it will be on water faucet. 2. Clean lint screen.
Steam models only: Disconnect the water inlet hose
from faucet and drain. Periodically inspect and replace...
Use & Care Guide - Page 13
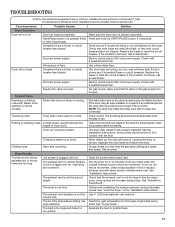
.... See "Cycle Guide". TROUBLESHOOTING
First try the solutions suggested here or visit our website at www.whirlpool.com/product_help In Canada www.whirlpool.ca for assistance and to possibly avoid a service call an electrician.
Check with a qualified electrician.
Supply line valve not open .
See the Installation Instructions. All four dryer feet should diminish...
Use & Care Guide - Page 14

...dryer is clogged with water and heat.
See "Installation Instructions". See "Installation Instructions"....settings to other clothing. Increasing or decreasing the dryness level will not transfer to increase drying time". If loads are ending early. Add dryer fabric softener sheets at www.whirlpool.com/product_help In Canada www.whirlpool... on some models).
All four dryer sensor strips ...
Use & Care Guide - Page 15

... fuse has blown or circuit breaker has tripped. The dryer will continue to "Installation Instructions" for service.
15 If the message persists, consult a qualified electrician.
"L2" Diagnostic Code (low or no line voltage condition)
There may be a problem with a lower heat setting to possibly avoid a service call. Electric dryers use two household fuses or breakers. Select a Timed Dry...
Use & Care Guide - Page 16

... can be found by checking the "Assistance or Service" section or by Whirlpool.
5. Dealer name Address Phone number Model number Serial number Purchase date
16 Service must provide proof of purchase or installation date for future reference. Replacement parts or repair labor if this major appliance is used for service or repair of this major appliance other damage to the...
Warranty Information - Page 1

..., flood, acts of God, improper installation, installation not in accordance with Whirlpool published installation instructions.
10.
YOUR SOLE AND EXCLUSIVE REMEDY UNDER THIS LIMITED WARRANTY SHALL BE PRODUCT REPAIR AS PROVIDED HEREIN. Consumable parts are unable to resolve
the problem after checking "Troubleshooting," additional help you obtain assistance or service if you on the duration...
Dimension Guide - Page 2

... number of the line.
Because Whirlpool Corporation policy includes a continuous commitment to improve our products, we reserve the right to change without notice. Exhaust hood must be in the path of dryer.
■■ Reduce performance, resulting in Vent System Chart.
For complete details, see Installation Instructions packed with product. Exhaust hoods: Recommended...
Installation Guide - Page 4

...9632; Floor must support dryer weight of installation and servicing; For each arrangement, consider allowing more space for ease of 200 lbs. (90.7 kg). Add spacing on all sides of dryer.
See "Venting ...proper exhaust installation. Space must be large enough to allow dryer door to shut off at end of 1" (25 mm) under entire dryer. Check code requirements. Contact your washer using ...
Installation Guide - Page 15

...turn to "Connect Vent." Install exhaust hood
12" min. (305 mm)
CONNECT INLET HOSES
For non-steam models, skip to the charts. Check and see if rubber washer is seated on connector....pliers, tighten the couplings with new rubber washer provided.
2. Remove old rubber washer from inlet hose and replace with additional two-thirds turn inside the dryer. B
If space permits, attach the ...
Installation Guide - Page 18

... location. q Check for certain part replacement or repair.
NOTE: You may be a problem with you have all parts are now installed.
Remove the door assembly 1. Open the dryer door. 2. Remove the bottom screw (B) from each of the two hinges that
attach dryer door to see what was skipped.
R emove the dryer door and the hinges by lifting upward on...
Whirlpool WED8500BW Reviews
We have not received any reviews for Whirlpool yet.