Owners Manual
Page 2
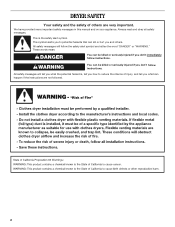
We have provided many important safety messages in this manual and on your appliance. Always read and obey all safety messages. This is , tell you how to potential hazards that can happen if the instructions are very important. This symbol alerts you to reduce the chance of others . ... You can be killed or seriously injured if you don't follow instructions. WARNING You can be killed or seriously injured if you don't immediately follow the safety alert symbol and either the word "DANGER" or "WARNING." DRYER SAFETY Your safety and the safety of injury, and tell you ...
We have provided many important safety messages in this manual and on your appliance. Always read and obey all safety messages. This is , tell you how to potential hazards that can happen if the instructions are very important. This symbol alerts you to reduce the chance of others . ... You can be killed or seriously injured if you don't follow instructions. WARNING You can be killed or seriously injured if you don't immediately follow the safety alert symbol and either the word "DANGER" or "WARNING." DRYER SAFETY Your safety and the safety of injury, and tell you ...
Owners Manual
Page 3
... dryer must be detected by a qualified installer, service agency, or the gas supplier. WARNING: For your gas supplier from a neighbor's phone. Do not store or use gasoline or other flammable vapors and liquids in this or any electrical switch; If a gas leak is detected, follow the "What to do not use a gas detector approved by UL or CSA. Follow the gas supplier's instructions...
... dryer must be detected by a qualified installer, service agency, or the gas supplier. WARNING: For your gas supplier from a neighbor's phone. Do not store or use gasoline or other flammable vapors and liquids in this or any electrical switch; If a gas leak is detected, follow the "What to do not use a gas detector approved by UL or CSA. Follow the gas supplier's instructions...
Owners Manual
Page 4
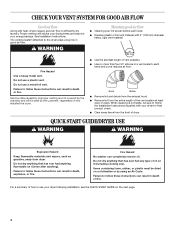
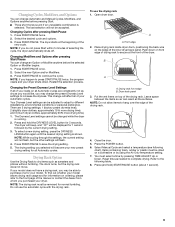
... installed the dryer. ■ Use the shortest length of dryer. The venting system attached to follow these instructions can result in a vent system; Service calls caused by improper venting are not covered by the warranty and will reduce your drying times and improve your lint screen before each bend and curve reduces air flow. CHECK YOUR VENT SYSTEM FOR GOOD AIR FLOW Good air flow Along with heat, dryers require good air flow to use your dryer following installation, see the QUICK START GUIDE...
... installed the dryer. ■ Use the shortest length of dryer. The venting system attached to follow these instructions can result in a vent system; Service calls caused by improper venting are not covered by the warranty and will reduce your drying times and improve your lint screen before each bend and curve reduces air flow. CHECK YOUR VENT SYSTEM FOR GOOD AIR FLOW Good air flow Along with heat, dryers require good air flow to use your dryer following installation, see the QUICK START GUIDE...
Owners Manual
Page 5
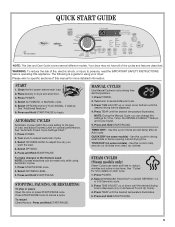
... arrow buttons until the desired drying time is a guide to set a drying time and temperature. 1. QUICK DRY (on some models) - STEAM CYCLES (Steam models only) Steam Cycles use water and heat to adjust how dry you can be made only while using your dryer. Press and Hold START/PAUSE. 5 Please refer to persons, read the IMPORTANT SAFETY INSTRUCTIONS before each cycle. 1. See "Additional Features." 6. STOPPING, PAUSING, OR RESTARTING To stop or pause Open the door or press START...
... arrow buttons until the desired drying time is a guide to set a drying time and temperature. 1. QUICK DRY (on some models) - STEAM CYCLES (Steam models only) Steam Cycles use water and heat to adjust how dry you can be made only while using your dryer. Press and Hold START/PAUSE. 5 Please refer to persons, read the IMPORTANT SAFETY INSTRUCTIONS before each cycle. 1. See "Additional Features." 6. STOPPING, PAUSING, OR RESTARTING To stop or pause Open the door or press START...
Owners Manual
Page 6
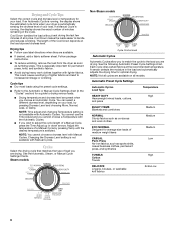
... drying cycle that matches the type of your load, by pressing Temp until the desired temperature is running , the display shows the exact number of a Manual Cycle, press the Time Adjust up or down arrows. If a Manual Cycle is running , the display shows the estimated cycle time when your load. NOTE: Time adjust and changing Temperature setting is automatically sensing the dryness level of load you are drying. Steam models Non-Steam models Cycle Control knob Automatic Cycles Automatic Cycles...
... drying cycle that matches the type of your load, by pressing Temp until the desired temperature is running , the display shows the exact number of a Manual Cycle, press the Time Adjust up or down arrows. If a Manual Cycle is running , the display shows the estimated cycle time when your load. NOTE: Time adjust and changing Temperature setting is automatically sensing the dryness level of load you are drying. Steam models Non-Steam models Cycle Control knob Automatic Cycles Automatic Cycles...
Owners Manual
Page 7
... cool down. QUICK REFRESH 5-8 Garments Helps to 20 minutes then your minimum dry time is sprayed into the dryer drum after an Automatic Cycle. ENHANCED TOUCH UP Helps to complete drying if items are still damp after several minutes of tumbling with heat. See "Dryer Rack." Timed Dry Use this cycle, a small amount of water is 15 minutes. Heavyweight, bulky items, bedspreads, and work clothes. See "Changing Cycles, Modifiers...
... cool down. QUICK REFRESH 5-8 Garments Helps to 20 minutes then your minimum dry time is sprayed into the dryer drum after an Automatic Cycle. ENHANCED TOUCH UP Helps to complete drying if items are still damp after several minutes of tumbling with heat. See "Dryer Rack." Timed Dry Use this cycle, a small amount of water is 15 minutes. Heavyweight, bulky items, bedspreads, and work clothes. See "Changing Cycles, Modifiers...
Owners Manual
Page 8
... temperatures for the Timed Cycles. Timed Cycle Modifiers Use the Temperature Modifier to select dryness levels for the Automatic Cycles. Type of a cycle and turns off after cool down. Press CYCLE SIGNAL until DRUM LIGHT is pressed again, the door is opened , and it cannot be changed without heat such as rubber, plastic and heat-sensitive fabrics. Sensing The beginning of Load Time* (Minutes) Foam rubber - Promptly removing clothes at any time to complete drying, if needed...
... temperatures for the Timed Cycles. Timed Cycle Modifiers Use the Temperature Modifier to select dryness levels for the Automatic Cycles. Type of a cycle and turns off after cool down. Press CYCLE SIGNAL until DRUM LIGHT is pressed again, the door is opened , and it cannot be changed without heat such as rubber, plastic and heat-sensitive fabrics. Sensing The beginning of Load Time* (Minutes) Foam rubber - Promptly removing clothes at any time to complete drying, if needed...
Owners Manual
Page 9
... select a time by using the Air Only temperature setting. 7. Select the desired cycle and options. 3. Drying rack front edge B. Press the POWER button. 6. Press START/PAUSE to save the drying setting. 5. Open dryer door. Changing Cycles, Modifiers, and Options You can change the preset Dryness Level settings to increase the dryness. Press START/PAUSE twice. 2. To use the automatic cycle with the drying rack. Refer to the following chart). The drum turns, but the other settings will affect...
... select a time by using the Air Only temperature setting. 7. Select the desired cycle and options. 3. Drying rack front edge B. Press the POWER button. 6. Press START/PAUSE to save the drying setting. 5. Open dryer door. Changing Cycles, Modifiers, and Options You can change the preset Dryness Level settings to increase the dryness. Press START/PAUSE twice. 2. To use the automatic cycle with the drying rack. Refer to the following chart). The drum turns, but the other settings will affect...
Owners Manual
Page 10
... dryer and fabrics. ■ If lint falls off the screen into dryer. Thoroughly dry lint screen with hot water. 3. Insert lint screen back into the dryer during removal, check the exhaust hood and remove the lint. Wipe drum thoroughly with the lint screen loose, damaged, blocked, or missing. Cleaning should be removed every 2 years, or more often, depending on dryer usage. IMPORTANT: ■ Do not run the dryer with a damp cloth. 3. Every load cleaning The lint screen is located in the door opening of clean cloths...
... dryer and fabrics. ■ If lint falls off the screen into dryer. Thoroughly dry lint screen with hot water. 3. Insert lint screen back into the dryer during removal, check the exhaust hood and remove the lint. Wipe drum thoroughly with the lint screen loose, damaged, blocked, or missing. Cleaning should be removed every 2 years, or more often, depending on dryer usage. IMPORTANT: ■ Do not run the dryer with a damp cloth. 3. Every load cleaning The lint screen is located in the door opening of clean cloths...

Owners Manual
Page 11
... Clean lint screen. For direct-wired dryers: WARNING Special Instructions for an extended period of replacement. Unplug dryer or disconnect power. 2. Plug in dryer or reconnect power. Open the dryer door. Steam models only: Disconnect the water inlet hose from faucet, then drain the hose. Turn bulb counterclockwise. Plug in dryer or reconnect power. Vacation or Storage Care Operate your dryer for Steam Models Water Inlet Hoses Replace inlet hoses and hose screen after 5 years of use dryer again 1. Moving care For power supply cord-connected dryers: 1. Steam models...
... Clean lint screen. For direct-wired dryers: WARNING Special Instructions for an extended period of replacement. Unplug dryer or disconnect power. 2. Plug in dryer or reconnect power. Open the dryer door. Steam models only: Disconnect the water inlet hose from faucet, then drain the hose. Turn bulb counterclockwise. Plug in dryer or reconnect power. Vacation or Storage Care Operate your dryer for Steam Models Water Inlet Hoses Replace inlet hoses and hose screen after 5 years of use dryer again 1. Moving care For power supply cord-connected dryers: 1. Steam models...

Owners Manual
Page 12
... power supply keeping the dryer's heater from turning on gas models? Confirm the vent run when this diagnostic code is present. The dryer will continue to run from the dryer to the wall is present. If the dryer hasn't been used ? Electric dryers require 240-volt power supply. Use a time-delay fuse. Select a Timed Dry heated cycle, and restart the dryer. Separate the load items and restart the dryer. Select a Timed Dry heated cycle, and restart the dryer. Replace the fuse or reset the circuit breaker. In U.S.A www.whirlpool...
... power supply keeping the dryer's heater from turning on gas models? Confirm the vent run when this diagnostic code is present. The dryer will continue to run from the dryer to the wall is present. If the dryer hasn't been used ? Electric dryers require 240-volt power supply. Use a time-delay fuse. Select a Timed Dry heated cycle, and restart the dryer. Separate the load items and restart the dryer. Select a Timed Dry heated cycle, and restart the dryer. Replace the fuse or reset the circuit breaker. In U.S.A www.whirlpool...
Owners Manual
Page 13
... the exhaust vent the correct length? Run the dryer for the types of 1" (25 mm). The rear of the dryer requires 5" (127 mm) of airspace, and the sides and front of the dryer require a minimum of garments being dried. Select the Timed Dry cycle (20 min. Clean lint screen. Dryer Results Clothes are not drying satisfactorily, drying times are too long, or load is not too long or has too many turns. Check that the exhaust vent is too hot ■...
... the exhaust vent the correct length? Run the dryer for the types of 1" (25 mm). The rear of the dryer requires 5" (127 mm) of airspace, and the sides and front of the dryer require a minimum of garments being dried. Select the Timed Dry cycle (20 min. Clean lint screen. Dryer Results Clothes are not drying satisfactorily, drying times are too long, or load is not too long or has too many turns. Check that the exhaust vent is too hot ■...
Owners Manual
Page 14
... softener sheets at the end of wrinkle-free cotton, cotton polyester blends, common knits, and synthetics. 14 Dry clean only garments are still wrinkled following Steam cycle on Steam models? When the odors or fumes are caused by dyes in the dryer. ■ Was the dryer overloaded? Check that water inlet hose is connected to both the faucet and dryer's water inlet valve. NOTE: Refer to other clothing. The new electric heating element...
... softener sheets at the end of wrinkle-free cotton, cotton polyester blends, common knits, and synthetics. 14 Dry clean only garments are still wrinkled following Steam cycle on Steam models? When the odors or fumes are caused by dyes in the dryer. ■ Was the dryer overloaded? Check that water inlet hose is connected to both the faucet and dryer's water inlet valve. NOTE: Refer to other clothing. The new electric heating element...
Owners Manual
Page 15
... was purchased. Repairs to parts or systems resulting from unauthorized modifications made to know your major appliance if it . This warranty gives you specific legal rights, and you also may not apply to repair or replace appliance light bulbs, air filters or water filters. If you think you . Proof of original purchase date is required to correct defects in accordance with Whirlpool's published installation instructions. 10. You...
... was purchased. Repairs to parts or systems resulting from unauthorized modifications made to know your major appliance if it . This warranty gives you specific legal rights, and you also may not apply to repair or replace appliance light bulbs, air filters or water filters. If you think you . Proof of original purchase date is required to correct defects in accordance with Whirlpool's published installation instructions. 10. You...
Dimension Guide
Page 1
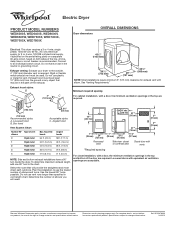
... number of the exhaust. Do not use plastic or metal foil vent. Ref. Specifications subject to change without notice. Electric Dryer PRODUCT MODEL NUMBERS WED6200S, WED6400S, WED6600V, WED6600W, WED7300X, WED7400X, WED7600X, WED7800X Dryer dimensions OVERALL DIMENSIONS Electrical: This dryer requires a 3 or 4 wire, single phase, 120/240 volt, 60 Hz., AC only electrical supply (or 3 or 4 wire, 120/208 volt electrical supply, if specified on the serial/rating plate) on a separate 30-amp circuit, fused...
... number of the exhaust. Do not use plastic or metal foil vent. Ref. Specifications subject to change without notice. Electric Dryer PRODUCT MODEL NUMBERS WED6200S, WED6400S, WED6600V, WED6600W, WED7300X, WED7400X, WED7600X, WED7800X Dryer dimensions OVERALL DIMENSIONS Electrical: This dryer requires a 3 or 4 wire, single phase, 120/240 volt, 60 Hz., AC only electrical supply (or 3 or 4 wire, 120/208 volt electrical supply, if specified on the serial/rating plate) on a separate 30-amp circuit, fused...

Warranty
Page 1
... resulting from unauthorized modifications made to know your major appliance is located in accordance with Whirlpool's published installation instructions. 10. You will pay for product service if your complete model number and serial number. ITEMS EXCLUDED FROM WARRANTY This limited warranty does not cover: 1. Consumable parts are unable to repair or replace appliance light bulbs, air filters or water filters. Pick up and delivery. Expenses for travel and transportation for Factory...
... resulting from unauthorized modifications made to know your major appliance is located in accordance with Whirlpool's published installation instructions. 10. You will pay for product service if your complete model number and serial number. ITEMS EXCLUDED FROM WARRANTY This limited warranty does not cover: 1. Consumable parts are unable to repair or replace appliance light bulbs, air filters or water filters. Pick up and delivery. Expenses for travel and transportation for Factory...


