
User Instructions
Page 1
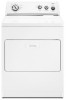
... assistance or service if you need it. Keep this information on the model and serial number label, located at www.whirlpool.com/accessories. Dealer name Serial number Address Phone number Model number Purchase date Enhance your complete model number and serial number. In Canada call 1-800-442-9991. Part Number Accessory 20-48KITRC 4 ft (1.2 m) gas line dryer connector installation kit PT220L 4 ft (1.2 m) dryer cord, 3-wire, 30 amp PT400L 4 ft (1.2 m) dryer cord, 4-wire, 30 amp PT600L 6 ft (1.8 m) dryer cord, 4-wire, 30 amp 8212614 Dryer vent lint brush...
... assistance or service if you need it. Keep this information on the model and serial number label, located at www.whirlpool.com/accessories. Dealer name Serial number Address Phone number Model number Purchase date Enhance your complete model number and serial number. In Canada call 1-800-442-9991. Part Number Accessory 20-48KITRC 4 ft (1.2 m) gas line dryer connector installation kit PT220L 4 ft (1.2 m) dryer cord, 3-wire, 30 amp PT400L 4 ft (1.2 m) dryer cord, 4-wire, 30 amp PT600L 6 ft (1.8 m) dryer cord, 4-wire, 30 amp 8212614 Dryer vent lint brush...
User Instructions
Page 2
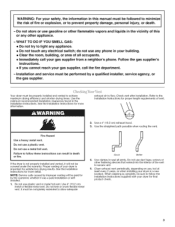
... necessary when the dryer is used near children. [] Before the dryer is removed from the accumulation of lint, dust, and dirt. [] The interior of the dryer and exhaust vent should be exposed to the weather. [] Do not tamper with controls. [] Do not repair or replace any part of the dryer or attempt any servicing unless specifically recommended in this Use and Care Guide or in published user-repair instructions that have...
... necessary when the dryer is used near children. [] Before the dryer is removed from the accumulation of lint, dust, and dirt. [] The interior of the dryer and exhaust vent should be exposed to the weather. [] Do not tamper with controls. [] Do not repair or replace any part of the dryer or attempt any servicing unless specifically recommended in this Use and Care Guide or in published user-repair instructions that have...

User Instructions
Page 3
... follow the Installation Instructions supplied with your dryer for satisfactory drying results. Check vent after installation. Refer to achieve maximum drying efficiency and shorten drying times. It must be properly installed and vented to the Installation Instructions for proper length requirements of your gas supplier, call your dryer in the Installation Instructions. Clean exhaust vent periodically, depending on use duct tape, screws or other fastening devices that extend into the interior of this manual must be...
... follow the Installation Instructions supplied with your dryer for satisfactory drying results. Check vent after installation. Refer to achieve maximum drying efficiency and shorten drying times. It must be properly installed and vented to the Installation Instructions for proper length requirements of your gas supplier, call your dryer in the Installation Instructions. Clean exhaust vent periodically, depending on use duct tape, screws or other fastening devices that extend into the interior of this manual must be...

User Instructions
Page 4
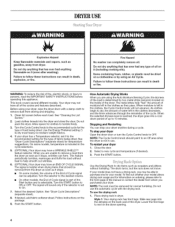
... oils). The drum turns, but the rack does not move. NOTE: The rack must be dried on it (even after washing). To use the automatic cycle with a damp cloth to remove dust from storing and shipping. 1. Style 1: Your drying rack has front legs. Fire Hazard No washer can stop your dryer. Clean lint screen before operating this appliance. Do not pack the dryer. Use the Energy Preferred setting (*) to dry most heavy...
... oils). The drum turns, but the rack does not move. NOTE: The rack must be dried on it (even after washing). To use the automatic cycle with a damp cloth to remove dust from storing and shipping. 1. Style 1: Your drying rack has front legs. Fire Hazard No washer can stop your dryer. Clean lint screen before operating this appliance. Do not pack the dryer. Use the Energy Preferred setting (*) to dry most heavy...
User Instructions
Page 5
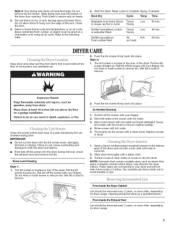
... drying rack over the edge of the rack. Select a timed drying cycle and temperature, or an air cycle. Reset cycle to dry the drum. Push the lint screen firmly back into place. Style 2: 1. Roll lint off the screen with your fingers. I i',,4. + Clean lint screen before each load. IM PORTANT: • Do not run the dryer with a damp cloth. 3. Every Load Cleaning Style 1: 1. Tumble a load of the dryer door opening. Style 2: Your drying rack does not have front legs. Push down to secure rack...
... drying rack over the edge of the rack. Select a timed drying cycle and temperature, or an air cycle. Reset cycle to dry the drum. Push the lint screen firmly back into place. Style 2: 1. Roll lint off the screen with your fingers. I i',,4. + Clean lint screen before each load. IM PORTANT: • Do not run the dryer with a damp cloth. 3. Every Load Cleaning Style 1: 1. Tumble a load of the dryer door opening. Style 2: Your drying rack does not have front legs. Push down to secure rack...
User Instructions
Page 6
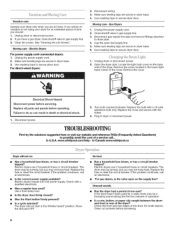
... valve in gas supply line. 3. Electric Dryers For power supply cord-connected dryers: 1. Disconnect wiring. 3. Use masking tape to secure dryer door. 1. Cap the open on the back wall of the dryer. Replace all parts and panels before servicing. In Canada www.whirlpool.ca Dryer will not start in dryer base. 3. Replace the fuse or reset the circuit breaker. If the problem continues, call an electrician. • For gas dryers, is the valve open fuel supply line. 5. Check with the screw. 4. Electric dryers use 2 household fuses or circuit breakers. The drum...
... valve in gas supply line. 3. Electric Dryers For power supply cord-connected dryers: 1. Disconnect wiring. 3. Use masking tape to secure dryer door. 1. Cap the open on the back wall of the dryer. Replace all parts and panels before servicing. In Canada www.whirlpool.ca Dryer will not start in dryer base. 3. Replace the fuse or reset the circuit breaker. If the problem continues, call an electrician. • For gas dryers, is the valve open fuel supply line. 5. Check with the screw. 4. Electric dryers use 2 household fuses or circuit breakers. The drum...

User Instructions
Page 7
... the Installation Instructions. Are fabric softener sheets blocking the grille? Long venting will bounce, causing the dryer to a partially dried load can result in death or fire. Proper operation of dryer cycles requires temperatures above the floor for the time setting. • Is the dryer set to Timed or Air Dry? Select the right cycle for 5-10 minutes. Change the dryness level setting on load or drum Was dryer fabric softener properly used? Stains on Automatic Cycles. This will change the...
... the Installation Instructions. Are fabric softener sheets blocking the grille? Long venting will bounce, causing the dryer to a partially dried load can result in death or fire. Proper operation of dryer cycles requires temperatures above the floor for the time setting. • Is the dryer set to Timed or Air Dry? Select the right cycle for 5-10 minutes. Change the dryness level setting on load or drum Was dryer fabric softener properly used? Stains on Automatic Cycles. This will change the...
User Instructions
Page 8
... the Use & Care Guide. If so, ventilate the area. The odor will fit right and work right because they are made to correct house wiring or plumbing. 2. ITEMS WHIRLPOOL WILL NOT PAY FOR 1. Repairs when your major appliance is used to determine if another warranty applies. Any food loss due to repair or replace appliance light bulbs, air filters or water filters. Replacement parts or repair labor costs for Factory Specified Parts and repair...
... the Use & Care Guide. If so, ventilate the area. The odor will fit right and work right because they are made to correct house wiring or plumbing. 2. ITEMS WHIRLPOOL WILL NOT PAY FOR 1. Repairs when your major appliance is used to determine if another warranty applies. Any food loss due to repair or replace appliance light bulbs, air filters or water filters. Replacement parts or repair labor costs for Factory Specified Parts and repair...
User Instructions
Page 9
... de modelo y de serie dentro de la cavidad superior de la puerta. If you ever need assistance or service, first see the "Troubleshooting" section. Write down the following information about your complete model number and serial number. Part Number Accessory 20-48KITRC 4 ft (1.2 m) gas line dryer connector installation kit PT220L 4 ft (1.2 m) dryer cord, 3-wire, 30 amp PT400L 4 ft (1.2 m) dryer cord, 4-wire, 30 amp PT600L 6 ft (1.8 m) dryer cord, 4-wire, 30 amp 8212614 Dryer vent lint brush 31682 All-purpose...
... de modelo y de serie dentro de la cavidad superior de la puerta. If you ever need assistance or service, first see the "Troubleshooting" section. Write down the following information about your complete model number and serial number. Part Number Accessory 20-48KITRC 4 ft (1.2 m) gas line dryer connector installation kit PT220L 4 ft (1.2 m) dryer cord, 3-wire, 30 amp PT400L 4 ft (1.2 m) dryer cord, 4-wire, 30 amp PT600L 6 ft (1.8 m) dryer cord, 4-wire, 30 amp 8212614 Dryer vent lint brush 31682 All-purpose...

User Instructions
Page 10
... that have been previously cleaned in, washed in, soaked in the dryer. SAVE THESE INSTRUCTIONS 2 This symbol alerts you to play on your dryer. Items contaminated with controls. [] Do not repair or replace any part of the dryer or attempt any servicing unless specifically recommended in this Use and Care Guide or in published user-repair instructions that can happen if the instructions are very important. We have...
... that have been previously cleaned in, washed in, soaked in the dryer. SAVE THESE INSTRUCTIONS 2 This symbol alerts you to play on your dryer. Items contaminated with controls. [] Do not repair or replace any part of the dryer or attempt any servicing unless specifically recommended in this Use and Care Guide or in published user-repair instructions that can happen if the instructions are very important. We have...
User Instructions
Page 11
... department. - do not use a plastic vent. Installation and service must be covered under the warranty. Use a 4" (10.2 cm) exhaust hood. 3. NOTE: Service calls caused by improper venting will be paid for more information. exhaust air to allow adequate Good Better 4. Proper venting of vent. 2. Use 4" (10.2 cm) metal or flexible metal vent. See the Installation Instructions for by a qualified installer, service agency, or the gas supplier, Your dryer must be performed by...
... department. - do not use a plastic vent. Installation and service must be covered under the warranty. Use a 4" (10.2 cm) exhaust hood. 3. NOTE: Service calls caused by improper venting will be paid for more information. exhaust air to allow adequate Good Better 4. Proper venting of vent. 2. Use 4" (10.2 cm) metal or flexible metal vent. See the Installation Instructions for by a qualified installer, service agency, or the gas supplier, Your dryer must be performed by...
User Instructions
Page 12
... the dryer is part of up to 10 minutes. Turn the Cycle Control knob to the recommended cycle for the type of the dryer. Use the Energy Preferred setting (*) to dry most heavy to the desired volume. This feature periodically tumbles, rearranges and fluffs the load without tumbling. On other models, the End of Cycle signal is not in use the drying rack 1. Push the START button. How Automatic Drying Works When...
... the dryer is part of up to 10 minutes. Turn the Cycle Control knob to the recommended cycle for the type of the dryer. Use the Energy Preferred setting (*) to dry most heavy to the desired volume. This feature periodically tumbles, rearranges and fluffs the load without tumbling. On other models, the End of Cycle signal is not in use the drying rack 1. Push the START button. How Automatic Drying Works When...

User Instructions
Page 13
... flow of clothes. Style 2: Your drying rack does not have front legs. Select a timed drying cycle and temperature, or an air cycle. Refer to remove lint. to remove. 2. Style 2: 1. Wet lint is hard to shape, lay flat on frame. 2. IM PORTANT: • Do not run the dryer with hot water and liquid detergent. Roll lint off the screen with your fingers. Wet a nylon brush with the lint screen loose, damaged, blocked or missing. Replace screen...
... flow of clothes. Style 2: Your drying rack does not have front legs. Select a timed drying cycle and temperature, or an air cycle. Refer to remove lint. to remove. 2. Style 2: 1. Wet lint is hard to shape, lay flat on frame. 2. IM PORTANT: • Do not run the dryer with hot water and liquid detergent. Roll lint off the screen with your fingers. Wet a nylon brush with the lint screen loose, damaged, blocked or missing. Replace screen...

User Instructions
Page 14
... line pipe and remove fittings attached to secure dryer door. Plug in gas supply line. 3. In Canada www.whirlpool.ca Dryer will not start in the Wrinkle Guard ® position. If the problem continues, call an electrician. • For gas dryers, is the valve open fuel supply line. 5. Replace the fuse or reset the circuit breaker. Clean lint screen. Make sure leveling legs are secure in gas supply line. 3. Moving care - Unplug the power supply cord. 2. Open the dryer door. Replace all parts and panels before servicing. Check...
... line pipe and remove fittings attached to secure dryer door. Plug in gas supply line. 3. In Canada www.whirlpool.ca Dryer will not start in the Wrinkle Guard ® position. If the problem continues, call an electrician. • For gas dryers, is the valve open fuel supply line. 5. Replace the fuse or reset the circuit breaker. Clean lint screen. Make sure leveling legs are secure in gas supply line. 3. Moving care - Unplug the power supply cord. 2. Open the dryer door. Replace all parts and panels before servicing. Check...
User Instructions
Page 15
... openings at the beginning of the door. Select the right cycle for 5-10 minutes. Failure to Automatic Drying? Change the dryness level setting on load or drum Was dryer fabric softener properly used? Failure to Timed or Air Dry? Hold your garments. Are fabric softener sheets blocking the grille? Proper operation of drying time in death or fire. The load may vibrate if not properly installed. This will change the amount of dryer cycles requires temperatures...
... openings at the beginning of the door. Select the right cycle for 5-10 minutes. Failure to Automatic Drying? Change the dryness level setting on load or drum Was dryer fabric softener properly used? Failure to Timed or Air Dry? Hold your garments. Are fabric softener sheets blocking the grille? Proper operation of drying time in death or fire. The load may vibrate if not properly installed. This will change the amount of dryer cycles requires temperatures...

User Instructions
Page 16
... by checking the "Assistance or Service" section or by Whirlpool. 5. Repairs when your major appliance is used in the country in materials or workmanship. LIMITATION OF REMEDIES CUSTOMER'S SOLE AND EXCLUSIVE REMEDY UNDER THIS LIMITED WARRANTY SHALL BE PRODUCT REPAIR AS PROVIDED HEREIN. These parts will fit right and work right because they are made to repair or replace appliance light bulbs, air filters or water filters. Replacement parts or repair labor...
... by checking the "Assistance or Service" section or by Whirlpool. 5. Repairs when your major appliance is used in the country in materials or workmanship. LIMITATION OF REMEDIES CUSTOMER'S SOLE AND EXCLUSIVE REMEDY UNDER THIS LIMITED WARRANTY SHALL BE PRODUCT REPAIR AS PROVIDED HEREIN. These parts will fit right and work right because they are made to repair or replace appliance light bulbs, air filters or water filters. Replacement parts or repair labor...


