
Use & Care Guide
Page 10
...." Unplug or disconnect power to gas supply line. 3. For direct-wired dryers: 1. Unplug dryer or disconnect power. 2. (For gas dryers only): Close shut off power at home. Use tape to dryer pipe. 4. Replace all parts and panels before servicing. If you are secure in dryer base. 4. Disconnect gas supply line pipe and remove fittings attached to...
...." Unplug or disconnect power to gas supply line. 3. For direct-wired dryers: 1. Unplug dryer or disconnect power. 2. (For gas dryers only): Close shut off power at home. Use tape to dryer pipe. 4. Replace all parts and panels before servicing. If you are secure in dryer base. 4. Disconnect gas supply line pipe and remove fittings attached to...
Installation Guide
Page 4
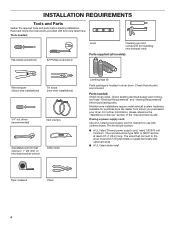
... 1" (25 mm) or hex-head socket wrench Utility knife Leveling legs (4) Parts package is located in ring terminals or spade terminals with any tools listed here. Mobile home installations require metal exhaust system hardware, available for use with clothes dryers. Read and follow the instructions provided with upturned ends. ■■ A UL...
... 1" (25 mm) or hex-head socket wrench Utility knife Leveling legs (4) Parts package is located in ring terminals or spade terminals with any tools listed here. Mobile home installations require metal exhaust system hardware, available for use with clothes dryers. Read and follow the instructions provided with upturned ends. ■■ A UL...
Installation Guide
Page 5
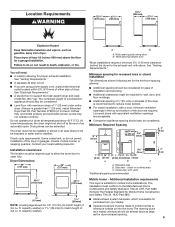
...door, and floor moldings. ■■ Additional spacing of 1" (25 mm) on all sides of the dryer is greater than 1" [25 mm], install Extended Dryer Feet Kit, Part Number 279810.) If not level, clothes may not tumble properly and automatic sensor cycles may not operate correctly. At... lower temperatures, the dryer might be large enough to allow the dryer door to introduce outside air into the dryer. Drying times can be...
...door, and floor moldings. ■■ Additional spacing of 1" (25 mm) on all sides of the dryer is greater than 1" [25 mm], install Extended Dryer Feet Kit, Part Number 279810.) If not level, clothes may not tumble properly and automatic sensor cycles may not operate correctly. At... lower temperatures, the dryer might be large enough to allow the dryer door to introduce outside air into the dryer. Drying times can be...
Installation Guide
Page 14
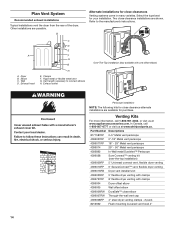
... Wall offset elbow 4396006RW DuraSafe™ close elbow 4396007RW Through-the-wall vent cap 4396008RP 4" steel dryer venting clamps - 2 pack 8212662 Flush mounting louvered vent hood 4" 14 Exhaust hood C D E F G B H E. Select the type best for your installation. Part Number Descriptions 8171587RP 0-5" Metal vent periscope 4396037RP 0"-18" Metal vent periscope 4396011RP 18" - 29" Metal...
... Wall offset elbow 4396006RW DuraSafe™ close elbow 4396007RW Through-the-wall vent cap 4396008RP 4" steel dryer venting clamps - 2 pack 8212662 Flush mounting louvered vent hood 4" 14 Exhaust hood C D E F G B H E. Select the type best for your installation. Part Number Descriptions 8171587RP 0-5" Metal vent periscope 4396037RP 0"-18" Metal vent periscope 4396011RP 18" - 29" Metal...
Installation Guide
Page 16
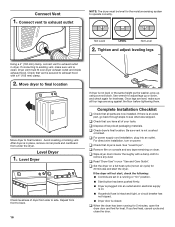
...using a wood block. Use wrench to side. q Check that dryer is in your tools. Not Level LEVEL Not Level 2. Dryer vent must be level for levelness. Level Dryer Check levelness of /recycle all parts are snug against the floor before tightening them. If there is ... heat, cancel cycle and close the door. Move dryer to final location Move dryer to see what was skipped. Level Dryer 1. Complete Installation Checklist q Check that vent is an extra part, go back through steps to final location. q Check dryer's final location. For direct wire installation, turn on...
...using a wood block. Use wrench to side. q Check that dryer is in your tools. Not Level LEVEL Not Level 2. Dryer vent must be level for levelness. Level Dryer Check levelness of /recycle all parts are snug against the floor before tightening them. If there is ... heat, cancel cycle and close the door. Move dryer to final location Move dryer to see what was skipped. Level Dryer 1. Complete Installation Checklist q Check that vent is an extra part, go back through steps to final location. q Check dryer's final location. For direct wire installation, turn on...
Installation Guide
Page 17
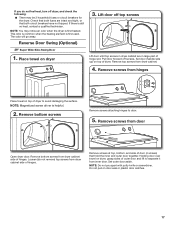
... and tight, or that hold the inner and outer door together. Remove screws from dryer cabinet. 4. Check that both fuses are in large part of hinges. NOTE: You may be 2 household fuses or circuit breakers for the dryer. The odor will go away. Place towel on door seal or plastic door catches.... 17 Loosen (do not feel heat, turn off screws. Holding door over towel on dryer, grasp sides of dryer. NOTE: Do...
... and tight, or that hold the inner and outer door together. Remove screws from dryer cabinet. 4. Check that both fuses are in large part of hinges. NOTE: You may be 2 household fuses or circuit breakers for the dryer. The odor will go away. Place towel on door seal or plastic door catches.... 17 Loosen (do not feel heat, turn off screws. Holding door over towel on dryer, grasp sides of dryer. NOTE: Do...


