Whirlpool WED4850BW Support Question
Whirlpool WED4850BW Support Question
Find answers below for this question about Whirlpool WED4850BW.Need a Whirlpool WED4850BW manual? We have 3 online manuals for this item!
Question posted by ke5vgf on February 22nd, 2016
Dryer Will Not Heat At Any Heat Setting.
Air intake is clear. Exhaust is clear. Tube air vents are clear. Element shows no damage and tests OK. 240VAC to the outlet.WED4850BWPurchased 11/21/2014
Current Answers
Answer #1: Posted by Odin on February 22nd, 2016 12:49 PM
Odin

Member since:
April 10th, 2010 Points: 41,236,680

Member since:
April 10th, 2010 Points: 41,236,680
Hope this is useful. Please don't forget to click the Accept This Answer button if you do accept it. My aim is to provide reliable helpful answers, not just a lot of them. See https://www.helpowl.com/profile/Odin.
Answer #2: Posted by majorapplirepair on February 22nd, 2016 4:19 PM
majorapplirepair

Member since:
October 7th, 2011 Points: 139,880
Member since:
October 7th, 2011 Points: 139,880
Look closely at the power cord itself, both ends. Make sure the cord connections are not burnt at the terminal block. Terminal block is where the cord attaches to the dryer. Check the prongs on the plug end of the cord and make sure there are no burnt marks on the prongs, the flat bladed prongs. Look for signs of any melting around the prongs, if so, replace the cord.
Related Whirlpool WED4850BW Manual Pages
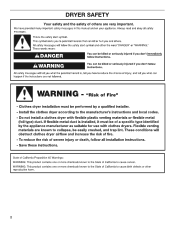
Use & Care Guide - Page 2
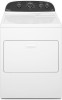
DRYER SAFETY
2
Use & Care Guide - Page 4

... dryer. n Clear away items from the exhaust hood.
n Use the shortest length of vent possible. The Energy Preferred cycle will be sure to efficiently dry laundry. Service calls caused by improper venting are sensed in a vent system;
With Timed Dry, the dryer runs the amount of time set and sometimes results in good air flow. CHECK YOUR VENT SYSTEM FOR GOOD AIR...
Use & Care Guide - Page 5

...dryer for a load, select the lower setting rather than the higher setting. NOTE: The No Heat temperature setting (on the fabrics in the load or air temperature and shuts off at any time before the cycle has ended.
2 DRYER CYCLE KNOB
Use your Dryer Cycle Knob to help keep wrinkles from the dryer...Senses moisture in your dryer model.
On models ..., and dryness setting.
3 TEMPERATURE ...
Use & Care Guide - Page 6

... specified time on the fabrics in your dryer has multiple heat settings:
A High temperature setting may be used for drying medium-weight items such as thick towels or robes
Any load
Heavy Dry Damp Dry
Temperature: Any Any
Available Options: Temperature
Temperature
Rubber, plastic, heat sensitive fabrics
Fluff Air
No Heat
Temperature
Cycle Details:
Choose high to...
Use & Care Guide - Page 7
...2.
Do not rinse or wash screen to tumble freely.
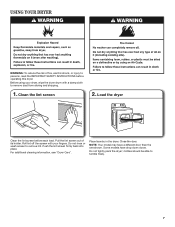
7 For additional cleaning information, see "Dryer Care". NOTE: Your model may have drop down doors. Pull the lint screen out of fire...be able to remove lint. Place laundry in the dryer. Before using your dryer, wipe the dryer drum with your fingers. Do not tightly pack the dryer; USING YOUR DRYER
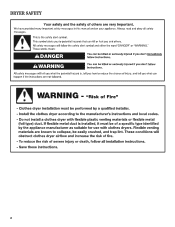
WARNING: To reduce the risk of ...
Use & Care Guide - Page 8
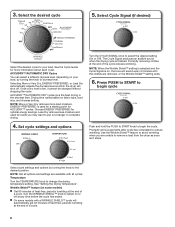
... when you may want to put on fabric type, load size, and dryness setting. Selecting More or Very Dry, ENERGY PREFERRED, or Less Dry automatically adjusts the dryness level at which the dryer will automatically get 40 minutes of heat-free, periodic tumbling at the end of
a cycle.
Promptly removing clothes at the...
Use & Care Guide - Page 9

... and damage to stop before your fingers. 2. IMPORTANT: n Do not run the dryer with hot water. 3. The screen is located in the dryer. Wet both the dryer and fabrics. Thoroughly dry lint screen with a damp cloth. 3. This includes clearing piles of the dryer. Cleaning the dryer interior
To clean dryer drum 1. NOTE: Garments that would block the air flow...
Use & Care Guide - Page 10

... Disconnect power before operating. Cap the open fuel supply line. 5. Replace the bulb with the screw.
4. Plug into a grounded outlet or reconnect power.
10 See "Cleaning the Lint Screen." Moving Care
For power supply cord-connected dryers: 1.
Use tape to dryer pipe. 4. Disconnect gas supply line pipe and remove fittings
attached to secure...
Use & Care Guide - Page 11

... the problem continues, call an electrician. Electric dryers use .
Use a time-delay fuse. The dryer may be a thumping sound during the first few minutes of lint or replace exhaust vent with lint, restricting air movement.
Has the Fluff Air cycle or No Heat temperature setting been selected. Exhaust vent or outside exhaust hood to START knob not pressed firmly or held...
Use & Care Guide - Page 12

....ca for very small loads. Change the Dry Level setting on high.
Odors
You have an odor.
Allow Cool...dryer. Laundry items removed from the dryer before removing laundry from dryer at the beginning of the cycle. Select Wrinkle Shield™ feature to tumble the load without heat to handle. Add dryer fabric softener sheets at the end of the cycle. The new electric heating element...
Installation Guide - Page 2
DRYER SAFETY
2
Installation Guide - Page 4
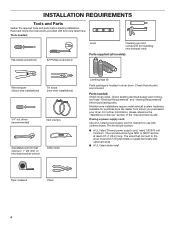
...supply cord kit marked for installing new exhaust vent)
Parts supplied (all parts are included. Tools needed : Check local codes. Read and follow the instructions provided with clothes dryers. Mobile home installations require metal exhaust system hardware, available for purchase from the dealer from whom you purchased your dryer. Parts needed :
Flat-blade screwdriver
#2 Phillips screwdriver...
Installation Guide - Page 5
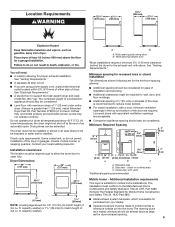
...all sides of the dryer is suitable for purchase from your local building inspector. Drying times can be 1/2" (13 mm) (to match height of the dryer in .2 * (155...Venting Requirements." Minimum spacing for the exhaust vent with equivalent ventilation openings are using power supply cord, a grounded electrical outlet located within 2 ft. (610 mm) of either side of 1" (25 mm) under entire dryer...
Installation Guide - Page 6
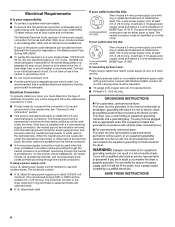
...using and follow the instructions provided for use with clothes dryers. The wires that connect to an individual branch circuit. If your outlet looks like this :
4-wire receptacle (14-30R)
Then... cord.
■■ If codes permit and a separate ground wire is used when the dryer is installed in a location where grounding through the neutral conductor is adequate. The National Electrical...
Installation Guide - Page 7

...holes until it is approximately 1/2" (13 mm) (to connect the exhaust vent. capacity washer) from dryer carton; Now stand the dryer on page 9 for power supply cord strain relief: then steps 3-6... Leveling Legs
Electrical Connection
Power Supply Cord
1. Firmly grasp dryer body (not console panel) and gently lay dryer down on page 11 for direct wire strain relief: then steps 3-7 for 4-...
Installation Guide - Page 14
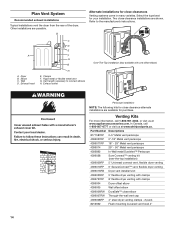
... Exhaust outlet
Over-The-Top installation (also available with clamps
4396004
Dryer offset elbow
4396005
Wall offset elbow
4396006RW DuraSafe™ close elbow
4396007RW Through-the-wall vent cap
4396008RP 4" steel dryer venting clamps - 2 pack
8212662
Flush mounting louvered vent hood 4"
14 Part Number Descriptions
8171587RP 0-5" Metal vent periscope
4396037RP 0"-18" Metal vent...
Installation Guide - Page 15

... will :
■■ Shorten life of dryer.
■■ Reduce performance, resulting in Vent system chart. Connect vent to exhaust hood
1
Rigid metal 54 ft. (16.5 m) 48 ft. (14.6 m)
2
Rigid metal 44 ft. (13.4 m) 38 ft. (11.6 m)
3
Rigid metal 35 ft. (10.7 m) 29 ft. (8.8 m)
4
Rigid metal 27 ft. (8.2 m) 21 ft. (6.4 m)
Vent must not terminate beneath the mobile...
Installation Guide - Page 16
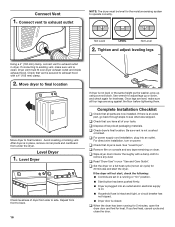
... to exhaust outlet in your tools.
q Remove film on console and any dust. q Set the dryer on dryer. Tighten and adjust leveling legs
Using a 4" (102 mm) clamp, connect vent to existing vent, make sure all packaging materials. Dryer vent must be level for the moisture sensing system to
remove any tape remaining on a full heat cycle (not an air cycle) for heat...
Installation Guide - Page 17
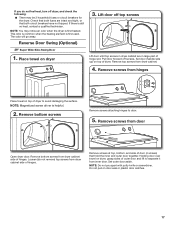
... (Optional)
29" Super Wide Side-Swing Door
1. Remove top screws from door
Open dryer door. NOTE: Magnetized screw driver is first heated. Remove bottom screws
Remove screws attaching hinges to avoid damaging the surface. Remove bottom screws from dryer cabinet side of dryer to door.
5. Remove screws at top, bottom, and side of hinge slot...
Installation Guide - Page 18
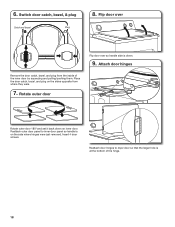
...door over so handle side is at the bottom of the inner door by squeezing and pulling/pushing them. Reattach outer door panel to dryer door so that the larger hole is down on the side where hinges were just removed. Switch door catch, bezel, & plug
... door hinges to inner door panel so handle is on inner door. 6. Rotate outer door
Rotate outer door 180º and set it back down .
9.
Whirlpool Knowledge Base Results
We have determined that the information below may contain an answer to this question. If you find an answer, please remember to return to this page and add it here using the "I KNOW THE ANSWER!" button above. It's that easy to earn points!-
The ice maker on my upright freezer is not producing ice or not enough ice
..., Oven or Cooktop Gas Range, Oven or Cooktop Microwave Trash Compactor Window Air Conditioner Hot Water Dispenser Vent Hood Ice Machine Commercial Laundry Vacuum Cleaner Central Vac Dehumidifier Using the control: Turn the freezer temperature control to the freezer turned on? This setting is cooled. When the freezer is first started, the compressor will... -
The temperature in my chest freezer is too warm
... Range, Oven or Cooktop Microwave Trash Compactor Window Air Conditioner Hot Water Dispenser Vent Hood Ice Machine Commercial Laundry Vacuum Cleaner Central Vac Dehumidifier Why is to remove heat from packages and air space inside the freezer. Has a large amount of food warms the freezer. Is the control set correctly for service, check the following: Is... -
Gas surface burner performance
...model: Keep food warm Simmering Power burner (on some models): Provide highest heat setting (left-front burner on some models) SureSimmer™ (on some models): Provide lowest simmer/heat setting Melt chocolate or butter Surface burners fail to ignite My gas range cooktop burners... performance How do gas surface burners operate? Use the following chart as a guide when setting heat levels.
Similar Questions

Checked Tstats Fuse Heater Still No Heat Model Wed4850bw0
no heat checked tstats heater fuse wed4850bw0
no heat checked tstats heater fuse wed4850bw0
(Posted by budechase 8 years ago)

Dryer Heats Up On Auto Cycles But Not Timed Cycle.
Any Idea Why?
(Posted by meehan26 10 years ago)

Timer Does Not Advance.
The timer on my WED5900SB0 does not advance. The dryer heats and dries clothes. Heat or no heat sett...
The timer on my WED5900SB0 does not advance. The dryer heats and dries clothes. Heat or no heat sett...
(Posted by csw99s 11 years ago)

Wed7800xwo
The Dryer Time Is Set At 40 Minutes.
Recently, the dryer time starts at 40 minutes. A few minutes later the time says 15 minutes remainin...
Recently, the dryer time starts at 40 minutes. A few minutes later the time says 15 minutes remainin...
(Posted by LWG65 11 years ago)

Gas Dryer
gas dryer fires up, and burner stays on for aprox. 1 min. and shuts off. It trys to refire and will ...
gas dryer fires up, and burner stays on for aprox. 1 min. and shuts off. It trys to refire and will ...
(Posted by Anonymous-70783 11 years ago)