Whirlpool WED5900SB Support Question
Whirlpool WED5900SB Support Question
Find answers below for this question about Whirlpool WED5900SB.Need a Whirlpool WED5900SB manual? We have 4 online manuals for this item!
Question posted by csw99s on April 3rd, 2013
Timer Does Not Advance.
The timer on my WED5900SB0 does not advance. The dryer heats and dries clothes. Heat or no heat settings don't seem to make any difference.
Current Answers
Related Whirlpool WED5900SB Manual Pages
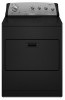
User Instructions - Page 1

...Number Accessory
20-48KITRC 4 ft (1.2 m) gas line dryer connector installation kit
PT220L
4 ft (1.2 m) dryer cord, 3-wire, 30 amp
PT400L
4 ft (1.2 m) dryer cord, 4-wire, 30 amp
PT600L
6 ft (1.8 m) dryer cord, 4-wire, 30 amp
8212614
Dryer vent lint brush
31682
All-purpose appliance cleaner
1903WH
Laundry supply storage cart
3404351
Drying rack - ft (0.20 cu.
Dealer name
Serial...
User Instructions - Page 2

... dryer and exhaust vent should be exposed to the weather.
■ Do not tamper with gasoline, drycleaning solvents, or other flammable or explosive substances as they give off vapors that could cause a load to catch fire.
■ Do not dry articles that have the skills to carry out.
■ Do not use heat...
User Instructions - Page 3

..., or when installing your dryer in a new location. Proper venting of your dryer is important for more information. See the Installation Instructions for satisfactory drying results. When cleaning is ...must be properly installed and vented to follow the Installation Instructions supplied with your dryer for by the customer, whether it will be completely extended to the Installation ...
User Instructions - Page 4

... the recommended cycle for the type of fabric being dried. As clothes begin to help "feel" the amount of moisture left in the clothes as sweaters and pillows without heat to dry, the amount of water left in the clothes decreases, and the timer advances through the remainder of the dryer.
Select a new cycle and temperature (if desired).
3.
To...
User Instructions - Page 5

... complete drying, if needed. or polyester filled)
Drying
Stuffed toys/pillows Foam rubber filled
Air
N/A
(no heat)
90 min. Style 2:
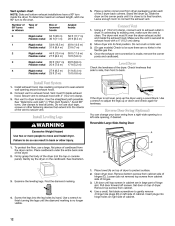
1. The lint screen is hard to remove lint. Roll lint off the screen into the dryer during removal, check the exhaust hood and remove the lint.
Roll lint off the screen with a soft cloth until...
User Instructions - Page 6
... small objects. If you may not have heat. Unplug dryer or disconnect power. 2. Clean lint screen. See "Cleaning the Lint Screen."
Unplug the power supply cord. 2. Make sure leveling legs are secure in dryer base. 3. Disconnect wiring. 3. Make sure leveling legs are secure in dryer base. 4.
Gas Dryers
1. Unplug the power supply cord. 2. Close shutoff valve in...
User Instructions - Page 7

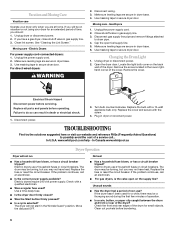
...; Is the lint screen clogged? Drum stains are too long, or load is the dryer level front to back and side to a partially dried load can result in back or other clothing.
7 Timer does not noticeably advance
■ Is the dryer set to do so can result in death or fire.
■ Is the exhaust vent or...
User Instructions - Page 8

... work right because they are gone from the area, rewash and dry the clothing.
■ Is the electric dryer being used in a country other than the country in which it..., improper installation, installation not in U.S.A. Loads are excluded from warranty coverage.
3. The new electric heating element may have an odor.
Those consumable parts are wrinkled
■ Was the load removed from ...
Installation Instructions - Page 1
...Plan Vent System ...11 Install Vent System...12 Install Leveling Legs...12 Connect Vent ...12 Level Dryer ...12 Reverse Door Swing (Optional)...12 Complete Installation ...13 SEGURIDAD DE LA SECADORA ...14 INSTRUCCIONES...243;mo invertir el cierre de la puerta (opcional)...26 Complete la instalación...27
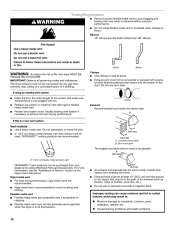
DRYER SAFETY
Your safety and the safety of injury, and tell you don't immediately follow ...
Installation Instructions - Page 2
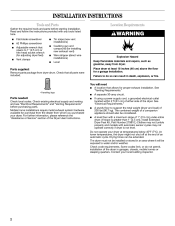
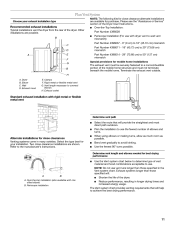
... side of an automatic cycle. A level floor with a maximum slope of 1" (2.5 cm) under entire dryer. (If slope is greater than 1" [2.5 cm], install Extended Dryer Feet Kit, Part Number 279810.) Clothes may not operate correctly if dryer is not level.
Drying times can result in an area where it will need
s
4 leveling legs
A location that allows...
Installation Instructions - Page 3
...recommended
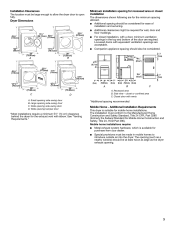
Mobile Home - Companion appliance spacing should be large enough to allow the dryer door to the Manufactured Home Construction and Safety Standard, Title 24 CFR, Part... view -
s
*Most installations require a minimum 5½" (14 cm) clearance behind the dryer for mobile home installations. Minimum installation spacing for recessed area or closet installation
The dimensions shown ...
Installation Instructions - Page 4

... (do not permit the connection of the line. Grounding through the neutral conductor is prohibited. s
GROUNDING INSTRUCTIONS
For a grounded, cord-connected dryer: This dryer must be run with clothes dryers. For a permanently connected dryer: This dryer must be connected to a grounded metal, permanent wiring system, or an equipment-grounding conductor must be removed from : National Fire...
Installation Instructions - Page 6
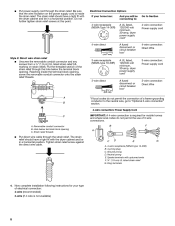
... on strain relief). The strain relief should have a tight fit with the dryer cabinet and be in a horizontal position. Do not further tighten strain relief screws... relief screw against the direct wire cable. Spade terminals with the dryer cabinet and be connecting to: A UL listed, 120/240-volt minimum, 30-amp, dryer power supply cord* A fused disconnect or circuit breaker box* A...
Installation Instructions - Page 7
... or center wire) D. ¾" (1.9 cm) UL listed strain relief E. 1. Connect ground wire (green or bare) of dryer rear panel. A
B
C
1. Tighten screw. External ground conductor screw - Ground wire (green or bare) of extra length so dryer can be moved if needed. Shape ends of wires into slot of power supply cord to outer...
Installation Instructions - Page 8
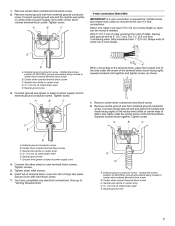
...terminals G. Tighten screw. Tighten screws.
3. 3.
Neutral ground wire F. Place the hooked ends of dryer rear panel. Connect the other power supply cable wires under the screw of the wire under the outer... relief screws. 6. Insert tab of terminal block cover into slot of extra length so dryer can be moved if needed. Now go to the terminal block, place the hooked end...
Installation Instructions - Page 9

...
E F
3. A. External ground conductor screw B. Insert tab of terminal block cover into slot of dryer rear panel. Loosen or remove center silver-colored terminal block screw. 2. Center silver-colored terminal block screw...colored terminal block screw. Insert tab of terminal block cover into slot of dryer rear panel. Tighten screw. Secure cover with hold -down screw. 6. You...
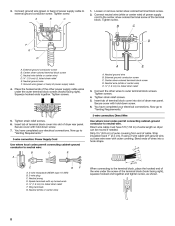
Installation Instructions - Page 10
... Hazard Use a heavy metal vent. The dryer exhaust must not be purchased from the entire length of the system and make sure exhaust hood is a new vent system... system if necessary to woodwork, furniture, paint, wallpaper, carpets, etc. If this dryer MUST BE
EXHAUSTED OUTDOORS.
Rigid metal vent s For best drying performance, rigid metal vents are shown here. s
2½" (6.4 cm)
s s...
Installation Instructions - Page 11
... be securely fastened to achieve the best drying performance.
11 When using elbows or making turns, allow as much room as possible. Determine vent length and elbows needed for best drying performance
Alternate installations for your exhaust installation type
Recommended exhaust installations
Typical installations vent the dryer from the rear of the mobile home...
Installation Instructions - Page 12
...dryer door. Pull door forward off screws. Set door on left -side opening around exhaust hood. 2. Stand the dryer up or down and check again for levelness. Leave enough room to move and install dryer. Connect Vent
1. Move dryer...to exhaust hood with 4" (10.2 cm) clamp. 3. If connecting to existing vent, make sure the vent is secured to a left side of the vent to seal exterior wall ...
Parts Diagram - Page 4

...8722;18 x 5/16)
27 8299897 Harness, Wiring
Illus. TOP AND CONSOLE PARTS
For Models: WED5900SW0, WED5900SB0 (White/Grey) (BLACK)
Illus. No. Part No. No. Part No. No. DESCRIPTION
1 ...Timer Knob
Assembly
W10034750 Silver
33 3936144 Connector
34 8566052 Bracket, Control
35
Panel, Control
(Includes
Illus. 20)
8566077 Silver
36 343641 Screw, 10−16 x 1/2
37 8566493 Heat...
Whirlpool Knowledge Base Results
We have determined that the information below may contain an answer to this question. If you find an answer, please remember to return to this page and add it here using the "I KNOW THE ANSWER!" button above. It's that easy to earn points!-
Product Registrations
... if you register online. All Accessory Air Purifier Built-in your question? Electric Dryer - Gas Drying Cabinet Freezer Hood & Vent Hot Water Dispenser Ice Maker (50lb) Ironing Cabinet...willing to take a moment to mail in Oven Combo Washer Dryer Compactor Cooktop Custom Laundry Option Dehumidifier Dishwasher Disposer Dryer - I register my product online? Gas Refrigerator Room Air Conditioner... -
Lint is on the load - Front-load washer
... allow the laundry items to tumble freely. Make sure that there are not any laundry items sticking...when line drying. The air movement and tumbling of laundry. Sort loads before starting a new load of a dryer removes lint ...laundry? Are you washing a large load? New clothes tend to create more likely to wash. Did you line dry the load of lint o n my clothes.... -
White residue on the front of the access panel
... soap or laundry detergents. Use automatic dishwasher detergent only. Never use of detergent making excess foam? Other detergents can produce excessive suds that can cause foam and lead to oversudsing: Are you using improper dishwasher detergent? Was rinse aid spilled inside the tub? Wipe up any spilled rinse aid with a damp cloth. Measure...
Similar Questions

My Dryer Whirpool Dryer Turns On But It Won’t Start It Makes A Noise How Do I
how do I reset my whirlpool dryer it turns on but won't start
how do I reset my whirlpool dryer it turns on but won't start
(Posted by Watchmework111 4 years ago)

Dryer Takes Too Long To Dry Clothes
Have to set dryer to one setting for towels to dry any type load . After cycle of 54 minutes is done...
Have to set dryer to one setting for towels to dry any type load . After cycle of 54 minutes is done...
(Posted by plazajoe 7 years ago)

Dryer Stops Before Clothes Are Dry
dryer stops before clothes are dry
dryer stops before clothes are dry
(Posted by shannonbolt 9 years ago)

Dryer Has No Heat And Not Drying Clothes
MY DRYER IS NOT DRYING THE CLOTHES AND NOT HOT AT ALL
MY DRYER IS NOT DRYING THE CLOTHES AND NOT HOT AT ALL
(Posted by MBUN27 12 years ago)

Dryer Not Drying
I've had my dryer since August 2010. After several days of no usage, it is suddenly not heating or d...
I've had my dryer since August 2010. After several days of no usage, it is suddenly not heating or d...
(Posted by coschober 12 years ago)