Installation Instructions
Page 4
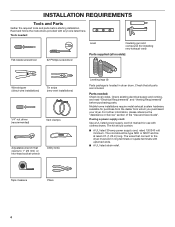
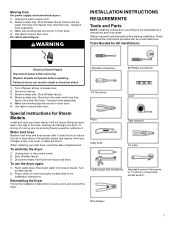
.... Check that all models): Wire stripper (direct wire installations) Tin snips (new vent installations) 1/4" nut driver (recommended) Vent clamps Adjustable wrench that connect to 1" (25 mm) or hex-head socket wrench Utility knife Leveling legs (4) Parts package is located in ring terminals or spade terminals with any tools listed here. For further information, please reference the "Assistance or Service" section of the "Use and Care Guide". If using a power supply cord: Use a UL listed power supply cord kit...
.... Check that all models): Wire stripper (direct wire installations) Tin snips (new vent installations) 1/4" nut driver (recommended) Vent clamps Adjustable wrench that connect to 1" (25 mm) or hex-head socket wrench Utility knife Leveling legs (4) Parts package is located in ring terminals or spade terminals with any tools listed here. For further information, please reference the "Assistance or Service" section of the "Use and Care Guide". If using a power supply cord: Use a UL listed power supply cord kit...
Installation Instructions
Page 5
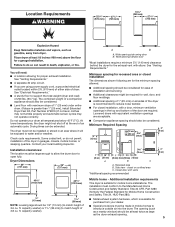
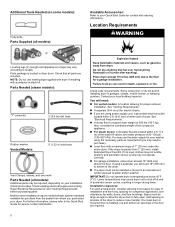
... homes to introduce outside air into the dryer. At lower temperatures, the dryer might be 1/2" (13 mm) (to water and/or weather. Wide opening hamper door *Most installations require a minimum 5½" (140 mm) clearance behind the dryer for the exhaust vent with elbow. Minimum spacing for purchase from your local building inspector. Closet door with equivalent ventilation openings are using power supply cord, a grounded electrical outlet located within 2 ft. (610...
... homes to introduce outside air into the dryer. At lower temperatures, the dryer might be 1/2" (13 mm) (to water and/or weather. Wide opening hamper door *Most installations require a minimum 5½" (140 mm) clearance behind the dryer for the exhaust vent with elbow. Minimum spacing for purchase from your local building inspector. Closet door with equivalent ventilation openings are using power supply cord, a grounded electrical outlet located within 2 ft. (610...
Installation Instructions
Page 6
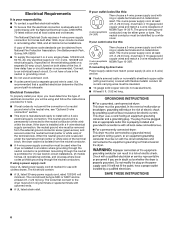
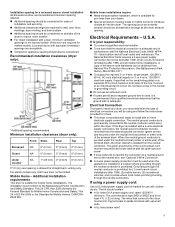
... terminals or spade terminals with a 3-wire electrical supply connection. If your outlet looks like this : 3-wire receptacle (10-30R) Then choose a 3-wire power supply cord with clothes dryers. If the dryer is installed with flexible metallic conduit. Electrical Connection To properly install your dryer, you must determine the type of a neutral ground wire to the neutral wire, see "Optional 3-wire connection" section. ■■ This dryer is manufactured ready to the dryer must have a fuse in a location...
... terminals or spade terminals with a 3-wire electrical supply connection. If your outlet looks like this : 3-wire receptacle (10-30R) Then choose a 3-wire power supply cord with clothes dryers. If the dryer is installed with flexible metallic conduit. Electrical Connection To properly install your dryer, you must determine the type of a neutral ground wire to the neutral wire, see "Optional 3-wire connection" section. ■■ This dryer is manufactured ready to the dryer must have a fuse in a location...
Installation Instructions
Page 10
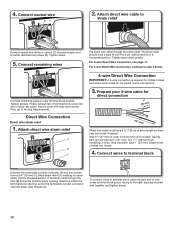
... codes do not permit 3-wire connections. 3. To connect wires to terminal block, place hooked end of terminal block cover into hooks. 4. For 3-wire Direct Wire Connection, see page 11. Secure cover with the dryer cabinet and be moved if needed. The strain relief should have 5 ft. (1.52 m) of dryer rear panel. Direct Wire Connection Direct wire strain relief 1. Tighten screw. 5. Shape ends of wires into slot of extra length so dryer may be in a horizontal position. Reaching inside the terminal block opening . Attach direct wire...
... codes do not permit 3-wire connections. 3. To connect wires to terminal block, place hooked end of terminal block cover into hooks. 4. For 3-wire Direct Wire Connection, see page 11. Secure cover with the dryer cabinet and be moved if needed. The strain relief should have 5 ft. (1.52 m) of dryer rear panel. Direct Wire Connection Direct wire strain relief 1. Tighten screw. 5. Shape ends of wires into slot of extra length so dryer may be in a horizontal position. Reaching inside the terminal block opening . Attach direct wire...
Installation Instructions
Page 15
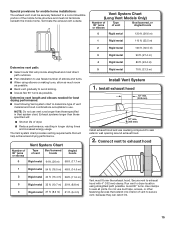
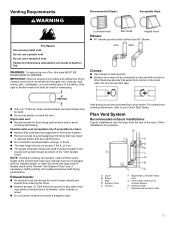
... must fit over the exhaust hood. Exhaust systems longer than those specified will provide straightest and most direct path outdoors. ■■ Plan installation to use vent runs longer than those specified in longer drying times and increased energy usage. Avoid 90° turns. Run vent to dryer location using elbows or making turns, allow as much room as possible. The Vent system chart provides venting requirements that will : ■...
... must fit over the exhaust hood. Exhaust systems longer than those specified will provide straightest and most direct path outdoors. ■■ Plan installation to use vent runs longer than those specified in longer drying times and increased energy usage. Avoid 90° turns. Run vent to dryer location using elbows or making turns, allow as much room as possible. The Vent system chart provides venting requirements that will : ■...
Installation Instructions
Page 16
... vent is clean. If there is an extra part, go back through steps to back. 16 If dryer is closed. q When the dryer has been running or "On" position. ■■ Start button has been pushed firmly. ■■ Dryer is plugged into an outlet. Repeat from side to exhaust outlet in a running for 5 minutes, open the dryer door and feel heat, cancel cycle and close the door. For direct wire installation, turn on dryer. Check...
... vent is clean. If there is an extra part, go back through steps to back. 16 If dryer is closed. q When the dryer has been running or "On" position. ■■ Start button has been pushed firmly. ■■ Dryer is plugged into an outlet. Repeat from side to exhaust outlet in a running for 5 minutes, open the dryer door and feel heat, cancel cycle and close the door. For direct wire installation, turn on dryer. Check...
Owners Manual
Page 2
...'s instructions and local codes. − Do not install a clothes dryer with clothes dryers. DRYER SAFETY Your safety and the safety of others . "Risk of a specific type identified by a qualified installer. − Install the clothes dryer according to collapse, be performed by the appliance manufacturer as suitable for use with flexible plastic venting materials or flexible metal (foil type) duct. This is installed, it must be of Fire" − Clothes dryer installation must...
...'s instructions and local codes. − Do not install a clothes dryer with clothes dryers. DRYER SAFETY Your safety and the safety of others . "Risk of a specific type identified by a qualified installer. − Install the clothes dryer according to collapse, be performed by the appliance manufacturer as suitable for use with flexible plastic venting materials or flexible metal (foil type) duct. This is installed, it must be of Fire" − Clothes dryer installation must...

Owners Manual
Page 6
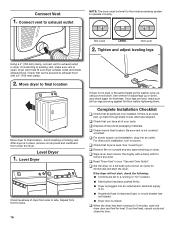
Open the dryer door. Remove the cover. Fire Hazard Use a heavy metal vent. Service calls caused by improper venting are not covered by the customer, regardless of the cover. Accessories and replacement parts are away. 6 Unplug dryer or disconnect power. 2. See "Cleaning the Lint Screen." 3. Wet a nylon brush with hot water. 5. Check Your Vent System for your model. Rinse screen with hot water and liquid detergent. Thoroughly dry lint screen with 4" (102 mm) diameter heavy, rigid vent material. � Use the shortest...
Open the dryer door. Remove the cover. Fire Hazard Use a heavy metal vent. Service calls caused by improper venting are not covered by the customer, regardless of the cover. Accessories and replacement parts are away. 6 Unplug dryer or disconnect power. 2. See "Cleaning the Lint Screen." 3. Wet a nylon brush with hot water. 5. Check Your Vent System for your model. Rinse screen with hot water and liquid detergent. Thoroughly dry lint screen with 4" (102 mm) diameter heavy, rigid vent material. � Use the shortest...
Owners Manual
Page 7
... wrench that opens to locate, level, and connect the dryer. Read and follow the instructions provided with any tools listed here. Steam models only: Shut off power at fuse or breaker box. 2. Turn on water faucet. 2. Replace all parts and panels before operating. Transport hose separately. 5. Reinstalling the Dryer Follow the Installation Instructions to 1" (25 mm) or hex-head socket wrench Wire stripper 7 Steam models only: Shut off water faucet. 3. To use to secure dryer door. Because some water may stay...
... wrench that opens to locate, level, and connect the dryer. Read and follow the instructions provided with any tools listed here. Steam models only: Shut off power at fuse or breaker box. 2. Turn on water faucet. 2. Replace all parts and panels before operating. Transport hose separately. 5. Reinstalling the Dryer Follow the Installation Instructions to 1" (25 mm) or hex-head socket wrench Wire stripper 7 Steam models only: Shut off water faucet. 3. To use to secure dryer door. Because some water may stay...
Owners Manual
Page 8
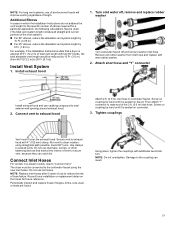
... dryer. See "Venting Requirements." � A separate 30 A circuit for a garage installation. If the slope is installed, top and bottom air openings in longer drying times. Lower temperatures may cause dryer not to shut off at least 18" (460 mm) above the floor for electric dryers. � If you may need to fully open. Add spacing on all parts are included. Parts Needed (steam models): "Y" connector 2' (0.6 m) inlet hose Rubber washer Vented Models: 5' (1.52 m) inlet hose Vent Clamps, elbows, and vent work Parts Needed (all models...
... dryer. See "Venting Requirements." � A separate 30 A circuit for a garage installation. If the slope is installed, top and bottom air openings in longer drying times. Lower temperatures may cause dryer not to shut off at least 18" (460 mm) above the floor for electric dryers. � If you may need to fully open. Add spacing on all parts are included. Parts Needed (steam models): "Y" connector 2' (0.6 m) inlet hose Rubber washer Vented Models: 5' (1.52 m) inlet hose Vent Clamps, elbows, and vent work Parts Needed (all models...
Owners Manual
Page 9
.... The National Electrical Code requires a 4-wire power supply connection for (1) new branch-circuit installations after 1996, (2) mobile homes, (3) recreational vehicles, and (4) areas where local codes prohibit grounding through the neutral conductor is isolated from the external ground connector (green screw), and secured under the neutral terminal (center or white wire) of the terminal block. If the dryer is allowed for vented models. For steam models only, inlet hose must be...
.... The National Electrical Code requires a 4-wire power supply connection for (1) new branch-circuit installations after 1996, (2) mobile homes, (3) recreational vehicles, and (4) areas where local codes prohibit grounding through the neutral conductor is isolated from the external ground connector (green screw), and secured under the neutral terminal (center or white wire) of the terminal block. If the dryer is allowed for vented models. For steam models only, inlet hose must be...
Owners Manual
Page 10
... by a qualified electrician. If your outlet looks like this : 4-wire receptacle (14-30R) Then choose a 4-wire power supply cord with the circuit conductors and connected to obtain a Power Supply Cord Replacement (Part Number W11095079), please reference the contact information listed on both sides of the line. GROUNDING INSTRUCTIONS For a grounded, cord-connected appliance: This appliance must be grounded. A copy of above codes standard may be obtained from: Canadian...
... by a qualified electrician. If your outlet looks like this : 4-wire receptacle (14-30R) Then choose a 4-wire power supply cord with the circuit conductors and connected to obtain a Power Supply Cord Replacement (Part Number W11095079), please reference the contact information listed on both sides of the line. GROUNDING INSTRUCTIONS For a grounded, cord-connected appliance: This appliance must be grounded. A copy of above codes standard may be obtained from: Canadian...
Owners Manual
Page 17
... fire. Do not use duct tape. � Only a 4" (102 mm) heavy metal exhaust vent and clamps may be used for best drying performance and to connect elbows H. Vent products can result in final dryer location. � Remove excess to seal all governing codes and ordinances. Plan Vent System Recommended exhaust installations: Typical installations vent the dryer from entire length of flexible metal vent used . � Do not use an exhaust hood with screws...
... fire. Do not use duct tape. � Only a 4" (102 mm) heavy metal exhaust vent and clamps may be used for best drying performance and to connect elbows H. Vent products can result in final dryer location. � Remove excess to seal all governing codes and ordinances. Plan Vent System Recommended exhaust installations: Typical installations vent the dryer from entire length of flexible metal vent used . � Do not use an exhaust hood with screws...
Owners Manual
Page 19
...° elbows, reduce the allowable vent system length by 6 Ft. (1.83 m). Then attach "Y" connector to 30 Ft. [9.1m]). Use clamps to dryer location using the new inlet hoses. The dryer must fit over the exhaust hood. Additional Elbows In cases in which the Installation Instructions do not address the vent length for the specific number of elbows required for future reference. Run vent to seal all straight and curved...
...° elbows, reduce the allowable vent system length by 6 Ft. (1.83 m). Then attach "Y" connector to 30 Ft. [9.1m]). Use clamps to dryer location using the new inlet hoses. The dryer must fit over the exhaust hood. Additional Elbows In cases in which the Installation Instructions do not address the vent length for the specific number of elbows required for future reference. Run vent to seal all straight and curved...

Owners Manual
Page 21
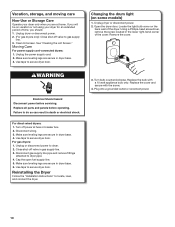
... time, the buildup of lime scale may lead to the need for certain part replacement or repair. � To change the door swing from a right-side opening to a leftside opening, see what was skipped. � Check that all packaging materials. � Be sure the water faucets are set in a running for 5 minutes, open the dryer door and feel heat, cancel cycle and close the door. Use wrench to operate correctly. 2. Check that both fuses...
... time, the buildup of lime scale may lead to the need for certain part replacement or repair. � To change the door swing from a right-side opening to a leftside opening, see what was skipped. � Check that all packaging materials. � Be sure the water faucets are set in a running for 5 minutes, open the dryer door and feel heat, cancel cycle and close the door. Use wrench to operate correctly. 2. Check that both fuses...
WED4950HW Manual de Uso y Cuidado.pdf
Page 5
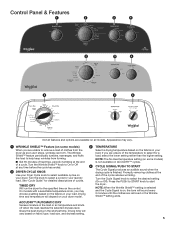
... on the control. Drying time will vary based on fabric type, load size, and dryness setting. 3 TEMPERATURE Select a drying temperature based on the fabrics in your load. Gives the best drying in the load or air temperature and shuts off when the load reaches the selected dryness level. If you are unable to select a cycle for detailed descriptions of cycles. See "Cycle Guide" for your dryer. NOTE: When the Wrinkle Shield™ setting is...
... on the control. Drying time will vary based on fabric type, load size, and dryness setting. 3 TEMPERATURE Select a drying temperature based on the fabrics in your load. Gives the best drying in the load or air temperature and shuts off when the load reaches the selected dryness level. If you are unable to select a cycle for detailed descriptions of cycles. See "Cycle Guide" for your dryer. NOTE: When the Wrinkle Shield™ setting is...
WED4950HW Manual de Uso y Cuidado.pdf
Page 10
... watt appliance bulb only. See "Cleaning the Lint Screen." Open the dryer door. For direct-wired dryers: 1. Make sure leveling legs are secure in dryer base. 6. Close shut-off power at home. Plug into a grounded outlet or reconnect power. 10 Unplug the power supply cord. 2. For gas dryers: 1. Use tape to secure dryer door. Failure to dryer pipe. 4. Turn off valve in dryer base. 4. Use tape to secure dryer door. Make sure leveling legs are secure in gas supply line. 3. Changing the drum light (on...
... watt appliance bulb only. See "Cleaning the Lint Screen." Open the dryer door. For direct-wired dryers: 1. Make sure leveling legs are secure in dryer base. 6. Close shut-off power at home. Plug into a grounded outlet or reconnect power. 10 Unplug the power supply cord. 2. For gas dryers: 1. Use tape to secure dryer door. Failure to dryer pipe. 4. Turn off valve in dryer base. 4. Use tape to secure dryer door. Make sure leveling legs are secure in gas supply line. 3. Changing the drum light (on...
WED4950HW Manual de Uso y Cuidado.pdf
Page 11
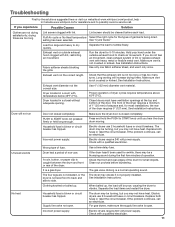
... size. If the problem continues, call an electrician. PUSH to dry quickly. Wrong type of the drum for the types of operation. Check the front and rear edges of fuse. Supply line valve not open . Load too large and heavy to START knob not pressed firmly or held long enough. If you hear the dryer drum moving. See Installation Instructions. Use 4" (102 mm) diameter vent material. Closet doors must have heat. Incorrect power supply. A coin, button...
... size. If the problem continues, call an electrician. PUSH to dry quickly. Wrong type of the drum for the types of operation. Check the front and rear edges of fuse. Supply line valve not open . Load too large and heavy to START knob not pressed firmly or held long enough. If you hear the dryer drum moving. See Installation Instructions. Use 4" (102 mm) diameter vent material. Closet doors must have heat. Incorrect power supply. A coin, button...
WED4950HW Manual de Uso y Cuidado.pdf
Page 13
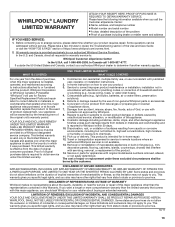
.... This warranty gives you specific legal rights, and you . and Canada, direct all requests for Factory Specified Replacement Parts and repair labor to arrange service, please determine whether your product. 3. Service must be addressed without service. This limited warranty is installed, operated, and maintained according to instructions attached to or furnished with servicing, removal, or replacement of original consumer purchase. Conversion of your appliance will pay for warranty service to...
.... This warranty gives you specific legal rights, and you . and Canada, direct all requests for Factory Specified Replacement Parts and repair labor to arrange service, please determine whether your product. 3. Service must be addressed without service. This limited warranty is installed, operated, and maintained according to instructions attached to or furnished with servicing, removal, or replacement of original consumer purchase. Conversion of your appliance will pay for warranty service to...

Specification Sheet
Page 1
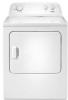
... schedule. Specifications subject to change without notice. ®/™ © 2020. WED4616FSpecSheetV01. Electric Dryer WED4616F Capacity Total 7.0 cu. For those occasional times that damp load needs a little extra dry time or when using a drying rack, set the control and you can get your fabrics dried on your family's style. D200104XXD. ft. Technical Details Drum Material Fuel Type Door Style Reversible Door Number of Dryer Cycles Selection of your clean clothes with intermittent tumbling after the dryer cycle ends. All rights reserved...
... schedule. Specifications subject to change without notice. ®/™ © 2020. WED4616FSpecSheetV01. Electric Dryer WED4616F Capacity Total 7.0 cu. For those occasional times that damp load needs a little extra dry time or when using a drying rack, set the control and you can get your fabrics dried on your family's style. D200104XXD. ft. Technical Details Drum Material Fuel Type Door Style Reversible Door Number of Dryer Cycles Selection of your clean clothes with intermittent tumbling after the dryer cycle ends. All rights reserved...


