Owners Manual
Page 1
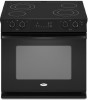
www.whirlpool.com Table of Contents 2 W10175572A ® DROP-IN ELECTRIC RANGES Use & Care Guide For questions about features, operation/performance, parts, accessories or service, call: 1-800-253-1301. or visit our website at...
www.whirlpool.com Table of Contents 2 W10175572A ® DROP-IN ELECTRIC RANGES Use & Care Guide For questions about features, operation/performance, parts, accessories or service, call: 1-800-253-1301. or visit our website at...
Owners Manual
Page 2
TABLE OF CONTENTS RANGE SAFETY 3 The Anti-Tip Bracket 3 COOKTOP USE 5 Cooktop Controls 5 Coil Elements and Burner Bowls 5 Dual Size Element 6 Ceramic Glass (on some models 6 Home Canning 7 Cookware 7 ... 10 Bakeware 10 Oven Vent 11 Meat Thermometer 11 Baking 11 Cook & Hold 11 Keep Warm 12 Broiling 12 Automatic Shut-Off/Sabbath Mode 13 RANGE CARE 13 Self-Cleaning Cycle (on some models 13 General Cleaning 14 Oven Light 16 Oven Door 16 TROUBLESHOOTING 17 ASSISTANCE OR SERVICE 18 In...
TABLE OF CONTENTS RANGE SAFETY 3 The Anti-Tip Bracket 3 COOKTOP USE 5 Cooktop Controls 5 Coil Elements and Burner Bowls 5 Dual Size Element 6 Ceramic Glass (on some models 6 Home Canning 7 Cookware 7 ... 10 Bakeware 10 Oven Vent 11 Meat Thermometer 11 Baking 11 Cook & Hold 11 Keep Warm 12 Broiling 12 Automatic Shut-Off/Sabbath Mode 13 RANGE CARE 13 Self-Cleaning Cycle (on some models 13 General Cleaning 14 Oven Light 16 Oven Door 16 TROUBLESHOOTING 17 ASSISTANCE OR SERVICE 18 In...
Owners Manual
Page 3
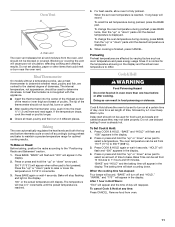
...seriously injured if you apply too much force or weight to floor or wall. • Slide range back so rear range foot is under anti-tip bracket. Failure to follow instructions. Range Foot Anti-Tip Bracket Making sure the anti-tip bracket is moved. The California Safe Drinking...have provided many important safety messages in death or serious burns to such substances. However, the range can tip the range and be killed. Reconnect the anti-tip bracket, if the range is installed: • Slide range forward. • Look for details. All safety messages will not tip during normal use....
...seriously injured if you apply too much force or weight to floor or wall. • Slide range back so rear range foot is under anti-tip bracket. Failure to follow instructions. Range Foot Anti-Tip Bracket Making sure the anti-tip bracket is moved. The California Safe Drinking...have provided many important safety messages in death or serious burns to such substances. However, the range can tip the range and be killed. Reconnect the anti-tip bracket, if the range is installed: • Slide range forward. • Look for details. All safety messages will not tip during normal use....
Owners Manual
Page 4
... AND SLIDE RANGE BACK SO REAR RANGE FOOT IS UNDER ANTI-TIP BRACKET. ■ CAUTION: Do not store items of interest to children in the manual. Loose-fitting or hanging garments should break, cleaning solutions and spillovers may penetrate the broken cooktop and create a risk of electric shock... to cover the surface unit heating element. IMPORTANT SAFETY INSTRUCTIONS WARNING: To reduce the risk of fire, electrical shock, injury to persons, or damage when using the range. ■ User Servicing - Some cleaners can produce noxious fumes if applied to line surface unit drip ...
... AND SLIDE RANGE BACK SO REAR RANGE FOOT IS UNDER ANTI-TIP BRACKET. ■ CAUTION: Do not store items of interest to children in the manual. Loose-fitting or hanging garments should break, cleaning solutions and spillovers may penetrate the broken cooktop and create a risk of electric shock... to cover the surface unit heating element. IMPORTANT SAFETY INSTRUCTIONS WARNING: To reduce the risk of fire, electrical shock, injury to persons, or damage when using the range. ■ User Servicing - Some cleaners can produce noxious fumes if applied to line surface unit drip ...
Owners Manual
Page 5
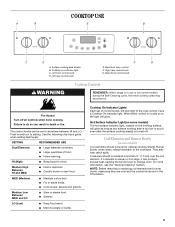
... ■ Stew or steam food. ■ Simmer. COOKTOP USE A B E B C D A. Electronic oven control F. Right rear control knob G. Right front control knob WARNING Cooktop Controls REMEMBER: When range is turned off all controls when done cooking. Failure to do so can produce excess heat, causing the burner bowl to touch, even after the...
... ■ Stew or steam food. ■ Simmer. COOKTOP USE A B E B C D A. Electronic oven control F. Right rear control knob G. Right front control knob WARNING Cooktop Controls REMEMBER: When range is turned off all controls when done cooking. Failure to do so can produce excess heat, causing the burner bowl to touch, even after the...
Owners Manual
Page 8
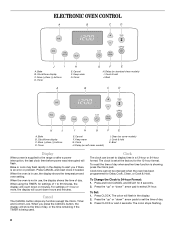
Clock A B G F E H. Bake B. Timer I . Cook & hold CANCEL and DELAY for settings of 1 to 59 minutes, the display will flash in the display to the range or after a power interruption, the last clock time before power was interrupted will count down in use , the display shows the time of 1 hour or ...
Clock A B G F E H. Bake B. Timer I . Cook & hold CANCEL and DELAY for settings of 1 to 59 minutes, the display will flash in the display to the range or after a power interruption, the last clock time before power was interrupted will count down in use , the display shows the time of 1 hour or ...
Owners Manual
Page 9
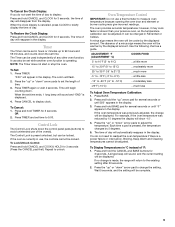
...start or stop the oven. The colon will appear in the display. 3. Oven Temperature Control IMPORTANT: Do not use a thermometer to the existing setting after 30 seconds. 2. Press and hold CANCEL and COOK & HOLD for 3 seconds (Press the CANCEL pad first.) Repeat to display: Press and hold CANCEL and... hold the "up " or "down " arrow pad to change is displayed. 4. A minus sign means the oven will sound and "END" is made, the range will begin counting down the control panel pads (buttons) to briefly display the time of day will show -15°. 4. the time of day. The...
...start or stop the oven. The colon will appear in the display. 3. Oven Temperature Control IMPORTANT: Do not use a thermometer to the existing setting after 30 seconds. 2. Press and hold CANCEL and COOK & HOLD for 3 seconds (Press the CANCEL pad first.) Repeat to display: Press and hold CANCEL and... hold the "up " or "down " arrow pad to change is displayed. 4. A minus sign means the oven will sound and "END" is made, the range will begin counting down the control panel pads (buttons) to briefly display the time of day will show -15°. 4. the time of day. The...
Owners Manual
Page 11
... top and bottom elements cycle on at any time: Press CANCEL. To Bake or Roast: Before baking, position the racks according to maintain a precise temperature range for food such as room temperature and peak energy usage times. "BAKE" will flash and "000" will rise in the display. 2. Press or press and...
... top and bottom elements cycle on at any time: Press CANCEL. To Bake or Roast: Before baking, position the racks according to maintain a precise temperature range for food such as room temperature and peak energy usage times. "BAKE" will flash and "000" will rise in the display. 2. Press or press and...
Owners Manual
Page 13
... if the touchpads are locked out or when the door is locked. ■ If the oven is baking when Sabbath Mode is extremely sensitive to slide. RANGE CARE Self-Cleaning Cycle (on . ■ Sabbath Mode cannot be displayed if a bake cycle is in use while the oven is essential for 5 seconds. Keep...
... if the touchpads are locked out or when the door is locked. ■ If the oven is baking when Sabbath Mode is extremely sensitive to slide. RANGE CARE Self-Cleaning Cycle (on . ■ Sabbath Mode cannot be displayed if a bake cycle is in use while the oven is essential for 5 seconds. Keep...
Owners Manual
Page 14
.... To Stop Self-Clean Anytime: Press CANCEL. These spills may remove numbers. STAINLESS STEEL (on some models) Food spills containing acids, such as the entire range is cool. The oven light will appear in the display. CL-M (Clean - If more than 5 seconds elapse between 3 hours and 4 hours for a delayed clean operation...
.... To Stop Self-Clean Anytime: Press CANCEL. These spills may remove numbers. STAINLESS STEEL (on some models) Food spills containing acids, such as the entire range is cool. The oven light will appear in the display. CL-M (Clean - If more than 5 seconds elapse between 3 hours and 4 hours for a delayed clean operation...
Owners Manual
Page 16
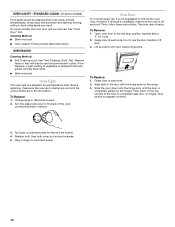
... coating of the oven counterclockwise to remove. To Replace: 1. Open oven door to remove from socket. 4. Align slots in the off and cool. Unplug range or disconnect power. 2. However, if removal is not suggested to lift door. 3. Do not use , it is necessary, make sure the oven and ...of the door to slide. Remove racks or they will help them slide. ■ Steel-wool pad Oven Light The oven light is heavy. Plug in the back of vegetable oil applied to the rack guides will discolor and become harder to completely seat door on the range. 3. Replace bulb,...
... coating of the oven counterclockwise to remove. To Replace: 1. Open oven door to remove from socket. 4. Align slots in the off and cool. Unplug range or disconnect power. 2. However, if removal is not suggested to lift door. 3. Do not use , it is necessary, make sure the oven and ...of the door to slide. Remove racks or they will help them slide. ■ Steel-wool pad Oven Light The oven light is heavy. Plug in the back of vegetable oil applied to the rack guides will discolor and become harder to completely seat door on the range. 3. Replace bulb,...
Owners Manual
Page 17
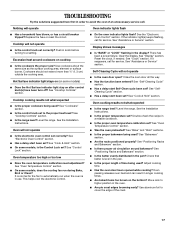
... time. ■ Has the oven door been opened while cooking? Move rack to a setting. See "Cooktop Controls" section. ■ Is the range level? Display shows messages ■ Is "BAKE" or "LOCK" flashing in the pan? Close the oven door all the way. ■ Has...See "Bakeware" section. ■ Are the racks positioned properly? Excessive heat around bakeware? Cooktop cooking results not what expected ■ Is the range level? It is normal for service. This helps cool the electronic control. ■ Do the oven indicator lights flash? Nothing will not operate ...
... time. ■ Has the oven door been opened while cooking? Move rack to a setting. See "Cooktop Controls" section. ■ Is the range level? Display shows messages ■ Is "BAKE" or "LOCK" flashing in the pan? Close the oven door all the way. ■ Has...See "Bakeware" section. ■ Are the racks positioned properly? Excessive heat around bakeware? Cooktop cooking results not what expected ■ Is the range level? It is normal for service. This helps cool the electronic control. ■ Do the oven indicator lights flash? Nothing will not operate ...
Dimension Guide
Page 1
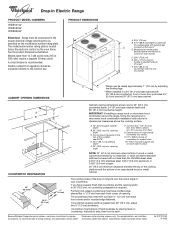
... not less than ¹⁄₄" (0.64 cm) flame retardant millboard covered with not less than 30" (76.2 cm), adjust the ³⁄₈" (1.0 cm) dimension. A C B D...back ³⁄₈" (1.0 cm) from appliance should not extend into cutout. Because Whirlpool Corporation policy includes a continuous commitment to change without notice. See the product dimensions illustration....legs. **When installed in Electric Range PRODUCT MODEL NUMBERS WDE101LV WDE150LV WDE350LV Electrical: Range must be connnected to the proper electrical voltage and frequency as ...
... not less than ¹⁄₄" (0.64 cm) flame retardant millboard covered with not less than 30" (76.2 cm), adjust the ³⁄₈" (1.0 cm) dimension. A C B D...back ³⁄₈" (1.0 cm) from appliance should not extend into cutout. Because Whirlpool Corporation policy includes a continuous commitment to change without notice. See the product dimensions illustration....legs. **When installed in Electric Range PRODUCT MODEL NUMBERS WDE101LV WDE150LV WDE350LV Electrical: Range must be connnected to the proper electrical voltage and frequency as ...
Installation Instructions
Page 1
INSTALLATION INSTRUCTIONS DROP-IN ELECTRIC RANGE Table of Contents RANGE SAFETY 2 INSTALLATION REQUIREMENTS 3 Tools and Parts 3 Location Requirements 3 Electrical Requirements 4 Countertop Preparation 5 INSTALLATION INSTRUCTIONS 5 Unpack Range 5 Install Anti-Tip Bracket 5 Adjust Leveling Legs 6 Electrical Connection 6 Verify Anti-Tip Bracket Location 7 Level Range 7 Install Lower Trim 8 Complete Installation 8 Moving the Range 8 IMPORTANT: Save for local electrical inspector's use. 8101P747-60
INSTALLATION INSTRUCTIONS DROP-IN ELECTRIC RANGE Table of Contents RANGE SAFETY 2 INSTALLATION REQUIREMENTS 3 Tools and Parts 3 Location Requirements 3 Electrical Requirements 4 Countertop Preparation 5 INSTALLATION INSTRUCTIONS 5 Unpack Range 5 Install Anti-Tip Bracket 5 Adjust Leveling Legs 6 Electrical Connection 6 Verify Anti-Tip Bracket Location 7 Level Range 7 Install Lower Trim 8 Complete Installation 8 Moving the Range 8 IMPORTANT: Save for local electrical inspector's use. 8101P747-60

Installation Instructions
Page 2
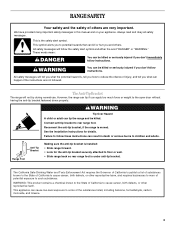
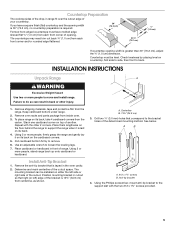
.... Connect anti-tip bracket to follow these instructions can be killed or seriously injured if you don't follow instructions. Failure to rear range foot. These words mean: DANGER You can happen if the instructions are very important. All safety messages will follow the safety alert ...symbol and either the word "DANGER" or "WARNING." RANGE SAFETY Your safety and the safety of injury, and tell you what can be killed or seriously injured if you don't immediately follow ...
.... Connect anti-tip bracket to follow these instructions can be killed or seriously injured if you don't follow instructions. Failure to rear range foot. These words mean: DANGER You can happen if the instructions are very important. All safety messages will follow the safety alert ...symbol and either the word "DANGER" or "WARNING." RANGE SAFETY Your safety and the safety of injury, and tell you what can be killed or seriously injured if you don't immediately follow ...
Installation Instructions
Page 3
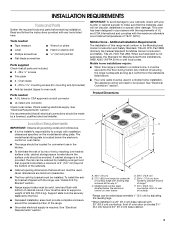
...Support slats must be securely fastened to the floor. ■ Recessed installation area must be able to the floor during transit. C F B* D E** A. 30³⁄₄" (78 cm) B. 27¹⁄₂" (69.9 cm) height to be reduced by adjusting the leveling legs. **When installed in accordance...24, HUD Part 280). It is adequate as long as it must provide complete enclosure around the recessed portion of the range. ■ Grounded electrical supply is to the Manufactured Home Construction and Safety Standard, Title 24 CFR, Part 3280 (formerly the Federal Standard for ...
...Support slats must be securely fastened to the floor. ■ Recessed installation area must be able to the floor during transit. C F B* D E** A. 30³⁄₄" (78 cm) B. 27¹⁄₂" (69.9 cm) height to be reduced by adjusting the leveling legs. **When installed in accordance...24, HUD Part 280). It is adequate as long as it must provide complete enclosure around the recessed portion of the range. ■ Grounded electrical supply is to the Manufactured Home Construction and Safety Standard, Title 24 CFR, Part 3280 (formerly the Federal Standard for ...

Installation Instructions
Page 4
...are in conformance with local codes. The model/serial number rating plate is recommended that a qualified electrical installer determine that the electrical connection and wire size are not sure the range is recommended. ■ Flexible conduit from : National Fire Protection Association One Batterymarch Park Quincy, ...less than No. 28 MSG sheet steel, 0.015" (0.4 mm) stainless steel, 0.024" (0.6 mm) aluminum or 0.020" (0.5 mm) copper. 30" (76.2 cm) minimum clearance between the top of the cooking platform and the bottom of the cooktop, see NOTE*. Check with local codes and ...
...are in conformance with local codes. The model/serial number rating plate is recommended that a qualified electrical installer determine that the electrical connection and wire size are not sure the range is recommended. ■ Flexible conduit from : National Fire Protection Association One Batterymarch Park Quincy, ...less than No. 28 MSG sheet steel, 0.015" (0.4 mm) stainless steel, 0.024" (0.6 mm) aluminum or 0.020" (0.5 mm) copper. 30" (76.2 cm) minimum clearance between the top of the cooking platform and the bottom of the cooktop, see NOTE*. Check with local codes and ...
Installation Instructions
Page 5
... If you have molded edge shaved flat ³⁄₈" (1.0 cm) from the range. Countertop must have a square finish (flat) countertop and the opening width is 30" (76.2 cm), no countertop preparation is required. 30" (76.2 cm) Formed front-edged countertops must be installed on its back. 4. ...corners. 5. Position mounting bracket in cutout so that is greater than 30" (76.2 cm), adjust the ³⁄₈" (1.0 cm) dimension. See below. Countertop Preparation The cooktop sides of the drop-in range fit over the cutout edge of the cutout space. Remove oven ...
... If you have molded edge shaved flat ³⁄₈" (1.0 cm) from the range. Countertop must have a square finish (flat) countertop and the opening width is 30" (76.2 cm), no countertop preparation is required. 30" (76.2 cm) Formed front-edged countertops must be installed on its back. 4. ...corners. 5. Position mounting bracket in cutout so that is greater than 30" (76.2 cm), adjust the ³⁄₈" (1.0 cm) dimension. See below. Countertop Preparation The cooktop sides of the drop-in range fit over the cutout edge of the cutout space. Remove oven ...
Installation Instructions
Page 6
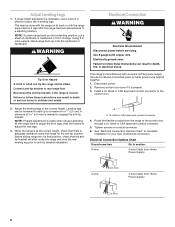
...child or adult can result in death, fire, or electrical shock. Reconnect the anti-tip bracket, if the range is manufactured with the range on its final position, check that there is present. 3. This range is moved. Before sliding range into a standing position, put a sheet of cardboard or...wire 4-wire Cable from Home Power Supply 3-wire ½" (1.3 cm) 3-wire Cable from the range to the junction box. 2. Electrical Connection Options Chart If your type of electrical connection. UL listed or CSA approved conduit connector 4. Remove junction box cover if it is adequate ...
...child or adult can result in death, fire, or electrical shock. Reconnect the anti-tip bracket, if the range is manufactured with the range on its final position, check that there is present. 3. This range is moved. Before sliding range into a standing position, put a sheet of cardboard or...wire 4-wire Cable from Home Power Supply 3-wire ½" (1.3 cm) 3-wire Cable from the range to the junction box. 2. Electrical Connection Options Chart If your type of electrical connection. UL listed or CSA approved conduit connector 4. Remove junction box cover if it is adequate ...
Installation Instructions
Page 7
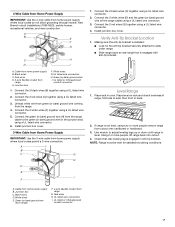
... conduit connector 1. A B C G H D E I A. Making sure the anti-tip bracket is engaged with anti-tip bracket. White wires E. White wires G. Use wrench to slats under range. ■ Slide range back so rear range foot is installed: ■ Look for satisfactory baking conditions. Connect the 2 black wires (C) together using a UL listed wire connector. 4. Using 2 or more people...
... conduit connector 1. A B C G H D E I A. Making sure the anti-tip bracket is engaged with anti-tip bracket. White wires E. White wires G. Use wrench to slats under range. ■ Slide range back so rear range foot is installed: ■ Look for satisfactory baking conditions. Connect the 2 black wires (C) together using a UL listed wire connector. 4. Using 2 or more people...


