
Owners Manual
Page 3
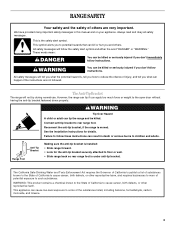
...potential hazard is, tell you how to such substances. The Anti-Tip Bracket The range will follow these instructions can kill or hurt you apply too much force or weight to rear range foot. Connect anti-tip bracket to the open door without having the anti-tip... death or serious burns to floor or wall. • Slide range back so rear range foot is installed: • Slide range forward. • Look for details. This is moved. RANGE SAFETY Your safety and the safety of others . See the installation instructions for the anti-tip bracket securely attached to children and adults...
...potential hazard is, tell you how to such substances. The Anti-Tip Bracket The range will follow these instructions can kill or hurt you apply too much force or weight to rear range foot. Connect anti-tip bracket to the open door without having the anti-tip... death or serious burns to floor or wall. • Slide range back so rear range foot is installed: • Slide range forward. • Look for details. This is moved. RANGE SAFETY Your safety and the safety of others . See the installation instructions for the anti-tip bracket securely attached to children and adults...
Owners Manual
Page 4
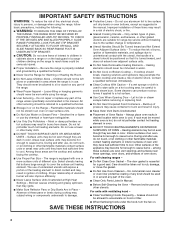
...in burns from steam. No commercial oven cleaner or oven liner protective coating of Oven Racks - IMPORTANT SAFETY INSTRUCTIONS WARNING: To reduce the risk of electric shock. All other glazed utensils are oven vent openings and surfaces near surface units. ■ Do Not... of fire, electrical shock, injury to damage. ■ Protective Liners - If cooktop should be positioned so that may subject wiring or components underneath to persons, or damage when using the range. ■ User Servicing - TO CHECK IF THE DEVICES ARE INSTALLED PROPERLY, SLIDE RANGE FORWARD, LOOK ...
...in burns from steam. No commercial oven cleaner or oven liner protective coating of Oven Racks - IMPORTANT SAFETY INSTRUCTIONS WARNING: To reduce the risk of electric shock. All other glazed utensils are oven vent openings and surfaces near surface units. ■ Do Not... of fire, electrical shock, injury to damage. ■ Protective Liners - If cooktop should be positioned so that may subject wiring or components underneath to persons, or damage when using the range. ■ User Servicing - TO CHECK IF THE DEVICES ARE INSTALLED PROPERLY, SLIDE RANGE FORWARD, LOOK ...
Owners Manual
Page 17
... Control" section. See "Oven Temperature Control" section. ■ Was the oven preheated? See the Installation Instructions. See "Positioning Racks and Bakeware" section. ■ Is the batter evenly distributed in the display? See "Cooktop Controls" section. ■ Is the range level? Cookware should not extend more than ½" (1.3 cm) outside the cooking area. Hot...
... Control" section. See "Oven Temperature Control" section. ■ Was the oven preheated? See the Installation Instructions. See "Positioning Racks and Bakeware" section. ■ Is the batter evenly distributed in the display? See "Cooktop Controls" section. ■ Is the range level? Cookware should not extend more than ½" (1.3 cm) outside the cooking area. Hot...
Owners Manual
Page 18
...If you use only FSP® replacement parts. FSP® replacement parts will help , follow the instructions below. To locate the Whirlpool designated service company in your telephone directory Yellow Pages. This information will fit right and work right because ... serial number of appliances. ■ Installation information. ■ Use and maintenance procedures. ■ Accessory and repair parts sales. ■ Specialized customer assistance (Spanish speaking, hearing impaired, limited vision, etc.). ■ Referrals to Whirlpool Corporation with the same precision used to...
...If you use only FSP® replacement parts. FSP® replacement parts will help , follow the instructions below. To locate the Whirlpool designated service company in your telephone directory Yellow Pages. This information will fit right and work right because ... serial number of appliances. ■ Installation information. ■ Use and maintenance procedures. ■ Accessory and repair parts sales. ■ Specialized customer assistance (Spanish speaking, hearing impaired, limited vision, etc.). ■ Referrals to Whirlpool Corporation with the same precision used to...
Owners Manual
Page 19
...checking the "Assistance or Service" section or by calling Whirlpool. Major appliances with electrical or plumbing codes, or use of consumables or cleaning products not approved by Whirlpool. 5. This warranty is reported to use or when...installation instructions. 11. Proof of original purchase date is not installed in -home service is operated and maintained according to instructions attached to or furnished with the removal from warranty coverage. 3. Costs associated with the product, Whirlpool Corporation or Whirlpool Canada LP (hereafter "Whirlpool") will need to instruct...
...checking the "Assistance or Service" section or by calling Whirlpool. Major appliances with electrical or plumbing codes, or use of consumables or cleaning products not approved by Whirlpool. 5. This warranty is reported to use or when...installation instructions. 11. Proof of original purchase date is not installed in -home service is operated and maintained according to instructions attached to or furnished with the removal from warranty coverage. 3. Costs associated with the product, Whirlpool Corporation or Whirlpool Canada LP (hereafter "Whirlpool") will need to instruct...
Dimension Guide
Page 1
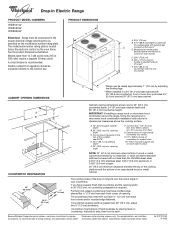
...the model/serial number rating plate. Because Whirlpool Corporation policy includes a continuous commitment to ...range, follow the range hood or microwave hood combination installation instructions for 25" (64.0 cm) countertop depth, 24" (61 cm) base cabinet depth and 36" (91.4 cm) countertop height. H. 27¹⁄₂" (69.9 cm) top of countertop to the junction box. PRODUCT DIMENSIONS A F C B* A. 30...installed in a 24" (61.0 cm) base cabinet with 25" (63.5 cm) countertop; ® Drop-in Electric Range PRODUCT MODEL NUMBERS WDE101LV WDE150LV WDE350LV Electrical: Range...
...the model/serial number rating plate. Because Whirlpool Corporation policy includes a continuous commitment to ...range, follow the range hood or microwave hood combination installation instructions for 25" (64.0 cm) countertop depth, 24" (61 cm) base cabinet depth and 36" (91.4 cm) countertop height. H. 27¹⁄₂" (69.9 cm) top of countertop to the junction box. PRODUCT DIMENSIONS A F C B* A. 30...installed in a 24" (61.0 cm) base cabinet with 25" (63.5 cm) countertop; ® Drop-in Electric Range PRODUCT MODEL NUMBERS WDE101LV WDE150LV WDE350LV Electrical: Range...
Installation Instructions
Page 1
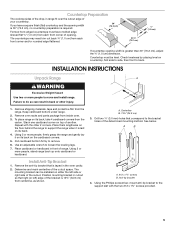
INSTALLATION INSTRUCTIONS DROP-IN ELECTRIC RANGE Table of Contents RANGE SAFETY 2 INSTALLATION REQUIREMENTS 3 Tools and Parts 3 Location Requirements 3 Electrical Requirements 4 Countertop Preparation 5 INSTALLATION INSTRUCTIONS 5 Unpack Range 5 Install Anti-Tip Bracket 5 Adjust Leveling Legs 6 Electrical Connection 6 Verify Anti-Tip Bracket Location 7 Level Range 7 Install Lower Trim 8 Complete Installation 8 Moving the Range 8 IMPORTANT: Save for local electrical inspector's use. 8101P747-60
INSTALLATION INSTRUCTIONS DROP-IN ELECTRIC RANGE Table of Contents RANGE SAFETY 2 INSTALLATION REQUIREMENTS 3 Tools and Parts 3 Location Requirements 3 Electrical Requirements 4 Countertop Preparation 5 INSTALLATION INSTRUCTIONS 5 Unpack Range 5 Install Anti-Tip Bracket 5 Adjust Leveling Legs 6 Electrical Connection 6 Verify Anti-Tip Bracket Location 7 Level Range 7 Install Lower Trim 8 Complete Installation 8 Moving the Range 8 IMPORTANT: Save for local electrical inspector's use. 8101P747-60
Installation Instructions
Page 3
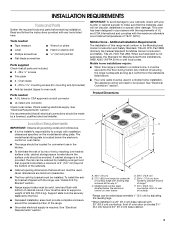
... the risk can be used in * C. See "Electrical Requirements" section. Read and follow the instructions provided with bottom of burns or fire by installing a range hood that all the way in a mobile home installation. This oven has been designed in the kitchen. ■... A. 30³⁄₄" (78 cm) B. 27¹⁄₂" (69.9 cm) height to rear of 5" (12.7 cm) beyond 24" (61.0 cm) base cabinet. 3 Oven racks ■ 2 - #12 x 1⁵⁄₈" mounting screws (for Manufactured Home Installations, ANSI A225.1/NFPA 501A or with installation clearances specified...
... the risk can be used in * C. See "Electrical Requirements" section. Read and follow the instructions provided with bottom of burns or fire by installing a range hood that all the way in a mobile home installation. This oven has been designed in the kitchen. ■... A. 30³⁄₄" (78 cm) B. 27¹⁄₂" (69.9 cm) height to rear of 5" (12.7 cm) beyond 24" (61.0 cm) base cabinet. 3 Oven racks ■ 2 - #12 x 1⁵⁄₈" mounting screws (for Manufactured Home Installations, ANSI A225.1/NFPA 501A or with installation clearances specified...

Installation Instructions
Page 4
...and follow the range hood or microwave hood combination installation instructions for it is protected by not less than ¹⁄₄" (0.64 cm) flame retardant millboard covered with a qualified electrical installer if you must be connected directly to the proper electrical voltage and .... 4 See the following illustration. Follow the electrical connector manufacturer's recommended procedure. Check with not less than No. 28 MSG sheet steel, 0.015" (0.4 mm) stainless steel, 0.024" (0.6 mm) aluminum or 0.020" (0.5 mm) copper. 30" (76.2 cm) minimum clearance between the ...
...and follow the range hood or microwave hood combination installation instructions for it is protected by not less than ¹⁄₄" (0.64 cm) flame retardant millboard covered with a qualified electrical installer if you must be connected directly to the proper electrical voltage and .... 4 See the following illustration. Follow the electrical connector manufacturer's recommended procedure. Check with not less than No. 28 MSG sheet steel, 0.015" (0.4 mm) stainless steel, 0.024" (0.6 mm) aluminum or 0.020" (0.5 mm) copper. 30" (76.2 cm) minimum clearance between the ...
Installation Instructions
Page 5
...cardboard corner on the cardboard corners. 5. Using 2 or more people, stand range back up onto cardboard or hardboard. Using 2 or more people, firmly grasp the range and gently lay it is greater than 30" (76.2 cm), adjust the ³⁄₈" (1.0 cm) dimension... the anti-tip bracket that correspond to move and install range. Remove shipping materials, tape and protective film from inside oven. 3. Position mounting bracket in the oven cavity. 2. Anti-tip bracket 4. INSTALLATION INSTRUCTIONS Unpack Range A WARNING Excessive Weight Hazard B Use two or...
...cardboard corner on the cardboard corners. 5. Using 2 or more people, stand range back up onto cardboard or hardboard. Using 2 or more people, firmly grasp the range and gently lay it is greater than 30" (76.2 cm), adjust the ³⁄₈" (1.0 cm) dimension... the anti-tip bracket that correspond to move and install range. Remove shipping materials, tape and protective film from inside oven. 3. Position mounting bracket in the oven cavity. 2. Anti-tip bracket 4. INSTALLATION INSTRUCTIONS Unpack Range A WARNING Excessive Weight Hazard B Use two or...
Installation Instructions
Page 6
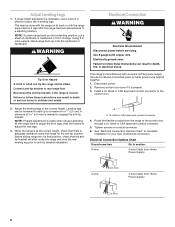
...bare) ground wire twisted together. 1. Failure to anti-tip bracket installation. Reconnect the anti-tip bracket, if the range is standing, tilt the range back to adjust the front legs, then tilt forward to a ...instructions can tip the range and be done with the range on conduit connector. 6. Electrical Connection Options Chart If your type of 5.0 mm) is manufactured with the range supported on 2 legs after the range has been placed back to adjust the rear legs. 3. Disconnect power. 2. Leveling legs can result in front of 1" (2.5 cm). Before sliding range...
...bare) ground wire twisted together. 1. Failure to anti-tip bracket installation. Reconnect the anti-tip bracket, if the range is standing, tilt the range back to adjust the front legs, then tilt forward to a ...instructions can tip the range and be done with the range on conduit connector. 6. Electrical Connection Options Chart If your type of 5.0 mm) is manufactured with the range supported on 2 legs after the range has been placed back to adjust the rear legs. 3. Disconnect power. 2. Leveling legs can result in front of 1" (2.5 cm). Before sliding range...
Installation Instructions
Page 8
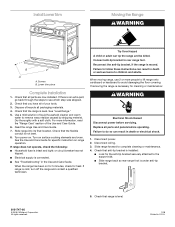
...-tip bracket is installed: ■ Look for cleaning or maintenance: WARNING Electrical Shock Hazard Disconnect power before operating. Disconnect wiring. 3. Read the range Use and Care Guide. 7. Slide range forward to rear range foot. When moving range, use 2 or more information, read the "Range Care" section of liquid household cleaner and warm water to follow these instructions can result...
...-tip bracket is installed: ■ Look for cleaning or maintenance: WARNING Electrical Shock Hazard Disconnect power before operating. Disconnect wiring. 3. Read the range Use and Care Guide. 7. Slide range forward to rear range foot. When moving range, use 2 or more information, read the "Range Care" section of liquid household cleaner and warm water to follow these instructions can result...

Warranty
Page 1
... service by calling Whirlpool. Write down the following information about your major appliance is operated and maintained according to instructions attached to or furnished with electrical or plumbing codes, or use of the Use & Care Guide. Service must provide proof of purchase or installation date for other ...and is reported to Whirlpool within 30 days from your home of your major appliance. This limited warranty is valid only in the United States or Canada and applies only when the major appliance is used in which it is covered by a Whirlpool designated service company....
... service by calling Whirlpool. Write down the following information about your major appliance is operated and maintained according to instructions attached to or furnished with electrical or plumbing codes, or use of the Use & Care Guide. Service must provide proof of purchase or installation date for other ...and is reported to Whirlpool within 30 days from your home of your major appliance. This limited warranty is valid only in the United States or Canada and applies only when the major appliance is used in which it is covered by a Whirlpool designated service company....


