Owners Manual
Page 2
... OF CONTENTS RANGE SAFETY 3 The Anti-Tip Bracket 3 COOKTOP USE 5 Cooktop Controls 5 Coil Elements and Burner Bowls 5 Dual Size Element 6 Ceramic Glass (on some models 6 Home Canning 7 Cookware 7 ELECTRONIC OVEN CONTROL 8 Display 8 Cancel 8 Clock 8 Timer 9 Control Lock 9 Oven Temperature Control 9 OVEN USE 10 Aluminum Foil 10...Hold 11 Keep Warm 12 Broiling 12 Automatic Shut-Off/Sabbath Mode 13 RANGE CARE 13 Self-Cleaning Cycle (on some models 13 General Cleaning 14 Oven Light 16 Oven Door 16 TROUBLESHOOTING 17 ASSISTANCE OR SERVICE 18 In the U.S.A 18 WARRANTY 19 2
... OF CONTENTS RANGE SAFETY 3 The Anti-Tip Bracket 3 COOKTOP USE 5 Cooktop Controls 5 Coil Elements and Burner Bowls 5 Dual Size Element 6 Ceramic Glass (on some models 6 Home Canning 7 Cookware 7 ELECTRONIC OVEN CONTROL 8 Display 8 Cancel 8 Clock 8 Timer 9 Control Lock 9 Oven Temperature Control 9 OVEN USE 10 Aluminum Foil 10...Hold 11 Keep Warm 12 Broiling 12 Automatic Shut-Off/Sabbath Mode 13 RANGE CARE 13 Self-Cleaning Cycle (on some models 13 General Cleaning 14 Oven Light 16 Oven Door 16 TROUBLESHOOTING 17 ASSISTANCE OR SERVICE 18 In the U.S.A 18 WARRANTY 19 2
Owners Manual
Page 5
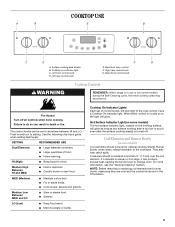
... knob D. When either control on a side is uneven or too large, it can result in and turn to the cookware. Cooktop on some models) Coil elements should not extend more information, see the "General Cleaning" section. Electronic oven control F. Right rear control knob G. Fire Hazard Turn...Low Between MED and LO ■ Stew or steam food. ■ Simmer. Hot Surface Indicator Light (on some models) The hot surface indicator light, located on some models) during the Self-Cleaning cycle, the entire cooktop area may become hot. They also help catch spills. Coil Elements...
... knob D. When either control on a side is uneven or too large, it can result in and turn to the cookware. Cooktop on some models) Coil elements should not extend more information, see the "General Cleaning" section. Electronic oven control F. Right rear control knob G. Fire Hazard Turn...Low Between MED and LO ■ Stew or steam food. ■ Simmer. Hot Surface Indicator Light (on some models) The hot surface indicator light, located on some models) during the Self-Cleaning cycle, the entire cooktop area may become hot. They also help catch spills. Coil Elements...
Owners Manual
Page 6
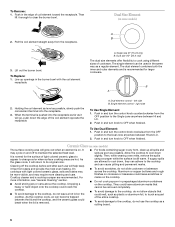
...not cook popcorn in the burner bowl with light colored ceramic glass, soils and stains may be more visible, and may cycle on some models) The surface cooking area will return to change color when surface cooking areas are recommended. They could melt, such as plastic or aluminum ...foil, to touch any form, clean up openings in prepackaged aluminum containers on some models) A B 2. Lift out the burner bowl. Allow the cooktop to cool down , they can adhere to the cooktop and can be removed completely. ...
...not cook popcorn in the burner bowl with light colored ceramic glass, soils and stains may be more visible, and may cycle on some models) The surface cooking area will return to change color when surface cooking areas are recommended. They could melt, such as plastic or aluminum ...foil, to touch any form, clean up openings in prepackaged aluminum containers on some models) A B 2. Lift out the burner bowl. Allow the cooktop to cool down , they can adhere to the cooktop and can be removed completely. ...
Owners Manual
Page 8
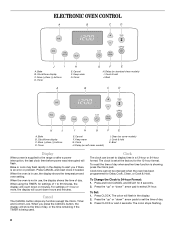
...used. To recall the time of day. 3. To Change the Clock to display time in minutes. Timer H E. More (+)/less (-) buttons D. Clean (on standard-clean models) I . To Set: 1. Press CLOCK. Press the "up " or "down "' arrow pads to 59 minutes, the display will show the time of day. Delay... (on some models) J. When the oven is supplied to select 24 hour. When you if there is set to 24-hour Format: 1. Cook & hold CANCEL and DELAY...
...used. To recall the time of day. 3. To Change the Clock to display time in minutes. Timer H E. More (+)/less (-) buttons D. Clean (on standard-clean models) I . To Set: 1. Press CLOCK. Press the "up " or "down "' arrow pads to 59 minutes, the display will show the time of day. Delay... (on some models) J. When the oven is supplied to select 24 hour. When you if there is set to 24-hour Format: 1. Cook & hold CANCEL and DELAY...
Owners Manual
Page 10
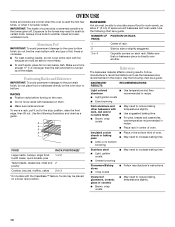
... RACK POSITION(S)* Large roasts, turkeys, angel food, bundt cakes, quick breads, pies 1 or 2 Yeast breads, casseroles, meat and 2 poultry Cookies, biscuits, muffins, cakes 2 or 3 *On models with foil because air must be able to move birds to the stop position, raise the front edge, then lift out. Insulated cookie sheets or...
... RACK POSITION(S)* Large roasts, turkeys, angel food, bundt cakes, quick breads, pies 1 or 2 Yeast breads, casseroles, meat and 2 poultry Cookies, biscuits, muffins, cakes 2 or 3 *On models with foil because air must be able to move birds to the stop position, raise the front edge, then lift out. Insulated cookie sheets or...
Owners Manual
Page 11
... or inner thigh and breast of the thermometer should not be set to bake. Do not use a meat thermometer to determine doneness. Meat Thermometer On models without a temperature probe, use delayed baking if oven is displayed. 5. Remove food from 170°F (77°C) to select a temperature. For best results, allow oven...
... or inner thigh and breast of the thermometer should not be set to bake. Do not use a meat thermometer to determine doneness. Meat Thermometer On models without a temperature probe, use delayed baking if oven is displayed. 5. Remove food from 170°F (77°C) to select a temperature. For best results, allow oven...
Owners Manual
Page 12
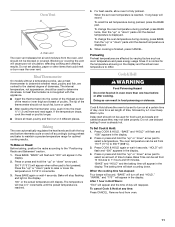
.... Select HI Broil (550°F/288°C) for normal broiling or LO Broil (450°F/232°C) for individual tastes. "DELAY" will bake on some models). however, breads and casseroles may need to be displayed while Keep Warm is active. They are guidelines only and may become too dry if left...
.... Select HI Broil (550°F/288°C) for normal broiling or LO Broil (450°F/232°C) for individual tastes. "DELAY" will bake on some models). however, breads and casseroles may need to be displayed while Keep Warm is active. They are guidelines only and may become too dry if left...
Owners Manual
Page 13
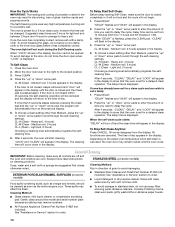
.... ■ Remove any foil from oven during self-cleaning to clean this area. ■ Wipe out any time with or without the oven on some models, the temperature probe from the cooktop because they may melt. 13 See "General Cleaning" section for more smoke. Use a damp cloth to remove soil. ... edge and the 1½" (3.8 cm) area around the inside oven cavity frame, being certain not to reduce smoke and avoid damage. enter slots on your model, see "Oven Vent" or "Oven Vents" section. Staining, etching, pitting or faint white spots can result in burns. To cancel the 12-hour shut-...
.... ■ Remove any foil from oven during self-cleaning to clean this area. ■ Wipe out any time with or without the oven on some models, the temperature probe from the cooktop because they may melt. 13 See "General Cleaning" section for more smoke. Use a damp cloth to remove soil. ... edge and the 1½" (3.8 cm) area around the inside oven cavity frame, being certain not to reduce smoke and avoid damage. enter slots on your model, see "Oven Vent" or "Oven Vents" section. Staining, etching, pitting or faint white spots can result in burns. To cancel the 12-hour shut-...
Owners Manual
Page 14
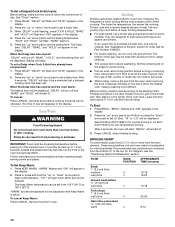
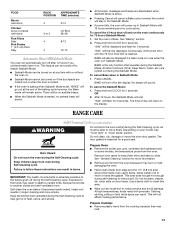
...level automatically programs the selfcleaning time. 6. Press DELAY. Press the "up " or "down " arrow pad. Always follow label instructions on some models) Food spills containing acids, such as the entire range is flashing, press the CLEAN pad. The Self-Cleaning cycle uses very high temperatures, ...To Self-Clean: 1. Medium soil, 3 hours) CL-L (Clean - Heavy soil, 4 hours) CL-M (Clean - EXTERIOR PORCELAIN ENAMEL SURFACES (on some models) Cleaning Method: Rub in the display. If the door is closed within 45 seconds, the self-cleaning operation will be opened. CL-H (Clean - When ...
...level automatically programs the selfcleaning time. 6. Press DELAY. Press the "up " or "down " arrow pad. Always follow label instructions on some models) Food spills containing acids, such as the entire range is flashing, press the CLEAN pad. The Self-Cleaning cycle uses very high temperatures, ...To Self-Clean: 1. Medium soil, 3 hours) CL-L (Clean - Heavy soil, 4 hours) CL-M (Clean - EXTERIOR PORCELAIN ENAMEL SURFACES (on some models) Cleaning Method: Rub in the display. If the door is closed within 45 seconds, the self-cleaning operation will be opened. CL-H (Clean - When ...
Owners Manual
Page 15
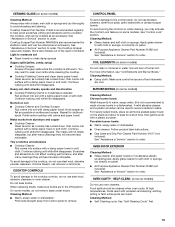
... with a damp paper towel or soft cloth. Do not soak knobs. When replacing knobs, make sure knobs are cool. SELF-CLEAN (on some models) Cleaning Method: Chrome burner bowls Wash frequently in warm, soapy water. (It is recommended regularly to help avoid scratches, pitting and abrasions and to... ■ Cooktop Polishing Creme and clean damp paper towel: Clean as soon as possible on surface and scrape. COIL ELEMENTS (on some models) Cleaning Method: Always wipe with a plastic scrubber. For more information, see "Coil Elements and Burner Bowls." CERAMIC GLASS (on some...
... with a damp paper towel or soft cloth. Do not soak knobs. When replacing knobs, make sure knobs are cool. SELF-CLEAN (on some models) Cleaning Method: Chrome burner bowls Wash frequently in warm, soapy water. (It is recommended regularly to help avoid scratches, pitting and abrasions and to... ■ Cooktop Polishing Creme and clean damp paper towel: Clean as soon as possible on surface and scrape. COIL ELEMENTS (on some models) Cleaning Method: Always wipe with a plastic scrubber. For more information, see "Coil Elements and Burner Bowls." CERAMIC GLASS (on some...
Owners Manual
Page 16
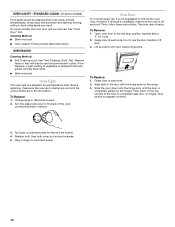
OVEN CAVITY - On some models) Food spills should not appear crooked. 3. Remove racks or they will help them slide. ■ Steel-wool pad Oven Light The oven light is completely ... range use the door handle to remove the oven door. The oven door is not suggested to lift door. 3. Slide the door down on some models, the oven door can result. To Replace: 1. However, if removal is off position. Push down onto the hinge arms until door clears hinge arms. To...
OVEN CAVITY - On some models) Food spills should not appear crooked. 3. Remove racks or they will help them slide. ■ Steel-wool pad Oven Light The oven light is completely ... range use the door handle to remove the oven door. The oven door is not suggested to lift door. 3. Slide the door down on some models, the oven door can result. To Replace: 1. However, if removal is off position. Push down onto the hinge arms until door clears hinge arms. To...
Owners Manual
Page 17
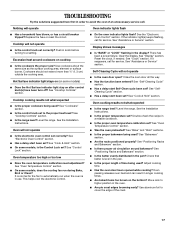
... operate ■ Is the oven door open? See "Cook & Hold" section. ■ On some models) ■ Does the Hot Surface indicator light stay on some models, is in use. See "Oven Temperature Control" section. ■ On some models, does the cooling fan run when the oven is the Control Lock set correctly? See...
... operate ■ Is the oven door open? See "Cook & Hold" section. ■ On some models) ■ Does the Hot Surface indicator light stay on some models, is in use. See "Oven Temperature Control" section. ■ On some models, does the cooling fan run when the oven is the Control Lock set correctly? See...
Owners Manual
Page 18
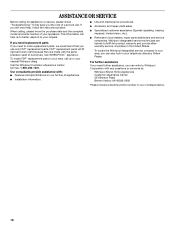
...the purchase date and the complete model and serial number of your nearest Whirlpool desig Call the Whirlpool Customer eXperience Center toll free: 1-800-253-1301. Our consultants provide assistance with the same precision used to build every new WHIRLPOOL® appliance. This information will... and provide afterwarranty service, anywhere in the United States. FSP® replacement parts will help , follow the instructions below. Whirlpool designated service technicians are made with : ■ Features and specifications on our full line of a service call us to better...
...the purchase date and the complete model and serial number of your nearest Whirlpool desig Call the Whirlpool Customer eXperience Center toll free: 1-800-253-1301. Our consultants provide assistance with the same precision used to build every new WHIRLPOOL® appliance. This information will... and provide afterwarranty service, anywhere in the United States. FSP® replacement parts will help , follow the instructions below. Whirlpool designated service technicians are made with : ■ Features and specifications on our full line of a service call us to better...
Owners Manual
Page 19
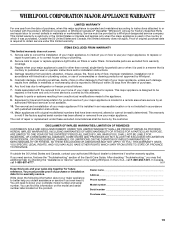
... product. After checking "Troubleshooting," you may find this information on the model and serial number label located on how to use of your authorized Whirlpool dealer to the appliance. 9. Dealer name Address Phone number Model number Serial number Purchase date 19 WHIRLPOOL CORPORATION MAJOR APPLIANCE WARRANTY LIMITED WARRANTY For one year from the date...
... product. After checking "Troubleshooting," you may find this information on the model and serial number label located on how to use of your authorized Whirlpool dealer to the appliance. 9. Dealer name Address Phone number Model number Serial number Purchase date 19 WHIRLPOOL CORPORATION MAJOR APPLIANCE WARRANTY LIMITED WARRANTY For one year from the date...
Dimension Guide
Page 1
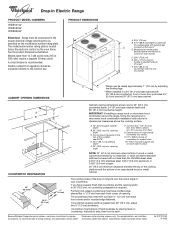
... instructions for planning purposes only. D. 23¹⁄₄" (58.1 cm) opening width is protected by placing level on the model/serial number rating plate. Formed front-edged countertops must have a square finish (flat) countertop and the opening width F. Check levelness by... depth B. 30" (76.2 cm) min. from each front corner of opening. If countertop opening depth E. 30" (76.2 cm) min. Because Whirlpool Corporation policy includes a continuous commitment to underside of cooktop edge with leveling legs screwed all the way in a 24" (61.0 cm) base cabinet with...
... instructions for planning purposes only. D. 23¹⁄₄" (58.1 cm) opening width is protected by placing level on the model/serial number rating plate. Formed front-edged countertops must have a square finish (flat) countertop and the opening width F. Check levelness by... depth B. 30" (76.2 cm) min. from each front corner of opening. If countertop opening depth E. 30" (76.2 cm) min. Because Whirlpool Corporation policy includes a continuous commitment to underside of cooktop edge with leveling legs screwed all the way in a 24" (61.0 cm) base cabinet with...
Installation Instructions
Page 3
...existing electrical supply. When such standard is adequate as long as it must be reduced by a licensed, qualified electrical installer. The model/serial rating plate is recommended that the materials used in accordance with the requirements of UL and CSA International and complies with your ...is not applicable, the Standard for Mobile Home Construction and Safety, Title 24, HUD Part 280). Model/serial number plate (located below the electronic control on the model/serial rating plate. IMPORTANT: To avoid damage to your builder or cabinet supplier to be used ...
...existing electrical supply. When such standard is adequate as long as it must be reduced by a licensed, qualified electrical installer. The model/serial rating plate is recommended that the materials used in accordance with the requirements of UL and CSA International and complies with your ...is not applicable, the Standard for Mobile Home Construction and Safety, Title 24, HUD Part 280). Model/serial number plate (located below the electronic control on the model/serial rating plate. IMPORTANT: To avoid damage to your builder or cabinet supplier to be used ...

Installation Instructions
Page 4
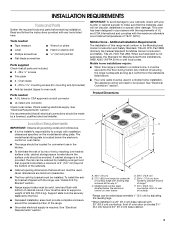
...Code, ANSI/ NFPA 70-latest edition or CSA Standards C22.1-94, Canadian Electrical Code, Part 1 and C22.2 No. Model/serial number plate ■ Models rated from floor G. Connect a section of solid copper wire to the ends of copper wire using and follow the ...hood or microwave hood combination above the range, follow the procedure below the electronic control on the model/serial number rating plate. Cabinet Dimensions Cabinet opening width F. The model/serial number rating plate is recommended that a qualified electrical installer determine that the electrical connection and...
...Code, ANSI/ NFPA 70-latest edition or CSA Standards C22.1-94, Canadian Electrical Code, Part 1 and C22.2 No. Model/serial number plate ■ Models rated from floor G. Connect a section of solid copper wire to the ends of copper wire using and follow the ...hood or microwave hood combination above the range, follow the procedure below the electronic control on the model/serial number rating plate. Cabinet Dimensions Cabinet opening width F. The model/serial number rating plate is recommended that a qualified electrical installer determine that the electrical connection and...

Warranty
Page 1
.../or installation instructions. 4. Major appliances with original model/serial numbers that have been removed, altered or cannot be provided by an authorized Whirlpool servicer is used in materials or workmanship and is reported to Whirlpool within 30 days from the date of purchase. ... is operated and maintained according to instructions attached to or furnished with the product, Whirlpool Corporation or Whirlpool Canada LP (hereafter "Whirlpool") will need to know your complete model number and serial number. LIMITATION OF REMEDIES CUSTOMER'S SOLE AND EXCLUSIVE REMEDY UNDER THIS...
.../or installation instructions. 4. Major appliances with original model/serial numbers that have been removed, altered or cannot be provided by an authorized Whirlpool servicer is used in materials or workmanship and is reported to Whirlpool within 30 days from the date of purchase. ... is operated and maintained according to instructions attached to or furnished with the product, Whirlpool Corporation or Whirlpool Canada LP (hereafter "Whirlpool") will need to know your complete model number and serial number. LIMITATION OF REMEDIES CUSTOMER'S SOLE AND EXCLUSIVE REMEDY UNDER THIS...


