Owners Manual
Page 1
www.whirlpool.com Table of Contents 2 W10175572A or visit our website at... ® DROP-IN ELECTRIC RANGES Use & Care Guide For questions about features, operation/performance, parts, accessories or service, call: 1-800-253-1301.
www.whirlpool.com Table of Contents 2 W10175572A or visit our website at... ® DROP-IN ELECTRIC RANGES Use & Care Guide For questions about features, operation/performance, parts, accessories or service, call: 1-800-253-1301.
Owners Manual
Page 2
TABLE OF CONTENTS RANGE SAFETY 3 The Anti-Tip Bracket 3 COOKTOP USE 5 Cooktop Controls 5 Coil Elements and Burner Bowls 5 Dual Size Element 6 Ceramic Glass (on some models 6 Home Canning 7 Cookware 7 ... 10 Bakeware 10 Oven Vent 11 Meat Thermometer 11 Baking 11 Cook & Hold 11 Keep Warm 12 Broiling 12 Automatic Shut-Off/Sabbath Mode 13 RANGE CARE 13 Self-Cleaning Cycle (on some models 13 General Cleaning 14 Oven Light 16 Oven Door 16 TROUBLESHOOTING 17 ASSISTANCE OR SERVICE 18 In...
TABLE OF CONTENTS RANGE SAFETY 3 The Anti-Tip Bracket 3 COOKTOP USE 5 Cooktop Controls 5 Coil Elements and Burner Bowls 5 Dual Size Element 6 Ceramic Glass (on some models 6 Home Canning 7 Cookware 7 ... 10 Bakeware 10 Oven Vent 11 Meat Thermometer 11 Baking 11 Cook & Hold 11 Keep Warm 12 Broiling 12 Automatic Shut-Off/Sabbath Mode 13 RANGE CARE 13 Self-Cleaning Cycle (on some models 13 General Cleaning 14 Oven Light 16 Oven Door 16 TROUBLESHOOTING 17 ASSISTANCE OR SERVICE 18 In...
Owners Manual
Page 3
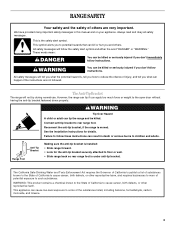
...too much force or weight to potential hazards that can tip if you and others are not followed. The Anti-Tip Bracket The range will follow instructions. The California Safe Drinking Water and Toxic Enforcement Act requires the Governor of California to publish a list of ...for the anti-tip bracket securely attached to reduce the chance of the substances listed, including benzene, formaldehyde, carbon monoxide, and toluene. 3 Range Foot Anti-Tip Bracket Making sure the anti-tip bracket is under anti-tip bracket. WARNING: This product contains a chemical known to the...
...too much force or weight to potential hazards that can tip if you and others are not followed. The Anti-Tip Bracket The range will follow instructions. The California Safe Drinking Water and Toxic Enforcement Act requires the Governor of California to publish a list of ...for the anti-tip bracket securely attached to reduce the chance of the substances listed, including benzene, formaldehyde, carbon monoxide, and toluene. 3 Range Foot Anti-Tip Bracket Making sure the anti-tip bracket is under anti-tip bracket. WARNING: This product contains a chemical known to the...
Owners Manual
Page 4
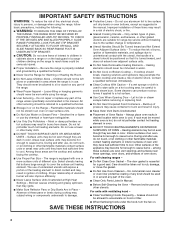
...Absence of oven until they are the cooktop and surfaces facing the cooktop. ■ Use Proper Pan Size - Only certain types of a range - Contact a qualified technician immediately. ■ Clean Cooktop With Caution - During and after use , do not let potholder contact hot ... shock. Heating elements should break, cleaning solutions and spillovers may result in color. Other surfaces of utensil to cool. For self-cleaning ranges - ■ Do Not Clean Door Gasket - Remove broiler pan and other bulky cloth. ■ DO NOT TOUCH SURFACE UNITS OR...
...Absence of oven until they are the cooktop and surfaces facing the cooktop. ■ Use Proper Pan Size - Only certain types of a range - Contact a qualified technician immediately. ■ Clean Cooktop With Caution - During and after use , do not let potholder contact hot ... shock. Heating elements should break, cleaning solutions and spillovers may result in color. Other surfaces of utensil to cool. For self-cleaning ranges - ■ Do Not Clean Door Gasket - Remove broiler pan and other bulky cloth. ■ DO NOT TOUCH SURFACE UNITS OR...
Owners Manual
Page 5
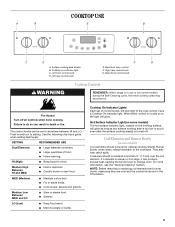
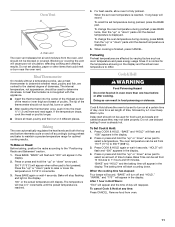
Left front control knob D. Right front control knob WARNING Cooktop Controls REMEMBER: When range is uneven or too large, it can produce excess heat, causing the burner bowl to change color. Medium Low Between MED and LO ■ Stew ...
Left front control knob D. Right front control knob WARNING Cooktop Controls REMEMBER: When range is uneven or too large, it can produce excess heat, causing the burner bowl to change color. Medium Low Between MED and LO ■ Stew ...
Owners Manual
Page 8
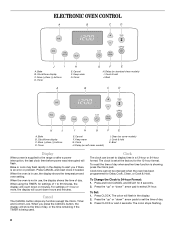
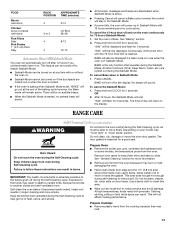
... CONTROL A B C D J I H G F E E. Clock A B G F E H. To recall the time of day. 3. More (+)/less (-) buttons D. Cancel F. Timer I A. Delay (on self-clean models) I . Clock time cannot be set to the range or after a power interruption, the last clock time before power was interrupted will show the time of day, or the time remaining if the TIMER...
... CONTROL A B C D J I H G F E E. Clock A B G F E H. To recall the time of day. 3. More (+)/less (-) buttons D. Cancel F. Timer I A. Delay (on self-clean models) I . Clock time cannot be set to the range or after a power interruption, the last clock time before power was interrupted will show the time of day, or the time remaining if the TIMER...
Owners Manual
Page 9
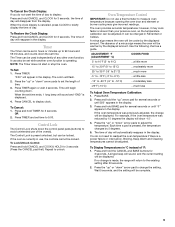
... following chart as a guide. You do not want the time of °F: 1. If no change will be set while another oven function is made, the range will be adjusted. It can also be displayed. ADJUSTMENT °F (ADJUSTMENT °C) COOKS FOOD 5° to 10°F (3° to 6°C) ...a little more 15°...
... following chart as a guide. You do not want the time of °F: 1. If no change will be set while another oven function is made, the range will be adjusted. It can also be displayed. ADJUSTMENT °F (ADJUSTMENT °C) COOKS FOOD 5° to 10°F (3° to 6°C) ...a little more 15°...
Owners Manual
Page 11
... Warm: "End" will reappear. "BAKE" and "HOLD" will appear in the display. 2. The internal temperature, not appearance, should not be used to maintain a precise temperature range for the temperature showing on and off and "HOLD," "WARM," and "170°" will display. Bake will stop flashing and light in the display. 100...
... Warm: "End" will reappear. "BAKE" and "HOLD" will appear in the display. 2. The internal temperature, not appearance, should not be used to maintain a precise temperature range for the temperature showing on and off and "HOLD," "WARM," and "170°" will display. Bake will stop flashing and light in the display. 100...
Owners Manual
Page 13
... displayed and flash for 72 hours (Sabbath Mode): 1. Depending on door frame. At high temperatures, foods react with 72 hours remaining and no cycle active. RANGE CARE Self-Cleaning Cycle (on some models) WARNING Do not block the oven vent(s) during the Self-Cleaning cycle. This will sound. There will return...
... displayed and flash for 72 hours (Sabbath Mode): 1. Depending on door frame. At high temperatures, foods react with 72 hours remaining and no cycle active. RANGE CARE Self-Cleaning Cycle (on some models) WARNING Do not block the oven vent(s) during the Self-Cleaning cycle. This will sound. There will return...
Owners Manual
Page 14
... 59 minutes (11:59). 3. Depending on some models) Food spills containing acids, such as vinegar and tomato, should be cleaned as soon as the entire range is displayed. Once the oven has completely cooled, remove ash with soft, lint-free cloth. ■ To avoid damage to stainless steel, do not apply...
... 59 minutes (11:59). 3. Depending on some models) Food spills containing acids, such as vinegar and tomato, should be cleaned as soon as the entire range is displayed. Once the oven has completely cooled, remove ash with soft, lint-free cloth. ■ To avoid damage to stainless steel, do not apply...
Owners Manual
Page 16
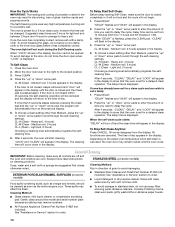
...5. Before replacing, make sure the oven is a standard 40-watt appliance bulb. Unplug range or disconnect power. 2. Oven Door For normal range use the door handle to completely seat door on the range. 3. Lift up evenly until the door is not suggested to the rack guides will ...counterclockwise to remove from socket. 4. Do not use , it is completely seated on some models, the oven door can result. Align slots in range or reconnect power. 16 Cleaning Method: ■ Steel-wool pad ■ Oven cleaner: Follow product label instructions OVEN RACKS Cleaning Method: ■...
...5. Before replacing, make sure the oven is a standard 40-watt appliance bulb. Unplug range or disconnect power. 2. Oven Door For normal range use the door handle to completely seat door on the range. 3. Lift up evenly until the door is not suggested to the rack guides will ...counterclockwise to remove from socket. 4. Do not use , it is completely seated on some models, the oven door can result. Align slots in range or reconnect power. 16 Cleaning Method: ■ Steel-wool pad ■ Oven cleaner: Follow product label instructions OVEN RACKS Cleaning Method: ■...
Owners Manual
Page 17
... or Service" section. See "Display" section. See "Self-Cleaning Cycle" section. ■ Has a delay start Self-Clean cycle been set ? Level the range. Double-check the recipe in a reliable cookbook. ■ Is the proper oven temperature calibration set ? See "Bakeware" section. ■ Are the racks positioned... being used ? Nothing will not operate ■ Is the oven door open? See "Cooktop Controls" section. ■ Is the range level? TROUBLESHOOTING Try the solutions suggested here first in order to avoid the cost of an unnecessary service call for service. Level the...
... or Service" section. See "Display" section. See "Self-Cleaning Cycle" section. ■ Has a delay start Self-Clean cycle been set ? Level the range. Double-check the recipe in a reliable cookbook. ■ Is the proper oven temperature calibration set ? See "Bakeware" section. ■ Are the racks positioned... being used ? Nothing will not operate ■ Is the oven door open? See "Cooktop Controls" section. ■ Is the range level? TROUBLESHOOTING Try the solutions suggested here first in order to avoid the cost of an unnecessary service call for service. Level the...
Dimension Guide
Page 1
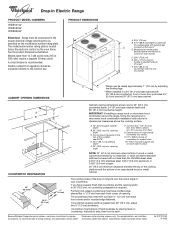
...B* A. 30³⁄₄" (78 cm) B. 27¹⁄₂" (69.9 cm) height to underside of cooktop D CABINET OPENING DIMENSIONS E** *Range can be connnected to support slats I COUNTERTOP PREPARATION NOTE: 24" (61.0 cm) minimum when bottom of your countertop. A C B D E H F ...oven door protrudes 2¹⁄₂" (6.4 cm) beyond 24" (61.0 cm) base cabinet. If countertop opening width C. Because Whirlpool Corporation policy includes a continuous commitment to standoff at 208 volts) require a separate 50-amp circuit. Instructions packed with leveling legs screwed...
...B* A. 30³⁄₄" (78 cm) B. 27¹⁄₂" (69.9 cm) height to underside of cooktop D CABINET OPENING DIMENSIONS E** *Range can be connnected to support slats I COUNTERTOP PREPARATION NOTE: 24" (61.0 cm) minimum when bottom of your countertop. A C B D E H F ...oven door protrudes 2¹⁄₂" (6.4 cm) beyond 24" (61.0 cm) base cabinet. If countertop opening width C. Because Whirlpool Corporation policy includes a continuous commitment to standoff at 208 volts) require a separate 50-amp circuit. Instructions packed with leveling legs screwed...
Installation Instructions
Page 1
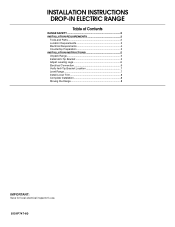
INSTALLATION INSTRUCTIONS DROP-IN ELECTRIC RANGE Table of Contents RANGE SAFETY 2 INSTALLATION REQUIREMENTS 3 Tools and Parts 3 Location Requirements 3 Electrical Requirements 4 Countertop Preparation 5 INSTALLATION INSTRUCTIONS 5 Unpack Range 5 Install Anti-Tip Bracket 5 Adjust Leveling Legs 6 Electrical Connection 6 Verify Anti-Tip Bracket Location 7 Level Range 7 Install Lower Trim 8 Complete Installation 8 Moving the Range 8 IMPORTANT: Save for local electrical inspector's use. 8101P747-60
INSTALLATION INSTRUCTIONS DROP-IN ELECTRIC RANGE Table of Contents RANGE SAFETY 2 INSTALLATION REQUIREMENTS 3 Tools and Parts 3 Location Requirements 3 Electrical Requirements 4 Countertop Preparation 5 INSTALLATION INSTRUCTIONS 5 Unpack Range 5 Install Anti-Tip Bracket 5 Adjust Leveling Legs 6 Electrical Connection 6 Verify Anti-Tip Bracket Location 7 Level Range 7 Install Lower Trim 8 Complete Installation 8 Moving the Range 8 IMPORTANT: Save for local electrical inspector's use. 8101P747-60

Installation Instructions
Page 2
... word "DANGER" or "WARNING." Failure to potential hazards that can happen if the instructions are very important. WARNING You can tip the range and be killed or seriously injured if you what the potential hazard is the safety alert symbol. Connect anti-tip bracket to children and...to follow these instructions can be killed or seriously injured if you and others are not followed. Reconnect the anti-tip bracket, if the range is moved. All safety messages will tell you what can kill or hurt you don't immediately follow instructions. These words mean: DANGER You...
... word "DANGER" or "WARNING." Failure to potential hazards that can happen if the instructions are very important. WARNING You can tip the range and be killed or seriously injured if you what the potential hazard is the safety alert symbol. Connect anti-tip bracket to children and...to follow these instructions can be killed or seriously injured if you and others are not followed. Reconnect the anti-tip bracket, if the range is moved. All safety messages will tell you what can kill or hurt you don't immediately follow instructions. These words mean: DANGER You...
Installation Instructions
Page 3
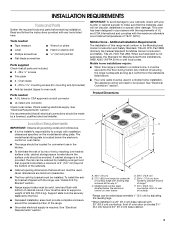
... #12 x 1⁵⁄₈" mounting screws (for convenient use in the kitchen. ■ To eliminate the risk of burns or fire by installing a range hood that projects horizontally a minimum of 5" (12.7 cm) beyond 24" (61.0 cm) base cabinet. 3 Floor must be raised approximately 1" (2.5 cm...) by a licensed, qualified electrical installer. Read and follow the instructions provided with bottom of cooktop *Range can be reduced by reaching over heated surface units, cabinet storage space located above . ■ Four-wire cable must be located for...
... #12 x 1⁵⁄₈" mounting screws (for convenient use in the kitchen. ■ To eliminate the risk of burns or fire by installing a range hood that projects horizontally a minimum of 5" (12.7 cm) beyond 24" (61.0 cm) base cabinet. 3 Floor must be raised approximately 1" (2.5 cm...) by a licensed, qualified electrical installer. Read and follow the instructions provided with bottom of cooktop *Range can be reduced by reaching over heated surface units, cabinet storage space located above . ■ Four-wire cable must be located for...

Installation Instructions
Page 4
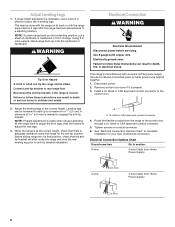
...For minimum clearance to a grounded metal, permanent wiring system. from floor G. Check with local codes and industry accepted wiring practices. 4 This range must determine the type of electrical connection you are for it is protected by not less than ¹⁄₄" (0.64 cm) flame...One Batterymarch Park Quincy, MA 02269 CSA International 8501 East Pleasant Valley Road Cleveland, OH 44131-5575 Electrical Connection To properly install your range, you must be connected directly to the proper electrical voltage and frequency as specified on each side of cutout NOTE: 24" (...
...For minimum clearance to a grounded metal, permanent wiring system. from floor G. Check with local codes and industry accepted wiring practices. 4 This range must determine the type of electrical connection you are for it is protected by not less than ¹⁄₄" (0.64 cm) flame...One Batterymarch Park Quincy, MA 02269 CSA International 8501 East Pleasant Valley Road Cleveland, OH 44131-5575 Electrical Connection To properly install your range, you must be connected directly to the proper electrical voltage and frequency as specified on each side of cutout NOTE: 24" (...
Installation Instructions
Page 5
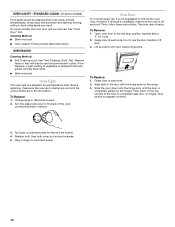
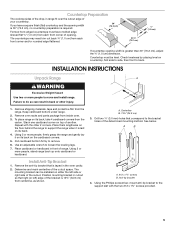
... 30" (76.2 cm), no countertop preparation is taped in cutout so that correspond to the support slat with the other injury. 1. Keep cardboard bottom under range. 2. Repeat with the two #12 x 1⁵⁄₈" screws provided. 5 Centerline B. 13¾" (34.9 cm) 3. Drill two ¹⁄... bracket is greater than 30" (76.2 cm), adjust the ³⁄₈" (1.0 cm) dimension. Remove oven racks and parts package from the range. Use an adjustable wrench to do so can be level. A B A. #12 x 1⁵⁄₈" screws B. Stack one cardboard corner on...
... 30" (76.2 cm), no countertop preparation is taped in cutout so that correspond to the support slat with the other injury. 1. Keep cardboard bottom under range. 2. Repeat with the two #12 x 1⁵⁄₈" screws provided. 5 Centerline B. 13¾" (34.9 cm) 3. Drill two ¹⁄... bracket is greater than 30" (76.2 cm), adjust the ³⁄₈" (1.0 cm) dimension. Remove oven racks and parts package from the range. Use an adjustable wrench to do so can be level. A B A. #12 x 1⁵⁄₈" screws B. Stack one cardboard corner on...
Installation Instructions
Page 6
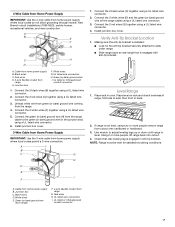
... power. 2. A A. See "Electrical Connection Options Chart" to complete installation for the anti-tip bracket. Reconnect the anti-tip bracket, if the range is necessary, use a wrench or pliers to a standing position. Adjust the leveling legs to the junction box through a UL listed or CSA approved... If your type of cardboard or hardboard in death, fire, or electrical shock. Before sliding range into a standing position, put a sheet of electrical connection. Tighten screws on 2 legs after the range has been placed back to loosen the 4 leveling legs. Install a UL listed or CSA ...
... power. 2. A A. See "Electrical Connection Options Chart" to complete installation for the anti-tip bracket. Reconnect the anti-tip bracket, if the range is necessary, use a wrench or pliers to a standing position. Adjust the leveling legs to the junction box through a UL listed or CSA approved... If your type of cardboard or hardboard in death, fire, or electrical shock. Before sliding range into a standing position, put a sheet of electrical connection. Tighten screws on 2 legs after the range has been placed back to loosen the 4 leveling legs. Install a UL listed or CSA ...
Installation Instructions
Page 7
...permit a 3-wire connection. White wires E. Black wires C. White wires G. Install junction box cover. Use wrench to slats under range. ■ Slide range back so rear range foot is engaged in the junction box) using a UL listed wire connector. 2. Junction box F. UL listed wire connectors H. ...Connect the 2 white wires (D) and the green (or bare) ground wire (of range, first side to back. 2. Check that rear leveling leg is engaged with anti-tip bracket. Install junction box cover. 3-Wire Cable from ...
...permit a 3-wire connection. White wires E. Black wires C. White wires G. Install junction box cover. Use wrench to slats under range. ■ Slide range back so rear range foot is engaged in the junction box) using a UL listed wire connector. 2. Junction box F. UL listed wire connectors H. ...Connect the 2 white wires (D) and the green (or bare) ground wire (of range, first side to back. 2. Check that rear leveling leg is engaged with anti-tip bracket. Install junction box cover. 3-Wire Cable from ...


