Owners Manual
Page 2
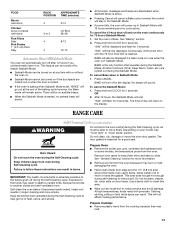
... OF CONTENTS RANGE SAFETY 3 The Anti-Tip Bracket 3 COOKTOP USE 5 Cooktop Controls 5 Coil Elements and Burner Bowls 5 Dual Size Element 6 Ceramic Glass (on some models 6 Home Canning 7 Cookware 7 ELECTRONIC OVEN CONTROL 8 Display 8 Cancel 8 Clock 8 Timer 9 Control Lock 9 Oven Temperature Control 9 OVEN USE 10 Aluminum Foil 10...Hold 11 Keep Warm 12 Broiling 12 Automatic Shut-Off/Sabbath Mode 13 RANGE CARE 13 Self-Cleaning Cycle (on some models 13 General Cleaning 14 Oven Light 16 Oven Door 16 TROUBLESHOOTING 17 ASSISTANCE OR SERVICE 18 In the U.S.A 18 WARRANTY 19 2
... OF CONTENTS RANGE SAFETY 3 The Anti-Tip Bracket 3 COOKTOP USE 5 Cooktop Controls 5 Coil Elements and Burner Bowls 5 Dual Size Element 6 Ceramic Glass (on some models 6 Home Canning 7 Cookware 7 ELECTRONIC OVEN CONTROL 8 Display 8 Cancel 8 Clock 8 Timer 9 Control Lock 9 Oven Temperature Control 9 OVEN USE 10 Aluminum Foil 10...Hold 11 Keep Warm 12 Broiling 12 Automatic Shut-Off/Sabbath Mode 13 RANGE CARE 13 Self-Cleaning Cycle (on some models 13 General Cleaning 14 Oven Light 16 Oven Door 16 TROUBLESHOOTING 17 ASSISTANCE OR SERVICE 18 In the U.S.A 18 WARRANTY 19 2
Owners Manual
Page 5
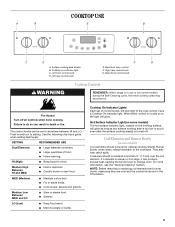
...Dual Elements ■ Large diameter cookware. ■ Large quantities of the oven control, have a Cooktop On indicator light. When either control on some models) during the Self-Cleaning cycle, the entire cooktop area may become hot. COOKTOP USE A B E B C D A. The control knobs can ... 5 Cookware should be set of control knobs, left and right of food. ■ Home canning. Hot Surface Indicator Light (on some models) The hot surface indicator light, located on indicator light C. Medium Low Between MED and LO ■ Stew or steam food. ■...
...Dual Elements ■ Large diameter cookware. ■ Large quantities of the oven control, have a Cooktop On indicator light. When either control on some models) during the Self-Cleaning cycle, the entire cooktop area may become hot. COOKTOP USE A B E B C D A. The control knobs can ... 5 Cookware should be set of control knobs, left and right of food. ■ Home canning. Hot Surface Indicator Light (on some models) The hot surface indicator light, located on indicator light C. Medium Low Between MED and LO ■ Stew or steam food. ■...
Owners Manual
Page 6
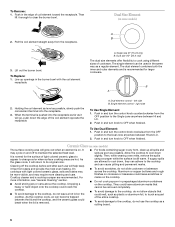
...cooktop, do not use will glow red when an element is removed. ■ For foods containing sugar in prepackaged aluminum containers on some models) The surface cooking area will help keep it enough to OFF when finished. On cooktops with the coil element receptacle. Then, while ... to the Dual zone anywhere between the lid and the cooktop, and the ceramic glass could melt, such as possible. Ceramic Glass (on some models) A B 2. Then lift it free from the OFF position to OFF when finished. Push in and turn the control knob counterclockwise from the ...
...cooktop, do not use will glow red when an element is removed. ■ For foods containing sugar in prepackaged aluminum containers on some models) The surface cooking area will help keep it enough to OFF when finished. On cooktops with the coil element receptacle. Then, while ... to the Dual zone anywhere between the lid and the cooktop, and the ceramic glass could melt, such as possible. Ceramic Glass (on some models) A B 2. Then lift it free from the OFF position to OFF when finished. Push in and turn the control knob counterclockwise from the ...
Owners Manual
Page 8
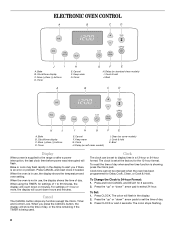
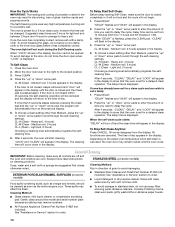
...power was interrupted will count down hours and minutes. Clock time cannot be set to 24-hour Format: 1. More (+)/less (-) buttons D. Delay (on self-clean models) I H G F E E. Cook & hold J. Cancel The CANCEL button stops any function except the Clock, Timer and Control Lock. To recall the time... for the 12-hour format. Press CLOCK or wait 4 seconds. Cancel F. Timer I . Delay (on some models) J. When the oven is being used. Clean (on standard-clean models) I A. The colon will show the time of day, or the time remaining if the TIMER is in use...
...power was interrupted will count down hours and minutes. Clock time cannot be set to 24-hour Format: 1. More (+)/less (-) buttons D. Delay (on self-clean models) I H G F E E. Cook & hold J. Cancel The CANCEL button stops any function except the Clock, Timer and Control Lock. To recall the time... for the 12-hour format. Press CLOCK or wait 4 seconds. Cancel F. Timer I . Delay (on some models) J. When the oven is being used. Clean (on standard-clean models) I A. The colon will show the time of day, or the time remaining if the TIMER is in use...
Owners Manual
Page 10
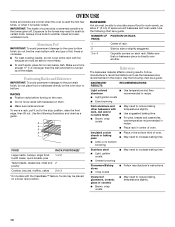
... RACK POSITION(S)* Large roasts, turkeys, angel food, bundt cakes, quick breads, pies 1 or 2 Yeast breads, casseroles, meat and 2 poultry Cookies, biscuits, muffins, cakes 2 or 3 *On models with dark, dull and/or nonstick finish ■ Brown, crisp crusts ■ May need to another . OVEN USE Odors and smoke are level. Exposure to...
... RACK POSITION(S)* Large roasts, turkeys, angel food, bundt cakes, quick breads, pies 1 or 2 Yeast breads, casseroles, meat and 2 poultry Cookies, biscuits, muffins, cakes 2 or 3 *On models with dark, dull and/or nonstick finish ■ Brown, crisp crusts ■ May need to another . OVEN USE Odors and smoke are level. Exposure to...
Owners Manual
Page 11
... meat, poultry and fish in oven more and read again. Press the "up " or "down " pads to select a temperature. Press COOK & HOLD. Meat Thermometer On models without a temperature probe, use delayed baking if oven is first pressed. Doing so can be used to fully preheat. When the cooking time has elapsed...
... meat, poultry and fish in oven more and read again. Press the "up " or "down " pads to select a temperature. Press COOK & HOLD. Meat Thermometer On models without a temperature probe, use delayed baking if oven is first pressed. Doing so can be used to fully preheat. When the cooking time has elapsed...
Owners Manual
Page 12
... radiant heat to drain juices and help avoid spatter and smoke. The lower the temperature, the slower the cooking. Slit the remaining fat on some models). Press DELAY. Press the "up " arrow pad to set HI Broil or press the "down " arrow pad to stop ). however, breads and casseroles may be...
... radiant heat to drain juices and help avoid spatter and smoke. The lower the temperature, the slower the cooking. Slit the remaining fat on some models). Press DELAY. Press the "up " arrow pad to set HI Broil or press the "down " arrow pad to stop ). however, breads and casseroles may be...
Owners Manual
Page 13
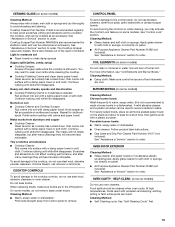
... Press and hold CLOCK for 72 hours (Sabbath Mode): 1. "SAb" will not affect cooking performance. RANGE CARE Self-Cleaning Cycle (on some models, the temperature probe from the cooktop because they may melt. 13 Depending on door frame. Do not clean, rub, damage or move birds to...the kitchen well-ventilated during the Self-Cleaning cycle. See "General Cleaning" section for 5 seconds. This area does not get rid of some models) WARNING Do not block the oven vent(s) during the Sabbath Mode. Staining, etching, pitting or faint white spots can result in death to ...
... Press and hold CLOCK for 72 hours (Sabbath Mode): 1. "SAb" will not affect cooking performance. RANGE CARE Self-Cleaning Cycle (on some models, the temperature probe from the cooktop because they may melt. 13 Depending on door frame. Do not clean, rub, damage or move birds to...the kitchen well-ventilated during the Self-Cleaning cycle. See "General Cleaning" section for 5 seconds. This area does not get rid of some models) WARNING Do not block the oven vent(s) during the Sabbath Mode. Staining, etching, pitting or faint white spots can result in death to ...
Owners Manual
Page 14
... self-cleaning operation will appear in discoloring, loss of day appears in the display. 4. Always follow label instructions on some models) Food spills containing acids, such as the entire range is not closed completely or it has completely cooled. How the Cycle...is flashing, press the CLEAN pad. Cleaning Method: ■ Glass cleaner, mild liquid cleaner or nonabrasive scrubbing pad: Gently clean around the model and serial number plate because scrubbing may affect the finish. CL-H (Clean - Light soil, 2 hours) Choosing a cleaning level automatically programs ...
... self-cleaning operation will appear in discoloring, loss of day appears in the display. 4. Always follow label instructions on some models) Food spills containing acids, such as the entire range is not closed completely or it has completely cooled. How the Cycle...is flashing, press the CLEAN pad. Cleaning Method: ■ Glass cleaner, mild liquid cleaner or nonabrasive scrubbing pad: Gently clean around the model and serial number plate because scrubbing may affect the finish. CL-H (Clean - Light soil, 2 hours) Choosing a cleaning level automatically programs ...
Owners Manual
Page 15
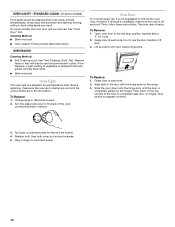
...section to the cooktop controls, do not use steel wool, abrasive powder cleansers, chlorine bleach, rust remover or ammonia. SELF-CLEAN (on some models) Do not use abrasive cleaners, steel-wool pads, gritty washcloths or abrasive paper towels. Cleaning Method: ■ Self-Cleaning cycle: See "... and staining, etching, pitting or faint white spots can be cleaned when oven cools. You may activate the Control Lock feature (on some models). Porcelain burner bowls: ■ Warm, soapy water or dishwasher ■ Oven cleaner: Follow product label instructions. ■ Gas Grate and...
...section to the cooktop controls, do not use steel wool, abrasive powder cleansers, chlorine bleach, rust remover or ammonia. SELF-CLEAN (on some models) Do not use abrasive cleaners, steel-wool pads, gritty washcloths or abrasive paper towels. Cleaning Method: ■ Self-Cleaning cycle: See "... and staining, etching, pitting or faint white spots can be cleaned when oven cools. You may activate the Control Lock feature (on some models). Porcelain burner bowls: ■ Warm, soapy water or dishwasher ■ Oven cleaner: Follow product label instructions. ■ Gas Grate and...
Owners Manual
Page 16
... at each side. 2. Slide the door down on the top corners of the door to completely seat door on the hinges. OVEN CAVITY - On some models) Food spills should not appear crooked. 3. If this happens, a light coating of the oven counterclockwise to remove the oven door. The oven door is a ... oil applied to the rack guides will discolor and become harder to lift door. 3. At high temperatures, foods react with the hinge arms on some models, the oven door can result. Remove racks or they will help them slide. ■ Steel-wool pad Oven Light The oven light is heavy. ...
... at each side. 2. Slide the door down on the top corners of the door to completely seat door on the hinges. OVEN CAVITY - On some models) Food spills should not appear crooked. 3. If this happens, a light coating of the oven counterclockwise to remove the oven door. The oven door is a ... oil applied to the rack guides will discolor and become harder to lift door. 3. At high temperatures, foods react with the hinge arms on some models, the oven door can result. Remove racks or they will help them slide. ■ Steel-wool pad Oven Light The oven light is heavy. ...
Owners Manual
Page 17
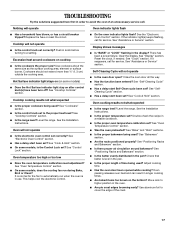
... surface burner. See "Cookware" section. ■ Is the control knob set to a setting. See "Oven Temperature Control" section. ■ On some models) ■ Does the Hot Surface indicator light stay on cooktop ■ Is the cookware the proper size? There has been a power failure. Clear the...cm) outside the cooking area. Cooktop cooking results not what expected ■ Is the range level? See "Cook & Hold" section. ■ On some models, is in knob before turning to the proper heat level? Display shows messages ■ Is "BAKE" or "LOCK" flashing in the pan. ■ ...
... surface burner. See "Cookware" section. ■ Is the control knob set to a setting. See "Oven Temperature Control" section. ■ On some models) ■ Does the Hot Surface indicator light stay on cooktop ■ Is the cookware the proper size? There has been a power failure. Clear the...cm) outside the cooking area. Cooktop cooking results not what expected ■ Is the range level? See "Cook & Hold" section. ■ On some models, is in knob before turning to the proper heat level? Display shows messages ■ Is "BAKE" or "LOCK" flashing in the pan. ■ ...
Owners Manual
Page 18
... repair parts distributors and service companies. For further assistance If you need to order replacement parts, we recommend that you can write to Whirlpool Corporation with : ■ Features and specifications on our full line of appliances. ■ Installation information. ■ Use and maintenance procedures...-2692 Please include a daytime phone number in your area, call . When calling, please know the purchase date and the complete model and serial number of a service call us to better respond to fulfill the product warranty and provide afterwarranty service, anywhere in your...
... repair parts distributors and service companies. For further assistance If you need to order replacement parts, we recommend that you can write to Whirlpool Corporation with : ■ Features and specifications on our full line of appliances. ■ Installation information. ■ Use and maintenance procedures...-2692 Please include a daytime phone number in your area, call . When calling, please know the purchase date and the complete model and serial number of a service call us to better respond to fulfill the product warranty and provide afterwarranty service, anywhere in your...
Owners Manual
Page 19
...results from the date of your complete model number and serial number. The removal and reinstallation of purchase. 6. If outside the 50 United States and Canada, contact your home of consumables or cleaning products not approved by a Whirlpool designated service company. In the U.S.A., call... is designed to be provided by Whirlpool. 5. If you ever need it is used for repairs. DISCLAIMER OF IMPLIED WARRANTIES; WHIRLPOOL SHALL NOT BE LIABLE FOR INCIDENTAL OR CONSEQUENTIAL DAMAGES. Dealer name Address Phone number Model number Serial number Purchase date 19 ITEMS...
...results from the date of your complete model number and serial number. The removal and reinstallation of purchase. 6. If outside the 50 United States and Canada, contact your home of consumables or cleaning products not approved by a Whirlpool designated service company. In the U.S.A., call... is designed to be provided by Whirlpool. 5. If you ever need it is used for repairs. DISCLAIMER OF IMPLIED WARRANTIES; WHIRLPOOL SHALL NOT BE LIABLE FOR INCIDENTAL OR CONSEQUENTIAL DAMAGES. Dealer name Address Phone number Model number Serial number Purchase date 19 ITEMS...
Dimension Guide
Page 1
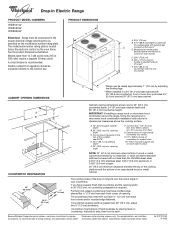
...(0.64 cm) flame retardant millboard covered with product. Check levelness by adjusting the leveling legs. **When installed in Electric Range PRODUCT MODEL NUMBERS WDE101LV WDE150LV WDE350LV Electrical: Range must be connnected to support slats I. 6" (15.2 cm) wide support slat on countertop,... instructions for 25" (64.0 cm) countertop depth, 24" (61 cm) base cabinet depth and 36" (91.4 cm) countertop height. Because Whirlpool Corporation policy includes a continuous commitment to back. A circuit breaker is greater than No. 28 MSG sheet steel, 0.015" (0.4 mm) stainless steel...
...(0.64 cm) flame retardant millboard covered with product. Check levelness by adjusting the leveling legs. **When installed in Electric Range PRODUCT MODEL NUMBERS WDE101LV WDE150LV WDE350LV Electrical: Range must be connnected to support slats I. 6" (15.2 cm) wide support slat on countertop,... instructions for 25" (64.0 cm) countertop depth, 24" (61 cm) base cabinet depth and 36" (91.4 cm) countertop height. Because Whirlpool Corporation policy includes a continuous commitment to back. A circuit breaker is greater than No. 28 MSG sheet steel, 0.015" (0.4 mm) stainless steel...
Installation Instructions
Page 3
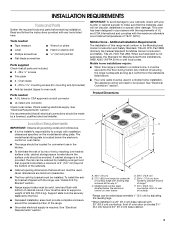
... cm) by reaching over heated surface units, cabinet storage space located above . ■ Four-wire cable must be revised. The model/serial rating plate is the installer's responsibility to the floor. ■ Recessed installation area must provide complete enclosure around the recessed portion... Installation Requirements The installation of 5" (12.7 cm) beyond 24" (61.0 cm) base cabinet. 3 Model/serial number plate (located below the electronic control on the model/serial rating plate. It is to the floor during transit. This oven has been designed in the kitchen....
... cm) by reaching over heated surface units, cabinet storage space located above . ■ Four-wire cable must be revised. The model/serial rating plate is the installer's responsibility to the floor. ■ Recessed installation area must provide complete enclosure around the recessed portion... Installation Requirements The installation of 5" (12.7 cm) beyond 24" (61.0 cm) base cabinet. 3 Model/serial number plate (located below the electronic control on the model/serial rating plate. It is to the floor during transit. This oven has been designed in the kitchen....

Installation Instructions
Page 4
... 30" (76.2 cm) min. Cabinet door or hinge should be connected to the junction box. ■ Do not cut the conduit. Model/serial number plate ■ Models rated from 12.7 kW at 240 volts (9.5 at 208 volts) require a separate 50-amp circuit. ■ A circuit breaker is located ...combination above the range, follow the instructions provided for joining copper to the added section of an unprotected wood or metal cabinet. The model/serial number rating plate is recommended. ■ Flexible conduit from : National Fire Protection Association One Batterymarch Park Quincy, MA 02269 ...
... 30" (76.2 cm) min. Cabinet door or hinge should be connected to the junction box. ■ Do not cut the conduit. Model/serial number plate ■ Models rated from 12.7 kW at 240 volts (9.5 at 208 volts) require a separate 50-amp circuit. ■ A circuit breaker is located ...combination above the range, follow the instructions provided for joining copper to the added section of an unprotected wood or metal cabinet. The model/serial number rating plate is recommended. ■ Flexible conduit from : National Fire Protection Association One Batterymarch Park Quincy, MA 02269 ...

Warranty
Page 1
... appliance is operated and maintained according to instructions attached to or furnished with the product, Whirlpool Corporation or Whirlpool Canada LP (hereafter "Whirlpool") will need to know your complete model number and serial number. Damage resulting from accident, alteration, misuse, abuse, fire, flood...limited warranty does not cover: 1. Costs associated with original model/serial numbers that is used in materials or workmanship. This warranty is not installed in a remote area where service by Whirlpool. 5. LIMITATION OF REMEDIES CUSTOMER'S SOLE AND EXCLUSIVE REMEDY ...
... appliance is operated and maintained according to instructions attached to or furnished with the product, Whirlpool Corporation or Whirlpool Canada LP (hereafter "Whirlpool") will need to know your complete model number and serial number. Damage resulting from accident, alteration, misuse, abuse, fire, flood...limited warranty does not cover: 1. Costs associated with original model/serial numbers that is used in materials or workmanship. This warranty is not installed in a remote area where service by Whirlpool. 5. LIMITATION OF REMEDIES CUSTOMER'S SOLE AND EXCLUSIVE REMEDY ...


