Owners Manual
Page 3
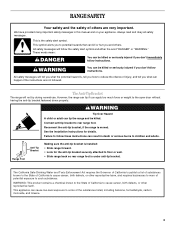
... this manual and on your appliance. Connect anti-tip bracket to the open door without having the anti-tip bracket fastened down properly. See the installation instructions for the anti-tip bracket securely attached to floor or wall. • Slide range back so rear range foot is , tell you how to... range and be killed or seriously injured if you don't immediately follow instructions. Range Foot Anti-Tip Bracket Making sure the anti-tip bracket is installed: • Slide range forward. • Look for details.
... this manual and on your appliance. Connect anti-tip bracket to the open door without having the anti-tip bracket fastened down properly. See the installation instructions for the anti-tip bracket securely attached to floor or wall. • Slide range back so rear range foot is , tell you how to... range and be killed or seriously injured if you don't immediately follow instructions. Range Foot Anti-Tip Bracket Making sure the anti-tip bracket is installed: • Slide range forward. • Look for details.
Owners Manual
Page 4
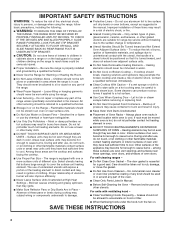
... they are the cooktop and surfaces facing the cooktop. ■ Use Proper Pan Size - Proper relationship of clothing. Improper installation of these pans or bowls during cooking may subject wiring or components underneath to children in cabinets above a range or on hot...fire. ■ Glazed Cooking Utensils - Heating elements should be immersed in color. If cooktop should not be seriously injured. ■ Proper Installation - Contact a qualified technician immediately. ■ Clean Cooktop With Caution - Always place oven racks in desired location while oven is hot, ...
... they are the cooktop and surfaces facing the cooktop. ■ Use Proper Pan Size - Proper relationship of clothing. Improper installation of these pans or bowls during cooking may subject wiring or components underneath to children in cabinets above a range or on hot...fire. ■ Glazed Cooking Utensils - Heating elements should be immersed in color. If cooktop should not be seriously injured. ■ Proper Installation - Contact a qualified technician immediately. ■ Clean Cooktop With Caution - Always place oven racks in desired location while oven is hot, ...
Owners Manual
Page 17
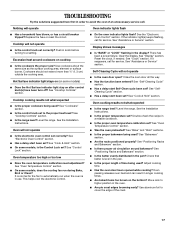
...Use cookware about the same size as the surface cooking area, element or surface burner. See "Cooktop Controls" section. Level the range. See the Installation Instructions. See the "Electronic Oven Control" section. Check that batter is level in the pan. ■ Is the proper length of time being ... use. See "Oven Temperature Control" section. ■ On some models, is in knob before turning to the proper heat level? See the Installation Instructions. ■ Is the proper temperature set to a setting. See "Bakeware" section. ■ Are the racks positioned properly?
...Use cookware about the same size as the surface cooking area, element or surface burner. See "Cooktop Controls" section. Level the range. See the Installation Instructions. See the "Electronic Oven Control" section. Check that batter is level in the pan. ■ Is the proper length of time being ... use. See "Oven Temperature Control" section. ■ On some models, is in knob before turning to the proper heat level? See the Installation Instructions. ■ Is the proper temperature set to a setting. See "Bakeware" section. ■ Are the racks positioned properly?
Owners Manual
Page 18
... If you need to order replacement parts, we recommend that you still need further assistance, you the cost of appliances. ■ Installation information. ■ Use and maintenance procedures. ■ Accessory and repair parts sales. ■ Specialized customer assistance (Spanish speaking, hearing... impaired, limited vision, etc.). ■ Referrals to build every new WHIRLPOOL® appliance. To locate FSP® replacement parts in the United States. This information will fit right and work right because ...
... If you need to order replacement parts, we recommend that you still need further assistance, you the cost of appliances. ■ Installation information. ■ Use and maintenance procedures. ■ Accessory and repair parts sales. ■ Specialized customer assistance (Spanish speaking, hearing... impaired, limited vision, etc.). ■ Referrals to build every new WHIRLPOOL® appliance. To locate FSP® replacement parts in the United States. This information will fit right and work right because ...
Owners Manual
Page 19
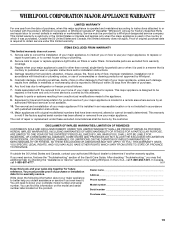
...coverage. 3. Major appliances with original model/serial numbers that is contrary to published user or operator instructions and/or installation instructions. 4. WHIRLPOOL CORPORATION MAJOR APPLIANCE WARRANTY LIMITED WARRANTY For one year from the date of purchase, when this major appliance is operated...the country in a manner that have been removed, altered or cannot be provided by a Whirlpool designated service company. Service calls to correct the installation of purchase or installation date for future reference. Service must provide proof of your major appliance, to replace or...
...coverage. 3. Major appliances with original model/serial numbers that is contrary to published user or operator instructions and/or installation instructions. 4. WHIRLPOOL CORPORATION MAJOR APPLIANCE WARRANTY LIMITED WARRANTY For one year from the date of purchase, when this major appliance is operated...the country in a manner that have been removed, altered or cannot be provided by a Whirlpool designated service company. Service calls to correct the installation of purchase or installation date for future reference. Service must provide proof of your major appliance, to replace or...
Dimension Guide
Page 1
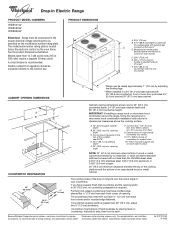
...179;⁄₈" (1.0 cm) from each front corner of wood or metal cabinet is protected by placing level on the oven frame. Because Whirlpool Corporation policy includes a continuous commitment to improve Dimensions are for 25" (64.0 cm) countertop depth, 24" (61 cm) base cabinet depth...60.3 cm) countertop notch to rear of cooktop D CABINET OPENING DIMENSIONS E** *Range can be raised approximately 1" (2.5 cm) by adjusting the leveling legs. **When installed in a 24" (61.0 cm) base cabinet with not less than 30" (76.2 cm), adjust the ³⁄₈" (1.0 cm) dimension. A ...
...179;⁄₈" (1.0 cm) from each front corner of wood or metal cabinet is protected by placing level on the oven frame. Because Whirlpool Corporation policy includes a continuous commitment to improve Dimensions are for 25" (64.0 cm) countertop depth, 24" (61 cm) base cabinet depth...60.3 cm) countertop notch to rear of cooktop D CABINET OPENING DIMENSIONS E** *Range can be raised approximately 1" (2.5 cm) by adjusting the leveling legs. **When installed in a 24" (61.0 cm) base cabinet with not less than 30" (76.2 cm), adjust the ³⁄₈" (1.0 cm) dimension. A ...
Installation Instructions
Page 1
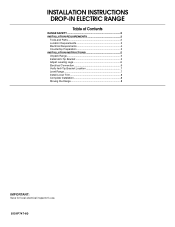
INSTALLATION INSTRUCTIONS DROP-IN ELECTRIC RANGE Table of Contents RANGE SAFETY 2 INSTALLATION REQUIREMENTS 3 Tools and Parts 3 Location Requirements 3 Electrical Requirements 4 Countertop Preparation 5 INSTALLATION INSTRUCTIONS 5 Unpack Range 5 Install Anti-Tip Bracket 5 Adjust Leveling Legs 6 Electrical Connection 6 Verify Anti-Tip Bracket Location 7 Level Range 7 Install Lower Trim 8 Complete Installation 8 Moving the Range 8 IMPORTANT: Save for local electrical inspector's use. 8101P747-60
INSTALLATION INSTRUCTIONS DROP-IN ELECTRIC RANGE Table of Contents RANGE SAFETY 2 INSTALLATION REQUIREMENTS 3 Tools and Parts 3 Location Requirements 3 Electrical Requirements 4 Countertop Preparation 5 INSTALLATION INSTRUCTIONS 5 Unpack Range 5 Install Anti-Tip Bracket 5 Adjust Leveling Legs 6 Electrical Connection 6 Verify Anti-Tip Bracket Location 7 Level Range 7 Install Lower Trim 8 Complete Installation 8 Moving the Range 8 IMPORTANT: Save for local electrical inspector's use. 8101P747-60
Installation Instructions
Page 3
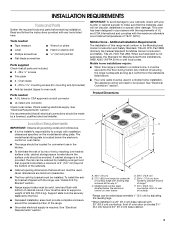
... cm) beyond 24" (61.0 cm) base cabinet. 3 When such standard is recommended that all electrical connections should be installed. To install the antitip bracket shipped with local codes. Model/serial number plate (located below the electronic control on the model/serial rating ... Check that all parts are included. ■ 2 - #8 x ¹⁄₂" screws ■ Trim plate ■ 2 - Additional Installation Requirements The installation of range** F. 23³⁄₄" (60.3 cm) countertop notch to comply with 25" (63.5 cm) countertop; Any method of 194...
... cm) beyond 24" (61.0 cm) base cabinet. 3 When such standard is recommended that all electrical connections should be installed. To install the antitip bracket shipped with local codes. Model/serial number plate (located below the electronic control on the model/serial rating ... Check that all parts are included. ■ 2 - #8 x ¹⁄₂" screws ■ Trim plate ■ 2 - Additional Installation Requirements The installation of range** F. 23³⁄₄" (60.3 cm) countertop notch to comply with 25" (63.5 cm) countertop; Any method of 194...

Installation Instructions
Page 4
... Association One Batterymarch Park Quincy, MA 02269 CSA International 8501 East Pleasant Valley Road Cleveland, OH 44131-5575 Electrical Connection To properly install your range, you must determine the type of the flexible conduit leads. 2. Connect a section of copper wire using and follow ... and UL listed for 25" (64.0 cm) countertop depth, 24" (61 cm) base cabinet depth and 36" (91.4 cm) countertop height. A A. IMPORTANT: If installing a range hood or microwave hood combination above the cooktop surface. A C B D E H F G I . 6" (15.2 cm) wide support slat on the model/serial...
... Association One Batterymarch Park Quincy, MA 02269 CSA International 8501 East Pleasant Valley Road Cleveland, OH 44131-5575 Electrical Connection To properly install your range, you must determine the type of the flexible conduit leads. 2. Connect a section of copper wire using and follow ... and UL listed for 25" (64.0 cm) countertop depth, 24" (61 cm) base cabinet depth and 36" (91.4 cm) countertop height. A A. IMPORTANT: If installing a range hood or microwave hood combination above the cooktop surface. A C B D E H F G I . 6" (15.2 cm) wide support slat on the model/serial...
Installation Instructions
Page 5
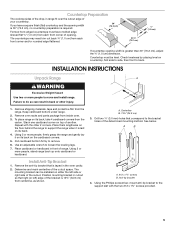
...leveling legs. 7. Place them lengthwise on the floor behind the range to the bracket holes of your countertop. Use an adjustable wrench to move and install range. If you have molded edge shaved flat ³⁄₈" (1.0 cm) from the carton. Tile countertops may need trim cut back &#...so that is 13¾" (34.9 cm) from the range. Using the Phillips screwdriver, mount anti-tip bracket to do so can be level. Install Anti-Tip Bracket 1. Place cardboard or hardboard in the oven cavity. 2. Stack one cardboard corner on countertop, first side to side, then front ...
...leveling legs. 7. Place them lengthwise on the floor behind the range to the bracket holes of your countertop. Use an adjustable wrench to move and install range. If you have molded edge shaved flat ³⁄₈" (1.0 cm) from the carton. Tile countertops may need trim cut back &#...so that is 13¾" (34.9 cm) from the range. Using the Phillips screwdriver, mount anti-tip bracket to do so can be level. Install Anti-Tip Bracket 1. Place cardboard or hardboard in the oven cavity. 2. Stack one cardboard corner on countertop, first side to side, then front ...
Installation Instructions
Page 6
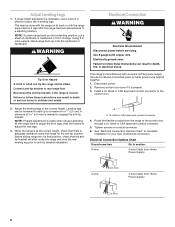
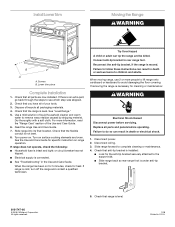
...wrench or pliers to the junction box through a UL listed or CSA approved conduit connector. 5. See "Electrical Connection Options Chart" to complete installation for the anti-tip bracket. Reconnect the anti-tip bracket, if the range is present. 3. Disconnect power. 2. When the range is ...box. 2. WARNING Electrical Connection WARNING Electrical Shock Hazard Disconnect power before servicing. Tip Over Hazard A child or adult can be killed. Install a UL listed or CSA approved conduit connector to the correct height. Tighten screws on 2 legs after the range has been placed back...
...wrench or pliers to the junction box through a UL listed or CSA approved conduit connector. 5. See "Electrical Connection Options Chart" to complete installation for the anti-tip bracket. Reconnect the anti-tip bracket, if the range is present. 3. Disconnect power. 2. When the range is ...box. 2. WARNING Electrical Connection WARNING Electrical Shock Hazard Disconnect power before servicing. Tip Over Hazard A child or adult can be killed. Install a UL listed or CSA approved conduit connector to the correct height. Tighten screws on 2 legs after the range has been placed back...
Installation Instructions
Page 7
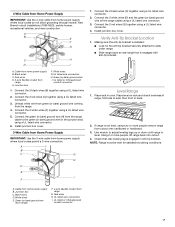
... 2 white wires (F) together using a UL listed wire connector. 2. Connect the 2 black wires (C) together using a UL listed wire connector. 5. Install junction box cover. Cable from home power supply B. Green (or bare) ground wire (from range) F. 4-wire flexible conduit from home power supply ...IMPORTANT: Use the 4-wire cable from range G. Black wires C. Connect the 2 black wires (B) together using a UL listed wire connector. 6. Install junction box cover. 3-Wire Cable from Home Power Supply IMPORTANT: Use the 3-wire cable from cutout onto cardboard or hardboard. 3. Check that ...
... 2 white wires (F) together using a UL listed wire connector. 2. Connect the 2 black wires (C) together using a UL listed wire connector. 5. Install junction box cover. Cable from home power supply B. Green (or bare) ground wire (from range) F. 4-wire flexible conduit from home power supply ...IMPORTANT: Use the 4-wire cable from range G. Black wires C. Connect the 2 black wires (B) together using a UL listed wire connector. 6. Install junction box cover. 3-Wire Cable from Home Power Supply IMPORTANT: Use the 3-wire cable from cutout onto cardboard or hardboard. 3. Check that ...
Installation Instructions
Page 8
... remove waxy residue caused by shipping material. Slide range into its final location. Connect anti-tip bracket to children and adults. Whirlpool Corporation. See the Use and Care Guide for heat. Replace all of liquid household cleaner and warm water to complete cleaning or... to do so can result in U.S.A. Check that all packaging materials. 4. Dry thoroughly with a soft cloth. Lower trim piece Complete Installation 1. Check that range is connected. ■ See "Troubleshooting" in death or serious burns to rear range foot. Turn on range ...
... remove waxy residue caused by shipping material. Slide range into its final location. Connect anti-tip bracket to children and adults. Whirlpool Corporation. See the Use and Care Guide for heat. Replace all of liquid household cleaner and warm water to complete cleaning or... to do so can result in U.S.A. Check that all packaging materials. 4. Dry thoroughly with a soft cloth. Lower trim piece Complete Installation 1. Check that range is connected. ■ See "Troubleshooting" in death or serious burns to rear range foot. Turn on range ...

Warranty
Page 1
... instructions attached to or furnished with the product, Whirlpool Corporation or Whirlpool Canada LP (hereafter "Whirlpool") will need to know your authorized Whirlpool dealer to determine if another warranty applies. Service calls to correct the installation of your major appliance to correct house wiring or... checking "Troubleshooting," you ever need service, first see the "Troubleshooting" section of God, improper installation, installation not in a manner that have been removed, altered or cannot be provided by calling Whirlpool. In Canada, call 1-800-253-1301.
... instructions attached to or furnished with the product, Whirlpool Corporation or Whirlpool Canada LP (hereafter "Whirlpool") will need to know your authorized Whirlpool dealer to determine if another warranty applies. Service calls to correct the installation of your major appliance to correct house wiring or... checking "Troubleshooting," you ever need service, first see the "Troubleshooting" section of God, improper installation, installation not in a manner that have been removed, altered or cannot be provided by calling Whirlpool. In Canada, call 1-800-253-1301.


