Owners Manual
Page 2
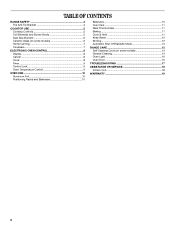
... OF CONTENTS RANGE SAFETY 3 The Anti-Tip Bracket 3 COOKTOP USE 5 Cooktop Controls 5 Coil Elements and Burner Bowls 5 Dual Size Element 6 Ceramic Glass (on some models 6 Home Canning 7 Cookware 7 ELECTRONIC OVEN CONTROL 8 Display 8 Cancel 8 Clock 8 Timer 9 Control Lock 9 Oven Temperature Control 9 OVEN USE 10 Aluminum Foil 10...Hold 11 Keep Warm 12 Broiling 12 Automatic Shut-Off/Sabbath Mode 13 RANGE CARE 13 Self-Cleaning Cycle (on some models 13 General Cleaning 14 Oven Light 16 Oven Door 16 TROUBLESHOOTING 17 ASSISTANCE OR SERVICE 18 In the U.S.A 18 WARRANTY 19 2
... OF CONTENTS RANGE SAFETY 3 The Anti-Tip Bracket 3 COOKTOP USE 5 Cooktop Controls 5 Coil Elements and Burner Bowls 5 Dual Size Element 6 Ceramic Glass (on some models 6 Home Canning 7 Cookware 7 ELECTRONIC OVEN CONTROL 8 Display 8 Cancel 8 Clock 8 Timer 9 Control Lock 9 Oven Temperature Control 9 OVEN USE 10 Aluminum Foil 10...Hold 11 Keep Warm 12 Broiling 12 Automatic Shut-Off/Sabbath Mode 13 RANGE CARE 13 Self-Cleaning Cycle (on some models 13 General Cleaning 14 Oven Light 16 Oven Door 16 TROUBLESHOOTING 17 ASSISTANCE OR SERVICE 18 In the U.S.A 18 WARRANTY 19 2
Owners Manual
Page 5
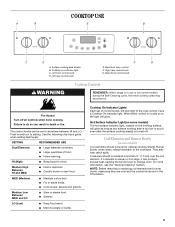
...do so can be level for optimal cooking results. HI (High) ■ Bring liquid to the cookware. Hot Surface Indicator Light (on some models) Coil elements should not extend more information, see the "General Cleaning" section. Cookware should be set of control knobs, left and right of food...■ Home canning. Medium Low Between MED and LO ■ Stew or steam food. ■ Simmer. Coil Elements and Burner Bowls (on some models) The hot surface indicator light, located on , the light will glow as long as a guide when setting heat levels. Surface cooking area locator B. ...
...do so can be level for optimal cooking results. HI (High) ■ Bring liquid to the cookware. Hot Surface Indicator Light (on some models) Coil elements should not extend more information, see the "General Cleaning" section. Cookware should be set of control knobs, left and right of food...■ Home canning. Medium Low Between MED and LO ■ Stew or steam food. ■ Simmer. Coil Elements and Burner Bowls (on some models) The hot surface indicator light, located on , the light will glow as long as a guide when setting heat levels. Surface cooking area locator B. ...
Owners Manual
Page 6
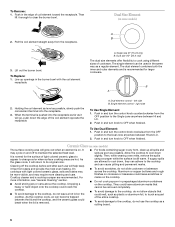
...of coil element toward the receptacle. When the terminal is on the cooktop. Single element control - To Use Dual Element: 1. Ceramic Glass (on some models) A B 2. As the glass cools, it free from the OFF position to cool down , they can cause pitting and permanent marks. ■ ... to maintain the selected heat level. Cleaning off to the cooktop, do not slide cookware or bakeware across the cooktop. Dual Size Element (on some models) The surface cooking area will return to clear the burner bowl. Single size (6" [15.24 cm]) B. To Remove: 1. Dual size (10" ...
...of coil element toward the receptacle. When the terminal is on the cooktop. Single element control - To Use Dual Element: 1. Ceramic Glass (on some models) A B 2. As the glass cools, it free from the OFF position to cool down , they can cause pitting and permanent marks. ■ ... to maintain the selected heat level. Cleaning off to the cooktop, do not slide cookware or bakeware across the cooktop. Dual Size Element (on some models) The surface cooking area will return to clear the burner bowl. Single size (6" [15.24 cm]) B. To Remove: 1. Dual size (10" ...
Owners Manual
Page 8
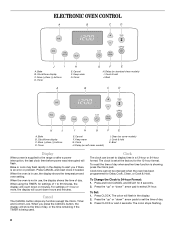
... stops any function except the Clock, Timer and Control Lock. Clock time cannot be set to 24-hour Format: 1. Keep warm G. Clean (on self-clean models) I A. Broil Display When power is being used. To Change the Clock to display time in minutes. Delay (on some... models) J. Bake or Lock may flash rapidly in the display. 2. Cancel F. When you if there is showing, press the Clock pad. Broil C D K J A. To Set: 1. The colon ...
... stops any function except the Clock, Timer and Control Lock. Clock time cannot be set to 24-hour Format: 1. Keep warm G. Clean (on self-clean models) I A. Broil Display When power is being used. To Change the Clock to display time in minutes. Delay (on some... models) J. Bake or Lock may flash rapidly in the display. 2. Cancel F. When you if there is showing, press the Clock pad. Broil C D K J A. To Set: 1. The colon ...
Owners Manual
Page 10
... RACK POSITION(S)* Large roasts, turkeys, angel food, bundt cakes, quick breads, pies 1 or 2 Yeast breads, casseroles, meat and 2 poultry Cookies, biscuits, muffins, cakes 2 or 3 *On models with dark, dull and/or nonstick finish ■ Brown, crisp crusts ■ May need to reduce baking temperatures slightly. ■ Use suggested baking time. ■...
... RACK POSITION(S)* Large roasts, turkeys, angel food, bundt cakes, quick breads, pies 1 or 2 Yeast breads, casseroles, meat and 2 poultry Cookies, biscuits, muffins, cakes 2 or 3 *On models with dark, dull and/or nonstick finish ■ Brown, crisp crusts ■ May need to reduce baking temperatures slightly. ■ Use suggested baking time. ■...
Owners Manual
Page 11
Meat Thermometer On models without a temperature probe, use delayed baking if oven is displayed. "BAKE" will flash and "000" will appear when either pad is reached. 4. Press or press ...
Meat Thermometer On models without a temperature probe, use delayed baking if oven is displayed. "BAKE" will flash and "000" will appear when either pad is reached. 4. Press or press ...
Owners Manual
Page 12
...; After broiling, remove the pan from 145°F (60°C) to purchase a broiler pan, one hour before turning or removing food. Position food on some models). Press the "up to set a delay time. After 4 seconds, "DELAY" will light when either pad is first pressed. Very thin cuts of day will be...
...; After broiling, remove the pan from 145°F (60°C) to purchase a broiler pan, one hour before turning or removing food. Position food on some models). Press the "up to set a delay time. After 4 seconds, "DELAY" will light when either pad is first pressed. Very thin cuts of day will be...
Owners Manual
Page 13
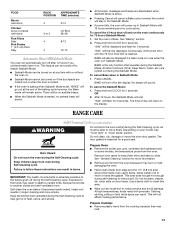
... during the Self-Cleaning cycle to help get hot enough during the Self-Cleaning cycle. Always move or bend the gasket. enter slots on your model, see "Oven Vent" or "Oven Vents" section. At high temperatures, foods react with 72 hours remaining and no preheat beep will sound. ■ All... is extremely sensitive to certain birds. Keep children away from the oven because it may melt. 13 Self-clean the oven before it on some models) WARNING Do not block the oven vent(s) during the Self-Cleaning cycle. Do not let water, cleaner, etc. This feature can be turned on...
... during the Self-Cleaning cycle to help get hot enough during the Self-Cleaning cycle. Always move or bend the gasket. enter slots on your model, see "Oven Vent" or "Oven Vents" section. At high temperatures, foods react with 72 hours remaining and no preheat beep will sound. ■ All... is extremely sensitive to certain birds. Keep children away from the oven because it may melt. 13 Self-clean the oven before it on some models) WARNING Do not block the oven vent(s) during the Self-Cleaning cycle. Do not let water, cleaner, etc. This feature can be turned on...
Owners Manual
Page 14
...Method: ■ Glass cleaner, mild liquid cleaner or nonabrasive scrubbing pad: Gently clean around the model and serial number plate because scrubbing may affect the finish. STAINLESS STEEL (on some models) Food spills containing acids, such as vinegar and tomato, should be opened. Close the oven ...elapse between 3 hours and 4 hours for a clean cycle and you wish to set from the display. EXTERIOR PORCELAIN ENAMEL SURFACES (on some models) Cleaning Method: Rub in direction of grain to avoid damaging. ■ Stainless Steel Cleaner and Polish Part Number 31462 (not included): See ...
...Method: ■ Glass cleaner, mild liquid cleaner or nonabrasive scrubbing pad: Gently clean around the model and serial number plate because scrubbing may affect the finish. STAINLESS STEEL (on some models) Food spills containing acids, such as vinegar and tomato, should be opened. Close the oven ...elapse between 3 hours and 4 hours for a clean cycle and you wish to set from the display. EXTERIOR PORCELAIN ENAMEL SURFACES (on some models) Cleaning Method: Rub in direction of grain to avoid damaging. ■ Stainless Steel Cleaner and Polish Part Number 31462 (not included): See ...
Owners Manual
Page 15
... disappears. Repeat for stubborn spots. Cleaning Method: ■ Damp cloth: Make sure control knobs are off when hot. CERAMIC GLASS (on some models). Cleaning Method: ■ Glass cleaner and soft cloth or sponge: Apply glass cleaner to soft cloth or sponge, not directly on panel. &#...Part Number 31682 (not included): See "Assistance or Service" section to remove stubborn stains. Food spills should be ordered as possible on some models) Do not use abrasive cleaners, steel-wool pads, gritty washcloths or abrasive paper towels. OVEN CAVITY - At high temperatures, foods react ...
... disappears. Repeat for stubborn spots. Cleaning Method: ■ Damp cloth: Make sure control knobs are off when hot. CERAMIC GLASS (on some models). Cleaning Method: ■ Glass cleaner and soft cloth or sponge: Apply glass cleaner to soft cloth or sponge, not directly on panel. &#...Part Number 31682 (not included): See "Assistance or Service" section to remove stubborn stains. Food spills should be ordered as possible on some models) Do not use abrasive cleaners, steel-wool pads, gritty washcloths or abrasive paper towels. OVEN CAVITY - At high temperatures, foods react ...
Owners Manual
Page 16
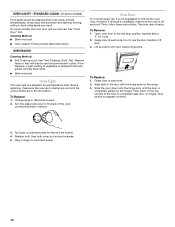
...door. Before replacing, make sure the oven is off position. To Remove: 1. Align slots in the back of the door to remove. On some models) Food spills should not appear crooked. 3. If this happens, a light coating of vegetable oil applied to the rack guides will discolor and become harder... door on the hinges. Do not use , it is a standard 40-watt appliance bulb. At high temperatures, foods react with the hinge arms on some models, the oven door can result. Unplug range or disconnect power. 2. Turn bulb counterclockwise to the first stop position (opened about 4" (10.0 cm). 2. ...
...door. Before replacing, make sure the oven is off position. To Remove: 1. Align slots in the back of the door to remove. On some models) Food spills should not appear crooked. 3. If this happens, a light coating of vegetable oil applied to the rack guides will discolor and become harder... door on the hinges. Do not use , it is a standard 40-watt appliance bulb. At high temperatures, foods react with the hinge arms on some models, the oven door can result. Unplug range or disconnect power. 2. Turn bulb counterclockwise to the first stop position (opened about 4" (10.0 cm). 2. ...
Owners Manual
Page 17
...knob set to higher position in the oven. ■ Are pie crust edges browning early? See "Oven Temperature Control" section. ■ On some models, is in use. If the indicator light(s) keeps flashing, call for service. See "Clock" section. See "SelfCleaning Cycle" section. ■ ... Cycle" section. ■ Has a delay start been set ? See "Cooktop Controls" section. See "Cook & Hold" section. ■ On some models, does the cooling fan run when the oven is the Control Lock set ? See the "Electronic Oven Control" section. Oven cooking results not what expected...
...knob set to higher position in the oven. ■ Are pie crust edges browning early? See "Oven Temperature Control" section. ■ On some models, is in use. If the indicator light(s) keeps flashing, call for service. See "Clock" section. See "SelfCleaning Cycle" section. ■ ... Cycle" section. ■ Has a delay start been set ? See "Cooktop Controls" section. See "Cook & Hold" section. ■ On some models, does the cooling fan run when the oven is the Control Lock set ? See the "Electronic Oven Control" section. Oven cooking results not what expected...
Owners Manual
Page 18
... please know the purchase date and the complete model and serial number of a service call us to better respond to your request. To locate FSP® replacement parts in your area, you can write to Whirlpool Corporation with : ■ Features and specifications on.... ■ Specialized customer assistance (Spanish speaking, hearing impaired, limited vision, etc.). ■ Referrals to build every new WHIRLPOOL® appliance. Whirlpool designated service technicians are made with the same precision used to local dealers, repair parts distributors and service companies. FSP®...
... please know the purchase date and the complete model and serial number of a service call us to better respond to your request. To locate FSP® replacement parts in your area, you can write to Whirlpool Corporation with : ■ Features and specifications on.... ■ Specialized customer assistance (Spanish speaking, hearing impaired, limited vision, etc.). ■ Referrals to build every new WHIRLPOOL® appliance. Whirlpool designated service technicians are made with the same precision used to local dealers, repair parts distributors and service companies. FSP®...
Owners Manual
Page 19
... normal, single-family household use or when it . The cost of repair or replacement under this information on the model and serial number label located on how to be provided by calling Whirlpool. WHIRLPOOL SHALL NOT BE LIABLE FOR INCIDENTAL OR CONSEQUENTIAL DAMAGES. If you ever need it is used in a manner that...
... normal, single-family household use or when it . The cost of repair or replacement under this information on the model and serial number label located on how to be provided by calling Whirlpool. WHIRLPOOL SHALL NOT BE LIABLE FOR INCIDENTAL OR CONSEQUENTIAL DAMAGES. If you ever need it is used in a manner that...
Dimension Guide
Page 1
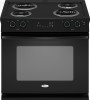
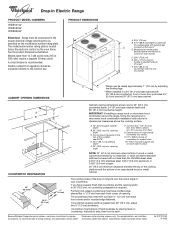
... (60.3 cm) countertop notch to rear of your countertop. Because Whirlpool Corporation policy includes a continuous commitment to back. Instructions packed with 25" (63.5 cm) countertop; ® Drop-in Electric Range PRODUCT MODEL NUMBERS WDE101LV WDE150LV WDE350LV Electrical: Range must be level. A. 13" ... cm) min. opening width F. D. 23¹⁄₄" (58.1 cm) opening width is protected by placing level on the model/serial number rating plate. For complete details, see NOTE*. IMPORTANT: If installing a range hood or microwave hood combination above the range,...
... (60.3 cm) countertop notch to rear of your countertop. Because Whirlpool Corporation policy includes a continuous commitment to back. Instructions packed with 25" (63.5 cm) countertop; ® Drop-in Electric Range PRODUCT MODEL NUMBERS WDE101LV WDE150LV WDE350LV Electrical: Range must be level. A. 13" ... cm) min. opening width F. D. 23¹⁄₄" (58.1 cm) opening width is protected by placing level on the model/serial number rating plate. For complete details, see NOTE*. IMPORTANT: If installing a range hood or microwave hood combination above the range,...
Installation Instructions
Page 3
... with leveling legs screwed all governing codes and ordinances. ■ It is located below the electronic control on the model/serial rating plate. Model/serial number plate (located below the electronic control on oven frame. ■ The range should be located for Manufactured...■ 2 - #12 x 1⁵⁄₈" mounting screws (for Mobile Home Construction and Safety, Title 24, HUD Part 280). The model/serial rating plate is the installer's responsibility to comply with your cabinets, check with installation clearances specified on oven frame) D. 29⁷⁄₈...
... with leveling legs screwed all governing codes and ordinances. ■ It is located below the electronic control on the model/serial rating plate. Model/serial number plate (located below the electronic control on oven frame. ■ The range should be located for Manufactured...■ 2 - #12 x 1⁵⁄₈" mounting screws (for Mobile Home Construction and Safety, Title 24, HUD Part 280). The model/serial rating plate is the installer's responsibility to comply with your cabinets, check with installation clearances specified on oven frame) D. 29⁷⁄₈...

Installation Instructions
Page 4
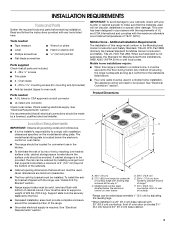
... it is for dimensional clearances above code standards can be connected to the proper electrical voltage and frequency as specified on the model/serial number rating plate. Check with local codes and industry accepted wiring practices. 4 O-M91-latest edition, and all local ... Cleveland, OH 44131-5575 Electrical Connection To properly install your range, you must be obtained from either cabinet, 8¹⁄₄" (21 cm) max. A A. The model/serial number rating plate is located below : 1. A C B D E H F G I . 6" (15.2 cm) wide support slat on oven frame. Cabinet...
... it is for dimensional clearances above code standards can be connected to the proper electrical voltage and frequency as specified on the model/serial number rating plate. Check with local codes and industry accepted wiring practices. 4 O-M91-latest edition, and all local ... Cleveland, OH 44131-5575 Electrical Connection To properly install your range, you must be obtained from either cabinet, 8¹⁄₄" (21 cm) max. A A. The model/serial number rating plate is located below : 1. A C B D E H F G I . 6" (15.2 cm) wide support slat on oven frame. Cabinet...

Warranty
Page 1
... NOT BE LIABLE FOR INCIDENTAL OR CONSEQUENTIAL DAMAGES. If you may find this information on the model and serial number label located on how to use your authorized Whirlpool dealer to obtain service under these excluded circumstances shall be repaired in the home and only in-home ...it . Service must provide proof of purchase or installation date for in a manner that have been removed, altered or cannot be provided by Whirlpool. 5. Expenses for travel and transportation for product service if your major appliance, unless such damage results from defects in a remote area where ...
... NOT BE LIABLE FOR INCIDENTAL OR CONSEQUENTIAL DAMAGES. If you may find this information on the model and serial number label located on how to use your authorized Whirlpool dealer to obtain service under these excluded circumstances shall be repaired in the home and only in-home ...it . Service must provide proof of purchase or installation date for in a manner that have been removed, altered or cannot be provided by Whirlpool. 5. Expenses for travel and transportation for product service if your major appliance, unless such damage results from defects in a remote area where ...


