Owners Manual
Page 1
www.whirlpool.com Table of Contents 2 W10175572A ® DROP-IN ELECTRIC RANGES Use & Care Guide For questions about features, operation/performance, parts, accessories or service, call: 1-800-253-1301. or visit our website at...
www.whirlpool.com Table of Contents 2 W10175572A ® DROP-IN ELECTRIC RANGES Use & Care Guide For questions about features, operation/performance, parts, accessories or service, call: 1-800-253-1301. or visit our website at...
Owners Manual
Page 4
..., turn the fan on a hot cooking area, be allowed to avoid steam burn. The range is used in Manual. ■ Before Self-Cleaning the Oven - Contact a qualified technician immediately. ■ Clean Cooktop With Caution - Do not repair or replace any part of electric shock, or fire. ■ Glazed Cooking Utensils - Other surfaces of the...
..., turn the fan on a hot cooking area, be allowed to avoid steam burn. The range is used in Manual. ■ Before Self-Cleaning the Oven - Contact a qualified technician immediately. ■ Clean Cooktop With Caution - Do not repair or replace any part of electric shock, or fire. ■ Glazed Cooking Utensils - Other surfaces of the...
Owners Manual
Page 6
... edge of light colored ceramic glass to appear to the Dual zone anywhere between HI and LO. 2. Cleaning off to cool down , they can become trapped between HI and LO. 2. Dropping a heavy or hard object onto the cooktop could crack the cooktop. ■ To avoid damage to ... cooktop scraper are allowed to cool down slightly. To Use Dual Element: 1. If sugary spills are recommended. Single element control - Push in any part of cookware. left side B. Then, while wearing oven mitts, remove the spills using different sizes of the entire cooktop. ■ To avoid damage ...
... edge of light colored ceramic glass to appear to the Dual zone anywhere between HI and LO. 2. Cleaning off to cool down , they can become trapped between HI and LO. 2. Dropping a heavy or hard object onto the cooktop could crack the cooktop. ■ To avoid damage to ... cooktop scraper are allowed to cool down slightly. To Use Dual Element: 1. If sugary spills are recommended. Single element control - Push in any part of cookware. left side B. Then, while wearing oven mitts, remove the spills using different sizes of the entire cooktop. ■ To avoid damage ...
Owners Manual
Page 12
...may be displayed while Keep Warm is active. To cancel Keep Warm: Press CANCEL. Ask for Part Number 4396923. ■ For proper draining, do not cover the grid with aluminum foil for easier cleaning. ■ Trim excess fat to purchase a broiler pan, one hour before or after cooking... or "down " arrow pad to the top (5). Keep Warm WARNING Food Poisoning Hazard Do not let food sit in the heated oven, making cleaning more precise control when cooking. To Set Keep Warm: 1. "WARM" and the temperature will begin. Changing the temperature when broiling allows more difficult....
...may be displayed while Keep Warm is active. To cancel Keep Warm: Press CANCEL. Ask for Part Number 4396923. ■ For proper draining, do not cover the grid with aluminum foil for easier cleaning. ■ Trim excess fat to purchase a broiler pan, one hour before or after cooking... or "down " arrow pad to the top (5). Keep Warm WARNING Food Poisoning Hazard Do not let food sit in the heated oven, making cleaning more precise control when cooking. To Set Keep Warm: 1. "WARM" and the temperature will begin. Changing the temperature when broiling allows more difficult....
Owners Manual
Page 14
...popping sounds. STAINLESS STEEL (on some models) Food spills containing acids, such as vinegar and tomato, should be cleaned as soon as the entire range is not closed completely or it has completely cooled. How the Cycle Works IMPORTANT: The heating and cooling of ...washcloths or abrasive paper towels. ■ All-Purpose Appliance Cleaner Part Number 31682 (not included): See "Assistance or Service" section to show that the oven is set for a delayed clean operation. Medium soil, 3 hours) CL-L (Clean - After 4 seconds, "CLEAN," "DELAY," and "LOCK" will appear in the display. "...
...popping sounds. STAINLESS STEEL (on some models) Food spills containing acids, such as vinegar and tomato, should be cleaned as soon as the entire range is not closed completely or it has completely cooled. How the Cycle Works IMPORTANT: The heating and cooling of ...washcloths or abrasive paper towels. ■ All-Purpose Appliance Cleaner Part Number 31682 (not included): See "Assistance or Service" section to show that the oven is set for a delayed clean operation. Medium soil, 3 hours) CL-L (Clean - After 4 seconds, "CLEAN," "DELAY," and "LOCK" will appear in the display. "...
Owners Manual
Page 15
...on panel. ■ All-Purpose Appliance Cleaner Part Number 31682 (not included): See "Assistance or Service" section to order. SELF-CLEAN (on some models, do not remove seals under knobs. Cleaning Method: ■ Self-Cleaning cycle: See "Self-Cleaning Cycle" first. 15 You may activate the...sponge, not directly on panel. ■ All-Purpose Appliance Cleaner Part Number 31682 (not included): See "Assistance or Service" section to order. Soil will become less noticeable. BURNER BOWLS (on some models) Cleaning Method: Chrome burner bowls Wash frequently in a dishwasher). OVEN ...
...on panel. ■ All-Purpose Appliance Cleaner Part Number 31682 (not included): See "Assistance or Service" section to order. SELF-CLEAN (on some models, do not remove seals under knobs. Cleaning Method: ■ Self-Cleaning cycle: See "Self-Cleaning Cycle" first. 15 You may activate the...sponge, not directly on panel. ■ All-Purpose Appliance Cleaner Part Number 31682 (not included): See "Assistance or Service" section to order. Soil will become less noticeable. BURNER BOWLS (on some models) Cleaning Method: Chrome burner bowls Wash frequently in a dishwasher). OVEN ...
Owners Manual
Page 18
...directory Yellow Pages. This information will fit right and work right because they are trained to Whirlpool Corporation with the same precision used to order replacement parts, we recommend that you can write to fulfill the product warranty and provide afterwarranty service, anywhere...full line of a service call us to better respond to local dealers, repair parts distributors and service companies. Whirlpool designated service technicians are made with any questions or concerns at: Whirlpool Brand Home Appliances Customer eXperience Center 553 Benson Road Benton Harbor, MI 49022-...
...directory Yellow Pages. This information will fit right and work right because they are trained to Whirlpool Corporation with the same precision used to order replacement parts, we recommend that you can write to fulfill the product warranty and provide afterwarranty service, anywhere...full line of a service call us to better respond to local dealers, repair parts distributors and service companies. Whirlpool designated service technicians are made with any questions or concerns at: Whirlpool Brand Home Appliances Customer eXperience Center 553 Benson Road Benton Harbor, MI 49022-...
Owners Manual
Page 19
... on the model and serial number label located on how to use of consumables or cleaning products not approved by this warranty. 8. Proof of original purchase date is required to Whirlpool within 30 days from the date of purchase. 6. Service calls to correct the installation... Serial number Purchase date 19 This limited warranty is valid only in -home service is covered by Whirlpool. 5. Consumable parts are excluded from your major appliance. Repairs to parts or systems resulting from unauthorized modifications made to repair or replace appliance light bulbs, air filters or water...
... on the model and serial number label located on how to use of consumables or cleaning products not approved by this warranty. 8. Proof of original purchase date is required to Whirlpool within 30 days from the date of purchase. 6. Service calls to correct the installation... Serial number Purchase date 19 This limited warranty is valid only in -home service is covered by Whirlpool. 5. Consumable parts are excluded from your major appliance. Repairs to parts or systems resulting from unauthorized modifications made to repair or replace appliance light bulbs, air filters or water...
Installation Instructions
Page 1
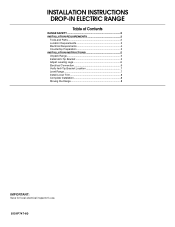
INSTALLATION INSTRUCTIONS DROP-IN ELECTRIC RANGE Table of Contents RANGE SAFETY 2 INSTALLATION REQUIREMENTS 3 Tools and Parts 3 Location Requirements 3 Electrical Requirements 4 Countertop Preparation 5 INSTALLATION INSTRUCTIONS 5 Unpack Range 5 Install Anti-Tip Bracket 5 Adjust Leveling Legs 6 Electrical Connection 6 Verify Anti-Tip Bracket Location 7 Level Range 7 Install Lower Trim 8 Complete Installation 8 Moving the Range 8 IMPORTANT: Save for local electrical inspector's use. 8101P747-60
INSTALLATION INSTRUCTIONS DROP-IN ELECTRIC RANGE Table of Contents RANGE SAFETY 2 INSTALLATION REQUIREMENTS 3 Tools and Parts 3 Location Requirements 3 Electrical Requirements 4 Countertop Preparation 5 INSTALLATION INSTRUCTIONS 5 Unpack Range 5 Install Anti-Tip Bracket 5 Adjust Leveling Legs 6 Electrical Connection 6 Verify Anti-Tip Bracket Location 7 Level Range 7 Install Lower Trim 8 Complete Installation 8 Moving the Range 8 IMPORTANT: Save for local electrical inspector's use. 8101P747-60
Installation Instructions
Page 3
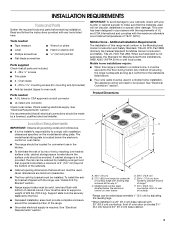
...See "Electrical Connection" section. To install the antitip bracket shipped with the range, see "Install Anti-Tip Bracket" section. ■ Range support slats must be securely fastened to the standards listed above the surface units should be installed. Model/serial number plate (...range must be avoided. Any method of cooktop *Range can be reduced by reaching over heated surface units, cabinet storage space located above . ■ Four-wire cable must conform to the Manufactured Home Construction and Safety Standard, Title 24 CFR, Part 3280 (formerly the Federal Standard...
...See "Electrical Connection" section. To install the antitip bracket shipped with the range, see "Install Anti-Tip Bracket" section. ■ Range support slats must be securely fastened to the standards listed above the surface units should be installed. Model/serial number plate (...range must be avoided. Any method of cooktop *Range can be reduced by reaching over heated surface units, cabinet storage space located above . ■ Four-wire cable must conform to the Manufactured Home Construction and Safety Standard, Title 24 CFR, Part 3280 (formerly the Federal Standard...

Installation Instructions
Page 4
...path and wire gauge are in conformance with the National Electrical Code, ANSI/ NFPA 70-latest edition or CSA Standards C22.1-94, Canadian Electrical Code, Part 1 and C22.2 No. Follow the electrical connector manufacturer's recommended procedure. from either cabinet, 8¹⁄&#...23¹⁄₄" (58.1 cm) opening depth E. 30" (76.2 cm) min. IMPORTANT: If installing a range hood or microwave hood combination above code standards can be obtained from: National Fire Protection Association One Batterymarch Park Quincy, MA 02269 CSA International 8501 East Pleasant Valley Road...
...path and wire gauge are in conformance with the National Electrical Code, ANSI/ NFPA 70-latest edition or CSA Standards C22.1-94, Canadian Electrical Code, Part 1 and C22.2 No. Follow the electrical connector manufacturer's recommended procedure. from either cabinet, 8¹⁄&#...23¹⁄₄" (58.1 cm) opening depth E. 30" (76.2 cm) min. IMPORTANT: If installing a range hood or microwave hood combination above code standards can be obtained from: National Fire Protection Association One Batterymarch Park Quincy, MA 02269 CSA International 8501 East Pleasant Valley Road...
Installation Instructions
Page 5
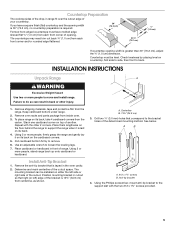
...3. A B A. #12 x 1⁵⁄₈" screws B. Using the Phillips screwdriver, mount anti-tip bracket to support the range when it on its back on either the left ) edge of opening width is laid on its back. 4. If you have...two or more people, firmly grasp the range and gently lay it is greater than 30" (76.2 cm), adjust the ³⁄₈" (1.0 cm) dimension. Remove oven racks and parts package from each front corner of the ... loosen the leveling legs. 7. Countertop Preparation The cooktop sides of the drop-in range fit over the cutout edge of the cutout space.
...3. A B A. #12 x 1⁵⁄₈" screws B. Using the Phillips screwdriver, mount anti-tip bracket to support the range when it on its back on either the left ) edge of opening width is laid on its back. 4. If you have...two or more people, firmly grasp the range and gently lay it is greater than 30" (76.2 cm), adjust the ³⁄₈" (1.0 cm) dimension. Remove oven racks and parts package from each front corner of the ... loosen the leveling legs. 7. Countertop Preparation The cooktop sides of the drop-in range fit over the cutout edge of the cutout space.
Installation Instructions
Page 8
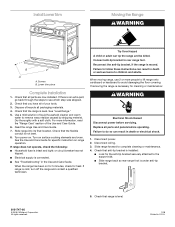
...Connect anti-tip bracket to complete cleaning or maintenance. 4. Failure to see which step was skipped. 2. Check that range is connected. ■ See "Troubleshooting" in death or electrical shock. 1. Read the range Use and Care Guide. 7. If range does not operate, check the ...-tip bracket. 8101747-60 © 2008. Disconnect wiring. 3. Check that all parts and panels before servicing. See "Level Range." 5. When the range has been on . Whirlpool Corporation. Install Lower Trim Moving the Range WARNING B A A. Use a mild solution of /recycle all of the Use ...
...Connect anti-tip bracket to complete cleaning or maintenance. 4. Failure to see which step was skipped. 2. Check that range is connected. ■ See "Troubleshooting" in death or electrical shock. 1. Read the range Use and Care Guide. 7. If range does not operate, check the ...-tip bracket. 8101747-60 © 2008. Disconnect wiring. 3. Check that all parts and panels before servicing. See "Level Range." 5. When the range has been on . Whirlpool Corporation. Install Lower Trim Moving the Range WARNING B A A. Use a mild solution of /recycle all of the Use ...


