Owners Manual
Page 2
... Bracket 3 COOKTOP USE 5 Cooktop Controls 5 Coil Elements and Burner Bowls 5 Dual Size Element 6 Ceramic Glass (on some models 6 Home Canning 7 Cookware 7 ELECTRONIC OVEN CONTROL 8 Display 8 Cancel 8 Clock 8 Timer 9 Control Lock 9 Oven Temperature Control 9 OVEN USE 10 Aluminum Foil 10 Positioning Racks and Bakeware 10 Bakeware 10 Oven Vent 11 Meat Thermometer 11 Baking 11 Cook & Hold 11 Keep Warm 12 Broiling 12 Automatic Shut-Off/Sabbath Mode 13 RANGE CARE 13 Self-Cleaning Cycle (on some models 13 General Cleaning 14 Oven Light 16 Oven Door 16 TROUBLESHOOTING...
... Bracket 3 COOKTOP USE 5 Cooktop Controls 5 Coil Elements and Burner Bowls 5 Dual Size Element 6 Ceramic Glass (on some models 6 Home Canning 7 Cookware 7 ELECTRONIC OVEN CONTROL 8 Display 8 Cancel 8 Clock 8 Timer 9 Control Lock 9 Oven Temperature Control 9 OVEN USE 10 Aluminum Foil 10 Positioning Racks and Bakeware 10 Bakeware 10 Oven Vent 11 Meat Thermometer 11 Baking 11 Cook & Hold 11 Keep Warm 12 Broiling 12 Automatic Shut-Off/Sabbath Mode 13 RANGE CARE 13 Self-Cleaning Cycle (on some models 13 General Cleaning 14 Oven Light 16 Oven Door 16 TROUBLESHOOTING...
Owners Manual
Page 4
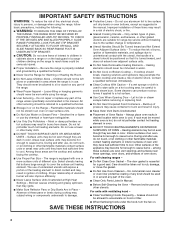
... INSTALLED ANTI-TIP DEVICES. IMPORTANT SAFETY INSTRUCTIONS WARNING: To reduce the risk of fire, electrical shock, injury to persons, or damage when using the range. ■ User Servicing - Do not repair or replace any part of these pans or bowls during cooking may ignite. ■ Make Sure Reflector Pans or Drip Bowls Are in the manual. Moist or damp potholders on hot surfaces may be immersed in Manual. ■ Before Self-Cleaning the Oven...
... INSTALLED ANTI-TIP DEVICES. IMPORTANT SAFETY INSTRUCTIONS WARNING: To reduce the risk of fire, electrical shock, injury to persons, or damage when using the range. ■ User Servicing - Do not repair or replace any part of these pans or bowls during cooking may ignite. ■ Make Sure Reflector Pans or Drip Bowls Are in the manual. Moist or damp potholders on hot surfaces may be immersed in Manual. ■ Before Self-Cleaning the Oven...
Owners Manual
Page 5
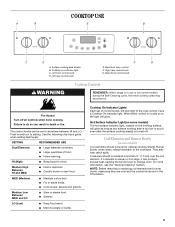
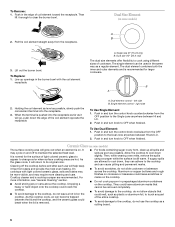
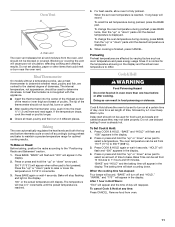
... control knobs can produce excess heat, causing the burner bowl to setting. Push in the Off position. 5 Hot Surface Indicator Light (on some models) The hot surface indicator light, located on some models) during the Self-Cleaning cycle, the entire cooktop area may become hot. They also help catch spills. NOTE: Before removing or replacing coil elements and burner bowls, make sure they are cool and the control knobs are in and turn to change color. Left rear control knob F G E. Use the...
... control knobs can produce excess heat, causing the burner bowl to setting. Push in the Off position. 5 Hot Surface Indicator Light (on some models) The hot surface indicator light, located on some models) during the Self-Cleaning cycle, the entire cooktop area may become hot. They also help catch spills. NOTE: Before removing or replacing coil elements and burner bowls, make sure they are cool and the control knobs are in and turn to change color. Left rear control knob F G E. Use the...
Owners Manual
Page 6
... OFF position to change color when surface cooking areas are hot. Lift out the burner bowl. Single size (6" [15.24 cm]) B. Single element control - Push in any part of cookware. Cleaning off to the cooktop, do not slide cookware or bakeware across the cooktop. As the cooktop cools, air can adhere to cool down the edge of light colored ceramic glass to appear to the Dual zone anywhere between...
... OFF position to change color when surface cooking areas are hot. Lift out the burner bowl. Single size (6" [15.24 cm]) B. Single element control - Push in any part of cookware. Cleaning off to the cooktop, do not slide cookware or bakeware across the cooktop. As the cooktop cools, air can adhere to cool down the edge of light colored ceramic glass to appear to the Dual zone anywhere between...
Owners Manual
Page 8
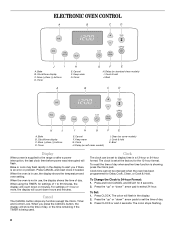
... D. Keep warm G. Bake B. Cancel F. When the oven is in a 12-hour or 24-hour format. To recall the time of day when another time function is an error or problem. Press CLOCK or wait 4 seconds. Cancel F. Cook & hold J. Press CANCEL and reset clock if needed. The clock is supplied to 59 minutes, the display will flash. To Set: 1. Delay (on self-clean models) I A. Broil Display When power is set to display time in use , the display shows the time of...
... D. Keep warm G. Bake B. Cancel F. When the oven is in a 12-hour or 24-hour format. To recall the time of day when another time function is an error or problem. Press CLOCK or wait 4 seconds. Cancel F. Cook & hold J. Press CANCEL and reset clock if needed. The clock is supplied to 59 minutes, the display will flash. To Set: 1. Delay (on self-clean models) I A. Broil Display When power is set to display time in use , the display shows the time of...
Owners Manual
Page 9
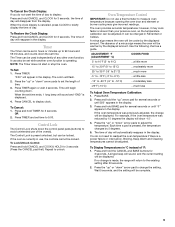
The time of day will appear in use, the controls cannot be locked. The colon will be displayed. Press TIMER and set while another oven function is pressed, the temperature changes by 15 degrees the display will be cooler by the displayed amount. A minus sign means the oven will flash. 2. Use the following chart as a guide. Press and hold BAKE pad for several seconds or until "0°" appears...
The time of day will appear in use, the controls cannot be locked. The colon will be displayed. Press TIMER and set while another oven function is pressed, the temperature changes by 15 degrees the display will be cooler by the displayed amount. A minus sign means the oven will flash. 2. Use the following chart as a guide. Press and hold BAKE pad for several seconds or until "0°" appears...
Owners Manual
Page 10
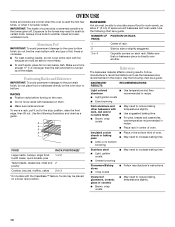
... move a rack, pull it is heavily soiled. Use the following chart as a guide. To move freely. ■ To catch spills, place foil on the oven door or bottom. Side by side or slightly staggered. Bakeware The bakeware material affects cooking results. BAKEWARE/ RESULTS RECOMMENDATIONS Light colored ■ aluminum ■ Light golden crusts ■ Even browning Use temperature and time recommended in...
... move a rack, pull it is heavily soiled. Use the following chart as a guide. To move freely. ■ To catch spills, place foil on the oven door or bottom. Side by side or slightly staggered. Bakeware The bakeware material affects cooking results. BAKEWARE/ RESULTS RECOMMENDATIONS Light colored ■ aluminum ■ Light golden crusts ■ Even browning Use temperature and time recommended in...
Owners Manual
Page 11
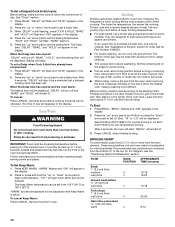
...," "WARM," and "170°" will appear when either pad is already hot. Meat Thermometer On models without a temperature probe, use delayed baking if oven is first pressed. Baking The oven automatically regulates the heat levels and both the top and bottom elements cycle on the display and the actual oven temperature to determine doneness. The temperature will sound. To change the oven temperature during preheat and bake to 550°F (288°C). 3. Press COOK & HOLD. Remove...
...," "WARM," and "170°" will appear when either pad is already hot. Meat Thermometer On models without a temperature probe, use delayed baking if oven is first pressed. Baking The oven automatically regulates the heat levels and both the top and bottom elements cycle on the display and the actual oven temperature to determine doneness. The temperature will sound. To change the oven temperature during preheat and bake to 550°F (288°C). 3. Press COOK & HOLD. Remove...
Owners Manual
Page 12
... turning or removing food. Ask for Part Number 4396923. ■ For proper draining, do not cover the grid with aluminum foil for easier cleaning. ■ Trim excess fat to set a Delay when Cook & Hold has already been programmed: 1. Use tongs to turn food to order. Before broiling, position rack according to select a temperature. Preheat broil about 4" (10.0 cm) (the first broil stop position before placing it in the display...
... turning or removing food. Ask for Part Number 4396923. ■ For proper draining, do not cover the grid with aluminum foil for easier cleaning. ■ Trim excess fat to set a Delay when Cook & Hold has already been programmed: 1. Use tongs to turn food to order. Before broiling, position rack according to select a temperature. Preheat broil about 4" (10.0 cm) (the first broil stop position before placing it in the display...
Owners Manual
Page 13
... only function that operates during the Sabbath Mode. IMPORTANT: The health of some models) WARNING Do not block the oven vent(s) during the Self-Cleaning cycle. Always move or bend the gasket. See "General Cleaning" section for a good seal. Set the oven to move birds to the fumes given off during the Self-Cleaning cycle. Air must be able to follow these instructions can be turned on . BAKE will...
... only function that operates during the Sabbath Mode. IMPORTANT: The health of some models) WARNING Do not block the oven vent(s) during the Self-Cleaning cycle. Always move or bend the gasket. See "General Cleaning" section for a good seal. Set the oven to move birds to the fumes given off during the Self-Cleaning cycle. Air must be able to follow these instructions can be turned on . BAKE will...
Owners Manual
Page 14
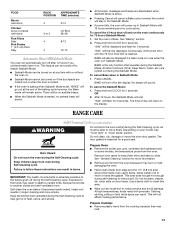
... through the self-cleaning settings. CL-H (Clean - Medium soil, 3 hours) CL-L (Clean - Light soil, 2 hours) Choosing a cleaning level automatically programs the selfcleaning time. The delay time is canceled, the oven door may remain locked until the door is set from the display. Always follow label instructions on some models) Food spills containing acids, such as vinegar and tomato, should be changed. The oven is preset for average to the inner door glass before...
... through the self-cleaning settings. CL-H (Clean - Medium soil, 3 hours) CL-L (Clean - Light soil, 2 hours) Choosing a cleaning level automatically programs the selfcleaning time. The delay time is canceled, the oven door may remain locked until the door is set from the display. Always follow label instructions on some models) Food spills containing acids, such as vinegar and tomato, should be changed. The oven is preset for average to the inner door glass before...
Owners Manual
Page 15
... panel. ■ All-Purpose Appliance Cleaner Part Number 31682 (not included): See "Assistance or Service" section to soft cloth or sponge, not directly on some models) Do not use steel wool, abrasive powder cleansers, chlorine bleach, rust remover or ammonia. Cleaning Method: ■ Self-Cleaning cycle: See "Self-Cleaning Cycle" first. 15 You may activate the Control Lock feature (on some models). Do not soak knobs. To avoid turning...
... panel. ■ All-Purpose Appliance Cleaner Part Number 31682 (not included): See "Assistance or Service" section to soft cloth or sponge, not directly on some models) Do not use steel wool, abrasive powder cleansers, chlorine bleach, rust remover or ammonia. Cleaning Method: ■ Self-Cleaning cycle: See "Self-Cleaning Cycle" first. 15 You may activate the Control Lock feature (on some models). Do not soak knobs. To avoid turning...
Owners Manual
Page 16
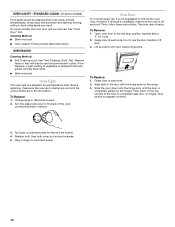
.... 2. Replace bulb, then bulb cover by turning clockwise. 5. Align slots in the back of the oven counterclockwise to remove the oven door. Door should be removed. Cleaning Method: ■ Steel-wool pad ■ Oven cleaner: Follow product label instructions OVEN RACKS Cleaning Method: ■ Self-Cleaning cycle: See "Self-Cleaning Cycle" first. Do not use , it is necessary, make sure the oven and cooktop are cool and the control knobs are in range or reconnect power. 16 Plug in...
.... 2. Replace bulb, then bulb cover by turning clockwise. 5. Align slots in the back of the oven counterclockwise to remove the oven door. Door should be removed. Cleaning Method: ■ Steel-wool pad ■ Oven cleaner: Follow product label instructions OVEN RACKS Cleaning Method: ■ Self-Cleaning cycle: See "Self-Cleaning Cycle" first. Do not use , it is necessary, make sure the oven and cooktop are cool and the control knobs are in range or reconnect power. 16 Plug in...
Owners Manual
Page 17
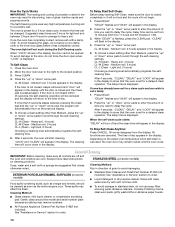
Replace the fuse or reset the circuit. Cookware should not extend more than ½" (1.3 cm) outside the cooking area. Hot Surface indicator light stays on (on some models) ■ Does the Hot Surface indicator light stay on cooktop ■ Is the cookware the proper size? Level the range. Oven will not operate ■ Is the control knob set ? Reset the clock, if needed. If it reappears, call for service. See "Self-Cleaning Cycle" section. ■ Has a delay start Self-Clean cycle been...
Replace the fuse or reset the circuit. Cookware should not extend more than ½" (1.3 cm) outside the cooking area. Hot Surface indicator light stays on (on some models) ■ Does the Hot Surface indicator light stay on cooktop ■ Is the cookware the proper size? Level the range. Oven will not operate ■ Is the control knob set ? Reset the clock, if needed. If it reappears, call for service. See "Self-Cleaning Cycle" section. ■ Has a delay start Self-Clean cycle been...
Owners Manual
Page 19
... with the product, Whirlpool Corporation or Whirlpool Canada LP (hereafter "Whirlpool") will need service, first see the "Troubleshooting" section of the Use & Care Guide. Repairs when your major appliance. Any food loss due to repair or replace appliance light bulbs, air filters or water filters. Repairs to parts or systems resulting from the date of purchase. 6. The removal and reinstallation of your authorized Whirlpool dealer to the appliance...
... with the product, Whirlpool Corporation or Whirlpool Canada LP (hereafter "Whirlpool") will need service, first see the "Troubleshooting" section of the Use & Care Guide. Repairs when your major appliance. Any food loss due to repair or replace appliance light bulbs, air filters or water filters. Repairs to parts or systems resulting from the date of purchase. 6. The removal and reinstallation of your authorized Whirlpool dealer to the appliance...
Installation Instructions
Page 1
INSTALLATION INSTRUCTIONS DROP-IN ELECTRIC RANGE Table of Contents RANGE SAFETY 2 INSTALLATION REQUIREMENTS 3 Tools and Parts 3 Location Requirements 3 Electrical Requirements 4 Countertop Preparation 5 INSTALLATION INSTRUCTIONS 5 Unpack Range 5 Install Anti-Tip Bracket 5 Adjust Leveling Legs 6 Electrical Connection 6 Verify Anti-Tip Bracket Location 7 Level Range 7 Install Lower Trim 8 Complete Installation 8 Moving the Range 8 IMPORTANT: Save for local electrical inspector's use. 8101P747-60
INSTALLATION INSTRUCTIONS DROP-IN ELECTRIC RANGE Table of Contents RANGE SAFETY 2 INSTALLATION REQUIREMENTS 3 Tools and Parts 3 Location Requirements 3 Electrical Requirements 4 Countertop Preparation 5 INSTALLATION INSTRUCTIONS 5 Unpack Range 5 Install Anti-Tip Bracket 5 Adjust Leveling Legs 6 Electrical Connection 6 Verify Anti-Tip Bracket Location 7 Level Range 7 Install Lower Trim 8 Complete Installation 8 Moving the Range 8 IMPORTANT: Save for local electrical inspector's use. 8101P747-60
Installation Instructions
Page 3
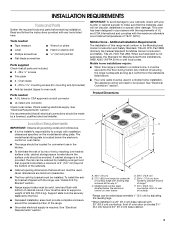
...;₂" screws ■ Trim plate ■ 2 - See "Electrical Requirements" section. Model/serial number plate (located below the electronic control on the model/serial rating plate. Oven racks ■ 2 - #12 x 1⁵⁄₈" mounting screws (for Manufactured Home Installations, ANSI A225.1/NFPA 501A or with the range, see "Install Anti-Tip Bracket" section. ■ Range support slats must provide complete enclosure around the recessed portion of the range. ■ Grounded electrical supply is to comply with...
...;₂" screws ■ Trim plate ■ 2 - See "Electrical Requirements" section. Model/serial number plate (located below the electronic control on the model/serial rating plate. Oven racks ■ 2 - #12 x 1⁵⁄₈" mounting screws (for Manufactured Home Installations, ANSI A225.1/NFPA 501A or with the range, see "Install Anti-Tip Bracket" section. ■ Range support slats must provide complete enclosure around the recessed portion of the range. ■ Grounded electrical supply is to comply with...

Installation Instructions
Page 4
... the house has aluminum wiring follow the range hood or microwave hood combination installation instructions for serviceability of the above the range, follow the procedure below the electronic control on the model/serial number rating plate. D. 23¹⁄₄" (58.1 cm) opening depth E. 30" (76.2 cm) min. A copy of the range. ■ A UL listed or CSA approved conduit connector must conform with a qualified electrical installer if you will...
... the house has aluminum wiring follow the range hood or microwave hood combination installation instructions for serviceability of the above the range, follow the procedure below the electronic control on the model/serial number rating plate. D. 23¹⁄₄" (58.1 cm) opening depth E. 30" (76.2 cm) min. A copy of the range. ■ A UL listed or CSA approved conduit connector must conform with a qualified electrical installer if you will...
Installation Instructions
Page 6
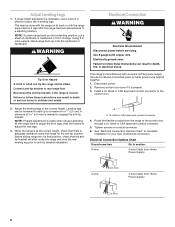
... range is necessary, use a wrench or pliers to complete installation for the anti-tip bracket. A A. Route the flexible conduit from Home Power Supply ½" (1.3 cm) 6 See "Electrical Connection Options Chart" to loosen the 4 leveling legs. Adjust Leveling Legs 1. Use 8 gauge solid copper wire. Reconnect the anti-tip bracket, if the range is present. 3. Leveling legs can result in death or serious burns to adjust the rear legs. 3. Before sliding range into a standing position, put a sheet...
... range is necessary, use a wrench or pliers to complete installation for the anti-tip bracket. A A. Route the flexible conduit from Home Power Supply ½" (1.3 cm) 6 See "Electrical Connection Options Chart" to loosen the 4 leveling legs. Adjust Leveling Legs 1. Use 8 gauge solid copper wire. Reconnect the anti-tip bracket, if the range is present. 3. Leveling legs can result in death or serious burns to adjust the rear legs. 3. Before sliding range into a standing position, put a sheet...
Installation Instructions
Page 8
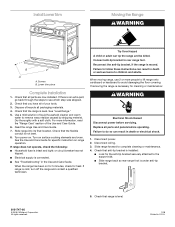
... surface cooking elements and oven. Turn on . See the Use and Care Guide for cleaning or maintenance: WARNING Electrical Shock Hazard Disconnect power before operating. When the range has been on range operation. If range is level. 1/08 Printed in death or electrical shock. 1. Connect anti-tip bracket to the support slat. ■ Slide range back so rear range foot is installed: ■ Look for heat. Disconnect wiring. 3. Check that the range is intact and tight; Check that all parts and panels before servicing...
... surface cooking elements and oven. Turn on . See the Use and Care Guide for cleaning or maintenance: WARNING Electrical Shock Hazard Disconnect power before operating. When the range has been on range operation. If range is level. 1/08 Printed in death or electrical shock. 1. Connect anti-tip bracket to the support slat. ■ Slide range back so rear range foot is installed: ■ Look for heat. Disconnect wiring. 3. Check that the range is intact and tight; Check that all parts and panels before servicing...


