Use & Care Guide
Page 2
...the burner cap from combustible materials, gasoline, and other reproductive harm. Lighting the Burners IMPORTANT: All burners will light only if the knob is pushed in then turned counterclockwise to IGNITE. WARNING: This product contains one or more chemicals known to the State of fire, ... Wait until you wish to use Liquid Propane (LP), call a licensed professional to install the LP gas conversion kit (included). Turn the knob counterclockwise to the desired setting. For more information, see a flame. 3. Do not use a wooden toothpick or clean in the dishwasher. &#...
...the burner cap from combustible materials, gasoline, and other reproductive harm. Lighting the Burners IMPORTANT: All burners will light only if the knob is pushed in then turned counterclockwise to IGNITE. WARNING: This product contains one or more chemicals known to the State of fire, ... Wait until you wish to use Liquid Propane (LP), call a licensed professional to install the LP gas conversion kit (included). Turn the knob counterclockwise to the desired setting. For more information, see a flame. 3. Do not use a wooden toothpick or clean in the dishwasher. &#...

Use & Care Guide
Page 4
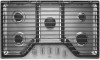
...; burner is the left rear burner on 30" (76.2 cm) models and the center burner on WCG9 series models only. For best results, rotate the knob to fully open ) position. A 20" (50.8 cm) minimum clearance from fast boiling to precise simmering. ■ Power: Select Hi for preparing large ...delicate simmering, use the small cap. Then position the grate down ) position once cleaning is complete. Set the knob to their vertical (fully open the grates. For best results, rotate the knob to Hi in the Power range. ■ Simmer: Use Simmer to slowly cook foods or to their normal ...
...; burner is the left rear burner on 30" (76.2 cm) models and the center burner on WCG9 series models only. For best results, rotate the knob to fully open ) position. A 20" (50.8 cm) minimum clearance from fast boiling to precise simmering. ■ Power: Select Hi for preparing large ...delicate simmering, use the small cap. Then position the grate down ) position once cleaning is complete. Set the knob to their vertical (fully open the grates. For best results, rotate the knob to Hi in the Power range. ■ Simmer: Use Simmer to slowly cook foods or to their normal ...
Use & Care Guide
Page 5
...be cleaned as affresh® Kitchen and Appliance Cleaner, Part Number W10355010. Surface Type Cleaning Recommendation Control Knobs (Plastic) The knobs should be cleaned with the following genuine Whirlpool accessories. Dishwasher: The grates may affect the finish. Burner Caps Use a nonabrasive plastic scrubbing pad ...dishwasher. Refer to avoid damaging the surface. Rub in direction of your White Ice or Black Ice Whirlpool kitchen appliances, coordinating knobs can be sure the knobs are durable, they will gradually lose their shine due to exposure to placing the grates in the...
...be cleaned as affresh® Kitchen and Appliance Cleaner, Part Number W10355010. Surface Type Cleaning Recommendation Control Knobs (Plastic) The knobs should be cleaned with the following genuine Whirlpool accessories. Dishwasher: The grates may affect the finish. Burner Caps Use a nonabrasive plastic scrubbing pad ...dishwasher. Refer to avoid damaging the surface. Rub in direction of your White Ice or Black Ice Whirlpool kitchen appliances, coordinating knobs can be sure the knobs are durable, they will gradually lose their shine due to exposure to placing the grates in the...
Use & Care Guide
Page 6
...é, thicken sauces, steam, or stew. ■ Low flame - Cookware Ideal cookware should match the cookware you adjust the heat, watch the flame, not the knob. Rough finishes may be medium to allow time for long periods, alternate the use , the entire cooktop area may leave permanent marks on the grates...
...é, thicken sauces, steam, or stew. ■ Low flame - Cookware Ideal cookware should match the cookware you adjust the heat, watch the flame, not the knob. Rough finishes may be medium to allow time for long periods, alternate the use , the entire cooktop area may leave permanent marks on the grates...
Use & Care Guide
Page 7
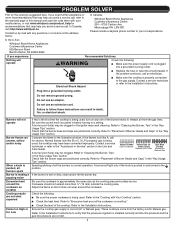
...an adapter. Refer to a setting. Compare the flame to the illustrations below : In Canada: Whirlpool Brand Home Appliances Customer eXperience Centre 200 - 6750 Century Ave. A burner will light only if the knob is plugged into a grounded 3 prong outlet. Refer to "Placement of the cooktop. Contact ...not wrap around the cookware on cooktop." Sparking/clicking of Burner Heads and Caps" in your mobile device, or visit www.whirlpool.com/product_help for Natural Gas A burner port (hole) may be clogged or the igniter may help you experience Recommended Solutions ...
...an adapter. Refer to a setting. Compare the flame to the illustrations below : In Canada: Whirlpool Brand Home Appliances Customer eXperience Centre 200 - 6750 Century Ave. A burner will light only if the knob is plugged into a grounded 3 prong outlet. Refer to "Placement of the cooktop. Contact ...not wrap around the cookware on cooktop." Sparking/clicking of Burner Heads and Caps" in your mobile device, or visit www.whirlpool.com/product_help for Natural Gas A burner port (hole) may be clogged or the igniter may help you experience Recommended Solutions ...

Installation Guide
Page 11
...flame should be clean and soft in death, fire, or electrical shock. 4. After verifying the proper burner operation, turn the surface burners control knobs to LO. 2. Adjustment screw location 4. WARNING Check Flame Height Adjust the height of standing pilots. Plug into a grounded 3 prong outlet....for a blue color. A Electrical Shock Hazard Plug into a grounded 3 prong outlet. Do not remove ground prong. When the cooktop control knob is the proper size. If a burner does not light at each setting IMPORTANT: Dual valve adjustments must be performed by turning the control ...
...flame should be clean and soft in death, fire, or electrical shock. 4. After verifying the proper burner operation, turn the surface burners control knobs to LO. 2. Adjustment screw location 4. WARNING Check Flame Height Adjust the height of standing pilots. Plug into a grounded 3 prong outlet....for a blue color. A Electrical Shock Hazard Plug into a grounded 3 prong outlet. Do not remove ground prong. When the cooktop control knob is the proper size. If a burner does not light at each setting IMPORTANT: Dual valve adjustments must be performed by turning the control ...

