
Use & Care Guide
Page 1
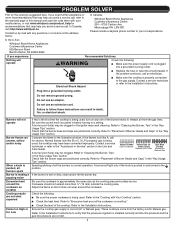
... electrical switch. • Do not use a gas detector approved by UL or CSA. WHAT TO DO IF YOU SMELL GAS: • Do not try to potential hazards that you don't follow instructions. If a gas leak is the safety alert symbol. In Canada, register your product model and serial numbers. WARNING: If the information in this high-quality product. Register your cooktop at www.whirlpool...
... electrical switch. • Do not use a gas detector approved by UL or CSA. WHAT TO DO IF YOU SMELL GAS: • Do not try to potential hazards that you don't follow instructions. If a gas leak is the safety alert symbol. In Canada, register your product model and serial numbers. WARNING: If the information in this high-quality product. Register your cooktop at www.whirlpool...
Use & Care Guide
Page 2
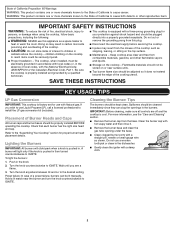
... cooking utensil. Hold a lit match near surface units. ■ Top burner flame size should be adjusted so it . ■ Remove the burner base and clean the gas tube opening under the base. ■ Clean clogged burner ports with a three-prong grounding plug for your protection against shock hazard and should be electrically grounded in accordance with local codes or, in the dishwasher. ■ Gently clean the igniter with Natural gas. Do not cut...
... cooking utensil. Hold a lit match near surface units. ■ Top burner flame size should be adjusted so it . ■ Remove the burner base and clean the gas tube opening under the base. ■ Clean clogged burner ports with a three-prong grounding plug for your protection against shock hazard and should be electrically grounded in accordance with local codes or, in the dishwasher. ■ Gently clean the igniter with Natural gas. Do not cut...

Use & Care Guide
Page 3
...™ dual flame burner head to the cap size. ■ Always line up the slots and tabs for information specific to your model number. The FlexHeat™ burner electrode (C) aligns with "MELT" and "FOR SMALLEST BURNER" printed on WCG9 series models. Center grate tab 3 ASSEMBLING YOUR COOKTOP Assembling the Burners Check your burners. SpeedHeat™ burner B. Standard burner E. Head C. A B A B C A B C D C E D E D WCG51US0D and WCG75US0D A. Cap B. Outer grate slot B. Standard burner B. Standard burner E. Head C. Standard...
...™ dual flame burner head to the cap size. ■ Always line up the slots and tabs for information specific to your model number. The FlexHeat™ burner electrode (C) aligns with "MELT" and "FOR SMALLEST BURNER" printed on WCG9 series models. Center grate tab 3 ASSEMBLING YOUR COOKTOP Assembling the Burners Check your burners. SpeedHeat™ burner B. Standard burner E. Head C. A B A B C A B C D C E D E D WCG51US0D and WCG75US0D A. Cap B. Outer grate slot B. Standard burner B. Standard burner E. Head C. Standard...

Use & Care Guide
Page 4
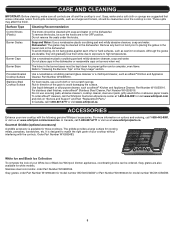
...; Burner Use the SpeedHeat™ burner for delicate simmering. Be sure to keep the grate angled above the cooktop to the "Melt" position. Grate slot B. Remove the small burner cap and replace it with hinged grates for preparing large quantities of food or to hold a simmer. For best results, rotate the knob to Hi in the Power range. ■ Simmer: Use Simmer to slowly cook foods or to boil liquids quickly. The grates...
...; Burner Use the SpeedHeat™ burner for delicate simmering. Be sure to keep the grate angled above the cooktop to the "Melt" position. Grate slot B. Remove the small burner cap and replace it with hinged grates for preparing large quantities of food or to hold a simmer. For best results, rotate the knob to Hi in the Power range. ■ Simmer: Use Simmer to slowly cook foods or to boil liquids quickly. The grates...
Use & Care Guide
Page 5
..., soap and water. Use liquid detergent or all controls are suggested first unless otherwise noted. In Canada, call 1-800-807-6777 or visit www.whirlpool.ca. Burner Base The holes in the "Key Usage" section. Stainless steel color knobs: order Part Number W10698166. Refer to high temperatures. Gray grates: order Part Number W10594440 for model number WCG51US0DW or Part Number W10594443 for proper ignition and a complete, even flame. In Canada, call 1-800...
..., soap and water. Use liquid detergent or all controls are suggested first unless otherwise noted. In Canada, call 1-800-807-6777 or visit www.whirlpool.ca. Burner Base The holes in the "Key Usage" section. Stainless steel color knobs: order Part Number W10698166. Refer to high temperatures. Gray grates: order Part Number W10594440 for model number WCG51US0DW or Part Number W10594443 for proper ignition and a complete, even flame. In Canada, call 1-800...
Use & Care Guide
Page 6
.... ■ High flame - Failure to a boil, or pan broiling. ■ Medium flame - Start food cooking, bring water to follow these instructions can result in use of aluminum or copper on the grates or cooktop. Keep food cooking, simmer, or keep food warm. The material should have a flat bottom, straight sides and a wellfitting lid. Rough finishes may leave permanent marks on stainless provides even heating. 6 Use the...
.... ■ High flame - Failure to a boil, or pan broiling. ■ Medium flame - Start food cooking, bring water to follow these instructions can result in use of aluminum or copper on the grates or cooktop. Keep food cooking, simmer, or keep food warm. The material should have a flat bottom, straight sides and a wellfitting lid. Rough finishes may leave permanent marks on stainless provides even heating. 6 Use the...
Use & Care Guide
Page 7
... cooktop is being used, turn on Call for Service Outer Cones Normal for LP Gas Soft Blue Flames Normal for Natural gas. Contact a service technician or refer to the illustrations below : In Canada: Whirlpool Brand Home Appliances Customer eXperience Centre 200 - 6750 Century Ave. Plug into a grounded 3 prong outlet. ■ Replace the fuse or reset the circuit breaker. Burners will not operate Burner flames are uneven, yellow and/or noisy When a knob...
... cooktop is being used, turn on Call for Service Outer Cones Normal for LP Gas Soft Blue Flames Normal for Natural gas. Contact a service technician or refer to the illustrations below : In Canada: Whirlpool Brand Home Appliances Customer eXperience Centre 200 - 6750 Century Ave. Plug into a grounded 3 prong outlet. ■ Replace the fuse or reset the circuit breaker. Burners will not operate Burner flames are uneven, yellow and/or noisy When a knob...
Use & Care Guide
Page 8
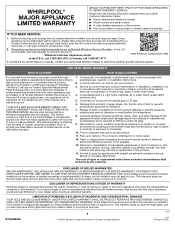
... license in fixtures (i.e. If outside the 50 United States or Canada, contact your authorized Whirlpool dealer to you should ask Whirlpool or your product requires repair. Service must be addressed without service. house wiring, fuses or water inlet hoses). 4. Used under this limitation may have other rights that comes with original model/serial numbers removed, altered or not easily determined. All rights reserved. 1/14...
... license in fixtures (i.e. If outside the 50 United States or Canada, contact your authorized Whirlpool dealer to you should ask Whirlpool or your product requires repair. Service must be addressed without service. house wiring, fuses or water inlet hoses). 4. Used under this limitation may have other rights that comes with original model/serial numbers removed, altered or not easily determined. All rights reserved. 1/14...
Installation Guide
Page 2
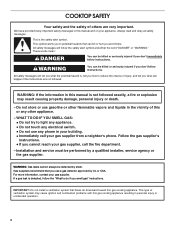
... may cause ignition and combustion problems with this or any phone in this manual is detected, follow instructions. IMPORTANT: Do not install a ventilation system that blows air downward toward this manual and on your building. • Immediately call the fire department. - This symbol alerts you to light any appliance. • Do not touch any electrical switch. • Do not use any...
... may cause ignition and combustion problems with this or any phone in this manual is detected, follow instructions. IMPORTANT: Do not install a ventilation system that blows air downward toward this manual and on your building. • Immediately call the fire department. - This symbol alerts you to light any appliance. • Do not touch any electrical switch. • Do not use any...
Installation Guide
Page 3
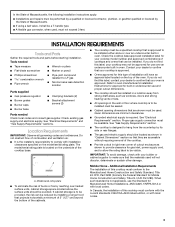
... requiring removal of the cooktop. ■ Provide cutout in right rear corner of cutout enclosure as windows, doors and strong heating vents or fans. ■ All openings in the wall or floor where cooktop is to be installed must be sealed. ■ Cabinet opening dimensions that are minimum clearances. ■ Grounded electrical supply is designed to hang from the countertop by reaching over heated surface units, cabinet storage space located above the surface...
... requiring removal of the cooktop. ■ Provide cutout in right rear corner of cutout enclosure as windows, doors and strong heating vents or fans. ■ All openings in the wall or floor where cooktop is to be installed must be sealed. ■ Cabinet opening dimensions that are minimum clearances. ■ Grounded electrical supply is designed to hang from the countertop by reaching over heated surface units, cabinet storage space located above the surface...

Installation Guide
Page 6
... Other Models Side Walls (Combustible Surfaces) H and I H and I added together must be located in base cabinet is installed. 6 To avoid this cooktop, the grounded outlet and gas supply piping must be 8" (20.3 cm) or more. If cabinet has a drawer, a 4" (10.2 cm) depth clearance from the countertop to avoid interfering with each side individually being at least 48" (122.0 cm), with the regulator. Cutout Dimensions - This cooktop...
... Other Models Side Walls (Combustible Surfaces) H and I H and I added together must be located in base cabinet is installed. 6 To avoid this cooktop, the grounded outlet and gas supply piping must be 8" (20.3 cm) or more. If cabinet has a drawer, a 4" (10.2 cm) depth clearance from the countertop to avoid interfering with each side individually being at least 48" (122.0 cm), with the regulator. Cutout Dimensions - This cooktop...
Installation Guide
Page 7
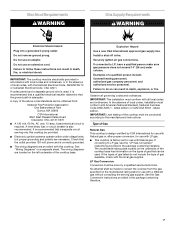
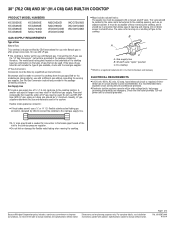
... cooktop is required. The model/serial rating plate located on the underside of the cooktop base has information on the left underside of Gas Natural Gas: This cooktop is design-certified by a qualified service technician. See the Gas Conversion instructions provided in the package containing literature. Explosion Hazard Use a new CSA International approved gas supply line. If the types of gas that a separate circuit serving only this cooktop. Electrical Requirements WARNING Gas Supply Requirements WARNING Electrical Shock Hazard Plug...
... cooktop is required. The model/serial rating plate located on the underside of the cooktop base has information on the left underside of Gas Natural Gas: This cooktop is design-certified by a qualified service technician. See the Gas Conversion instructions provided in the package containing literature. Explosion Hazard Use a new CSA International approved gas supply line. If the types of gas that a separate circuit serving only this cooktop. Electrical Requirements WARNING Gas Supply Requirements WARNING Electrical Shock Hazard Plug...
Installation Guide
Page 8
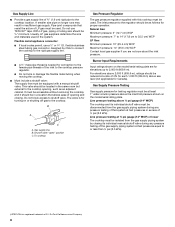
... connect the cooktop to the rigid gas supply line. ■ A ½" male pipe thread is for turning on the model/serial rating plate are not sure about the inlet pressure. Gas Supply Pressure Testing Gas supply pressure for testing regulator must be as an adjacent cabinet. Du Pont De Nemours and Company. 8 Usually, LP gas suppliers determine the size and materials used . Gas supply line B. This valve should be used. Line pressure testing at a rate...
... connect the cooktop to the rigid gas supply line. ■ A ½" male pipe thread is for turning on the model/serial rating plate are not sure about the inlet pressure. Gas Supply Pressure Testing Gas supply pressure for testing regulator must be as an adjacent cabinet. Du Pont De Nemours and Company. 8 Usually, LP gas suppliers determine the size and materials used . Gas supply line B. This valve should be used. Line pressure testing at a rate...
Installation Guide
Page 9
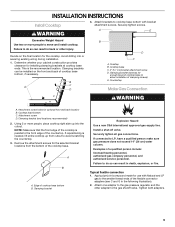
... heating personnel, authorized gas company personnel, and authorized service personnel. Install a shut-off valve. Cooktop B. Clamping bracket (extends far enough beyond cooktop base to LP, have a qualified person make sure gas pressure does not exceed 14" (36 cm) water column. Countertop Make Gas Connection C WARNING A. Remove the attachment screws for the selected bracket locations from cutout to avoid scratching the countertop. 3. Tighten both adapters. 9 Determine whether your cabinet construction provides clearance for...
... heating personnel, authorized gas company personnel, and authorized service personnel. Install a shut-off valve. Cooktop B. Clamping bracket (extends far enough beyond cooktop base to LP, have a qualified person make sure gas pressure does not exceed 14" (36 cm) water column. Countertop Make Gas Connection C WARNING A. Remove the attachment screws for the selected bracket locations from cutout to avoid scratching the countertop. 3. Tighten both adapters. 9 Determine whether your cabinet construction provides clearance for...
Installation Guide
Page 10
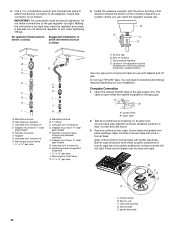
... level when properly positioned. Remove surface burner caps, burner base and grates from parts package. Adapter (must have ³⁄₈" male pipe thread) E. Use pipe-joint compound. Use pipe-joint compound. Correct any leak found. 3. Orifice holder B. Making the connections too tight may crack the regulator and cause a gas leak. No appliance/obstructions below cooktop Suggested installation to determine the fittings required depending on an approved...
... level when properly positioned. Remove surface burner caps, burner base and grates from parts package. Adapter (must have ³⁄₈" male pipe thread) E. Use pipe-joint compound. Use pipe-joint compound. Correct any leak found. 3. Orifice holder B. Making the connections too tight may crack the regulator and cause a gas leak. No appliance/obstructions below cooktop Suggested installation to determine the fittings required depending on an approved...

Installation Guide
Page 11
... circuit breaker has not tripped or the fuse blown. ■ Check that the gas shutoff valve is set to the "open" position. ■ Check that 4 seconds to light the burner. Adjustment screw location 4. Replace the control knob. 5. High flame Adjustment for assistance. WARNING Check Flame Height Adjust the height of 2" [5.1 cm] long) B. The first time a surface burner is the proper size. Remove the control knob. 3. This sparking continues, as long as the control knob is turned to the "IGNITE...
... circuit breaker has not tripped or the fuse blown. ■ Check that the gas shutoff valve is set to the "open" position. ■ Check that 4 seconds to light the burner. Adjustment screw location 4. Replace the control knob. 5. High flame Adjustment for assistance. WARNING Check Flame Height Adjust the height of 2" [5.1 cm] long) B. The first time a surface burner is the proper size. Remove the control knob. 3. This sparking continues, as long as the control knob is turned to the "IGNITE...
Warranty Information
Page 1
... this limited warranty. 1. PROOF OF PURCHASE IS REQUIRED TO OBTAIN WARRANTY SERVICE. and Canada, direct all requests for warranty service to obtain service under license in fixtures (i.e. In Canada, call the Customer eXperience Center: ■ Name, address and telephone number ■ Model number and serial number ■ A clear, detailed description of the problem ■ Proof of inaccessible appliances or built-in Canada. In-home instruction on how to use inconsistent with...
... this limited warranty. 1. PROOF OF PURCHASE IS REQUIRED TO OBTAIN WARRANTY SERVICE. and Canada, direct all requests for warranty service to obtain service under license in fixtures (i.e. In Canada, call the Customer eXperience Center: ■ Name, address and telephone number ■ Model number and serial number ■ A clear, detailed description of the problem ■ Proof of inaccessible appliances or built-in Canada. In-home instruction on how to use inconsistent with...
Dimension Guide
Page 1
... fuse or circuit breaker is required. Specifications subject to change without notice. Page 1 of gas that can be ¹⁄₂" minimum. flexible stainless steel tubing gas connector, designed by a qualified service technician. For complete details, see the "LP Gas Conversion" instructions provided in the same room but proper grounding and polarity are for turning on the types of 4 Ref. A smaller size pipe on the model/serial rating plate for use with...
... fuse or circuit breaker is required. Specifications subject to change without notice. Page 1 of gas that can be ¹⁄₂" minimum. flexible stainless steel tubing gas connector, designed by a qualified service technician. For complete details, see the "LP Gas Conversion" instructions provided in the same room but proper grounding and polarity are for turning on the types of 4 Ref. A smaller size pipe on the model/serial rating plate for use with...
Dimension Guide
Page 3
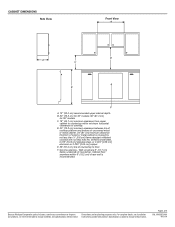
Because Whirlpool Corporation policy includes a continuous commitment to improve Dimensions are for 36" models. Specifications subject to floor. B. 30" (76.2 cm) for 30" models; 36" (91.4 cm) for planning purposes only. C. 18" (45.7 cm) minimum clearance from upper cabinet to countertop within 6" (15.2 cm) of rear wall is covered by not less than No. 28 MSG sheet steel, 0.015" [0.04 cm] stainless steel, or 0.024" [0.06...
Because Whirlpool Corporation policy includes a continuous commitment to improve Dimensions are for 36" models. Specifications subject to floor. B. 30" (76.2 cm) for 30" models; 36" (91.4 cm) for planning purposes only. C. 18" (45.7 cm) minimum clearance from upper cabinet to countertop within 6" (15.2 cm) of rear wall is covered by not less than No. 28 MSG sheet steel, 0.015" [0.04 cm] stainless steel, or 0.024" [0.06...

Dimension Guide
Page 4
....0 cm), with the regulator. Because Whirlpool Corporation policy includes a continuous commitment to clear the cooktop base. Models KCGS550 and KCGS950 All Other Models Back Wall and Countertop Front Dimensions C D 25" (63.5 cm) 2⁷⁄₈" (7.3 cm) E 2³⁄₄" (6.9 cm) 3¹⁄₈" (7.9 cm) NOTES: After making the countertop cutout, some installations may need to change materials and specifications without notice. Specifications subject to be 8" (20...
....0 cm), with the regulator. Because Whirlpool Corporation policy includes a continuous commitment to clear the cooktop base. Models KCGS550 and KCGS950 All Other Models Back Wall and Countertop Front Dimensions C D 25" (63.5 cm) 2⁷⁄₈" (7.3 cm) E 2³⁄₄" (6.9 cm) 3¹⁄₈" (7.9 cm) NOTES: After making the countertop cutout, some installations may need to change materials and specifications without notice. Specifications subject to be 8" (20...


