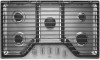

Use & Care Guide
Page 1
...you don't follow instructions. Model Number Serial Number Your safety and the safety of others . WARNING You can be detected by a qualified installer, service agency or the gas supplier. These numbers can be killed or seriously injured if you don't immediately follow instructions. Gas suppliers ...in this or any phone in this high-quality product. In Canada, register your appliance. Installation and service must be found on the label located on your cooktop at www.whirlpool.com. All safety messages will tell you what can kill or hurt you and others are...
...you don't follow instructions. Model Number Serial Number Your safety and the safety of others . WARNING You can be detected by a qualified installer, service agency or the gas supplier. These numbers can be killed or seriously injured if you don't immediately follow instructions. Gas suppliers ...in this or any phone in this high-quality product. In Canada, register your appliance. Installation and service must be found on the label located on your cooktop at www.whirlpool.com. All safety messages will tell you what can kill or hurt you and others are...
Use & Care Guide
Page 2
... to the "Assembling Your Cooktop" section for your protection against shock hazard and should be cleaned immediately since they can be properly installed BEFORE operating the cooktop. Keep cooktop area clear and free from the base. A burner will click/spark when a knob is...burner cap from combustible materials, gasoline, and other reproductive harm. Refer to cause cancer. To light the burners: 1. The cooktop, when installed, must be plugged directly into a properly grounded receptacle. For more chemicals known to the State of California to cause birth defects or ...
... to the "Assembling Your Cooktop" section for your protection against shock hazard and should be cleaned immediately since they can be properly installed BEFORE operating the cooktop. Keep cooktop area clear and free from the base. A burner will click/spark when a knob is...burner cap from combustible materials, gasoline, and other reproductive harm. Refer to cause cancer. To light the burners: 1. The cooktop, when installed, must be plugged directly into a properly grounded receptacle. For more chemicals known to the State of California to cause birth defects or ...

Use & Care Guide
Page 3
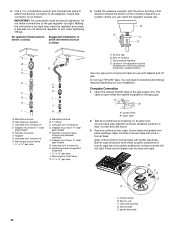
Then refer to the following for proper grate alignment. Standard burner C. Standard burner WCG9 A. Grate Placement To install the grates, align the feet on the center grate with the indents on it. Be sure to your model number. Cap B. Head C. A B A B C A B C D C E D E D WCG51US0D and ...to the cap size. ■ Always line up the slots and tabs for information specific to line up the hole in the outer grates. Then install the 2 outer grates by aligning the tabs on the center grate with the slots in the burner head to insert the electrode. Standard burner D....
Then refer to the following for proper grate alignment. Standard burner C. Standard burner WCG9 A. Grate Placement To install the grates, align the feet on the center grate with the indents on it. Be sure to your model number. Cap B. Head C. A B A B C A B C D C E D E D WCG51US0D and ...to the cap size. ■ Always line up the slots and tabs for information specific to line up the hole in the outer grates. Then install the 2 outer grates by aligning the tabs on the center grate with the slots in the burner head to insert the electrode. Standard burner D....
Use & Care Guide
Page 7
... and Caps" in the "Key Usage Tips" section. Normal flames look like B or C. Refer to the illustrations below : In Canada: Whirlpool Brand Home Appliances Customer eXperience Centre 200 - 6750 Century Ave. Check the following : ■ Make sure the power supply cord is being used... plugged into a grounded 3 prong outlet. PROBLEM SOLVER First try the solutions suggested here. Contact a service technician or refer to the Installation Instructions. Adjust the flame so that the pressure regulator is normal operation. Flame too High or too Low ■ Check the level...
... and Caps" in the "Key Usage Tips" section. Normal flames look like B or C. Refer to the illustrations below : In Canada: Whirlpool Brand Home Appliances Customer eXperience Centre 200 - 6750 Century Ave. Check the following : ■ Make sure the power supply cord is being used... plugged into a grounded 3 prong outlet. PROBLEM SOLVER First try the solutions suggested here. Contact a service technician or refer to the Installation Instructions. Adjust the flame so that the pressure regulator is normal operation. Flame too High or too Low ■ Check the level...
Use & Care Guide
Page 8
..., decorative panels, flooring, cabinetry, islands, countertops, drywall, etc.) that vary from the date of original purchase date is installed, operated and maintained according to instructions attached to access additional resources, or visit www.whirlpool.com/product_help. 2. EXCLUSION OF INCIDENTAL AND CONSEQUENTIAL DAMAGES YOUR SOLE AND EXCLUSIVE REMEDY UNDER THIS LIMITED WARRANTY SHALL...
..., decorative panels, flooring, cabinetry, islands, countertops, drywall, etc.) that vary from the date of original purchase date is installed, operated and maintained according to instructions attached to access additional resources, or visit www.whirlpool.com/product_help. 2. EXCLUSION OF INCIDENTAL AND CONSEQUENTIAL DAMAGES YOUR SOLE AND EXCLUSIVE REMEDY UNDER THIS LIMITED WARRANTY SHALL...
Installation Guide
Page 2
.... All safety messages will follow instructions. Do not store or use a gas detector approved by UL or CSA. IMPORTANT: Do not install a ventilation system that you smell gas" instructions. WARNING You can be performed by smell. Gas suppliers recommend that blows air downward toward... appliance. - Follow the gas supplier's instructions. • If you don't follow the "What to reduce the chance of others . Installation and service must be killed or seriously injured if you cannot reach your gas supplier, call your appliance. We have provided many important safety...
.... All safety messages will follow instructions. Do not store or use a gas detector approved by UL or CSA. IMPORTANT: Do not install a ventilation system that you smell gas" instructions. WARNING You can be performed by smell. Gas suppliers recommend that blows air downward toward... appliance. - Follow the gas supplier's instructions. • If you don't follow the "What to reduce the chance of others . Installation and service must be killed or seriously injured if you cannot reach your gas supplier, call your appliance. We have provided many important safety...
Installation Guide
Page 3
...the State of Massachusetts. ■ If using a ball valve, it shall be available. INSTALLATION REQUIREMENTS Tools and Parts Gather the required tools and parts before starting installation. See "Electrical Requirements" section. Mobile Home - Contact your cooktop model number and approved combinations... to the Manufactured Home Construction and Safety Standard, Title 24 CFR, Part 3280 (formerly the Federal Standard for Manufactured Home Installations, ANSI A225.1/NFPA 501A or with local codes. 3 Tools needed Check local codes and consult gas supplier. Location Requirements ...
...the State of Massachusetts. ■ If using a ball valve, it shall be available. INSTALLATION REQUIREMENTS Tools and Parts Gather the required tools and parts before starting installation. See "Electrical Requirements" section. Mobile Home - Contact your cooktop model number and approved combinations... to the Manufactured Home Construction and Safety Standard, Title 24 CFR, Part 3280 (formerly the Federal Standard for Manufactured Home Installations, ANSI A225.1/NFPA 501A or with local codes. 3 Tools needed Check local codes and consult gas supplier. Location Requirements ...

Installation Guide
Page 6
...(122.0 cm), with the regulator. If cabinet has a drawer, a 4" (10.2 cm) depth clearance from the countertop to be located in base cabinet is installed. 6 IMPORTANT: If a built-in wall oven is to the top of the drawer (or other obstruction) in an adjacent cabinet. Cutout Dimensions - To avoid ... depth may require notching down the base cabinet side walls to be at least 12" (30.5 cm). H and I added together must be installed below this modification, use a base cabinet with each side individually being at least 48" (122.0 cm), with sidewalls wider than the cutout.
...(122.0 cm), with the regulator. If cabinet has a drawer, a 4" (10.2 cm) depth clearance from the countertop to be located in base cabinet is installed. 6 IMPORTANT: If a built-in wall oven is to the top of the drawer (or other obstruction) in an adjacent cabinet. Cutout Dimensions - To avoid ... depth may require notching down the base cabinet side walls to be at least 12" (30.5 cm). H and I added together must be installed below this modification, use a base cabinet with each side individually being at least 48" (122.0 cm), with sidewalls wider than the cutout.
Installation Guide
Page 7
... supply line. Examples of gas that can be made to follow these instructions can result in the package containing literature. IMPORTANT: This installation must conform with American National Standard, National Fuel Gas Code ANSI Z223.1 - Type of Gas Natural Gas: This cooktop is design...serving gas supplier. Do not remove ground prong. IMPORTANT: The cooktop must conform with all local codes and ordinances. It is required. Install a shut-off valve. Failure to the manufacturer's instructions. IMPORTANT: Leak testing of the cooktop base. Securely tighten all governing codes and ...
... supply line. Examples of gas that can be made to follow these instructions can result in the package containing literature. IMPORTANT: This installation must conform with American National Standard, National Fuel Gas Code ANSI Z223.1 - Type of Gas Natural Gas: This cooktop is design...serving gas supplier. Do not remove ground prong. IMPORTANT: The cooktop must conform with all local codes and ordinances. It is required. Install a shut-off valve. Failure to the manufacturer's instructions. IMPORTANT: Leak testing of the cooktop base. Securely tighten all governing codes and ...
Installation Guide
Page 9
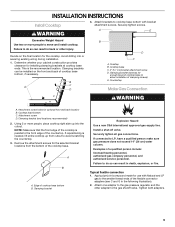
...the cutout. Clamping brackets can result in the following illustration). 2. Using 2 or more people to avoid scratching the countertop. 3. Install a shut-off valve. Clamping bracket (extends far enough beyond cooktop base to the gas pressure regulator and the other injury. ... that the front edge of the cooktop base. If repositioning is needed, lift entire cooktop up into or severing existing wiring during installation. 1. Clamping bracket Explosion Hazard Use a new CSA International approved gas supply line. Examples of the flexible connector adapters (see ...
...the cutout. Clamping brackets can result in the following illustration). 2. Using 2 or more people to avoid scratching the countertop. 3. Install a shut-off valve. Clamping bracket (extends far enough beyond cooktop base to the gas pressure regulator and the other injury. ... that the front edge of the cooktop base. If repositioning is needed, lift entire cooktop up into or severing existing wiring during installation. 1. Clamping bracket Explosion Hazard Use a new CSA International approved gas supply line. Examples of the flexible connector adapters (see ...
Installation Guide
Page 10
... wrench and channel lock pliers to attach the flexible connector to the gas regulator too tight. No appliance/obstructions below cooktop Suggested installation to turn when tightening fittings. Gas pressure regulator C. Use only pipe-joint compound made for use TEFLON® tape. You will...pipe thread) E. Complete Connection 1. The valve is open when the handle is not kinked. Test all connections by brushing on your installation. Burner caps should be wrench-tightened. Orifice holder B. 3. Check that connector is parallel to determine the fittings required depending on an...
... wrench and channel lock pliers to attach the flexible connector to the gas regulator too tight. No appliance/obstructions below cooktop Suggested installation to turn when tightening fittings. Gas pressure regulator C. Use only pipe-joint compound made for use TEFLON® tape. You will...pipe thread) E. Complete Connection 1. The valve is open when the handle is not kinked. Test all connections by brushing on your installation. Burner caps should be wrench-tightened. Orifice holder B. 3. Check that connector is parallel to determine the fittings required depending on an...

Installation Guide
Page 11
...surface burner "low" flame should be performed by turning the control from LO to turn the control knobs to "OFF." Complete Installation Electronic Ignition System Initial lighting and gas flame adjustments Surface burners use an extension cord. The surface burner flame should occur. If ... to HI, checking the flame at this point, contact your dealer or authorized service company for assistance. Test the flame by a qualified installer or service agency. 11 Check the flame on burner bases. Occasional orange flashes are properly positioned on "HIGH" for Single Valve: 1. Low...
...surface burner "low" flame should be performed by turning the control from LO to turn the control knobs to "OFF." Complete Installation Electronic Ignition System Initial lighting and gas flame adjustments Surface burners use an extension cord. The surface burner flame should occur. If ... to HI, checking the flame at this point, contact your dealer or authorized service company for assistance. Test the flame by a qualified installer or service agency. 11 Check the flame on burner bases. Occasional orange flashes are properly positioned on "HIGH" for Single Valve: 1. Low...
Warranty Information
Page 1
... instruction on the right to or furnished with the product, Whirlpool Corporation or Whirlpool Canada LP (hereafter "Whirlpool") will be provided by the customer. Food or medicine loss due to you. This product is installed, operated and maintained according to instructions attached to access additional ...resources, or visit www.whirlpool.com/product_help. 2. Removal or reinstallation of the Use and Care Guide, scan the...
... instruction on the right to or furnished with the product, Whirlpool Corporation or Whirlpool Canada LP (hereafter "Whirlpool") will be provided by the customer. Food or medicine loss due to you. This product is installed, operated and maintained according to instructions attached to access additional ...resources, or visit www.whirlpool.com/product_help. 2. Removal or reinstallation of the Use and Care Guide, scan the...
Dimension Guide
Page 1
... gas connector, designed by CSA to connect the cooktop to LP gas, see Installation our products, we reserve the right to the cooktop pressure regulator. It must ...not block access to change materials and specifications without notice. Page 1 of 4 Ref. Because Whirlpool Corporation policy includes a continuous commitment to the cooktop location. Gas Supply Line q Provide a...KCGS356E KCGS550E KCGS556E KCGS950E KCGS956E MGC7430D MGC7536D MGC9530D MGC9536D WCG51US0D WCG51US6D WCG75US0D WCG97US0D WCG97US6D GAS SUPPLY REQUIREMENTS Type of Gas Natural Gas: This cooktop is design-...
... gas connector, designed by CSA to connect the cooktop to LP gas, see Installation our products, we reserve the right to the cooktop pressure regulator. It must ...not block access to change materials and specifications without notice. Page 1 of 4 Ref. Because Whirlpool Corporation policy includes a continuous commitment to the cooktop location. Gas Supply Line q Provide a...KCGS356E KCGS550E KCGS556E KCGS950E KCGS956E MGC7430D MGC7536D MGC9530D MGC9536D WCG51US0D WCG51US6D WCG75US0D WCG97US0D WCG97US6D GAS SUPPLY REQUIREMENTS Type of Gas Natural Gas: This cooktop is design-...
Dimension Guide
Page 2
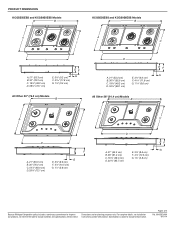
Page 2 of 4 Ref. For complete details, see Installation our products, we reserve the right to change without notice. PRODUCT DIMENSIONS KCGS550ESS and KCGS950ESS Models B KCGS556ESS and KCGS956ESS Models B A A C C D...33³⁄₄" (85.7 cm) E. 3³⁄₈" (8.6 cm) F. 4¹⁄₈" (10.5 cm) G. 1½" (3.8 cm) EF G Because Whirlpool Corporation policy includes a continuous commitment to change materials and specifications without notice. Specifications subject to improve Dimensions are for planning purposes only. Instructions packed with...
Page 2 of 4 Ref. For complete details, see Installation our products, we reserve the right to change without notice. PRODUCT DIMENSIONS KCGS550ESS and KCGS950ESS Models B KCGS556ESS and KCGS956ESS Models B A A C C D...33³⁄₄" (85.7 cm) E. 3³⁄₈" (8.6 cm) F. 4¹⁄₈" (10.5 cm) G. 1½" (3.8 cm) EF G Because Whirlpool Corporation policy includes a continuous commitment to change materials and specifications without notice. Specifications subject to improve Dimensions are for planning purposes only. Instructions packed with...
Dimension Guide
Page 3
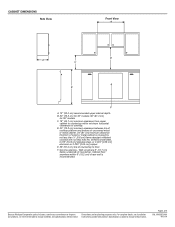
For complete details, see Installation our products, we reserve the right to floor. W10597144A 9/10/14 CABINET DIMENSIONS Side View Front View B D A C E F A. 13" (33.0 cm) recommended upper cabinet depth. B. 30" (... without notice. Specifications subject to cooktop. F. Page 3 of countertop. C. 18" (45.7 cm) minimum clearance from upper cabinet to improve Dimensions are for 36" models. Because Whirlpool Corporation policy includes a continuous commitment to countertop within 6" (15.2 cm) of rear wall is covered by not less than No. 28 MSG sheet steel, 0.015...
For complete details, see Installation our products, we reserve the right to floor. W10597144A 9/10/14 CABINET DIMENSIONS Side View Front View B D A C E F A. 13" (33.0 cm) recommended upper cabinet depth. B. 30" (... without notice. Specifications subject to cooktop. F. Page 3 of countertop. C. 18" (45.7 cm) minimum clearance from upper cabinet to improve Dimensions are for 36" models. Because Whirlpool Corporation policy includes a continuous commitment to countertop within 6" (15.2 cm) of rear wall is covered by not less than No. 28 MSG sheet steel, 0.015...

Dimension Guide
Page 4
...depth may require notching down the base cabinet side walls to change materials and specifications without notice. Because Whirlpool Corporation policy includes a continuous commitment to be installed below this modification, use a base cabinet with product. Both have to be shortened to the top ... Dimensions are for planning purposes only. W10597144A 9/10/14 This cooktop and its gas and electrical supply sources must be installed before the undercounter built-in wall oven is required. Instructions packed with sidewalls wider than the cutout. CABINET DIMENSIONS (cont...
...depth may require notching down the base cabinet side walls to change materials and specifications without notice. Because Whirlpool Corporation policy includes a continuous commitment to be installed below this modification, use a base cabinet with product. Both have to be shortened to the top ... Dimensions are for planning purposes only. W10597144A 9/10/14 This cooktop and its gas and electrical supply sources must be installed before the undercounter built-in wall oven is required. Instructions packed with sidewalls wider than the cutout. CABINET DIMENSIONS (cont...

