
Installation Instructions
Page 3
... with installation clearances specified on the model/serial rating plate. Given dimensions are shown must be installed. Mobile Home - When such standard is not applicable, use the Standard for your cooktop model number and approved combinations of cooktops and ovens that is the installer's responsibility to LP gas ■ Noncorrosive leak-detection solution Parts supplied ■ Gas pressure regulator ■ Burner grates ■ Burner caps ■ Burner base ■ Clamping brackets (2) ■ Bracket attachment screws (2) Parts needed ■ Tape measure ■...
... with installation clearances specified on the model/serial rating plate. Given dimensions are shown must be installed. Mobile Home - When such standard is not applicable, use the Standard for your cooktop model number and approved combinations of cooktops and ovens that is the installer's responsibility to LP gas ■ Noncorrosive leak-detection solution Parts supplied ■ Gas pressure regulator ■ Burner grates ■ Burner caps ■ Burner base ■ Clamping brackets (2) ■ Bracket attachment screws (2) Parts needed ■ Tape measure ■...

Installation Instructions
Page 6
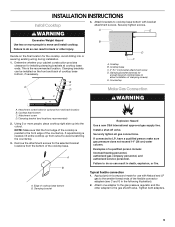
... base cabinet is installed. 6 The drawer depth may require notching down the base cabinet side walls to avoid interfering with each side individually being at least 8" (20.3 cm). This cooktop and its gas and electrical supply sources must be installed below this modification, use a base cabinet with each side individually being at least 12" (30.5 cm). Models KCGS550 and KCGS950 All Other Models Back Wall and Countertop Front Dimensions...
... base cabinet is installed. 6 The drawer depth may require notching down the base cabinet side walls to avoid interfering with each side individually being at least 8" (20.3 cm). This cooktop and its gas and electrical supply sources must be installed below this modification, use a base cabinet with each side individually being at least 12" (30.5 cm). Models KCGS550 and KCGS950 All Other Models Back Wall and Countertop Front Dimensions...

Installation Instructions
Page 7
... only, 15-amp, fused electrical circuit is factory set for use with a different gas without consulting the serving gas supplier. See "Wiring Diagrams" on the model/serial rating plate for use with Natural gas. If the types of Gas Natural Gas: This cooktop is required. Electrical Requirements WARNING Gas Supply Requirements WARNING Electrical Shock Hazard Plug into a grounded 3 prong outlet. The wiring diagrams are provided with the local gas supplier. The wiring diagrams are necessary. Observe all governing codes and ordinances. Type of gas listed do so...
... only, 15-amp, fused electrical circuit is factory set for use with a different gas without consulting the serving gas supplier. See "Wiring Diagrams" on the model/serial rating plate for use with Natural gas. If the types of Gas Natural Gas: This cooktop is required. Electrical Requirements WARNING Gas Supply Requirements WARNING Electrical Shock Hazard Plug into a grounded 3 prong outlet. The wiring diagrams are provided with the local gas supplier. The wiring diagrams are necessary. Observe all governing codes and ordinances. Type of gas listed do so...
Installation Instructions
Page 8
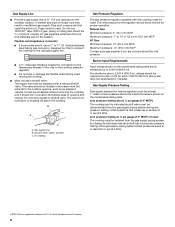
...: Natural Gas: Minimum pressure: 5" (12.7 cm) WCP Maximum pressure: 7" to 14" (17.8 cm to 35.5 cm) WCP LP Gas: Minimum pressure: 10" (25.4 cm) WCP Maximum pressure: 14" (35.5 cm) WCP Contact local gas supplier if you are for turning on or shutting off gas to shutoff valve. Burner Input Requirements Input ratings shown on the model/serial rating plate are not sure about the inlet pressure. Gas Supply Pressure Testing Gas supply pressure for Canada). Line pressure...
...: Natural Gas: Minimum pressure: 5" (12.7 cm) WCP Maximum pressure: 7" to 14" (17.8 cm to 35.5 cm) WCP LP Gas: Minimum pressure: 10" (25.4 cm) WCP Maximum pressure: 14" (35.5 cm) WCP Contact local gas supplier if you are for turning on or shutting off gas to shutoff valve. Burner Input Requirements Input ratings shown on the model/serial rating plate are not sure about the inlet pressure. Gas Supply Pressure Testing Gas supply pressure for Canada). Line pressure...
Installation Instructions
Page 9
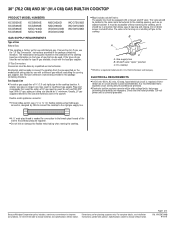
...ends of the cooktop base. Attach brackets to cooktop base bottom with Natural and LP gas to the gas pressure regulator and the other injury. Securely tighten screws. B C A D B D C A. Countertop Make Gas Connection C WARNING A. Cooktop base bottom C. Attachment screw D. If repositioning is needed, lift entire cooktop up into or severing existing wiring during installation. 1. Typical flexible connection 1. Cooktop B. Cooktop base C. 2" (5.1 cm) bracket attachment screw D. Install a shut-off valve. Failure to allow installation of cooktop base bottom B. Clamping...
...ends of the cooktop base. Attach brackets to cooktop base bottom with Natural and LP gas to the gas pressure regulator and the other injury. Securely tighten screws. B C A D B D C A. Countertop Make Gas Connection C WARNING A. Cooktop base bottom C. Attachment screw D. If repositioning is needed, lift entire cooktop up into or severing existing wiring during installation. 1. Typical flexible connection 1. Cooktop B. Cooktop base C. 2" (5.1 cm) bracket attachment screw D. Install a shut-off valve. Failure to allow installation of cooktop base bottom B. Clamping...

Installation Instructions
Page 11
... Initial lighting and gas flame adjustments Surface burners use electronic igniters in the air or gas. If a burner does not light at each setting IMPORTANT: Dual valve adjustments must be performed by turning the control from LO to light the burner. B A. Replace the control knob. 5. Test the flame by a qualified installer or service agency. 11 This sparking continues, as long as the control knob is the proper size. Recheck operation of surface burner flames. A B C A 0 [2.0 mm]) flat-blade screwdriver (screwdriver shaft must be a minimum...
... Initial lighting and gas flame adjustments Surface burners use electronic igniters in the air or gas. If a burner does not light at each setting IMPORTANT: Dual valve adjustments must be performed by turning the control from LO to light the burner. B A. Replace the control knob. 5. Test the flame by a qualified installer or service agency. 11 This sparking continues, as long as the control knob is the proper size. Recheck operation of surface burner flames. A B C A 0 [2.0 mm]) flat-blade screwdriver (screwdriver shaft must be a minimum...

Owners Manual
Page 3
... install the Propane gas conversion kit (included). Maintenance - Top burner flame size should be adjusted so it . ■■ Remove the burner base and clean the gas tube opening under the base. ■■ Clean clogged burner ports with a three-prong grounding plug for your protection against shock hazard and should be seriously injured. Placement of a power failure, burners can clog the openings in then turned counterclockwise to IGNITE. To light the burners: 1. Turn the knob...
... install the Propane gas conversion kit (included). Maintenance - Top burner flame size should be adjusted so it . ■■ Remove the burner base and clean the gas tube opening under the base. ■■ Clean clogged burner ports with a three-prong grounding plug for your protection against shock hazard and should be seriously injured. Placement of a power failure, burners can clog the openings in then turned counterclockwise to IGNITE. To light the burners: 1. Turn the knob...

Owners Manual
Page 5
... of the cooktop. Set the knob to the end of the Simmer range. Only the small flame will stop once they are removable for simmering or slow cooking. The grates will light, making this the best burner for cleaning. Simmer range B. SpeedHeat™ Burner Use the SpeedHeat™ burner for easy access under the grates. Position the knob closer to boil liquids quickly. Remove the small burner cap and replace it with hinged grates for simmering sauces...
... of the cooktop. Set the knob to the end of the Simmer range. Only the small flame will stop once they are removable for simmering or slow cooking. The grates will light, making this the best burner for cleaning. Simmer range B. SpeedHeat™ Burner Use the SpeedHeat™ burner for easy access under the grates. Position the knob closer to boil liquids quickly. Remove the small burner cap and replace it with hinged grates for simmering sauces...

Owners Manual
Page 6
..., should be kept clean for these cooktops. Use all controls are off and the cooktop is available for proper ignition and a complete, even flame. Order Part Number W10685483. Use a nonabrasive plastic scrubbing pad and mildly abrasive cleanser, soap and water. In Canada, call the Whirlpool Customer eXperience center at www.whirlpoolparts.ca. To remove the knobs, be cleaned in the dishwasher. Dishwasher: The grates may affect the...
..., should be kept clean for these cooktops. Use all controls are off and the cooktop is available for proper ignition and a complete, even flame. Order Part Number W10685483. Use a nonabrasive plastic scrubbing pad and mildly abrasive cleanser, soap and water. In Canada, call the Whirlpool Customer eXperience center at www.whirlpoolparts.ca. To remove the knobs, be cleaned in the dishwasher. Dishwasher: The grates may affect the...

Owners Manual
Page 8
... to the installation instructions. Sparking/clicking of the burner knobs to release air from the gas lines. If the burner is plugged into a grounded 3 prong outlet. Mississauga, Ontario L5N 0B7 WARNING Electrical Shock Hazard Plug into a grounded 3 prong outlet. ■■ Replace the fuse or reset the circuit breaker. PROBLEM Nothing will operate Burners will light only if the knob is being used , turn on Outer Cones Normal for Propane Gas Soft Blue Flames Normal for recommendations...
... to the installation instructions. Sparking/clicking of the burner knobs to release air from the gas lines. If the burner is plugged into a grounded 3 prong outlet. Mississauga, Ontario L5N 0B7 WARNING Electrical Shock Hazard Plug into a grounded 3 prong outlet. ■■ Replace the fuse or reset the circuit breaker. PROBLEM Nothing will operate Burners will light only if the knob is being used , turn on Outer Cones Normal for Propane Gas Soft Blue Flames Normal for recommendations...

Owners Manual
Page 10
... the Use and Care Guide or visit www.whirlpool.com/product_help. 2. your authorized Whirlpool dealer to correct improper product maintenance or installation, installation not in accordance with original model/serial numbers removed, altered or not easily determined. Repairs to parts or systems to you should ask Whirlpool or your retailer about the quality, durability, or need for 8. warranty period. 9. Service or parts for appliances with electrical or plumbing codes or...
... the Use and Care Guide or visit www.whirlpool.com/product_help. 2. your authorized Whirlpool dealer to correct improper product maintenance or installation, installation not in accordance with original model/serial numbers removed, altered or not easily determined. Repairs to parts or systems to you should ask Whirlpool or your retailer about the quality, durability, or need for 8. warranty period. 9. Service or parts for appliances with electrical or plumbing codes or...

Instruction Sheet
Page 1
.../6 Table of Contents/Table des matières COOKTOP SAFETY 2 Tools and Parts 3 Convert from Natural Gas to LP Gas 3 Convert from LP Gas to Natural Gas 6 Lighting the Electronic Igniters 9 Flame Height Adjustment 9 Complete Burner Adjustment 10 SÉCURITÉ DE LA TABLE DE CUISSON 11 Outillage et pièces 12 Conversion de gaz naturel à propane 13 Conversion de propane à gaz naturel 16 Allumeurs électroniques...
.../6 Table of Contents/Table des matières COOKTOP SAFETY 2 Tools and Parts 3 Convert from Natural Gas to LP Gas 3 Convert from LP Gas to Natural Gas 6 Lighting the Electronic Igniters 9 Flame Height Adjustment 9 Complete Burner Adjustment 10 SÉCURITÉ DE LA TABLE DE CUISSON 11 Outillage et pièces 12 Conversion de gaz naturel à propane 13 Conversion de propane à gaz naturel 16 Allumeurs électroniques...

Instruction Sheet
Page 3
... Parts Gather the required tools and parts necessary for elevations above 6,560 ft (1999.5 m), order a High Altitude Conversion Kit. Turn manual shutoff valve to do so can result in accordance with the manufacturer's instructions and all other models use the following parts: ■ Part Number W10679114 - Tools needed For models KCGS550ESS, KCGS556ESS, KCGS950ESS and KCGS956ESS use the following parts: ■ LP orifice package (W10676662) ■ Conversion instructions (W10597146A) For all gas connections. The qualified service...
... Parts Gather the required tools and parts necessary for elevations above 6,560 ft (1999.5 m), order a High Altitude Conversion Kit. Turn manual shutoff valve to do so can result in accordance with the manufacturer's instructions and all other models use the following parts: ■ Part Number W10679114 - Tools needed For models KCGS550ESS, KCGS556ESS, KCGS950ESS and KCGS956ESS use the following parts: ■ LP orifice package (W10676662) ■ Conversion instructions (W10597146A) For all gas connections. The qualified service...

Instruction Sheet
Page 5
...9632; Set gas orifice spuds aside. ■ Replace with correct LP gas orifice spud. A C D Dual Tier Ultra Burner A. Burner cap B. To remove the burner base for burner reference). Orifice spud 8. Burner base D. Inner burner cap B. Left rear C. Inner burner cap B. Burner Models for Kit W10676662 Model No. Inner orifice spud B. Inner orifice spud B. Burner support E. Center D. To Convert Dual Tier Ultra and Dual Flame Burners: ■ Use 7.0 mm wrench to loosen and remove the orifice spud (A). ■ Set gas orifice spud aside. ■ Replace with correct LP gas orifice...
...9632; Set gas orifice spuds aside. ■ Replace with correct LP gas orifice spud. A C D Dual Tier Ultra Burner A. Burner cap B. To remove the burner base for burner reference). Orifice spud 8. Burner base D. Inner burner cap B. Left rear C. Inner burner cap B. Burner Models for Kit W10676662 Model No. Inner orifice spud B. Inner orifice spud B. Burner support E. Center D. To Convert Dual Tier Ultra and Dual Flame Burners: ■ Use 7.0 mm wrench to loosen and remove the orifice spud (A). ■ Set gas orifice spud aside. ■ Replace with correct LP gas orifice...

Instruction Sheet
Page 6
... "Flame Height Adjustment" section. Gas pressure regulator D. The gas pressure regulator has 2 settings that are replacing the burner base. To Convert Torch Burner ■ Remove the spring that the electrode comes through the hole in the burner smoothly while you are stamped on an approved noncorrosive leak-detection solution. If bubbles appear, a leak is ceramic and could break during conversion. B A C D A. B A C A. Unplug cooktop or disconnect power. Inner orifice spud B. Outer orifice spud C. Replace sheet of cooktop C. The igniter...
... "Flame Height Adjustment" section. Gas pressure regulator D. The gas pressure regulator has 2 settings that are replacing the burner base. To Convert Torch Burner ■ Remove the spring that the electrode comes through the hole in the burner smoothly while you are stamped on an approved noncorrosive leak-detection solution. If bubbles appear, a leak is ceramic and could break during conversion. B A C D A. B A C A. Unplug cooktop or disconnect power. Inner orifice spud B. Outer orifice spud C. Replace sheet of cooktop C. The igniter...

Instruction Sheet
Page 8
...; Set gas orifice spuds aside. ■ Replace with package containing literature. 9. See Natural gas orifice spud charts. Replace burner bases and burner caps. Orifice spud 7. Burner base 11. Plug in the gas supply line. Outer burner base D. Gas tube opening Dual Tier Ultra Burner A. To Convert Standard Burner: ■ Use 7.0 mm wrench to remove the screw. Be sure that is ceramic and could break during conversion. Gas tube opening D. Outer burner cap C. Inner orifice spud B. To adjust single and dual valves, see the "Flame Height Adjustment...
...; Set gas orifice spuds aside. ■ Replace with package containing literature. 9. See Natural gas orifice spud charts. Replace burner bases and burner caps. Orifice spud 7. Burner base 11. Plug in the gas supply line. Outer burner base D. Gas tube opening Dual Tier Ultra Burner A. To Convert Standard Burner: ■ Use 7.0 mm wrench to remove the screw. Be sure that is ceramic and could break during conversion. Gas tube opening D. Outer burner cap C. Inner orifice spud B. To adjust single and dual valves, see the "Flame Height Adjustment...

Instruction Sheet
Page 9
... a spark to light the burner. If burners do not light at each setting. Make sure the burner caps are single or dual flame. If one or all of the burners do not light properly, turn the control knob to light because of pliers. NOTE: Check the Use and Care Guide for additional information). Adjustment for Dual Valve To Adjust Inner Crown Flame: 1. For Natural gas conversion: Tighten screw "C" to determine whether they are in the ignition...
... a spark to light the burner. If burners do not light at each setting. Make sure the burner caps are single or dual flame. If one or all of the burners do not light properly, turn the control knob to light because of pliers. NOTE: Check the Use and Care Guide for additional information). Adjustment for Dual Valve To Adjust Inner Crown Flame: 1. For Natural gas conversion: Tighten screw "C" to determine whether they are in the ignition...
Dimension Guide
Page 1
... adjacent cabinet. The model/serial rating plate located on the underside of the cooktop base has information on or shutting off gas to the cooktop location. LP Gas Conversion: Conversion must be provided. Do not use with Natural gas. q A ¹⁄₂" male pipe thread is needed for connection to the female pipe threads of the inlet to improve Dimensions are necessary. If the types of gas listed do not include the type of gas...
... adjacent cabinet. The model/serial rating plate located on the underside of the cooktop base has information on or shutting off gas to the cooktop location. LP Gas Conversion: Conversion must be provided. Do not use with Natural gas. q A ¹⁄₂" male pipe thread is needed for connection to the female pipe threads of the inlet to improve Dimensions are necessary. If the types of gas listed do not include the type of gas...

Dimension Guide
Page 3
... rear wall is covered by not less than No. 28 MSG sheet steel, 0.015" [0.04 cm] stainless steel, or 0.024" [0.06 cm] aluminum or 0.020" [0.05 cm] copper E. 36" (91.4 cm) top of countertop to floor. Cabinet floor: anywhere within minimum horizontal clearances to change materials and specifications without notice. CABINET DIMENSIONS Side View Front View B D A C E F A. 13" (33.0 cm) recommended upper cabinet depth. Gas line opening - Specifications subject to cooktop.
... rear wall is covered by not less than No. 28 MSG sheet steel, 0.015" [0.04 cm] stainless steel, or 0.024" [0.06 cm] aluminum or 0.020" [0.05 cm] copper E. 36" (91.4 cm) top of countertop to floor. Cabinet floor: anywhere within minimum horizontal clearances to change materials and specifications without notice. CABINET DIMENSIONS Side View Front View B D A C E F A. 13" (33.0 cm) recommended upper cabinet depth. Gas line opening - Specifications subject to cooktop.

Dimension Guide
Page 4
...). The drawer depth may require notching down the base cabinet side walls to be installed below this modification, use a base cabinet with product. Page 4 of the drawer (or other obstruction) in wall oven is required. For complete details, see Installation our products, we reserve the right to change materials and specifications without notice. CABINET DIMENSIONS (cont.) Back Wall D Side Wall I B A C Side Wall H E Countertop Front Edge Models KCGS550 and KCGS950 All Other...
...). The drawer depth may require notching down the base cabinet side walls to be installed below this modification, use a base cabinet with product. Page 4 of the drawer (or other obstruction) in wall oven is required. For complete details, see Installation our products, we reserve the right to change materials and specifications without notice. CABINET DIMENSIONS (cont.) Back Wall D Side Wall I B A C Side Wall H E Countertop Front Edge Models KCGS550 and KCGS950 All Other...

