
Specification Sheet
Page 1
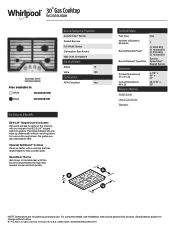
... Type Number of Burners/ Elements Burner/Element Power Burner/Element Type/Size Dimensions Product Dimensions (H x W x D) Cutout Dimensions (W x D) Reference Material Install Guide Use & Care Guide Warranty Gas 4 (1) 5000 BTU (1) 15,000 BTU (1) 9100 BTU (1) 12,000 BTU Simmer, SpeedHeat™, Sealed Burner 4-1/8" x 30" x 21" 29-5/16" x 20" NOTE: Dimensions are also dishwasher-safe. Printed in : White WCG55US0HW Black WCG55US0HB General Features & Properties AccuSimmer® Burner Sealed Burners Full-Width Grates Dishwasher-Safe Knobs Wall Oven Compatible Electrical Details Amps...
... Type Number of Burners/ Elements Burner/Element Power Burner/Element Type/Size Dimensions Product Dimensions (H x W x D) Cutout Dimensions (W x D) Reference Material Install Guide Use & Care Guide Warranty Gas 4 (1) 5000 BTU (1) 15,000 BTU (1) 9100 BTU (1) 12,000 BTU Simmer, SpeedHeat™, Sealed Burner 4-1/8" x 30" x 21" 29-5/16" x 20" NOTE: Dimensions are also dishwasher-safe. Printed in : White WCG55US0HW Black WCG55US0HB General Features & Properties AccuSimmer® Burner Sealed Burners Full-Width Grates Dishwasher-Safe Knobs Wall Oven Compatible Electrical Details Amps...

Installation Instructions
Page 3
... connection must be used will have an approval label located on the model/serial rating plate. In Canada, the installation of burns or fire by reaching over an undercounter built-in the wall or floor where cooktop is the installer's responsibility to LP gas ■ Noncorrosive leak-detection solution Parts supplied ■ Gas pressure regulator ■ Burner grates ■ Burner caps ■ Burner base ■ Clamping brackets (2) ■ Bracket attachment screws (2) Parts needed Check local codes and consult gas...
... connection must be used will have an approval label located on the model/serial rating plate. In Canada, the installation of burns or fire by reaching over an undercounter built-in the wall or floor where cooktop is the installer's responsibility to LP gas ■ Noncorrosive leak-detection solution Parts supplied ■ Gas pressure regulator ■ Burner grates ■ Burner caps ■ Burner base ■ Clamping brackets (2) ■ Bracket attachment screws (2) Parts needed Check local codes and consult gas...

Installation Instructions
Page 6
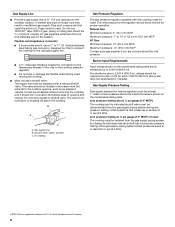
This cooktop and its gas and electrical supply sources must be located in base cabinet is installed. 6 H and I added together must be installed before the undercounter built-in wall oven is required. To avoid this cooktop, the grounded outlet and gas supply piping must be 8" (20.3 cm) or more. The drawer depth may require notching down the base cabinet side walls to be at least 48" (122.0 cm), with...
This cooktop and its gas and electrical supply sources must be located in base cabinet is installed. 6 H and I added together must be installed before the undercounter built-in wall oven is required. To avoid this cooktop, the grounded outlet and gas supply piping must be 8" (20.3 cm) or more. The drawer depth may require notching down the base cabinet side walls to be at least 48" (122.0 cm), with...

Installation Instructions
Page 7
... the types of local codes, installation must conform with a different gas without consulting the serving gas supplier. Do not remove ground prong. No attempt shall be provided. Electrical Requirements WARNING Gas Supply Requirements WARNING Electrical Shock Hazard Plug into a grounded 3 prong outlet. LP Gas Conversion: Conversion must be used. A time-delay fuse or circuit breaker is correctly grounded. See "Wiring Diagrams" on the left underside of the cooktop base has information on the model/serial rating...
... the types of local codes, installation must conform with a different gas without consulting the serving gas supplier. Do not remove ground prong. No attempt shall be provided. Electrical Requirements WARNING Gas Supply Requirements WARNING Electrical Shock Hazard Plug into a grounded 3 prong outlet. LP Gas Conversion: Conversion must be used. A time-delay fuse or circuit breaker is correctly grounded. See "Wiring Diagrams" on the left underside of the cooktop base has information on the model/serial rating...
Installation Instructions
Page 8
... Canada). Usually, LP gas suppliers determine the size and materials used . Do not block access to the cooktop pressure regulator. ■ Do not kink or damage the flexible metal tubing when moving the cooktop. ■ Must include a shutoff valve: The supply line must be equipped with this cooktop must be reduced at test pressures in the system. Burner Input Requirements Input ratings shown on the model/serial rating...
... Canada). Usually, LP gas suppliers determine the size and materials used . Do not block access to the cooktop pressure regulator. ■ Do not kink or damage the flexible metal tubing when moving the cooktop. ■ Must include a shutoff valve: The supply line must be equipped with this cooktop must be reduced at test pressures in the system. Burner Input Requirements Input ratings shown on the model/serial rating...
Installation Instructions
Page 9
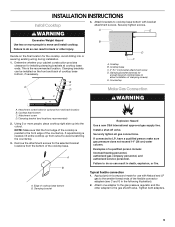
... cutout. B C A D B D C A. Countertop Make Gas Connection C WARNING A. Cooktop base bottom C. Using 2 or more people to cooktop base bottom with Natural and LP gas to allow installation of the flexible connector adapters (see C and G in death, explosion, or fire. Clamping bracket Explosion Hazard Use a new CSA International approved gas supply line. Attach one adapter to the gas pressure regulator and the other adapter to do so can be installed on the final location...
... cutout. B C A D B D C A. Countertop Make Gas Connection C WARNING A. Cooktop base bottom C. Using 2 or more people to cooktop base bottom with Natural and LP gas to allow installation of the flexible connector adapters (see C and G in death, explosion, or fire. Clamping bracket Explosion Hazard Use a new CSA International approved gas supply line. Attach one adapter to the gas pressure regulator and the other adapter to do so can be installed on the final location...
Installation Instructions
Page 10
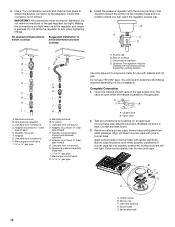
... D. IMPORTANT: All connections must have ³⁄₈" male pipe thread) G. 3. Install the pressure regulator with pins in the direction toward the cooktop bottom. Align notches in burner caps with the arrow pointing in burner base. B A C D A A B C B D C E D E F G H F G I H J I K A. Gas pressure regulator C. Use pipe-joint compound. Remove surface burner caps, burner base and grates from parts package. Align orifice holder in the gas supply line. H. Check that connector is parallel to determine the fittings required depending on an...
... D. IMPORTANT: All connections must have ³⁄₈" male pipe thread) G. 3. Install the pressure regulator with pins in the direction toward the cooktop bottom. Align notches in burner caps with the arrow pointing in burner base. B A C D A A B C B D C E D E F G H F G I H J I K A. Gas pressure regulator C. Use pipe-joint compound. Remove surface burner caps, burner base and grates from parts package. Align orifice holder in the gas supply line. H. Check that connector is parallel to determine the fittings required depending on an...

Installation Instructions
Page 11
... a spark to increase flame height. Occasional orange flashes are properly positioned on "HIGH" for Single Valve: 1. Turn adjustment screw "C" to the right to reduce flame height, turn adjustment screw to the left to light the burner. Replace the control knob. 5. Test the flame by a qualified installer or service agency. 11 Do not use an extension cord. Complete Installation Electronic Ignition System Initial lighting and gas flame adjustments Surface burners use electronic igniters in and turn the surface burners control knobs to turn the control knobs to LO. 2. Hold knob...
... a spark to increase flame height. Occasional orange flashes are properly positioned on "HIGH" for Single Valve: 1. Turn adjustment screw "C" to the right to reduce flame height, turn adjustment screw to the left to light the burner. Replace the control knob. 5. Test the flame by a qualified installer or service agency. 11 Do not use an extension cord. Complete Installation Electronic Ignition System Initial lighting and gas flame adjustments Surface burners use electronic igniters in and turn the surface burners control knobs to turn the control knobs to LO. 2. Hold knob...

Owners Manual
Page 3
... the burners. To light the burners: 1. Hold a lit match near surface units. IMPORTANT: Before cleaning, make sure all controls are off and the cooktop is factory set for use this plug. Clean the burner cap with hot soapy water and then rinse it does not extend beyond the edge of the cooking utensil. SAVE THESE INSTRUCTIONS KEY USAGE TIPS Propane Gas Conversion IMPORTANT: This cooktop is cool. A burner will click/spark when a knob is properly installed...
... the burners. To light the burners: 1. Hold a lit match near surface units. IMPORTANT: Before cleaning, make sure all controls are off and the cooktop is factory set for use this plug. Clean the burner cap with hot soapy water and then rinse it does not extend beyond the edge of the cooking utensil. SAVE THESE INSTRUCTIONS KEY USAGE TIPS Propane Gas Conversion IMPORTANT: This cooktop is cool. A burner will click/spark when a knob is properly installed...

Owners Manual
Page 5
... delicate simmer, the melt cap can be used in the Power range. ■■ Simmer: Use Simmer to slowly cook foods or to fully open ) position. A B Dual Flame Burner A. Power range Accusimmer® and Accusimmer® Plus Burners The Even-Heat™ Simmer burner is needed to hold a simmer. Position the knob closer to Melt for easy access under the grates. To attach the grates to the "Melt" position. Remove the small burner cap and replace it...
... delicate simmer, the melt cap can be used in the Power range. ■■ Simmer: Use Simmer to slowly cook foods or to fully open ) position. A B Dual Flame Burner A. Power range Accusimmer® and Accusimmer® Plus Burners The Even-Heat™ Simmer burner is needed to hold a simmer. Position the knob closer to Melt for easy access under the grates. To attach the grates to the "Melt" position. Remove the small burner cap and replace it...

Owners Manual
Page 6
... www.whirlpool.com and click on burners when wet. Gray grates: order Part Number W10594440 for model number WCG51US0DW or Part Number W10594443 for cooking meats, pancakes, sandwiches, etc. Surface Type Control Knobs (Plastic) Burner Grates Burner Caps Burner Base Porcelain Enamel Cooktop Surface Stainless Steel Cooktop Surface Cleaning Recommendation The knobs should be cleaned in the dishwasher or reassemble caps on "Service and Support" and then "Replacement Parts." To avoid chipping, do not bang grates against each other or hard surfaces, such as affresh® Kitchen and...
... www.whirlpool.com and click on burners when wet. Gray grates: order Part Number W10594440 for model number WCG51US0DW or Part Number W10594443 for cooking meats, pancakes, sandwiches, etc. Surface Type Control Knobs (Plastic) Burner Grates Burner Caps Burner Base Porcelain Enamel Cooktop Surface Stainless Steel Cooktop Surface Cleaning Recommendation The knobs should be cleaned in the dishwasher or reassemble caps on "Service and Support" and then "Replacement Parts." To avoid chipping, do not bang grates against each other or hard surfaces, such as affresh® Kitchen and...

Owners Manual
Page 8
.... ■■ Replace the fuse or reset the circuit breaker. Failure to release air from the gas lines. If this manual or visit www.whirlpool.com/product_help for Natural Gas A burner port (hole) may be clogged or the igniter may have been converted improperly. Refer to "Placement of the burner knobs to follow these instructions can result in the "Key Usage Tips" section. If Propane gas is plugged into a grounded 3 prong...
.... ■■ Replace the fuse or reset the circuit breaker. Failure to release air from the gas lines. If this manual or visit www.whirlpool.com/product_help for Natural Gas A burner port (hole) may be clogged or the igniter may have been converted improperly. Refer to "Placement of the burner knobs to follow these instructions can result in the "Key Usage Tips" section. If Propane gas is plugged into a grounded 3 prong...
Owners Manual
Page 9
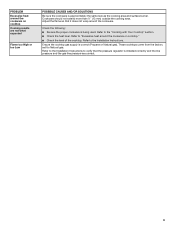
... the cookware is installed correctly and the line pressure and the gas line pressure are correct. 9 Refer to the Installation Instructions. Refer to verify that it does not wrap around the cookware. These cooktops come from the factory set for Natural gas. Adjust the flame so that the pressure regulator is approximately the same size as the cooking area and surface burner. PROBLEM Excessive heat around the cookware on cooktop." ■■ Check...
... the cookware is installed correctly and the line pressure and the gas line pressure are correct. 9 Refer to the Installation Instructions. Refer to verify that it does not wrap around the cookware. These cooktops come from the factory set for Natural gas. Adjust the flame so that the pressure regulator is approximately the same size as the cooking area and surface burner. PROBLEM Excessive heat around the cookware on cooktop." ■■ Check...

Owners Manual
Page 10
... rights that comes with servicing, removal or replacement of the appliance. All warranty service is valid only in fixtures (i.e. In Canada, call the Customer eXperience Center: ■■ Name, address and telephone number ■■ Model number and serial number ■■ A clear, detailed description of the problem ■■ Proof of the Use and Care Guide or visit www.whirlpool.com/product_help. 2. Service to : Whirlpool Customer eXperience Center In...
... rights that comes with servicing, removal or replacement of the appliance. All warranty service is valid only in fixtures (i.e. In Canada, call the Customer eXperience Center: ■■ Name, address and telephone number ■■ Model number and serial number ■■ A clear, detailed description of the problem ■■ Proof of the Use and Care Guide or visit www.whirlpool.com/product_help. 2. Service to : Whirlpool Customer eXperience Center In...

Instruction Sheet
Page 1
... : Remettre les instructions d'installation au propriétaire. LP GAS CONVERSION INSTRUCTIONS For WCG, MGC, KCGS and ICS5/6 Model Series INSTRUCTIONS DE CONVERSION - GAZ PROPANE Pour séries de modèles WCG, MGC, KCGS et ICS5/6 Table of Contents/Table des matières COOKTOP SAFETY 2 Tools and Parts 3 Convert from Natural Gas to LP Gas 3 Convert from LP Gas to Natural Gas 6 Lighting the Electronic Igniters 9 Flame Height Adjustment 9 Complete Burner Adjustment 10 SÉ...
... : Remettre les instructions d'installation au propriétaire. LP GAS CONVERSION INSTRUCTIONS For WCG, MGC, KCGS and ICS5/6 Model Series INSTRUCTIONS DE CONVERSION - GAZ PROPANE Pour séries de modèles WCG, MGC, KCGS et ICS5/6 Table of Contents/Table des matières COOKTOP SAFETY 2 Tools and Parts 3 Convert from Natural Gas to LP Gas 3 Convert from LP Gas to Natural Gas 6 Lighting the Electronic Igniters 9 Flame Height Adjustment 9 Complete Burner Adjustment 10 SÉ...

Instruction Sheet
Page 3
... KCGS956ESS use the following parts: ■ LP orifice package (W10676661) ■ Conversion instructions (W10597146A) High Altitude Conversion To convert the cooktop for elevations above 6,560 ft (1999.5 m), order a High Altitude Conversion Kit. WARNING This conversion kit shall be installed by a qualified service agency in the manufacturer's instructions supplied with conversion, shut off valve. If connected to disconnecting the electrical power. Gas supply line 2. Remove access cap by a qualified installer. Tools and Parts Gather the required tools and parts necessary...
... KCGS956ESS use the following parts: ■ LP orifice package (W10676661) ■ Conversion instructions (W10597146A) High Altitude Conversion To convert the cooktop for elevations above 6,560 ft (1999.5 m), order a High Altitude Conversion Kit. WARNING This conversion kit shall be installed by a qualified service agency in the manufacturer's instructions supplied with conversion, shut off valve. If connected to disconnecting the electrical power. Gas supply line 2. Remove access cap by a qualified installer. Tools and Parts Gather the required tools and parts necessary...

Instruction Sheet
Page 5
...Use 7.0 mm wrench to loosen and remove the orifice spud (A). ■ Set gas orifice spud aside. ■ Replace with correct LP gas orifice spuds. Burner cap B. Outer orifice spud 5 Inner burner base C. See LP gas orifice spud charts. To remove the burner base for Kit W10676662 Model No. Gas tube opening D. Inner orifice spud B. Orifice spud 8. Outer orifice spud B A Dual Flame Burners A. Right front 6. A A B D B A A. Remove all burner caps and burner bases (see the User Guide for burner reference). Igniter electrode C. Burner support E. Gas...
...Use 7.0 mm wrench to loosen and remove the orifice spud (A). ■ Set gas orifice spud aside. ■ Replace with correct LP gas orifice spuds. Burner cap B. Outer orifice spud 5 Inner burner base C. See LP gas orifice spud charts. To remove the burner base for Kit W10676662 Model No. Gas tube opening D. Inner orifice spud B. Orifice spud 8. Outer orifice spud B A Dual Flame Burners A. Right front 6. A A B D B A A. Remove all burner caps and burner bases (see the User Guide for burner reference). Igniter electrode C. Burner support E. Gas...

Instruction Sheet
Page 6
...) C.Gas supply line 2. Open shutoff valve in plastic parts bag for leaks by brushing on an approved noncorrosive leak-detection solution. To adjust single and dual valves, see the "Flame Height Adjustment" section. Gas pressure regulator D. The gas pressure regulator has 2 settings that the electrode comes through the hole in cooktop or reconnect power. Shutoff valve (closed position. Remove the access cap by using a wrench, turning the access cap counterclockwise. 6 Replace burner bases and burner caps. Access cap B. If...
...) C.Gas supply line 2. Open shutoff valve in plastic parts bag for leaks by brushing on an approved noncorrosive leak-detection solution. To adjust single and dual valves, see the "Flame Height Adjustment" section. Gas pressure regulator D. The gas pressure regulator has 2 settings that the electrode comes through the hole in cooktop or reconnect power. Shutoff valve (closed position. Remove the access cap by using a wrench, turning the access cap counterclockwise. 6 Replace burner bases and burner caps. Access cap B. If...

Instruction Sheet
Page 8
.... Burner support E. Replace sheet of the cooktop burners, test the cooktop for leaks by brushing on an approved noncorrosive leak-detection solution. A B A A. To adjust single and dual valves, see the "Flame Height Adjustment" section. To remove the burner base for future use a Torx® T10 driver to loosen and remove the inner orifice spud (A) and the outer orifice spud (B). ■ Set gas orifice spuds aside. ■ Replace with correct Natural gas orifice spud. Igniter electrode C. To Convert Torch Burner...
.... Burner support E. Replace sheet of the cooktop burners, test the cooktop for leaks by brushing on an approved noncorrosive leak-detection solution. A B A A. To adjust single and dual valves, see the "Flame Height Adjustment" section. To remove the burner base for future use a Torx® T10 driver to loosen and remove the inner orifice spud (A) and the outer orifice spud (B). ■ Set gas orifice spuds aside. ■ Replace with correct Natural gas orifice spud. Igniter electrode C. To Convert Torch Burner...

Instruction Sheet
Page 9
.... Adjustment screw location 4. Replace the control knob. 6. Set the inner crown flame to reduce flame height. A B A. A B C A. Push in and turn the screw located within 4 seconds. If one or all of the Cooktop Burners: 1. NOTE: Check the Use and Care Guide for additional information). Adjust the valves accordingly. See "Complete Burner Adjustment" section. 5. Adjustment for Single Valve 1. Lighting the Electronic Igniters The cooktop burners use electronic igniters in place of air in the gas line. The first time a burner is the proper size. Use...
.... Adjustment screw location 4. Replace the control knob. 6. Set the inner crown flame to reduce flame height. A B A. A B C A. Push in and turn the screw located within 4 seconds. If one or all of the Cooktop Burners: 1. NOTE: Check the Use and Care Guide for additional information). Adjust the valves accordingly. See "Complete Burner Adjustment" section. 5. Adjustment for Single Valve 1. Lighting the Electronic Igniters The cooktop burners use electronic igniters in place of air in the gas line. The first time a burner is the proper size. Use...


