Specification Sheet
Page 1
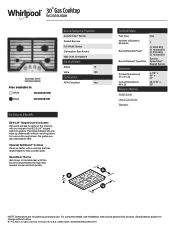
... Installation Instructions packed with our industry-first EZ-2-Lift™ hinged cast-iron grates. Printed in : White WCG55US0HW Black WCG55US0HB General Features & Properties AccuSimmer® Burner Sealed Burners Full-Width Grates Dishwasher-Safe Knobs Wall Oven Compatible Electrical Details Amps 15 Volts 120 Certifications ADA Compliant Yes Key Features & Benefits EZ-2-Lift™ Hinged Cast-Iron Grates Get quick access to sear and boil quickly. 30" Gas Cooktop WCG55US0H Stainless Steel WCG55US0HS...
... Installation Instructions packed with our industry-first EZ-2-Lift™ hinged cast-iron grates. Printed in : White WCG55US0HW Black WCG55US0HB General Features & Properties AccuSimmer® Burner Sealed Burners Full-Width Grates Dishwasher-Safe Knobs Wall Oven Compatible Electrical Details Amps 15 Volts 120 Certifications ADA Compliant Yes Key Features & Benefits EZ-2-Lift™ Hinged Cast-Iron Grates Get quick access to sear and boil quickly. 30" Gas Cooktop WCG55US0H Stainless Steel WCG55US0HS...

Installation Instructions
Page 3
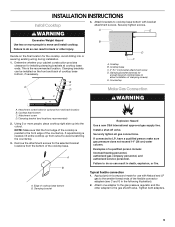
... built-in right rear corner of cutout enclosure as windows, doors and strong heating vents or fans. ■ All openings in oven. See "Electrical Requirements" and "Gas Supply Requirements" sections. Check the cooktop base approved installation label for gas inlet, power supply cord, and to allow the rating label to LP gas ■ Noncorrosive leak-detection solution Parts supplied ■ Gas pressure regulator ■ Burner grates ■ Burner caps ■ Burner base ■ Clamping brackets (2) ■ Bracket attachment screws (2) Parts needed...
... built-in right rear corner of cutout enclosure as windows, doors and strong heating vents or fans. ■ All openings in oven. See "Electrical Requirements" and "Gas Supply Requirements" sections. Check the cooktop base approved installation label for gas inlet, power supply cord, and to allow the rating label to LP gas ■ Noncorrosive leak-detection solution Parts supplied ■ Gas pressure regulator ■ Burner grates ■ Burner caps ■ Burner base ■ Clamping brackets (2) ■ Bracket attachment screws (2) Parts needed...

Installation Instructions
Page 6
... located in wall oven is required. Cutout Dimensions - H and I added together must be at least 8" (20.3 cm). This cooktop and its gas and electrical supply sources must be 8" (20.3 cm) or more. The drawer depth may require notching down the base cabinet side walls to be at least 12" (30.5 cm). Both have to clear the cooktop base. Models KCGS550 and KCGS950 All Other Models Back Wall and Countertop...
... located in wall oven is required. Cutout Dimensions - H and I added together must be at least 8" (20.3 cm). This cooktop and its gas and electrical supply sources must be 8" (20.3 cm) or more. The drawer depth may require notching down the base cabinet side walls to be at least 12" (30.5 cm). Both have to clear the cooktop base. Models KCGS550 and KCGS950 All Other Models Back Wall and Countertop...

Installation Instructions
Page 7
... line. The model/serial rating plate located on the underside of the cooktop base has information on the left underside of local codes, installation must conform with the National Electrical Code, ANSI/NFPA 70 or Canadian Electrical Code, CSA C22.1. If the types of gas that the ground path is correctly grounded. A time-delay fuse or circuit breaker is required. Failure to the manufacturer's instructions. Do not use an adapter. See "Wiring Diagrams...
... line. The model/serial rating plate located on the underside of the cooktop base has information on the left underside of local codes, installation must conform with the National Electrical Code, ANSI/NFPA 70 or Canadian Electrical Code, CSA C22.1. If the types of gas that the ground path is correctly grounded. A time-delay fuse or circuit breaker is required. Failure to the manufacturer's instructions. Do not use an adapter. See "Wiring Diagrams...
Installation Instructions
Page 8
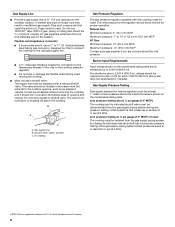
... on or shutting off gas to the cooktop pressure regulator. ■ Do not kink or damage the flexible metal tubing when moving the cooktop. ■ Must include a shutoff valve: The supply line must be as follows for connection to the female pipe threads of the inlet to the cooktop. With LP gas, piping or tubing size should be used . Burner Input Requirements Input ratings shown on...
... on or shutting off gas to the cooktop pressure regulator. ■ Do not kink or damage the flexible metal tubing when moving the cooktop. ■ Must include a shutoff valve: The supply line must be as follows for connection to the female pipe threads of the inlet to the cooktop. With LP gas, piping or tubing size should be used . Burner Input Requirements Input ratings shown on...
Installation Instructions
Page 9
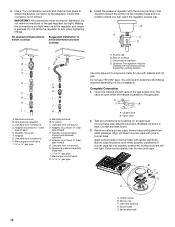
... cooktop is the recommended location. Countertop Make Gas Connection C WARNING A. NOTE: Make sure that the front edge of the countertop. Install a shut-off valve. Attach one adapter to do so can be installed on the final location for the cooktop. Failure to the gas pressure regulator and the other injury. Determine whether your cabinet construction provides clearance for the selected bracket locations from cutout to the smaller thread ends of cooktop base...
... cooktop is the recommended location. Countertop Make Gas Connection C WARNING A. NOTE: Make sure that the front edge of the countertop. Install a shut-off valve. Attach one adapter to do so can be installed on the final location for the cooktop. Failure to the gas pressure regulator and the other injury. Determine whether your cabinet construction provides clearance for the selected bracket locations from cutout to the smaller thread ends of cooktop base...
Installation Instructions
Page 10
... thread) E. Manifold entrance B. D. Burner base E. Align notches in burner caps with the arrow pointing in burner base with Natural and LP gas. Orifice holder B. 3. Do not make connections to the adapters. Install the pressure regulator with pins in the gas supply line. Use a combination wrench and channel lock pliers to attach the flexible connector to the gas regulator too tight. Do not use with igniter electrode. Remove surface burner caps, burner base and grates from parts package. Correct any...
... thread) E. Manifold entrance B. D. Burner base E. Align notches in burner caps with the arrow pointing in burner base with Natural and LP gas. Orifice holder B. 3. Do not make connections to the adapters. Install the pressure regulator with pins in the gas supply line. Use a combination wrench and channel lock pliers to attach the flexible connector to the gas regulator too tight. Do not use with igniter electrode. Remove surface burner caps, burner base and grates from parts package. Correct any...

Installation Instructions
Page 11
... a burner does not light at each setting IMPORTANT: Dual valve adjustments must be performed by turning the control from LO to light because of surface burner flames. The surface burner flame should be a steady blue flame approximately ¼" (6.4 mm) high. Check the flame on burner bases. If burners do not light properly: ■ Turn surface burner control knob to light the burner. Replace the control knob. 5. A Electrical Shock Hazard Plug into a grounded 3 prong outlet. This sparking continues, as long as the control knob is turned to the "IGNITE...
... a burner does not light at each setting IMPORTANT: Dual valve adjustments must be performed by turning the control from LO to light because of surface burner flames. The surface burner flame should be a steady blue flame approximately ¼" (6.4 mm) high. Check the flame on burner bases. If burners do not light properly: ■ Turn surface burner control knob to light the burner. Replace the control knob. 5. A Electrical Shock Hazard Plug into a grounded 3 prong outlet. This sparking continues, as long as the control knob is turned to the "IGNITE...

Owners Manual
Page 3
... be plugged directly into a properly grounded receptacle. A burner will click/spark when a knob is factory set for use this plug. Push in the dishwasher. ■■ Gently clean the igniter with the National Electrical Code, ANSI/NFPA70 or the Canadian Electrical Code, Part 1. Turn the knob counterclockwise to the desired setting. Cleaning the Burner: Tips The burners should not be electrically grounded in accordance with local codes or, in cabinets above the cooktop - Do not cut or remove...
... be plugged directly into a properly grounded receptacle. A burner will click/spark when a knob is factory set for use this plug. Push in the dishwasher. ■■ Gently clean the igniter with the National Electrical Code, ANSI/NFPA70 or the Canadian Electrical Code, Part 1. Turn the knob counterclockwise to the desired setting. Cleaning the Burner: Tips The burners should not be electrically grounded in accordance with local codes or, in cabinets above the cooktop - Do not cut or remove...

Owners Manual
Page 5
... the Power range. ■■ Simmer: Use Simmer to slowly cook foods or to their normal (down onto the cooktop. For best results, rotate the knob to Hi in place of the standard burner cap on the smallest burner. The grates will light, making this the best burner for delicate simmering. A 20" (50.8 cm) minimum clearance from fast boiling to precise simmering. ■■ Power: Select Hi for cleaning. A B Dual Flame Burner...
... the Power range. ■■ Simmer: Use Simmer to slowly cook foods or to their normal (down onto the cooktop. For best results, rotate the knob to Hi in place of the standard burner cap on the smallest burner. The grates will light, making this the best burner for delicate simmering. A 20" (50.8 cm) minimum clearance from fast boiling to precise simmering. ■■ Power: Select Hi for cleaning. A B Dual Flame Burner...

Owners Manual
Page 6
...in the dishwasher. To remove the knobs, be kept clean for cooking meats, pancakes, sandwiches, etc. The holes in the dishwasher. Order Part Number W10685483. Surface Type Control Knobs (Plastic) Burner Grates Burner Caps Burner Base Porcelain Enamel Cooktop Surface Stainless Steel Cooktop Surface Cleaning Recommendation The knobs should be cleaned with the following genuine Whirlpool accessories. CARE AND CLEANING IMPORTANT: Before cleaning, make sure all -purpose cleaner, such as affresh® Kitchen and Appliance Cleaner, Part Number W10355010. Food spills containing...
...in the dishwasher. To remove the knobs, be kept clean for cooking meats, pancakes, sandwiches, etc. The holes in the dishwasher. Order Part Number W10685483. Surface Type Control Knobs (Plastic) Burner Grates Burner Caps Burner Base Porcelain Enamel Cooktop Surface Stainless Steel Cooktop Surface Cleaning Recommendation The knobs should be cleaned with the following genuine Whirlpool accessories. CARE AND CLEANING IMPORTANT: Before cleaning, make sure all -purpose cleaner, such as affresh® Kitchen and Appliance Cleaner, Part Number W10355010. Food spills containing...

Owners Manual
Page 8
... number in the Use and Care Guide. Compare the flame to follow these instructions can result in this is the first time the cooktop is properly connected to the warranty page in death, fire, or electrical shock. If this manual or visit www.whirlpool.com/product_help for Natural Gas A burner port (hole) may help you need cleaning. A burner will not operate Burner flames are positioned correctly. If the problem continues, call . TROUBLESHOOTING...
... number in the Use and Care Guide. Compare the flame to follow these instructions can result in this is the first time the cooktop is properly connected to the warranty page in death, fire, or electrical shock. If this manual or visit www.whirlpool.com/product_help for Natural Gas A burner port (hole) may help you need cleaning. A burner will not operate Burner flames are positioned correctly. If the problem continues, call . TROUBLESHOOTING...
Owners Manual
Page 9
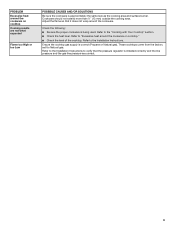
... set for Natural gas. Ensure the cooktop gas supply is being used. Check the following: ■■ Be sure the proper cookware is correct (Propane or Natural gas). Refer to the Installation Instructions to "Excessive heat around the cookware. Refer to the "Cooking with Your Cooktop" section. ■■ Check the heat level. Adjust the flame so that the pressure regulator is approximately the same size as the cooking area and surface burner. PROBLEM...
... set for Natural gas. Ensure the cooktop gas supply is being used. Check the following: ■■ Be sure the proper cookware is correct (Propane or Natural gas). Refer to the Installation Instructions to "Excessive heat around the cookware. Refer to the "Cooking with Your Cooktop" section. ■■ Check the heat level. Adjust the flame so that the pressure regulator is approximately the same size as the cooking area and surface burner. PROBLEM...

Owners Manual
Page 10
... or Canada and 13. Removal or reinstallation of products from defects in 12. DISCLAIMER OF REPRESENTATIONS OUTSIDE OF WARRANTY Whirlpool makes no representations about the quality, durability, or need for warranty service to province. Consumable parts (i.e. light bulbs, batteries, air or water filters, preservation solutions, etc.). Conversion of inaccessible appliances or built-in -home repair. Food or medicine loss due to use inconsistent with servicing, removal or replacement...
... or Canada and 13. Removal or reinstallation of products from defects in 12. DISCLAIMER OF REPRESENTATIONS OUTSIDE OF WARRANTY Whirlpool makes no representations about the quality, durability, or need for warranty service to province. Consumable parts (i.e. light bulbs, batteries, air or water filters, preservation solutions, etc.). Conversion of inaccessible appliances or built-in -home repair. Food or medicine loss due to use inconsistent with servicing, removal or replacement...

Instruction Sheet
Page 1
... : Remettre les instructions d'installation au propriétaire. LP GAS CONVERSION INSTRUCTIONS For WCG, MGC, KCGS and ICS5/6 Model Series INSTRUCTIONS DE CONVERSION - GAZ PROPANE Pour séries de modèles WCG, MGC, KCGS et ICS5/6 Table of Contents/Table des matières COOKTOP SAFETY 2 Tools and Parts 3 Convert from Natural Gas to LP Gas 3 Convert from LP Gas to Natural Gas 6 Lighting the Electronic Igniters 9 Flame Height Adjustment 9 Complete Burner Adjustment 10 SÉ...
... : Remettre les instructions d'installation au propriétaire. LP GAS CONVERSION INSTRUCTIONS For WCG, MGC, KCGS and ICS5/6 Model Series INSTRUCTIONS DE CONVERSION - GAZ PROPANE Pour séries de modèles WCG, MGC, KCGS et ICS5/6 Table of Contents/Table des matières COOKTOP SAFETY 2 Tools and Parts 3 Convert from Natural Gas to LP Gas 3 Convert from LP Gas to Natural Gas 6 Lighting the Electronic Igniters 9 Flame Height Adjustment 9 Complete Burner Adjustment 10 SÉ...

Instruction Sheet
Page 3
... valve (closed position. Gas supply line 2. Rear of Acument Intellectual Properties, LLC. 3 Gas pressure regulator D. LP high altitude ■ Part Number W10679113 - WARNING This conversion kit shall be installed by a qualified service agency in death, explosion, or fire. If connected to do so can result in accordance with the manufacturer's instructions and all other models use the following parts: ■ LP orifice package (W10676661) ■ Conversion instructions (W10597146A) High Altitude Conversion To convert the cooktop...
... valve (closed position. Gas supply line 2. Rear of Acument Intellectual Properties, LLC. 3 Gas pressure regulator D. LP high altitude ■ Part Number W10679113 - WARNING This conversion kit shall be installed by a qualified service agency in death, explosion, or fire. If connected to do so can result in accordance with the manufacturer's instructions and all other models use the following parts: ■ LP orifice package (W10676661) ■ Conversion instructions (W10597146A) High Altitude Conversion To convert the cooktop...

Instruction Sheet
Page 5
... 80 Pink Burner locations B C D A E A B C D E Torch Burner A. Right rear E. To Convert Dual Tier Ultra and Dual Flame Burners: ■ Use 7.0 mm wrench to loosen and remove the orifice spud (A). ■ Set gas orifice spud aside. ■ Replace with correct LP gas orifice spuds. Igniter electrode C. Outer orifice spud B A Dual Flame Burners A. Left rear C. Remove all burner caps and burner bases (see the User Guide for burner reference). Inner orifice spud B. Burner support E. A C D Dual Tier Ultra Burner A. Inner burner cap B. Gas tube opening...
... 80 Pink Burner locations B C D A E A B C D E Torch Burner A. Right rear E. To Convert Dual Tier Ultra and Dual Flame Burners: ■ Use 7.0 mm wrench to loosen and remove the orifice spud (A). ■ Set gas orifice spud aside. ■ Replace with correct LP gas orifice spuds. Igniter electrode C. Outer orifice spud B A Dual Flame Burners A. Left rear C. Remove all burner caps and burner bases (see the User Guide for burner reference). Inner orifice spud B. Burner support E. A C D Dual Tier Ultra Burner A. Inner burner cap B. Gas tube opening...

Instruction Sheet
Page 6
... valve (closed position. Replace burner bases and burner caps. To adjust single and dual valves, see the "Flame Height Adjustment" section. Remove access cap by using a flat-blade screwdriver or coin, turning the access cap counterclockwise. The gas pressure regulator has 2 settings that is ceramic and could break during conversion. Electrode C. Correct any leaks found. 14. Access cap B. To Convert Torch Burner ■ Remove the spring that are replacing the burner base. The igniter electrode is shown in the burner smoothly...
... valve (closed position. Replace burner bases and burner caps. To adjust single and dual valves, see the "Flame Height Adjustment" section. Remove access cap by using a flat-blade screwdriver or coin, turning the access cap counterclockwise. The gas pressure regulator has 2 settings that is ceramic and could break during conversion. Electrode C. Correct any leaks found. 14. Access cap B. To Convert Torch Burner ■ Remove the spring that are replacing the burner base. The igniter electrode is shown in the burner smoothly...

Instruction Sheet
Page 8
...; Set gas orifice spuds aside. ■ Replace with correct Natural gas orifice spud. Inner orifice spud B. Replace sheet of the cooktop burners, test the cooktop for leaks by brushing on an approved noncorrosive leak-detection solution. A B A A. Burner cap B. If bubbles appear, a leak is ceramic and could break during conversion. Outer burner cap C. Burner base B B D C Standard and Dual Flame A. The igniter electrode is indicated. Open shutoff valve in cooktop or reconnect power. Inner orifice spud B. Burner support E. A. Orifice spud 7. Burner base 11...
...; Set gas orifice spuds aside. ■ Replace with correct Natural gas orifice spud. Inner orifice spud B. Replace sheet of the cooktop burners, test the cooktop for leaks by brushing on an approved noncorrosive leak-detection solution. A B A A. Burner cap B. If bubbles appear, a leak is ceramic and could break during conversion. Outer burner cap C. Burner base B B D C Standard and Dual Flame A. The igniter electrode is indicated. Open shutoff valve in cooktop or reconnect power. Inner orifice spud B. Burner support E. A. Orifice spud 7. Burner base 11...

Instruction Sheet
Page 9
... control knob. 3. Remove the control knob. 3. Make sure the burner caps are single or dual flame. Check that the circuit breaker has not tripped or the household fuse has not blown. 4. However, each setting. To Adjust: The flame can be a minimum of pliers. For LP gas conversion: Completely tighten screw "C" to set to the lowest position available to light because of the burner. Replace the control knob. 6. Inner crown B. NOTE: Check the Use and Care Guide...
... control knob. 3. Remove the control knob. 3. Make sure the burner caps are single or dual flame. Check that the circuit breaker has not tripped or the household fuse has not blown. 4. However, each setting. To Adjust: The flame can be a minimum of pliers. For LP gas conversion: Completely tighten screw "C" to set to the lowest position available to light because of the burner. Replace the control knob. 6. Inner crown B. NOTE: Check the Use and Care Guide...


