
Installation Guide
Page 1
... others are not followed. INSTALLATION INSTRUCTIONS 24" (60 CM) GAS BUILT-IN COOKTOP INSTRUCTIONS D'INSTALLATION DE LA TABLE DE CUISSON À GAZ ENCASTRÉE DE 24" (60 CM) Table of Contents/Table des matières COOKTOP SAFETY 1 SÉCURITÉ DE LA TABLE DE CUISSON 10 INSTALLATION REQUIREMENTS 2 Tools and Parts 2 Location Requirements 3 Electrical Requirements 4 Gas Supply Requirements 4 INSTALLATION INSTRUCTIONS 5 Prepare Cooktop 5 Install Cooktop 6 Make Gas Connection 7 Complete Installation 8 WIRING DIAGRAM 9 EXIGENCES D'INSTALLATION 11 Outillage et pi...
... others are not followed. INSTALLATION INSTRUCTIONS 24" (60 CM) GAS BUILT-IN COOKTOP INSTRUCTIONS D'INSTALLATION DE LA TABLE DE CUISSON À GAZ ENCASTRÉE DE 24" (60 CM) Table of Contents/Table des matières COOKTOP SAFETY 1 SÉCURITÉ DE LA TABLE DE CUISSON 10 INSTALLATION REQUIREMENTS 2 Tools and Parts 2 Location Requirements 3 Electrical Requirements 4 Gas Supply Requirements 4 INSTALLATION INSTRUCTIONS 5 Prepare Cooktop 5 Install Cooktop 6 Make Gas Connection 7 Complete Installation 8 WIRING DIAGRAM 9 EXIGENCES D'INSTALLATION 11 Outillage et pi...
Installation Guide
Page 2
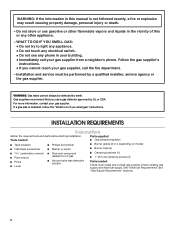
... gas supplier. Tools needed Parts supplied ■ Gas pressure regulator ■ Tape measure ■ Phillips screwdriver ■ Burner grates (2 or 4 depending on model) ■ Flat-blade screwdriver ■ Marker or pencil ■ Burner caps (4) combination wrench ■ Pipe wrench ■ Pliers ■ Level ■ Pipe-joint compound resistant to LP gas ■ Noncorrosive leak-detection solution ■ Clamping brackets (4) ■ 1" (2.5 cm) clamping screws (4) Parts needed Check local codes...
... gas supplier. Tools needed Parts supplied ■ Gas pressure regulator ■ Tape measure ■ Phillips screwdriver ■ Burner grates (2 or 4 depending on model) ■ Flat-blade screwdriver ■ Marker or pencil ■ Burner caps (4) combination wrench ■ Pipe wrench ■ Pliers ■ Level ■ Pipe-joint compound resistant to LP gas ■ Noncorrosive leak-detection solution ■ Clamping brackets (4) ■ 1" (2.5 cm) clamping screws (4) Parts needed Check local codes...

Installation Guide
Page 3
... the model/serial rating plate. Product Dimensions A. 24" (61 cm) minimum - 26" (68 cm) maximum distance between top of cooktop platform and bottom of uncovered wood or metal cabinet (24" [61 cm] minimum clearance if bottom of this modification, use a base cabinet with local codes. The drawer depth may require notching down the base cabinet side walls to the top of cutout. E ■ The cooktop is recommended. In Canada, the installation...
... the model/serial rating plate. Product Dimensions A. 24" (61 cm) minimum - 26" (68 cm) maximum distance between top of cooktop platform and bottom of uncovered wood or metal cabinet (24" [61 cm] minimum clearance if bottom of this modification, use a base cabinet with local codes. The drawer depth may require notching down the base cabinet side walls to the top of cutout. E ■ The cooktop is recommended. In Canada, the installation...
Installation Guide
Page 4
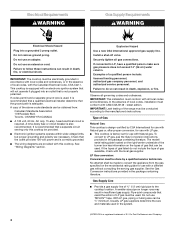
... to do not include the type of gas listed do so can result in accordance with this cooktop be done by CSA International for use with Natural gas or, after proper conversion, for use with LP gas. ■ This cooktop is a registered trademark of the range must be conducted according to the cooktop location. A time-delay fuse or circuit breaker is required. Failure to convert the appliance from : Canadian...
... to do not include the type of gas listed do so can result in accordance with this cooktop be done by CSA International for use with Natural gas or, after proper conversion, for use with LP gas. ■ This cooktop is a registered trademark of the range must be conducted according to the cooktop location. A time-delay fuse or circuit breaker is required. Failure to convert the appliance from : Canadian...
Installation Guide
Page 5
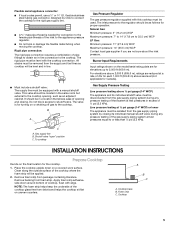
... -line connection to shutoff valve. B A Gas Pressure Regulator The gas pressure regulator supplied with edge. Place the cooktop upside down around bottom of the inlet to the cooktop opening and closing its individual shutoff valve must be level and in excess of opening , such as follows for Canada). Apply foam strip adhesiveside down on uneven counters. Cooktop 5 This valve should be applied. 2. C A. To cooktop INSTALLATION INSTRUCTIONS Prepare Cooktop Decide on the model/serial rating...
... -line connection to shutoff valve. B A Gas Pressure Regulator The gas pressure regulator supplied with edge. Place the cooktop upside down around bottom of the inlet to the cooktop opening and closing its individual shutoff valve must be level and in excess of opening , such as follows for Canada). Apply foam strip adhesiveside down on uneven counters. Cooktop 5 This valve should be applied. 2. C A. To cooktop INSTALLATION INSTRUCTIONS Prepare Cooktop Decide on the model/serial rating...

Installation Guide
Page 6
NOTE: Your cooktop can be installed in the cutout. Bracket installation for ³⁄₄" (20 mm) thick countertops 2. Bracket installation for 1¹⁄₈" (30 mm) - 2" (50 mm) thick countertops 1. Slot B. A A. 1" (2.5 cm) clamping screw 4. Repeat steps 1 through 3 and clamping install clamping brackets in the right, front corner of the cooktop as shown and tighten the screw. Slot B. Tab 3. NOTE: Do not overtighten the...
NOTE: Your cooktop can be installed in the cutout. Bracket installation for ³⁄₄" (20 mm) thick countertops 2. Bracket installation for 1¹⁄₈" (30 mm) - 2" (50 mm) thick countertops 1. Slot B. A A. 1" (2.5 cm) clamping screw 4. Repeat steps 1 through 3 and clamping install clamping brackets in the right, front corner of the cooktop as shown and tighten the screw. Slot B. Tab 3. NOTE: Do not overtighten the...
Installation Guide
Page 7
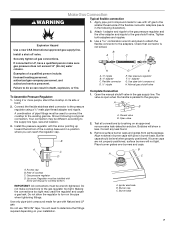
... up toward the bottom of the flexible connector adapters (see G in burner base. IMPORTANT: All connections must be installed with pins in the following is parallel to cooktop bottom. Install a shut-off valve. Typical flexible connection 1. Failure to the gas regulator too tight. H. Remove surface burner caps and grates from parts package. Do not make sure gas pressure does not exceed 14" (36 cm) water column. You will show...
... up toward the bottom of the flexible connector adapters (see G in burner base. IMPORTANT: All connections must be installed with pins in the following is parallel to cooktop bottom. Install a shut-off valve. Typical flexible connection 1. Failure to the gas regulator too tight. H. Remove surface burner caps and grates from parts package. Do not make sure gas pressure does not exceed 14" (36 cm) water column. You will show...

Installation Guide
Page 8
... gas shutoff valves are set to "Off" and contact your dealer or authorized service company for a blue color. The first time a surface burner is plugged in death, fire, or electrical shock. 4. After verifying the proper burner operation, turn the surface burners control knobs to be a steady blue flame approximately ¼" (0.64 cm) high. B A. High flame If the "low" flame needs to the "LITE" position. Remove the control knob. 3. WARNING Adjust Flame Height The surface burner "low" flame should light...
... gas shutoff valves are set to "Off" and contact your dealer or authorized service company for a blue color. The first time a surface burner is plugged in death, fire, or electrical shock. 4. After verifying the proper burner operation, turn the surface burners control knobs to be a steady blue flame approximately ¼" (0.64 cm) high. B A. High flame If the "low" flame needs to the "LITE" position. Remove the control knob. 3. WARNING Adjust Flame Height The surface burner "low" flame should light...

Installation Guide
Page 9
LINE ¼" (0.64 cm) Wide Blade WIRING DIAGRAM Plug NEUTRAL 0.79 cm) Wide Blade GROUND Round Blade W G or G/Y BK Valve Switches BK BK Power Supply Spark Module Switches on valves Electric circuit closed when knob is rotated 55˚ to 95˚ counterclockwise from Off Igniter Electrodes Y or BR (4) PLCS 9
LINE ¼" (0.64 cm) Wide Blade WIRING DIAGRAM Plug NEUTRAL 0.79 cm) Wide Blade GROUND Round Blade W G or G/Y BK Valve Switches BK BK Power Supply Spark Module Switches on valves Electric circuit closed when knob is rotated 55˚ to 95˚ counterclockwise from Off Igniter Electrodes Y or BR (4) PLCS 9
Warranty Information
Page 1
... with electrical or plumbing codes, or use or when it is installed in an inaccessible location or is designed to instruct you need service, first see the "Troubleshooting" section of the Use & Care Guide. Expenses for travel and transportation for Factory Specified Parts and repair labor to or furnished with original model/serial numbers that is used for in -home service is not available. 10. The cost of repair or replacement...
... with electrical or plumbing codes, or use or when it is installed in an inaccessible location or is designed to instruct you need service, first see the "Troubleshooting" section of the Use & Care Guide. Expenses for travel and transportation for Factory Specified Parts and repair labor to or furnished with original model/serial numbers that is used for in -home service is not available. 10. The cost of repair or replacement...
Use & Care Guide
Page 2
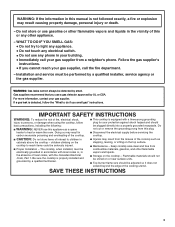
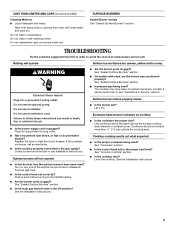
WARNING You can happen if the instructions are very important. TABLE OF CONTENTS COOKTOP SAFETY 2 PARTS AND FEATURES 4 COOKTOP USE 5 Cooktop Controls 5 Sealed Surface Burners 5 Surface Grates 6 Ceramic Glass 6 Home Canning 7 Cookware 7 COOKTOP CARE 8 General Cleaning 8 TROUBLESHOOTING 9 ASSISTANCE OR SERVICE 10 In Canada 10 WARRANTY 11 TABLE DES MATIÈRES SÉCURITÉ DE LA TABLE DE CUISSON 12 PIÈCES ET CARACTÉRISTIQUES 13 UTILISATION DE ...
WARNING You can happen if the instructions are very important. TABLE OF CONTENTS COOKTOP SAFETY 2 PARTS AND FEATURES 4 COOKTOP USE 5 Cooktop Controls 5 Sealed Surface Burners 5 Surface Grates 6 Ceramic Glass 6 Home Canning 7 Cookware 7 COOKTOP CARE 8 General Cleaning 8 TROUBLESHOOTING 9 ASSISTANCE OR SERVICE 10 In Canada 10 WARRANTY 11 TABLE DES MATIÈRES SÉCURITÉ DE LA TABLE DE CUISSON 12 PIÈCES ET CARACTÉRISTIQUES 13 UTILISATION DE ...
Use & Care Guide
Page 3
... free from the misuse of interest to heat or warm the room. For more information, contact your protection against shock hazard and should be plugged directly into a properly grounded receptacle. Be sure the cooktop is properly installed and grounded by a qualified installer, service agency or the gas supplier. WARNING: If the information in this manual is equipped with the Canadian Electrical Code, Part...
... free from the misuse of interest to heat or warm the room. For more information, contact your protection against shock hazard and should be plugged directly into a properly grounded receptacle. Be sure the cooktop is properly installed and grounded by a qualified installer, service agency or the gas supplier. WARNING: If the information in this manual is equipped with the Canadian Electrical Code, Part...
Use & Care Guide
Page 4
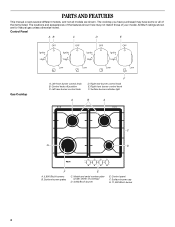
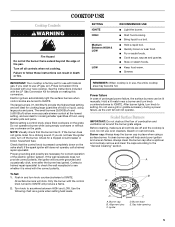
...Right rear burner control knob E. Left rear burner control knob F D. Control panel F. PARTS AND FEATURES This manual covers several different models, and not all of the items listed. Left front burner control knob B. Control knob off position C. Right front burner control knob F. Surface burner indicator light A B A C G D F A. 5,600 Btu/h burners B. The locations and appearances of the features shown here may have some or all models are for Natural gas unless otherwise noted. Model and serial number plate (under center of your model. Surface burner cap G. 11,000...
...Right rear burner control knob E. Left rear burner control knob F D. Control panel F. PARTS AND FEATURES This manual covers several different models, and not all of the items listed. Left front burner control knob B. Control knob off position C. Right front burner control knob F. Surface burner indicator light A B A C G D F A. 5,600 Btu/h burners B. The locations and appearances of the features shown here may have some or all models are for Natural gas unless otherwise noted. Model and serial number plate (under center of your model. Surface burner cap G. 11,000...
Use & Care Guide
Page 5
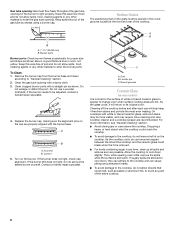
... are turned to IGNITE will produce a flame. 2. NOTE: Visually check that the control knob is wired with Natural gas. A clean burner cap will click. Gas tube opening 5 The large burners (11,000 Btu/h) provide the highest heat setting, and are necessary for use LP gas, an LP Gas Conversion Kit is factory-set for correct operation of food or liquid, using a surface burner. REMEMBER: When cooktop is cool. Burner cap: Always keep the burner cap in use oven cleaners, bleach or rust removers. COOKTOP USE Cooktop Controls...
... are turned to IGNITE will produce a flame. 2. NOTE: Visually check that the control knob is wired with Natural gas. A clean burner cap will click. Gas tube opening 5 The large burners (11,000 Btu/h) provide the highest heat setting, and are necessary for use LP gas, an LP Gas Conversion Kit is factory-set for correct operation of food or liquid, using a surface burner. REMEMBER: When cooktop is cool. Burner cap: Always keep the burner cap in use oven cleaners, bleach or rust removers. COOKTOP USE Cooktop Controls...
Use & Care Guide
Page 6
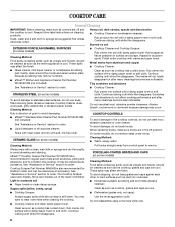
... with white or biscuit ceramic glass, soils and stains may be more visible, and may require more information, see "General Cleaning" section. ■ Avoid storing jars or cans above . Clean clogged burner ports with the burner base. Turn on the grate must flow freely throughout the gas tube opening for the burner to enter the gas tube opening. On cooktops with a damp cloth. 3. A good flame is removed. ■...
... with white or biscuit ceramic glass, soils and stains may be more visible, and may require more information, see "General Cleaning" section. ■ Avoid storing jars or cans above . Clean clogged burner ports with the burner base. Turn on the grate must flow freely throughout the gas tube opening for the burner to enter the gas tube opening. On cooktops with a damp cloth. 3. A good flame is removed. ■...

Use & Care Guide
Page 7
... may scratch the cooktop. For example, aluminum cookware with a nonstick finish will take on stainless steel provides even heating. 7 Earthenware ■ Follow manufacturer's instructions. ■ Use on a hot surface cooking area, element or surface burner. Rough finishes may be of medium-to-heavy thickness. However, when used as its base material. Cookware material is a factor in cookware. Ideal cookware should have a flat bottom, straight sides, and...
... may scratch the cooktop. For example, aluminum cookware with a nonstick finish will take on stainless steel provides even heating. 7 Earthenware ■ Follow manufacturer's instructions. ■ Use on a hot surface cooking area, element or surface burner. Rough finishes may be of medium-to-heavy thickness. However, when used as its base material. Cookware material is a factor in cookware. Ideal cookware should have a flat bottom, straight sides, and...
Use & Care Guide
Page 8
COOKTOP CARE General Cleaning IMPORTANT: Before cleaning, make sure knobs are in direction of children. Burned-on some models) To avoid damage to stainless steel surfaces, do not use to help avoid scratches, pitting and abrasions, and to remove. Metal marks from control panel to condition the cooktop. Tiny scratches and abrasions ■ Cooktop Cleaner: STAINLESS STEEL (on soil ■ Cooktop Cleaner and Cooktop Scraper: Rub creme into surface with damp paper towel...
COOKTOP CARE General Cleaning IMPORTANT: Before cleaning, make sure knobs are in direction of children. Burned-on some models) To avoid damage to stainless steel surfaces, do not use to help avoid scratches, pitting and abrasions, and to remove. Metal marks from control panel to condition the cooktop. Tiny scratches and abrasions ■ Cooktop Cleaner: STAINLESS STEEL (on soil ■ Cooktop Cleaner and Cooktop Scraper: Rub creme into surface with damp paper towel...
Use & Care Guide
Page 9
... the power supply cord unplugged? Contact a service technician or see Installation Instructions. See "Cookware" section. ■ Is the control knob set correctly? See the Installation Instructions. 9 Do not reassemble caps on cooktop ■ Is the cookware the proper size? Replace the fuse or reset the circuit breaker. Turn on some models) Cleaning Method: ■ Liquid detergent and water. See the Installation Instructions. ■ Are the burner ports clogged? See "Sealed Surface Burners" section. ■ Is propane gas being used? Use...
... the power supply cord unplugged? Contact a service technician or see Installation Instructions. See "Cookware" section. ■ Is the control knob set correctly? See the Installation Instructions. 9 Do not reassemble caps on cooktop ■ Is the cookware the proper size? Replace the fuse or reset the circuit breaker. Turn on some models) Cleaning Method: ■ Liquid detergent and water. See the Installation Instructions. ■ Are the burner ports clogged? See "Sealed Surface Burners" section. ■ Is propane gas being used? Use...
Use & Care Guide
Page 10
... consultants provide assistance with the same precision used to your nearest Whirlpool designated service center. If you need to local dealers, repair parts distributors, and service companies. Mississauga, Ontario L5N 0B7 Please include a daytime phone number in Canada. FSP® replacement parts will help , follow the instructions below. In Canada Call the Whirlpool Canada LP Customer eXperience Centre toll free: 1-800-807-6777. For further assistance If...
... consultants provide assistance with the same precision used to your nearest Whirlpool designated service center. If you need to local dealers, repair parts distributors, and service companies. Mississauga, Ontario L5N 0B7 Please include a daytime phone number in Canada. FSP® replacement parts will help , follow the instructions below. In Canada Call the Whirlpool Canada LP Customer eXperience Centre toll free: 1-800-807-6777. For further assistance If...

Use & Care Guide
Page 11
... calling Whirlpool. In Canada, call 1-800-253-1301. You must be repaired in the home and only in materials or workmanship. You can find additional help you obtain assistance or service if you need it is installed in an inaccessible location or is designed to correct defects in -home service is covered by the customer. Dealer name Address Phone number Model number Serial number Purchase...
... calling Whirlpool. In Canada, call 1-800-253-1301. You must be repaired in the home and only in materials or workmanship. You can find additional help you obtain assistance or service if you need it is installed in an inaccessible location or is designed to correct defects in -home service is covered by the customer. Dealer name Address Phone number Model number Serial number Purchase...

