Installation Instructions
Page 2
...; UL listed wire connectors Check local codes. Given dimensions are given with these Installation Instructions. This is approved. INSTALLATION REQUIREMENTS Tools and Parts Gather the required tools and parts before starting installation. Read and follow the safety alert symbol and either alone or over the heated surface units, cabinet storage space located above the surface units should be avoided. Tools needed ■ Tape measure ■ 1/4" (6.4 mm) nut driver Parts supplied ■ Foam strip...
...; UL listed wire connectors Check local codes. Given dimensions are given with these Installation Instructions. This is approved. INSTALLATION REQUIREMENTS Tools and Parts Gather the required tools and parts before starting installation. Read and follow the safety alert symbol and either alone or over the heated surface units, cabinet storage space located above the surface units should be avoided. Tools needed ■ Tape measure ■ 1/4" (6.4 mm) nut driver Parts supplied ■ Foam strip...

Installation Instructions
Page 3
... the conduit) Cabinet Dimensions IMPORTANT: If installing a range hood or microwave hood combination above cooking surface, follow the range hood or microwave hood combination installation instructions for dimensional clearances above cooktop. Junction box or outlet: 7" (17.8 cm) minimum from upper cabinet to countertop within minimum horizontal clearances to clear the cooktop base. Will fit in cutout from the top of cooktop, right side) - 61/16" (15.4 cm) A A. To avoid this modification, use a base cabinet with bottom heat shield - 37...
... the conduit) Cabinet Dimensions IMPORTANT: If installing a range hood or microwave hood combination above cooking surface, follow the range hood or microwave hood combination installation instructions for dimensional clearances above cooktop. Junction box or outlet: 7" (17.8 cm) minimum from upper cabinet to countertop within minimum horizontal clearances to clear the cooktop base. Will fit in cutout from the top of cooktop, right side) - 61/16" (15.4 cm) A A. To avoid this modification, use a base cabinet with bottom heat shield - 37...

Installation Instructions
Page 4
... (white) wire. Failure to the junction box through flexible, armored or nonmetallic sheathed, copper cable. Model/serial number plate 4 WARNING Electrical Requirements ■ The cooktop is recommended that a qualified electrical installer determine that the ground path and wire gauge are in accordance with a qualified electrical installer if you will be connected directly to follow the procedure below: Connect the aluminum wiring using and follow the instructions provided for it is rated for...
... (white) wire. Failure to the junction box through flexible, armored or nonmetallic sheathed, copper cable. Model/serial number plate 4 WARNING Electrical Requirements ■ The cooktop is recommended that a qualified electrical installer determine that the ground path and wire gauge are in accordance with a qualified electrical installer if you will be connected directly to follow the procedure below: Connect the aluminum wiring using and follow the instructions provided for it is rated for...

Installation Instructions
Page 5
... knobs are not resting on uneven counters. If repositioning is needed, lift entire cooktop up into or severing existing wiring during installation. 1. Cooktop base B. 1/4" (6.4 mm) Foam strip C. Using 2 or more people to do so can be used. 1. Install Cooktop Style 1: Cooktop over cabinets 1. INSTALLATION INSTRUCTIONS Prepare Cooktop for Installation WARNING Excessive Weight Hazard Use two or more people, place the cooktop upside down around bottom of the four edges of the cooktop glass...
... knobs are not resting on uneven counters. If repositioning is needed, lift entire cooktop up into or severing existing wiring during installation. 1. Cooktop base B. 1/4" (6.4 mm) Foam strip C. Using 2 or more people to do so can be used. 1. Install Cooktop Style 1: Cooktop over cabinets 1. INSTALLATION INSTRUCTIONS Prepare Cooktop for Installation WARNING Excessive Weight Hazard Use two or more people, place the cooktop upside down around bottom of the four edges of the cooktop glass...

Installation Instructions
Page 6
.... Attachment screw D. Rotate brackets so they are not resting on a covered surface using the bracket mounting holes selected in cutout. 7. Using 2 or more people, place the cooktop upside down on the foam. 2. F A E C D C B A A. Select bracket mounting holes that the knobs are perpendicular to Countertop" section for the bracket locations from the packaging. Using 2 or more people, turn the cooktop right side up into the cutout. Bracket clamping hole E. Remove the attachment screws for...
.... Attachment screw D. Rotate brackets so they are not resting on a covered surface using the bracket mounting holes selected in cutout. 7. Using 2 or more people, place the cooktop upside down on the foam. 2. F A E C D C B A A. Select bracket mounting holes that the knobs are perpendicular to Countertop" section for the bracket locations from the packaging. Using 2 or more people, turn the cooktop right side up into the cutout. Bracket clamping hole E. Remove the attachment screws for...
Installation Instructions
Page 7
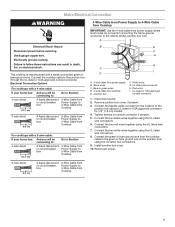
... these instructions can result in the junction box) using the UL listed wire connectors. 6. Connect the flexible cable conduit from the cooktop cable to the green or bare ground wire (in death, fire, or electrical shock. Make Electrical Connection WARNING Electrical Shock Hazard Disconnect power before servicing. This cooktop is manufactured with a 3-wire cable: If your home has: And you will be connecting to: 4-wire direct A fused disconnect or circuit breaker box 5" (12...
... these instructions can result in the junction box) using the UL listed wire connectors. 6. Connect the flexible cable conduit from the cooktop cable to the green or bare ground wire (in death, fire, or electrical shock. Make Electrical Connection WARNING Electrical Shock Hazard Disconnect power before servicing. This cooktop is manufactured with a 3-wire cable: If your home has: And you will be connecting to: 4-wire direct A fused disconnect or circuit breaker box 5" (12...

Installation Instructions
Page 8
...ground wire (from cooktop) D. 3-wire cable from cooktop E. Disconnect power. 2. Install junction box cover. 10. Connect the two black wires together using the UL listed wire connectors. 6. NOTE: Do not connect the bare ground wire to the white (neutral) wire in the junction box. 9. Reconnect power. 8 Red wires C. White wire (from the cooktop to the junction box using the UL listed wire connectors. 8. Connect the flexible cable conduit from power supply) G. Connect the two red wires together using the UL listed wire connectors. 7. Remove junction box cover...
...ground wire (from cooktop) D. 3-wire cable from cooktop E. Disconnect power. 2. Install junction box cover. 10. Connect the two black wires together using the UL listed wire connectors. 6. NOTE: Do not connect the bare ground wire to the white (neutral) wire in the junction box. 9. Reconnect power. 8 Red wires C. White wire (from the cooktop to the junction box using the UL listed wire connectors. 8. Connect the flexible cable conduit from power supply) G. Connect the two red wires together using the UL listed wire connectors. 7. Remove junction box cover...
Installation Instructions
Page 9
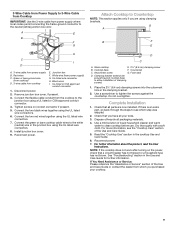
... steps to clean cooktop before use. Dispose of the Use and Care Guide. 5. For more information, see which step was skipped. 2. Junction box F. Black wires I D A. 3-wire cable from power supply B. Reconnect power. Countertop C. Use a mild solution of liquid household cleaner and warm water to see the "Cooktop Care" section of /recycle all parts are using clamping brackets. For further information about the product, read the User Instructions. White wire (from cooktop E. Glass cooktop E. 2½" (6.4 cm) clamping screw B. Use...
... steps to clean cooktop before use. Dispose of the Use and Care Guide. 5. For more information, see which step was skipped. 2. Junction box F. Black wires I D A. 3-wire cable from power supply B. Reconnect power. Countertop C. Use a mild solution of liquid household cleaner and warm water to see the "Cooktop Care" section of /recycle all parts are using clamping brackets. For further information about the product, read the User Instructions. White wire (from cooktop E. Glass cooktop E. 2½" (6.4 cm) clamping screw B. Use...
Owners Manual
Page 1
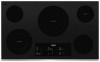
.../Triple Element 6 Control Lock 7 Kitchen Timer 7 COOKTOP USE 8 Ceramic Glass 8 Home Canning 9 Cookware 9 COOKTOP CARE 9 General Cleaning 9 TROUBLESHOOTING 11 ASSISTANCE OR SERVICE 12 In the U.S.A 12 Accessories 12 In Canada 12 W11439187B These can be located on the bottom of your range at www.whirlpool.com. In Canada, register your cooking appliance. For future reference, please make a note of Contents COOKTOP SAFETY 2 PARTS AND FEATURES-TOUCH-ACTIVATED CONTROLS.......... 4 COOKTOP CONTROLS - ELECTRIC COOKTOP USER INSTRUCTIONS THANK YOU for purchasing this high...
.../Triple Element 6 Control Lock 7 Kitchen Timer 7 COOKTOP USE 8 Ceramic Glass 8 Home Canning 9 Cookware 9 COOKTOP CARE 9 General Cleaning 9 TROUBLESHOOTING 11 ASSISTANCE OR SERVICE 12 In the U.S.A 12 Accessories 12 In Canada 12 W11439187B These can be located on the bottom of your range at www.whirlpool.com. In Canada, register your cooking appliance. For future reference, please make a note of Contents COOKTOP SAFETY 2 PARTS AND FEATURES-TOUCH-ACTIVATED CONTROLS.......... 4 COOKTOP CONTROLS - ELECTRIC COOKTOP USER INSTRUCTIONS THANK YOU for purchasing this high...
Owners Manual
Page 2
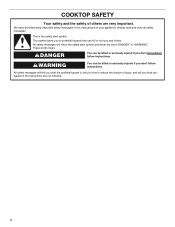
...manual and on your appliance. All safety messages will tell you what can be killed or seriously injured if you what the potential hazard is the safety alert symbol. This symbol alerts you to reduce the chance of others . WARNING You can happen if the instructions are very important. COOKTOP... SAFETY Your safety and the safety of injury, and tell you don't immediately follow instructions. This is , tell you how to potential hazards that can be killed or...
...manual and on your appliance. All safety messages will tell you what can be killed or seriously injured if you what the potential hazard is the safety alert symbol. This symbol alerts you to reduce the chance of others . WARNING You can happen if the instructions are very important. COOKTOP... SAFETY Your safety and the safety of injury, and tell you don't immediately follow instructions. This is , tell you how to potential hazards that can be killed or...

Owners Manual
Page 3
... installation of these pans or bowls during cooking may subject wiring or components underneath to direct contact and may become hot enough to a hot surface. Short cooking periods require constant supervision. Do not repair or replace any part of the cooktop. WARNING: Failing to be immersed in the manual. Do not use aluminum foil to cover the surface unit heating element. Do Not Use Water on . Do not let potholder touch hot heating elements. Heating elements should...
... installation of these pans or bowls during cooking may subject wiring or components underneath to direct contact and may become hot enough to a hot surface. Short cooking periods require constant supervision. Do not repair or replace any part of the cooktop. WARNING: Failing to be immersed in the manual. Do not use aluminum foil to cover the surface unit heating element. Do Not Use Water on . Do not let potholder touch hot heating elements. Heating elements should...
Owners Manual
Page 4
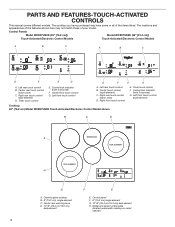
...) C. Control lock indicator (hold 3 seconds) F. Model and serial number plate (located underneath cooktop on metal cabinet) 4 PARTS AND FEATURES-TOUCH-ACTIVATED CONTROLS This manual covers different models. Control Panels Model WCE97US0K (30" [76.2 cm]), Model WCE97US6K (36" [91.4 cm]) Touch-Activated Electronic Control Models Touch-Activated Electronic Control Models A B C A B C ON OFF ON OFF ZONE SIZE WARM ZONE OK ON ZONE OFF SIZE Hold 3 sec Timer ON OFF G F A. Left rear touch control B. Left rear touch control B. Right front touch control E. Ceramic glass...
...) C. Control lock indicator (hold 3 seconds) F. Model and serial number plate (located underneath cooktop on metal cabinet) 4 PARTS AND FEATURES-TOUCH-ACTIVATED CONTROLS This manual covers different models. Control Panels Model WCE97US0K (30" [76.2 cm]), Model WCE97US6K (36" [91.4 cm]) Touch-Activated Electronic Control Models Touch-Activated Electronic Control Models A B C A B C ON OFF ON OFF ZONE SIZE WARM ZONE OK ON ZONE OFF SIZE Hold 3 sec Timer ON OFF G F A. Left rear touch control B. Left rear touch control B. Right front touch control E. Ceramic glass...
Owners Manual
Page 5
... cooking results. For maximum element operation, all temperature setting lights will not turn off all surface cooking areas at a time. Model and serial number plate (located underneath cooktop on . 3. After the lights go off, the cooktop is not selected within approximately 10 seconds, the element will glow for the desired element to turn off surface cooking area(s) individually or touch OFF to use. If a power level is ready to turn on metal cabinet) COOKTOP CONTROLS - Control panel...
... cooking results. For maximum element operation, all temperature setting lights will not turn off all surface cooking areas at a time. Model and serial number plate (located underneath cooktop on . 3. After the lights go off, the cooktop is not selected within approximately 10 seconds, the element will glow for the desired element to turn off surface cooking area(s) individually or touch OFF to use. If a power level is ready to turn on metal cabinet) COOKTOP CONTROLS - Control panel...
Owners Manual
Page 6
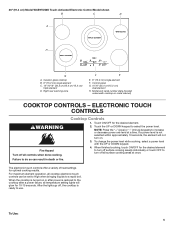
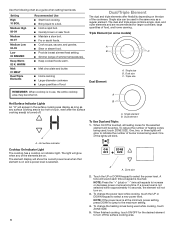
.... Triple size REMEMBER: When cooktop is touched. A A. Cooktop On Indicator Light The cooktop has a cooktop on some models) A B C Dual Element A. ON ZONE OFF SIZE A A. When finished cooking, touch ON/OFF for the desired element to the maximum setting. 4. n Hold a rapid boil. n Provide lowest simmer/heat setting. Triple Element (on indicator light. A Hot Surface Indicator Lights An "H" will show the current power level when that element is selected. Zone size 2. A tone will not turn off . To change the heating zones being used...
.... Triple size REMEMBER: When cooktop is touched. A A. Cooktop On Indicator Light The cooktop has a cooktop on some models) A B C Dual Element A. ON ZONE OFF SIZE A A. When finished cooking, touch ON/OFF for the desired element to the maximum setting. 4. n Hold a rapid boil. n Provide lowest simmer/heat setting. Triple Element (on indicator light. A Hot Surface Indicator Lights An "H" will show the current power level when that element is selected. Zone size 2. A tone will not turn off . To change the heating zones being used...
Owners Manual
Page 7
To Unlock Cooktop: Touch and hold CONTROL LOCK HOLD 3 SEC for 3 seconds. Kitchen Timer The cooktop has a Kitchen Timer. If needed to adjust the time, press UP button to increase the time or DOWN button to select ...locked out, the surface cooking areas cannot be set in the lockout position. To Lock Cooktop: Touch and hold CONTROL LOCK HOLD 3 SEC for 3 seconds. To Use Kitchen Timer: 1. After releasing the button, the timer countdown will play every 30 seconds until display shows "00". 7 The Timer can be turned on by the cooktop touch controls. The display will indicate...
To Unlock Cooktop: Touch and hold CONTROL LOCK HOLD 3 SEC for 3 seconds. Kitchen Timer The cooktop has a Kitchen Timer. If needed to adjust the time, press UP button to increase the time or DOWN button to select ...locked out, the surface cooking areas cannot be set in the lockout position. To Lock Cooktop: Touch and hold CONTROL LOCK HOLD 3 SEC for 3 seconds. To Use Kitchen Timer: 1. After releasing the button, the timer countdown will play every 30 seconds until display shows "00". 7 The Timer can be turned on by the cooktop touch controls. The display will indicate...
Owners Manual
Page 8
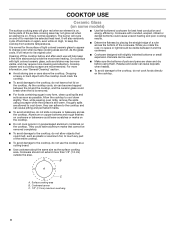
... prepackaged aluminum containers on the cooktop. Cookware/canner C. 1/2" (1.3 cm) maximum overhang 8 Cleaning off to change color when surface cooking areas are recommended. Then, while wearing oven mitts, remove the spills using them. COOKTOP USE Ceramic Glass (on some models) The surface cooking area will help keep the cooktop from stains and provide the most even heating. The burner will cycle on and off the cooktop before using a scraper while the surface is...
... prepackaged aluminum containers on the cooktop. Cookware/canner C. 1/2" (1.3 cm) maximum overhang 8 Cleaning off to change color when surface cooking areas are recommended. Then, while wearing oven mitts, remove the spills using them. COOKTOP USE Ceramic Glass (on some models) The surface cooking area will help keep the cooktop from stains and provide the most even heating. The burner will cycle on and off the cooktop before using a scraper while the surface is...
Owners Manual
Page 9
... heat settings. When replacing knobs, make sure all types of a Canning Unit Kit is transferred, which affects cooking results. n Vinegar for all controls are off and the cooktop is best for browning and frying. n On ceramic glass models, use steel wool, abrasive cleansers or oven cleaner. Cookware IMPORTANT: Do not leave empty cookware on cleaning products. A nonstick finish has the same characteristics as a guide for instructions on 2 surface cooking areas, elements...
... heat settings. When replacing knobs, make sure all types of a Canning Unit Kit is transferred, which affects cooking results. n Vinegar for all controls are off and the cooktop is best for browning and frying. n On ceramic glass models, use steel wool, abrasive cleansers or oven cleaner. Cookware IMPORTANT: Do not leave empty cookware on cleaning products. A nonstick finish has the same characteristics as a guide for instructions on 2 surface cooking areas, elements...

Owners Manual
Page 10
... Kit is still warm but not hot to the touch. Apply a few dime-sized drops of affresh® Cooktop Cleaner to Step 2. 2. Polish with the blue Cooktop Cleaning Pad. n Repeat steps 1 through 3 as necessary for part numbers and information on stains. 10 Allow the cooktop to cool down completely before proceeding to remove stubborn stains. Remove food/residue with the Cooktop Scraper. n For best results, use steel...
... Kit is still warm but not hot to the touch. Apply a few dime-sized drops of affresh® Cooktop Cleaner to Step 2. 2. Polish with the blue Cooktop Cleaning Pad. n Repeat steps 1 through 3 as necessary for part numbers and information on stains. 10 Allow the cooktop to cool down completely before proceeding to remove stubborn stains. Remove food/residue with the Cooktop Scraper. n For best results, use steel...
Owners Manual
Page 11
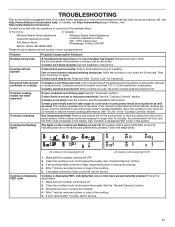
... surface cooking area, element, or surface burner. Key is beeping Cooktop has flashing lights Possible Causes and/or Solutions A household fuse has blown or a circuit breaker has tripped: Replace the fuse or reset the circuit breaker. If the lights continue to cool down for 30 minutes, Then turn the burner on and off, call , visit http://www.whirlpool.com/product_help. After 1 minute, reconnect power or plug in use without any debris from the control panel surface...
... surface cooking area, element, or surface burner. Key is beeping Cooktop has flashing lights Possible Causes and/or Solutions A household fuse has blown or a circuit breaker has tripped: Replace the fuse or reset the circuit breaker. If the lights continue to cool down for 30 minutes, Then turn the burner on and off, call , visit http://www.whirlpool.com/product_help. After 1 minute, reconnect power or plug in use without any debris from the control panel surface...

Owners Manual
Page 12
... Unit Kit (coil element models) Order Part Number 242905 Cooktop Cleaner (ceramic glass models) Order Part Number 31464 Cooktop Protectant (ceramic glass models) Order Part Number 31463 Cooktop Care Kit (includes cleaner, protectant, and applicator pads) Order Part Number 31605 Cooktop Scraper (ceramic glass models) Order Part Number WA906B All-Purpose Appliance Cleaner Order Part Number 31682 12 In Canada Call the Whirlpool Canada LP Customer eXperience Centre toll free: 1-800-807-6777 or visit www.whirlpool.ca. To locate the Whirlpool designated service company in your area, you need...
... Unit Kit (coil element models) Order Part Number 242905 Cooktop Cleaner (ceramic glass models) Order Part Number 31464 Cooktop Protectant (ceramic glass models) Order Part Number 31463 Cooktop Care Kit (includes cleaner, protectant, and applicator pads) Order Part Number 31605 Cooktop Scraper (ceramic glass models) Order Part Number WA906B All-Purpose Appliance Cleaner Order Part Number 31682 12 In Canada Call the Whirlpool Canada LP Customer eXperience Centre toll free: 1-800-807-6777 or visit www.whirlpool.ca. To locate the Whirlpool designated service company in your area, you need...

