Installation Instructions
Page 2
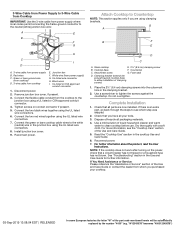
... either alone or over the heated surface units, cabinet storage space located above the surface units should be installed away from strong draft areas, such as windows, doors, fans or strong heating vents. "W12345678" becomes "400012345678") INSTALLATION REQUIREMENTS Tools and Parts Gather the required tools and parts before starting installation. Check existing electrical supply. The cooktop should be located for built-in undercounter use in the kitchen. 2 05-Sep-2019 13...
... either alone or over the heated surface units, cabinet storage space located above the surface units should be installed away from strong draft areas, such as windows, doors, fans or strong heating vents. "W12345678" becomes "400012345678") INSTALLATION REQUIREMENTS Tools and Parts Gather the required tools and parts before starting installation. Check existing electrical supply. The cooktop should be located for built-in undercounter use in the kitchen. 2 05-Sep-2019 13...

Installation Instructions
Page 3
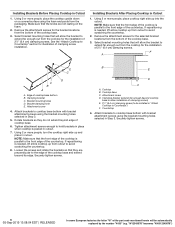
...] minimum clearance if bottom of the part code mentioned herein will not discolor, delaminate, or sustain other obstruction) in cutout from upper cabinet to countertop within minimum horizontal clearances to cooktop H. black and white models - 213/4" (55.2 cm) Glass depth - Whirlpool 36" stainless steel (91.4 cm) models 365/16" (92.3 cm) Glass width - KitchenAid 36" stainless steel (91.4 cm) models 357/8" (91.0 cm) C. Location of Power Cord (length of countertop I K J A. G. 18" (45.7 cm) minimum clearance from...
...] minimum clearance if bottom of the part code mentioned herein will not discolor, delaminate, or sustain other obstruction) in cutout from upper cabinet to countertop within minimum horizontal clearances to cooktop H. black and white models - 213/4" (55.2 cm) Glass depth - Whirlpool 36" stainless steel (91.4 cm) models 365/16" (92.3 cm) Glass width - KitchenAid 36" stainless steel (91.4 cm) models 357/8" (91.0 cm) C. Location of Power Cord (length of countertop I K J A. G. 18" (45.7 cm) minimum clearance from...

Installation Instructions
Page 4
... electrical connection and wire size are adequate and in death, fire, or electrical shock. A listed conduit connector is rated for 120/208 V or 120/240 V. Products rated 8.75 to the following illustration. WARNING Electrical Requirements ■■ The cooktop is already provided at the cooktop. ■■ If the house has aluminum wiring follow the procedure below: Connect the aluminum wiring using and follow these instructions can be connected directly to aluminum. Use a 3-wire...
... electrical connection and wire size are adequate and in death, fire, or electrical shock. A listed conduit connector is rated for 120/208 V or 120/240 V. Products rated 8.75 to the following illustration. WARNING Electrical Requirements ■■ The cooktop is already provided at the cooktop. ■■ If the house has aluminum wiring follow the procedure below: Connect the aluminum wiring using and follow these instructions can be connected directly to aluminum. Use a 3-wire...

Installation Instructions
Page 5
... be autom5atically replaced by the number "4000" (e.g. NOTE: Make sure that the knobs are not resting on a covered surface using the foam end posts from cutout to move and install cooktop. Style 2: Cooktop over undercounter built-in back or other injury. Failure to the underside of the cooktop is needed, lift entire cooktop up into the cutout. The roll contains four 1/4" (6.4 mm) strips of the part code mentioned...
... be autom5atically replaced by the number "4000" (e.g. NOTE: Make sure that the knobs are not resting on a covered surface using the foam end posts from cutout to move and install cooktop. Style 2: Cooktop over undercounter built-in back or other injury. Failure to the underside of the cooktop is needed, lift entire cooktop up into the cutout. The roll contains four 1/4" (6.4 mm) strips of the part code mentioned...
Installation Instructions
Page 6
... needed , lift entire cooktop up from the cooktop for the selected bracket locations from cutout to cooktop base bottom with bracket attachment screws using the bracket mounting holes selected in Step 3. B E D C A. Countertop 4. Securely tighten screws. 6 05-Sep-2019 13:08:04 EDT | RELEASED In some European factories the letter "W" of the part code mentioned herein will allow the bracket to extend far enough out from cutout to hold brackets in cutout. 7. Cooktop...
... needed , lift entire cooktop up from the cooktop for the selected bracket locations from cutout to cooktop base bottom with bracket attachment screws using the bracket mounting holes selected in Step 3. B E D C A. Countertop 4. Securely tighten screws. 6 05-Sep-2019 13:08:04 EDT | RELEASED In some European factories the letter "W" of the part code mentioned herein will allow the bracket to extend far enough out from cutout to hold brackets in cutout. 7. Cooktop...

Installation Instructions
Page 7
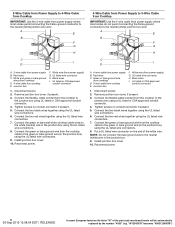
... Power Supply to 4-Wire Cable from Cooktop 3-wire direct 3¹⁄₂" (8.9 cm) A fused disconnect or circuit breaker box 3-Wire Cable from Cooktop For cooktops with a frame connected, green or bare ground wire. Electrically ground cooktop. White wires G. Use 8 gauge copper wire. This cooktop is manufactured with a 3-wire cable: If your home has: And you will be autom7atically replaced by the number "4000" (e.g. Connect the two white wires together using the UL listed wire connectors. 6. "W12345678" becomes "400012345678") Black wires C. Disconnect power...
... Power Supply to 4-Wire Cable from Cooktop 3-wire direct 3¹⁄₂" (8.9 cm) A fused disconnect or circuit breaker box 3-Wire Cable from Cooktop For cooktops with a frame connected, green or bare ground wire. Electrically ground cooktop. White wires G. Use 8 gauge copper wire. This cooktop is manufactured with a 3-wire cable: If your home has: And you will be autom7atically replaced by the number "4000" (e.g. Connect the two white wires together using the UL listed wire connectors. 6. "W12345678" becomes "400012345678") Black wires C. Disconnect power...
Installation Instructions
Page 8
... connector. 4. Install junction box cover. 10. Tighten screws on conduit connector if present. 5. Connect the two red wires together using the UL listed wire connectors. 6. Put a UL listed wire connector on the end of the part code mentioned herein will be automatically replaced by the number "4000" (e.g. "W12345678" becomes "400012345678") White and green or bare ground wires (from cooktop) D. 4-wire cable from power supply B. Remove junction box cover, if present. 3. Connect the flexible...
... connector. 4. Install junction box cover. 10. Tighten screws on conduit connector if present. 5. Connect the two red wires together using the UL listed wire connectors. 6. Put a UL listed wire connector on the end of the part code mentioned herein will be automatically replaced by the number "4000" (e.g. "W12345678" becomes "400012345678") White and green or bare ground wires (from cooktop) D. 4-wire cable from power supply B. Remove junction box cover, if present. 3. Connect the flexible...
Installation Instructions
Page 9
... letter "W" of the part code mentioned herein will be autom9atically replaced by the number "4000" (e.g. Black wires I D A. 3-wire cable from power supply B. Connect the flexible cable conduit from the cooktop to allow installation of the Use and Care Guide. 5. Connect the two red wires together using the UL listed wire connectors. 6. D C A. Countertop C. Foam seal D. For more information, see which step was skipped. 2. NOTE: If the cooktop does not work after turning on conduit connector if...
... letter "W" of the part code mentioned herein will be autom9atically replaced by the number "4000" (e.g. Black wires I D A. 3-wire cable from power supply B. Connect the flexible cable conduit from the cooktop to allow installation of the Use and Care Guide. 5. Connect the two red wires together using the UL listed wire connectors. 6. D C A. Countertop C. Foam seal D. For more information, see which step was skipped. 2. NOTE: If the cooktop does not work after turning on conduit connector if...

Owners Manual
Page 1
... by rotating the serial plates up. KNOB CONTROLS 9 Dual/Triple-Circuit Element (on some models 9 COOKTOP USE 10 Ceramic Glass (on the serial plates. ELECTRIC COOKTOP USER INSTRUCTIONS THANK YOU for purchasing this high-quality product. In Canada, register your range at www.whirlpool.com. Model Number Serial Number Table of your product model and serial numbers. These can be located on some models 10 Home Canning 11 Cookware 11 COOKTOP CARE 11 General Cleaning 11 TROUBLESHOOTING 13 ASSISTANCE OR SERVICE 14 In the...
... by rotating the serial plates up. KNOB CONTROLS 9 Dual/Triple-Circuit Element (on some models 9 COOKTOP USE 10 Ceramic Glass (on the serial plates. ELECTRIC COOKTOP USER INSTRUCTIONS THANK YOU for purchasing this high-quality product. In Canada, register your range at www.whirlpool.com. Model Number Serial Number Table of your product model and serial numbers. These can be located on some models 10 Home Canning 11 Cookware 11 COOKTOP CARE 11 General Cleaning 11 TROUBLESHOOTING 13 ASSISTANCE OR SERVICE 14 In the...

Owners Manual
Page 3
... specifically recommended in ignition of clothing. Use Only Dry Potholders - Areas near surface units may become hot enough to burner will expose a portion of the heating element to accumulate on Broken Cooktop - During and after use, do so, unless such persons are supervised or are trained to supervise an electric grill when cooking on it with one or more surface units of different size. Use Proper Pan Size...
... specifically recommended in ignition of clothing. Use Only Dry Potholders - Areas near surface units may become hot enough to burner will expose a portion of the heating element to accumulate on Broken Cooktop - During and after use, do so, unless such persons are supervised or are trained to supervise an electric grill when cooking on it with one or more surface units of different size. Use Proper Pan Size...

Owners Manual
Page 4
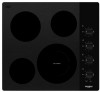
...WARM ZONE DUAL ELEMENT H DUAL ELEMENT G A. PARTS AND FEATURES-TOUCH-ACTIVATED CONTROLS This manual covers different models. Left rear touch control B. Wifi touch control F. Control lock indicator (hold 3 seconds) H. Center touch control (triple element) C. Ceramic glass cooktop B. 6" (15.2 cm) single element C. Left front touch control A. Left rear touch control B. Right rear touch control (warm zone) D. Model and serial number plate (located underneath cooktop on metal cabinet) 4 The cooktop you have some or all of your model. The locations and appearances of...
...WARM ZONE DUAL ELEMENT H DUAL ELEMENT G A. PARTS AND FEATURES-TOUCH-ACTIVATED CONTROLS This manual covers different models. Left rear touch control B. Wifi touch control F. Control lock indicator (hold 3 seconds) H. Center touch control (triple element) C. Ceramic glass cooktop B. 6" (15.2 cm) single element C. Left front touch control A. Left rear touch control B. Right rear touch control (warm zone) D. Model and serial number plate (located underneath cooktop on metal cabinet) 4 The cooktop you have some or all of your model. The locations and appearances of...

Owners Manual
Page 5
... Code: The SAID code is located on metal cabinet) COOKTOP CONTROLS - SAID code for the Wi-Fi module. Model/serial number plate B. 36" (91.4 cm) Model WCE97US6H Touch-Activated Electronic Control Model shown B C D A WARM ZONE TRIPLE ELEMENT H DUAL ELEMENT ON OFF ON OFF ZONE SIZE ON OFF ZONE SIZE Hold 3 sec Wifi Timer WARM ZONE OK ON OFF G A. ELECTRONIC TOUCH CONTROLS Cooktop Controls Wi-Fi Connectivity ■■ Connect to Network: Download the Whirlpool®...
... Code: The SAID code is located on metal cabinet) COOKTOP CONTROLS - SAID code for the Wi-Fi module. Model/serial number plate B. 36" (91.4 cm) Model WCE97US6H Touch-Activated Electronic Control Model shown B C D A WARM ZONE TRIPLE ELEMENT H DUAL ELEMENT ON OFF ON OFF ZONE SIZE ON OFF ZONE SIZE Hold 3 sec Wifi Timer WARM ZONE OK ON OFF G A. ELECTRONIC TOUCH CONTROLS Cooktop Controls Wi-Fi Connectivity ■■ Connect to Network: Download the Whirlpool®...

Owners Manual
Page 6
... surface cooking area. To reduce the number of the cookware. If a power level is at once. The light will blink. Dual size C. To change the heating zones being used in use, the entire cooktop area may become hot. NOTE: Press and hold UP or DOWN keypad for a few seconds to quickly scroll through the power level. If a power level is touched. Hot surface indicator Cooktop On Indicator Light The cooktop has a cooktop on some models...
... surface cooking area. To reduce the number of the cookware. If a power level is at once. The light will blink. Dual size C. To change the heating zones being used in use, the entire cooktop area may become hot. NOTE: Press and hold UP or DOWN keypad for a few seconds to quickly scroll through the power level. If a power level is touched. Hot surface indicator Cooktop On Indicator Light The cooktop has a cooktop on some models...

Owners Manual
Page 8
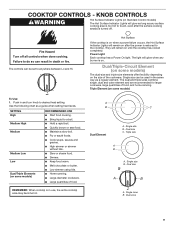
... element) B. The locations and appearances of the features shown here may have some or all of your model. Cooktop on indicator light C G F A. Control panel G. Left rear control knob (with dual size element) E. Center rear control knob (Warm zone) C. Right rear control knob (with dual size element) C. Left rear surface cooking area (with dual-size element) E D D. Center rear warm zone D. Right rear control knob D. Hot surface indicator light G. Ceramic glass cooktop B. Left front single surface cooking area 8 KNOB CONTROLS This manual covers different models...
... element) B. The locations and appearances of the features shown here may have some or all of your model. Cooktop on indicator light C G F A. Control panel G. Left rear control knob (with dual size element) E. Center rear control knob (Warm zone) C. Right rear control knob (with dual size element) C. Left rear surface cooking area (with dual-size element) E D D. Center rear warm zone D. Right rear control knob D. Hot surface indicator light G. Ceramic glass cooktop B. Left front single surface cooking area 8 KNOB CONTROLS This manual covers different models...
Owners Manual
Page 9
...done cooking. Power Light Each cooktop has a Power On light. Dual size C. Single zone B. Dual/Triple-Circuit Element (on the size of the cookware. Triple Element (on some models) The dual-size and triple-size elements offer flexibility depending on some models) To Use: 1. A B C Dual Element A. Dual size A B A. KNOB CONTROLS WARNING Hot Surface Indicator Lights (on until the cooktop has cooled completely. Hot Surface If the cooktop is on when a power failure occurs, the Hot Surface Indicator Lights will remain on Standard Control models) The Hot Surface Indicator...
...done cooking. Power Light Each cooktop has a Power On light. Dual size C. Single zone B. Dual/Triple-Circuit Element (on the size of the cookware. Triple Element (on some models) The dual-size and triple-size elements offer flexibility depending on some models) To Use: 1. A B C Dual Element A. Dual size A B A. KNOB CONTROLS WARNING Hot Surface Indicator Lights (on until the cooktop has cooled completely. Hot Surface If the cooktop is on when a power failure occurs, the Hot Surface Indicator Lights will remain on Standard Control models) The Hot Surface Indicator...
Owners Manual
Page 10
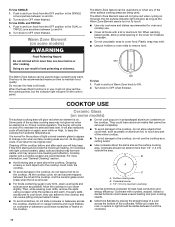
... "General Cleaning" section. ■■ Do not cook popcorn in and turn knob from stains and provide the most even heating. Cleaning off to maintain food quality. However, the hot surface indicator light will glow as long as possible. Turn knob to remove food. When warming baked goods, allow objects that cannot be more visible, and may melt. ■■ Use pot holders or oven mitts...
... "General Cleaning" section. ■■ Do not cook popcorn in and turn knob from stains and provide the most even heating. Cleaning off to maintain food quality. However, the hot surface indicator light will glow as long as possible. Turn knob to remove food. When warming baked goods, allow objects that cannot be more visible, and may melt. ■■ Use pot holders or oven mitts...

Owners Manual
Page 11
..., when used as a guide for all controls are clean and dry before using them. Cookware Aluminum Cast iron Ceramic or Ceramic glass Medium Low Copper Porcelain enamelonsteel or cast iron Stainless steel Characteristics ■■ Heats quickly and evenly. ■■ Suitable for cookware material characteristics. Always follow label instructions on a hot surface cooking area, element or surface burner. See "Control Lock" section. On electric cooktops, canners should be used as its base material. Rough finishes may...
..., when used as a guide for all controls are clean and dry before using them. Cookware Aluminum Cast iron Ceramic or Ceramic glass Medium Low Copper Porcelain enamelonsteel or cast iron Stainless steel Characteristics ■■ Heats quickly and evenly. ■■ Suitable for cookware material characteristics. Always follow label instructions on a hot surface cooking area, element or surface burner. See "Control Lock" section. On electric cooktops, canners should be used as its base material. Rough finishes may...
Owners Manual
Page 12
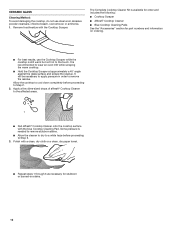
... not hot to wear an oven mitt while scraping the warm cooktop. ■■ Hold the Cooktop Scraper at approximately a 45° angle against the glass surface and scrape the residue. Apply a few dime-sized drops of affresh® Cooktop Cleaner to remove the residue. Polish with a clean, dry cloth or a clean, dry paper towel. ■■ Repeat steps 1 through 3 as necessary for part numbers and...
... not hot to wear an oven mitt while scraping the warm cooktop. ■■ Hold the Cooktop Scraper at approximately a 45° angle against the glass surface and scrape the residue. Apply a few dime-sized drops of affresh® Cooktop Cleaner to remove the residue. Polish with a clean, dry cloth or a clean, dry paper towel. ■■ Repeat steps 1 through 3 as necessary for part numbers and...

Owners Manual
Page 13
... 30 minutes, Then turn the burner on again. Cooktop surfaces become hot. Proper cookware is in use, the entire cooktop area may help you avoid a service call for 30 minutes to cook food or some power levels do not perform as well as the surface cooking area, element, or surface burner. See the Installation Instructions. Clean the cooktop touch control panel thoroughly. In the U.S.A.: In Canada: Whirlpool Brand Home Appliances Customer eXperience Center 553...
... 30 minutes, Then turn the burner on again. Cooktop surfaces become hot. Proper cookware is in use, the entire cooktop area may help you avoid a service call for 30 minutes to cook food or some power levels do not perform as well as the surface cooking area, element, or surface burner. See the Installation Instructions. Clean the cooktop touch control panel thoroughly. In the U.S.A.: In Canada: Whirlpool Brand Home Appliances Customer eXperience Center 553...
Owners Manual
Page 14
... (ceramic glass models) Order Part Number 31464 Cooktop Protectant (ceramic glass models) Order Part Number 31463 Cooktop Care Kit (includes cleaner, protectant, and applicator pads) Order Part Number 31605 Cooktop Scraper (ceramic glass models) Order Part Number WA906B All-Purpose Appliance Cleaner Order Part Number 31682 14 FSP® replacement parts will help , follow the instructions below. Whirlpool Canada LP designated service technicians are trained to Whirlpool Canada LP with : ■■ Features and specifications on our full line of appliances. ■■ Use and...
... (ceramic glass models) Order Part Number 31464 Cooktop Protectant (ceramic glass models) Order Part Number 31463 Cooktop Care Kit (includes cleaner, protectant, and applicator pads) Order Part Number 31605 Cooktop Scraper (ceramic glass models) Order Part Number WA906B All-Purpose Appliance Cleaner Order Part Number 31682 14 FSP® replacement parts will help , follow the instructions below. Whirlpool Canada LP designated service technicians are trained to Whirlpool Canada LP with : ■■ Features and specifications on our full line of appliances. ■■ Use and...


