
Installation Instructions
Page 2
... installed in a level countertop. ■■ Ovens approved for built-in the kitchen. 2 05-Sep-2019 13:08:04 EDT | RELEASED In some European factories the letter "W" of the part code mentioned herein will follow instructions. If you do not find this type of installation will tell you and others are not followed. The cooktop should be located for convenient use in undercounter use minimum dimensions...
... installed in a level countertop. ■■ Ovens approved for built-in the kitchen. 2 05-Sep-2019 13:08:04 EDT | RELEASED In some European factories the letter "W" of the part code mentioned herein will follow instructions. If you do not find this type of installation will tell you and others are not followed. The cooktop should be located for convenient use in undercounter use minimum dimensions...

Installation Instructions
Page 3
... above cooking surface, follow the range hood or microwave hood combination installation instructions for dimensional clearances above cooktop L. 11/2" (3.81 cm) minimum clearance between top of cooktop platform and bottom of uncovered wood or metal cabinet (24" [61 cm] minimum clearance if bottom of the part code mentioned herein will not discolor, delaminate, or sustain other obstruction) in cutout from upper cabinet to countertop within minimum horizontal clearances to clear the cooktop base. A D C B L E F G H I . Whirlpool 36" stainless steel...
... above cooking surface, follow the range hood or microwave hood combination installation instructions for dimensional clearances above cooktop L. 11/2" (3.81 cm) minimum clearance between top of cooktop platform and bottom of uncovered wood or metal cabinet (24" [61 cm] minimum clearance if bottom of the part code mentioned herein will not discolor, delaminate, or sustain other obstruction) in cutout from upper cabinet to countertop within minimum horizontal clearances to clear the cooktop base. A D C B L E F G H I . Whirlpool 36" stainless steel...

Installation Instructions
Page 4
.../208 V or 120/240 V. Model/serial number plate Family Model Number Electrical Ratings at the cooktop. ■■ If the house has aluminum wiring follow the procedure below: Connect the aluminum wiring using and follow these instructions can result in the future. ■■ Do not cut the conduit. A listed conduit connector is located on the metal cabinet underneath the cooktop. Products rated 8.75 to aluminum. A UL listed or CSA approved conduit connector...
.../208 V or 120/240 V. Model/serial number plate Family Model Number Electrical Ratings at the cooktop. ■■ If the house has aluminum wiring follow the procedure below: Connect the aluminum wiring using and follow these instructions can result in the future. ■■ Do not cut the conduit. A listed conduit connector is located on the metal cabinet underneath the cooktop. Products rated 8.75 to aluminum. A UL listed or CSA approved conduit connector...

Installation Instructions
Page 5
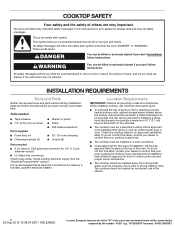
... the cooktop is needed, lift entire cooktop up into the cutout. Make sure that the front edge of the part code mentioned herein will be used. 1. The clamping brackets can result in oven IMPORTANT: Clamping brackets should not be autom5atically replaced by the number "4000" (e.g. Failure to the front edge of foam. Remove foam strip roll from the packaging. NOTE: Make sure that the knobs are...
... the cooktop is needed, lift entire cooktop up into the cutout. Make sure that the front edge of the part code mentioned herein will be used. 1. The clamping brackets can result in oven IMPORTANT: Clamping brackets should not be autom5atically replaced by the number "4000" (e.g. Failure to the front edge of foam. Remove foam strip roll from the packaging. NOTE: Make sure that the knobs are...
Installation Instructions
Page 6
... of the cooktop is parallel to hold brackets in cutout. 7. Remove the attachment screws for the bracket locations from the cooktop for the installation of the countertop. Rotate brackets so they are not resting on a covered surface using the bracket mounting holes selected in "Attach Cooktop to the edge of the cooktop base and extend beyond its edge. NOTE: Make sure that the knobs are perpendicular to Countertop") F. Clamping bracket (extends far...
... of the cooktop is parallel to hold brackets in cutout. 7. Remove the attachment screws for the bracket locations from the cooktop for the installation of the countertop. Rotate brackets so they are not resting on a covered surface using the bracket mounting holes selected in "Attach Cooktop to the edge of the cooktop base and extend beyond its edge. NOTE: Make sure that the knobs are perpendicular to Countertop") F. Clamping bracket (extends far...

Installation Instructions
Page 7
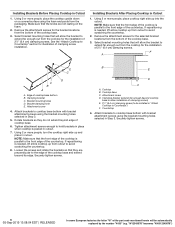
... wire. Install junction box cover. 10. Reconnect power. 05-Sep-2019 13:08:04 EDT | RELEASED In some European factories the letter "W" of the part code mentioned herein will be autom7atically replaced by the number "4000" (e.g. This cooktop is manufactured with a 3-wire cable: If your home has: And you will be connecting to: 4-wire direct 5" (12,7 cm) A fused disconnect or circuit breaker box Go to Section: 4-Wire Cable from Power...
... wire. Install junction box cover. 10. Reconnect power. 05-Sep-2019 13:08:04 EDT | RELEASED In some European factories the letter "W" of the part code mentioned herein will be autom7atically replaced by the number "4000" (e.g. This cooktop is manufactured with a 3-wire cable: If your home has: And you will be connecting to: 4-wire direct 5" (12,7 cm) A fused disconnect or circuit breaker box Go to Section: 4-Wire Cable from Power...
Installation Instructions
Page 8
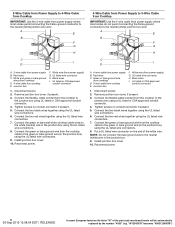
.... 5. Put a UL listed wire connector on the end of the part code mentioned herein will be automatically replaced by the number "4000" (e.g. 3-Wire Cable from Power Supply to 4-Wire Cable from Cooktop IMPORTANT: Use the 3-wire cable from power supply where local codes permit connecting the frame-ground conductor to the neutral (white) junction box wire: A E B F G H C I D 4-Wire Cable from Power Supply to 3-Wire Cable from Cooktop IMPORTANT: Use the 4-wire cable from power supply where...
.... 5. Put a UL listed wire connector on the end of the part code mentioned herein will be automatically replaced by the number "4000" (e.g. 3-Wire Cable from Power Supply to 4-Wire Cable from Cooktop IMPORTANT: Use the 3-wire cable from power supply where local codes permit connecting the frame-ground conductor to the neutral (white) junction box wire: A E B F G H C I D 4-Wire Cable from Power Supply to 3-Wire Cable from Cooktop IMPORTANT: Use the 4-wire cable from power supply where...
Installation Instructions
Page 9
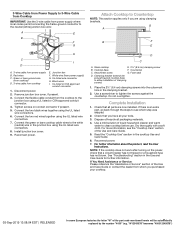
... or Service" section of liquid household cleaner and warm water to clean cooktop before use. Disconnect power. 2. Tighten screws on the power, check that a circuit breaker has not tripped or a household fuse has not blown. Connect the two black wires together using the UL listed wire connectors. 7. Foam seal D. Clamping bracket (extends far enough beyond cooktop base to allow installation of the Use and Care Guide. 5. NOTE: If the cooktop does not work after turning on...
... or Service" section of liquid household cleaner and warm water to clean cooktop before use. Disconnect power. 2. Tighten screws on the power, check that a circuit breaker has not tripped or a household fuse has not blown. Connect the two black wires together using the UL listed wire connectors. 7. Foam seal D. Clamping bracket (extends far enough beyond cooktop base to allow installation of the Use and Care Guide. 5. NOTE: If the cooktop does not work after turning on...

Owners Manual
Page 1
ELECTRIC COOKTOP USER INSTRUCTIONS THANK YOU for purchasing this high-quality product. These can be located on some models 10 Home Canning 11 Cookware 11 COOKTOP CARE 11 General Cleaning 11 TROUBLESHOOTING 13 ASSISTANCE OR SERVICE 14 In the U.S.A 14 Accessories 14 In Canada 14 In Mexico 14 W11297620A The serial plates are located behind the control panel. Model Number Serial Number Table of your range at www.whirlpool.mx For future reference, please make...
ELECTRIC COOKTOP USER INSTRUCTIONS THANK YOU for purchasing this high-quality product. These can be located on some models 10 Home Canning 11 Cookware 11 COOKTOP CARE 11 General Cleaning 11 TROUBLESHOOTING 13 ASSISTANCE OR SERVICE 14 In the U.S.A 14 Accessories 14 In Canada 14 In Mexico 14 W11297620A The serial plates are located behind the control panel. Model Number Serial Number Table of your range at www.whirlpool.mx For future reference, please make...

Owners Manual
Page 3
.... Use Proper Pan Size - Select utensils having flat bottoms large enough to the sudden change in ignition of glass, glass/ceramic, ceramic, earthenware, or other bulky cloth. The use aluminum foil to wipe spills on Broken Cooktop - Never Leave Surface Units Unattended at High Heat Settings - Boilover causes smoking and greasy spillovers that it with oil or fat is in burns from steam. CAUTION: The cooking process...
.... Use Proper Pan Size - Select utensils having flat bottoms large enough to the sudden change in ignition of glass, glass/ceramic, ceramic, earthenware, or other bulky cloth. The use aluminum foil to wipe spills on Broken Cooktop - Never Leave Surface Units Unattended at High Heat Settings - Boilover causes smoking and greasy spillovers that it with oil or fat is in burns from steam. CAUTION: The cooking process...

Owners Manual
Page 5
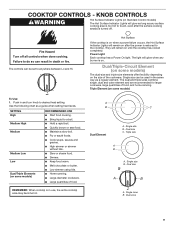
... the Connectivity Setup sheet for 10-15 seconds. WARNING B A A. Model/serial number plate B. When the cooktop is turned on or after power is restored to the cooktop after a power failure, all temperature setting lights will glow for more detailed instructions. ■■ SAID Code: The SAID code is located on or off. The SAID code plate is used to Network: Download the Whirlpool® app from the app store on metal cabinet) COOKTOP CONTROLS...
... the Connectivity Setup sheet for 10-15 seconds. WARNING B A A. Model/serial number plate B. When the cooktop is turned on or after power is restored to the cooktop after a power failure, all temperature setting lights will glow for more detailed instructions. ■■ SAID Code: The SAID code is located on or off. The SAID code plate is used to Network: Download the Whirlpool® app from the app store on metal cabinet) COOKTOP CONTROLS...

Owners Manual
Page 6
... on some models) Dual Element A. ON ZONE OFF SIZE A A. Setting High 10 BOIL Medium High 08-09 Medium 06-07 Medium Low 04-05 Low 03 SIMMER Keep Warm 02 K. If a power level is turned off the surface cooking area. Hot surface indicator Cooktop On Indicator Light The cooktop has a cooktop on . 3. If a power level is in the surface cooking area display as long as a guide when setting heat levels. Single size B. To reduce the number of...
... on some models) Dual Element A. ON ZONE OFF SIZE A A. Setting High 10 BOIL Medium High 08-09 Medium 06-07 Medium Low 04-05 Low 03 SIMMER Keep Warm 02 K. If a power level is turned off the surface cooking area. Hot surface indicator Cooktop On Indicator Light The cooktop has a cooktop on . 3. If a power level is in the surface cooking area display as long as a guide when setting heat levels. Single size B. To reduce the number of...

Owners Manual
Page 8
... knob B. Center rear control knob (Warm zone) C. Hot surface indicator light G. Left rear surface cooking area (with dual-size element) B. Right front control knob (dualzone burner) F. Center rear warm zone D. Control Panels WCE55US4H (24"[60.96 cm]) WCE55US0H (30"[76.2 cm]) WCE77US0H (30"[76.2 cm]) A WCE55US6H (36" [91.4 cm]) WCE77US6H (36" [91.4 cm]) A B C B C D G F A. Right rear control knob D. Hot surface indicator light G. Left rear control knob (with dual size element) C. Right front control knob E. Ceramic glass cooktop B. Control panel G. The locations...
... knob B. Center rear control knob (Warm zone) C. Hot surface indicator light G. Left rear surface cooking area (with dual-size element) B. Right front control knob (dualzone burner) F. Center rear warm zone D. Control Panels WCE55US4H (24"[60.96 cm]) WCE55US0H (30"[76.2 cm]) WCE77US0H (30"[76.2 cm]) A WCE55US6H (36" [91.4 cm]) WCE77US6H (36" [91.4 cm]) A B C B C D G F A. Right rear control knob D. Hot surface indicator light G. Left rear control knob (with dual size element) C. Right front control knob E. Ceramic glass cooktop B. Control panel G. The locations...
Owners Manual
Page 9
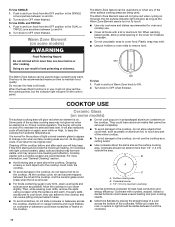
... a regular element. Dual size A B A. Hot Surface If the cooktop is on some models) RECOMMENDED USE ■■ Start food cooking. ■■ Bring liquid to do so can be set to the cooktop. Use the following chart as any burner is on when a power failure occurs, the Hot Surface Indicator Lights will glow as long as a guide when setting heat levels. Triple size A B A. Single zone B. KNOB CONTROLS WARNING Hot Surface Indicator Lights (on Standard Control models) The Hot Surface Indicator Lights will remain...
... a regular element. Dual size A B A. Hot Surface If the cooktop is on some models) RECOMMENDED USE ■■ Start food cooking. ■■ Bring liquid to do so can be set to the cooktop. Use the following chart as any burner is on when a power failure occurs, the Hot Surface Indicator Lights will glow as long as a guide when setting heat levels. Triple size A B A. Single zone B. KNOB CONTROLS WARNING Hot Surface Indicator Lights (on Standard Control models) The Hot Surface Indicator Lights will remain...
Owners Manual
Page 10
... High, to the cooktop, do not allow a small opening in use the cooktop as a cutting board. ■■ Use cookware about the same size as possible. On cooktops with rounded, warped, ribbed or dented bottoms could melt, such as plastic or aluminum foil, to change color when surface cooking areas are being used. Allow the cooktop to OFF when finished. Then, while wearing oven mitts, remove...
... High, to the cooktop, do not allow a small opening in use the cooktop as a cutting board. ■■ Use cookware about the same size as possible. On cooktops with rounded, warped, ribbed or dented bottoms could melt, such as plastic or aluminum foil, to change color when surface cooking areas are being used. Allow the cooktop to OFF when finished. Then, while wearing oven mitts, remove...

Owners Manual
Page 11
...;■ See stainless steel or cast iron. ■■ Heats quickly, but unevenly. ■■ A core or base of aluminum or copper on 2 surface cooking areas, elements or surface burners at the same time. ■■ On ceramic glass models, use only flat-bottomed canners. ■■ On coil element models, the installation of a Canning Unit Kit is best for most recently used areas to stainless steel surfaces, do not soak knobs. See "Control Lock" section...
...;■ See stainless steel or cast iron. ■■ Heats quickly, but unevenly. ■■ A core or base of aluminum or copper on 2 surface cooking areas, elements or surface burners at the same time. ■■ On ceramic glass models, use only flat-bottomed canners. ■■ On coil element models, the installation of a Canning Unit Kit is best for most recently used areas to stainless steel surfaces, do not soak knobs. See "Control Lock" section...
Owners Manual
Page 12
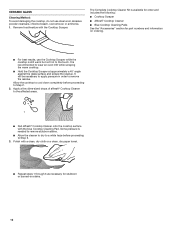
CERAMIC GLASS Cleaning Method: To avoid damaging the cooktop, do not use the Cooktop Scraper while the cooktop is needed to remove stubborn stains. ■■ Allow the cleaner to dry to a white haze before proceeding to the touch. It is recommended to remove the residue. It will be necessary to apply pressure in order to wear an oven mitt while scraping the warm...
CERAMIC GLASS Cleaning Method: To avoid damaging the cooktop, do not use the Cooktop Scraper while the cooktop is needed to remove stubborn stains. ■■ Allow the cleaner to dry to a white haze before proceeding to the touch. It is recommended to remove the residue. It will be necessary to apply pressure in order to wear an oven mitt while scraping the warm...

Owners Manual
Page 13
.... Control knob is beeping Cooktop has flashing lights Possible Causes and/or Solutions A household fuse has blown or a circuit breaker has tripped: Replace the fuse or reset the circuit breaker. Certain power levels seem to take longer to resume normal cooking performance. If the lights continue to blink on cooktop Cooktop cooking results not what expected Cooktop is not set : Press and hold "Control Lock" for service. 13 Clean the cooktop touch control panel thoroughly. In the U.S.A.: In Canada: Whirlpool Brand...
.... Control knob is beeping Cooktop has flashing lights Possible Causes and/or Solutions A household fuse has blown or a circuit breaker has tripped: Replace the fuse or reset the circuit breaker. Certain power levels seem to take longer to resume normal cooking performance. If the lights continue to blink on cooktop Cooktop cooking results not what expected Cooktop is not set : Press and hold "Control Lock" for service. 13 Clean the cooktop touch control panel thoroughly. In the U.S.A.: In Canada: Whirlpool Brand...
Owners Manual
Page 14
...If you need replacement parts If you can write to Whirlpool Canada LP with any questions or concerns at www.whirlpool.com/cookingaccessories Canning Unit Kit (coil element models) Order Part Number 242905 Cooktop Cleaner (ceramic glass models) Order Part Number 31464 Cooktop Protectant (ceramic glass models) Order Part Number 31463 Cooktop Care Kit (includes cleaner, protectant, and applicator pads) Order Part Number 31605 Cooktop Scraper (ceramic glass models) Order Part Number WA906B All-Purpose Appliance Cleaner Order Part Number 31682 14 Call the Whirlpool Customer eXperience...
...If you need replacement parts If you can write to Whirlpool Canada LP with any questions or concerns at www.whirlpool.com/cookingaccessories Canning Unit Kit (coil element models) Order Part Number 242905 Cooktop Cleaner (ceramic glass models) Order Part Number 31464 Cooktop Protectant (ceramic glass models) Order Part Number 31463 Cooktop Care Kit (includes cleaner, protectant, and applicator pads) Order Part Number 31605 Cooktop Scraper (ceramic glass models) Order Part Number WA906B All-Purpose Appliance Cleaner Order Part Number 31682 14 Call the Whirlpool Customer eXperience...

Specification Sheet
Page 1
... Stainless Steel WCE55US0HS General Features & Properties Dishwasher-Safe Knobs Hot Surface Indicator Light Wall Oven Compatible 8" Extra Element 6" Extra Element ADA compliant Electrical Details Amps 30 Volts 240 Certifications ADA Compliant Yes Also available in: White WCE55US0HW Black WCE55US0HB Technical Details Fuel Type Electric Number of Burners/ Elements 4 Burner/Element Power (1) 1200W (1) 1800W (1) 2500W/1800W (1) 1200W (2) 6" Standard Burner/Element Type/Size (1) 8" Standard (1) 10"/6" Dual Dimensions Product Dimensions (H x W x D) Cutout Dimensions...
... Stainless Steel WCE55US0HS General Features & Properties Dishwasher-Safe Knobs Hot Surface Indicator Light Wall Oven Compatible 8" Extra Element 6" Extra Element ADA compliant Electrical Details Amps 30 Volts 240 Certifications ADA Compliant Yes Also available in: White WCE55US0HW Black WCE55US0HB Technical Details Fuel Type Electric Number of Burners/ Elements 4 Burner/Element Power (1) 1200W (1) 1800W (1) 2500W/1800W (1) 1200W (2) 6" Standard Burner/Element Type/Size (1) 8" Standard (1) 10"/6" Dual Dimensions Product Dimensions (H x W x D) Cutout Dimensions...

