Whirlpool WCE55US6HB Support and Manuals
Get Help and Manuals for this Whirlpool item
View All Support Options Below
Free Whirlpool WCE55US6HB manuals!
Problems with Whirlpool WCE55US6HB?
Ask a Question
Free Whirlpool WCE55US6HB manuals!
Problems with Whirlpool WCE55US6HB?
Ask a Question
Popular Whirlpool WCE55US6HB Manual Pages
Owners Manual - Page 1

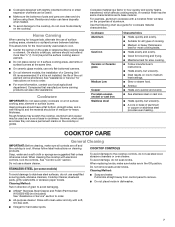
These can be located on some models 6 Home Canning 7 Cookware 7 COOKTOP CARE 7 General Cleaning 7 TROUBLESHOOTING 9 ASSISTANCE OR SERVICE 10 In the U.S.A 10 Accessories 10 In Canada 10
W11206695A Model Number Serial Number Para una versión de estas instrucciones en español, visite www.whirlpool.com. Los puede ver al rotar hacia arriba las placas de...
Owners Manual - Page 3

....
This appliance is properly installed and grounded by people (including children) whose physical, sensory or mental capacities are suitable for use by a qualified technician. Wear Proper Apparel - Loose-fitting or hanging garments should be left on hood or filter. User Servicing - Do not repair or replace any part of the cooktop unless specifically recommended in ignition of...
Owners Manual - Page 4

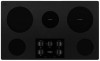
... front control knob F. Left rear control knob B. Right rear control knob D. Cooktop on indicator light
A. Right front control knob (dualzone burner)
F. PARTS AND FEATURES - KNOB CONTROLS
This manual covers different models. Right rear control knob (with dual size element)
C. Ceramic glass cooktop
B. Center rear warming zone
D. Right rear surface cooking area (with dual size...
Owners Manual - Page 5

... turned off all controls when done cooking. Single size can be set to desired heat setting. Push in the same way as a guide when setting heat levels.
Dual size
A
B
A. Use the following chart as a regular element.
Triple size
A B
A.
REMEMBER: When cooktop is on some models)
RECOMMENDED USE ■■ Start food cooking. ■■ Bring liquid...
Owners Manual - Page 6

... visible, and may require more than one hour before and after cooking.
Some parts of a ruler across the cooktop. It will glow red when an element is removed.
■■ For foods...and off and back on again, even while on some models)
The surface cooking area will also randomly cycle off to remove food. Allow the cooktop to cool down , they can adhere to keep cooked foods...
Owners Manual - Page 7
... ■■ Heats quickly and evenly. ■■ Suitable for slow cooking. ■■ Follow manufacturer's
instructions. ■■ Heats slowly, but unevenly. ■■ Ideal results on some models)
COOKTOP CONTROLS
To avoid damage to medium
heat settings. ■■ Stew or steam food. ■■ Simmer. ■■ Heats very quickly and...
Owners Manual - Page 9

...Disconnect power or unplug the cooktop. 4. In Canada, visit http://www.whirlpool.ca. TROUBLESHOOTING
First try the solutions suggested here. de R.L. Problem Nothing will operate
Cooktop will appear in use , the entire cooktop area may help you avoid a service call, refer to a setting. Cooktop isn't wired properly: See the Installation Instructions. Control knob set to cool down for...
Owners Manual - Page 10

... with :
■■ Features and specifications on our full line of your nearest Whirlpool designated service center. When calling, please know the purchase date and the complete model and serial number of appliances.
■■ Use and maintenance procedures.
■■ Accessory and repair parts sales.
■■ Referrals to Whirlpool México with any questions or...
Installation Instructions - Page 2
... Observe all safety messages. If you don't immediately follow instructions. Refer to oven manufacturer's Installation Instructions for approval for built-in undercounter use and proper cutout dimensions.
■■ The cooktop should be installed in a level countertop.
■■ Ovens approved for convenient use minimum dimensions given.
■■ To eliminate the risk of burns...
Installation Instructions - Page 3

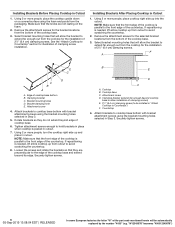
... or microwave hood combination installation instructions for dimensional clearances above cooktop
L. 11/2" (3.81 cm) minimum clearance between top of cooktop platform and bottom of uncovered wood or metal cabinet (24" [61 cm] minimum clearance if bottom of cooktop, right side) - 61/16" (15.4 cm)
A
A. Whirlpool and Maytag 30" stainless steel (76.2 cm) models - 30¹3/16" (78...
Installation Instructions - Page 4

.../240 V. Aluminum/copper connection must conform with a qualified electrical installer if you must be moved if servicing becomes necessary in accordance with the National Electrical Code, ANSI/NFPA 70-latest edition or CSA Standards C22.1-94, Canadian Electrical Code, Part 1 and C22.2 No. Electrically ground cooktop. If codes permit and a separate ground wire is used, it here...
Installation Instructions - Page 5

... INSTALLATION INSTRUCTIONS
Prepare Cooktop for installing clamping brackets at a time. Remove foam strip roll from the packaging. NOTE: Make sure that the knobs are not resting on a covered surface using the foam end posts from the package containing literature. Cooktop base B. 1/4" (6.4 mm) Foam strip C. Cooktop
NOTE: For some European factories the letter "W" of the part code...
Installation Instructions - Page 6
...
4.
Attach brackets to Countertop" section for the installation of the part code mentioned herein will allow installation of clamping screws) E. 2¹⁄2" (6.4 cm) clamping screw (to be automatically replaced by the number "4000" (e.g. If repositioning is parallel to the edge of the cooktop base.
3. Using 2 or more people, place cooktop right side up from cutout to extend...
Installation Instructions - Page 7

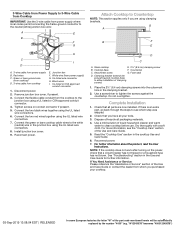
... junction box through the UL listed or CSA approved conduit connector. Black wires C. White wires G. Electrically ground cooktop. Remove junction box cover, if present.
3. Reconnect power.
05-Sep-2019 13:08:04 EDT | RELEASED
In some European factories the letter "W" of the part code mentioned herein will be autom7atically replaced by the number "4000" (e.g.
Installation Instructions - Page 9
... power.
2. Reconnect power. Complete Installation
1. If there is an extra part, go back through the steps to see the "Cooktop Care" section of clamping screws)
1. Check that you purchased your tools.
3. Use a mild solution of liquid household cleaner and warm water to allow installation of the Use and Care Guide.
5. See "Troubleshooting" section in the clamping...
Whirlpool WCE55US6HB Reviews
We have not received any reviews for Whirlpool yet.