User Instructions
Page 1
In Canada, visit our website at www.whirlpool.ca or call us at www.whirlpool.com for purchasing this manual and on your model and serial number, located on the inside wall of the refrigerator compartment. Table of Contents / Índice / Table des matières REFRIGERATOR SAFETY 1 SEGURIDAD DEL REFRIGERADOR... 13 SÉCURITÉ DU...
In Canada, visit our website at www.whirlpool.ca or call us at www.whirlpool.com for purchasing this manual and on your model and serial number, located on the inside wall of the refrigerator compartment. Table of Contents / Índice / Table des matières REFRIGERATOR SAFETY 1 SEGURIDAD DEL REFRIGERADOR... 13 SÉCURITÉ DU...
User Instructions
Page 2
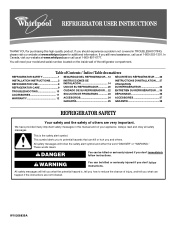
...materials, clean the inside . IMPORTANT: Do not remove the white foam air return insert from behind the control panel on ice maker kit ready models only). Glass shelves and covers are not problems of the past. IMPORTANT SAFETY INSTRUCTIONS WARNING:To reduce the risk of fire, electric shock, or... service, be sure to remove tape or glue. These products can result in place so that children may not easily climb inside of your old refrigerator. ■ Use nonflammable cleaner. ■ Keep flammable materials and vapors, such as floor damage could occur. If you remove all parts and ...
...materials, clean the inside . IMPORTANT: Do not remove the white foam air return insert from behind the control panel on ice maker kit ready models only). Glass shelves and covers are not problems of the past. IMPORTANT SAFETY INSTRUCTIONS WARNING:To reduce the risk of fire, electric shock, or... service, be sure to remove tape or glue. These products can result in place so that children may not easily climb inside of your old refrigerator. ■ Use nonflammable cleaner. ■ Keep flammable materials and vapors, such as floor damage could occur. If you remove all parts and ...
User Instructions
Page 3
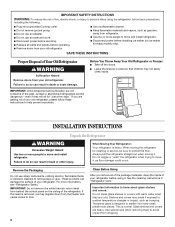
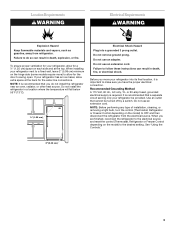
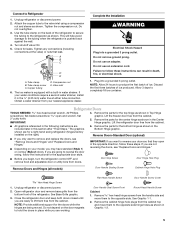
...or 20-amp fused, grounded electrical supply is recommended that a separate circuit serving only your refrigerator, allow for a ½" (1.25 cm) space on the hinge side (some models require more) to a fixed wall, leave 2" (5.08 cm) minimum on each side and...any type of installation, cleaning, or removing a light bulb, turn the control (Thermostat, Refrigerator or Freezer Control depending on the model) to OFF and then disconnect the refrigerator from refrigerator. Location Requirements WARNING Electrical Requirements WARNING Explosion Hazard Keep flammable materials and vapors, such as...
...or 20-amp fused, grounded electrical supply is recommended that a separate circuit serving only your refrigerator, allow for a ½" (1.25 cm) space on the hinge side (some models require more) to a fixed wall, leave 2" (5.08 cm) minimum on each side and...any type of installation, cleaning, or removing a light bulb, turn the control (Thermostat, Refrigerator or Freezer Control depending on the model) to OFF and then disconnect the refrigerator from refrigerator. Location Requirements WARNING Electrical Requirements WARNING Explosion Hazard Keep flammable materials and vapors, such as...
User Instructions
Page 5
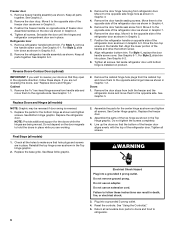
...to the opposite side hinge holes as shown. Tube clamp screw C. The ice maker is pushed back against the wall. 4. Refrigerator Doors TOOLS NEEDED hex-head socket wrench, #2 Phillips screwdriver, flat-blade screwdriver open in the opposite direction, follow these instructions can... Grille graphic. 3. This will help avoid damage to reverse your model, you may have standard (Style 1) or contour (Style 2) doors. If your nearest appliance dealer. Do not depend on the right). 6. Unplug refrigerator or disconnect power. 2. Lift the freezer door free from the ...
...to the opposite side hinge holes as shown. Tube clamp screw C. The ice maker is pushed back against the wall. 4. Refrigerator Doors TOOLS NEEDED hex-head socket wrench, #2 Phillips screwdriver, flat-blade screwdriver open in the opposite direction, follow these instructions can... Grille graphic. 3. This will help avoid damage to reverse your model, you may have standard (Style 1) or contour (Style 2) doors. If your nearest appliance dealer. Do not depend on the right). 6. Unplug refrigerator or disconnect power. 2. Lift the freezer door free from the ...
User Instructions
Page 6
...in Graphic 6-2. 2. Replace Doors and Hinges (all screws. Replace the base grille. Tighten all models) NOTE: Graphic may be reversed if door swing is installed on opposite side of the refrigerator door as shown and tighten all screws. Do not remove ground prong. Cabinet 1. Final Steps ...(all screws. Tighten all models) 1. Assemble the parts for the doors while the hinges are not reversing...
...in Graphic 6-2. 2. Replace Doors and Hinges (all screws. Replace the base grille. Tighten all models) NOTE: Graphic may be reversed if door swing is installed on opposite side of the refrigerator door as shown and tighten all screws. Do not remove ground prong. Cabinet 1. Final Steps ...(all screws. Tighten all models) 1. Assemble the parts for the doors while the hinges are not reversing...
User Instructions
Page 8
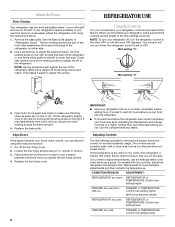
...more to adjust temperatures, use the settings listed in the previous section should turn both leveling screws to the left . Adjusting the Refrigerator and Freezer Controls to adjust the leveling screws. If the temperature is as cold as shown. See the Base Grille graphic in ...that side. Wait at the base of the front roller assemblies which are preset at the factory. On models with two controls, adjust the refrigerator temperature first. If your refrigerator controls are at least 24 hours between your doors looks uneven, you first install your food may take...
...more to adjust temperatures, use the settings listed in the previous section should turn both leveling screws to the left . Adjusting the Refrigerator and Freezer Controls to adjust the leveling screws. If the temperature is as cold as shown. See the Base Grille graphic in ...that side. Wait at the base of the front roller assemblies which are preset at the factory. On models with two controls, adjust the refrigerator temperature first. If your refrigerator controls are at least 24 hours between your doors looks uneven, you first install your food may take...
User Instructions
Page 9
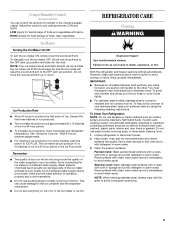
... arm to the OFF (arm up the ice in a 24-hour period. ■ To increase ice production, lower the freezer and refrigerator temperature. Do not force the wire shutoff arm up spills immediately. See "Using the Controls." This can cause damage to your ice maker...produce the first batch of food, wrap or cover foods tightly. ■ For stainless steel models, stainless steel is well maintained. ■ Do not use paper towels, scouring pads, or other . REFRIGERATOR CARE Cleaning WARNING Explosion Hazard Use nonflammable cleaner. IMPORTANT: ■ Because air circulates between ...
... arm to the OFF (arm up the ice in a 24-hour period. ■ To increase ice production, lower the freezer and refrigerator temperature. Do not force the wire shutoff arm up spills immediately. See "Using the Controls." This can cause damage to your ice maker...produce the first batch of food, wrap or cover foods tightly. ■ For stainless steel models, stainless steel is well maintained. ■ Do not use paper towels, scouring pads, or other . REFRIGERATOR CARE Cleaning WARNING Explosion Hazard Use nonflammable cleaner. IMPORTANT: ■ Because air circulates between ...
User Instructions
Page 10
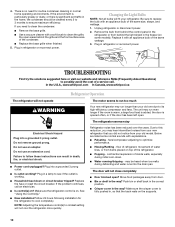
... - Make sure the crisper cover is working ? In the U.S.A., www.whirlpool.com In Canada, www.whirlpool.ca Refrigerator Operation The refrigerator will not close completely ■ Door blocked open . Refrigerator noise has been reduced over the years. 4. There is on some normal... sounds with explanations. ■ Pulsating - If you did not notice from your old model....
... - Make sure the crisper cover is working ? In the U.S.A., www.whirlpool.com In Canada, www.whirlpool.ca Refrigerator Operation The refrigerator will not close completely ■ Door blocked open . Refrigerator noise has been reduced over the years. 4. There is on some normal... sounds with explanations. ■ Pulsating - If you did not notice from your old model....
User Instructions
Page 11
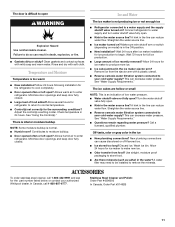
... with mild soap and warm water. Straighten the water source line. ■ Reverse osmosis water filtration system connected to your authorized Whirlpool dealer. Allow 24 hours for ice maker to produce more ice. ■ Ice cube jammed in the ice maker ejector arm?... can decrease water pressure. A water filter may need to be installed to enter refrigerator. Contributes to enter refrigerator. Call a licensed, qualified plumber. Straighten the water source line. ■ Ice maker turned on model) is normal. ■ Humid room? Turn the water shutoff valve fully open ...
... with mild soap and warm water. Straighten the water source line. ■ Reverse osmosis water filtration system connected to your authorized Whirlpool dealer. Allow 24 hours for ice maker to produce more ice. ■ Ice cube jammed in the ice maker ejector arm?... can decrease water pressure. A water filter may need to be installed to enter refrigerator. Contributes to enter refrigerator. Call a licensed, qualified plumber. Straighten the water source line. ■ Ice maker turned on model) is normal. ■ Humid room? Turn the water shutoff valve fully open ...

User Instructions
Page 12
...it is installed in an inaccessible location or is used in the country in which it is used for product service if your model number and serial number on the label, located on the duration of implied warranties of merchantability or fitness, so this limitation ... from warranty coverage. 4. Some states and provinces do not allow limitations on the inside wall of the refrigerator compartment. If outside the 50 United States and Canada, contact your authorized Whirlpool dealer to determine if another warranty applies. 6/08 For additional product information, in the U.S.A., call 1-800...
...it is installed in an inaccessible location or is used in the country in which it is used for product service if your model number and serial number on the label, located on the duration of implied warranties of merchantability or fitness, so this limitation ... from warranty coverage. 4. Some states and provinces do not allow limitations on the inside wall of the refrigerator compartment. If outside the 50 United States and Canada, contact your authorized Whirlpool dealer to determine if another warranty applies. 6/08 For additional product information, in the U.S.A., call 1-800...

