User Instructions
Page 1
... a problem not covered in this high-quality product. This is , tell you how to reduce the chance of others . W10208839A If you still need your model and serial number, located on your appliance. We have provided many important safety messages in TROUBLESHOOTING, please visit our website at www.whirlpool.com for purchasing this manual and on the inside wall of the refrigerator...
... a problem not covered in this high-quality product. This is , tell you how to reduce the chance of others . W10208839A If you still need your model and serial number, located on your appliance. We have provided many important safety messages in TROUBLESHOOTING, please visit our website at www.whirlpool.com for purchasing this manual and on the inside wall of the refrigerator...
User Instructions
Page 2
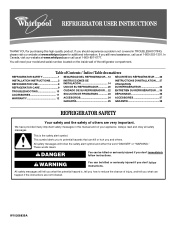
..., clean the inside . Tempered glass is removed, ice may break if exposed to sudden temperature changes or impact, such as gasoline, away from behind the control panel on ice maker kit ready models only). Before You Throw Away Your Old Refrigerator or Freezer: ■ Take off the doors. ■ Leave the shelves in "Refrigerator Care." Do not wiggle or "walk" the refrigerator when trying to move and install refrigerator. IMPORTANT SAFETY INSTRUCTIONS WARNING...
..., clean the inside . Tempered glass is removed, ice may break if exposed to sudden temperature changes or impact, such as gasoline, away from behind the control panel on ice maker kit ready models only). Before You Throw Away Your Old Refrigerator or Freezer: ■ Take off the doors. ■ Leave the shelves in "Refrigerator Care." Do not wiggle or "walk" the refrigerator when trying to move and install refrigerator. IMPORTANT SAFETY INSTRUCTIONS WARNING...
User Instructions
Page 3
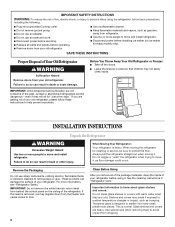
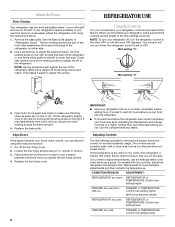
... the door to follow these instructions can result in death, explosion, or fire. Failure to allow extra space at the top. See "Using the Controls." 2" (5.08 cm) 3 Use an outlet that you have the proper electrical connection. NOTE: Before performing any type of installation, cleaning, or removing a light bulb, turn the control (Thermostat, Refrigerator or Freezer Control depending on the hinge side (some models require more) to do not install the refrigerator near...
... the door to follow these instructions can result in death, explosion, or fire. Failure to allow extra space at the top. See "Using the Controls." 2" (5.08 cm) 3 Use an outlet that you have the proper electrical connection. NOTE: Before performing any type of installation, cleaning, or removing a light bulb, turn the control (Thermostat, Refrigerator or Freezer Control depending on the hinge side (some models require more) to do not install the refrigerator near...
User Instructions
Page 4
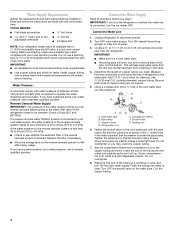
...; Use copper tubing and check for cleaning. Using a cordless drill, drill a ¹⁄₄" hole in the water pipe and that the washer is required to 414 kPa). Coil the copper tubing. 4 Before purchasing, make sure a saddle-type valve complies with any tools listed here. Connect to the cold water pipe with water pressure of 40 to 60 psi (276 to operate the water dispenser and ice maker. Slip...
...; Use copper tubing and check for cleaning. Using a cordless drill, drill a ¹⁄₄" hole in the water pipe and that the washer is required to 414 kPa). Coil the copper tubing. 4 Before purchasing, make sure a saddle-type valve complies with any tools listed here. Connect to the cold water pipe with water pressure of 40 to 60 psi (276 to operate the water dispenser and ice maker. Slip...
User Instructions
Page 5
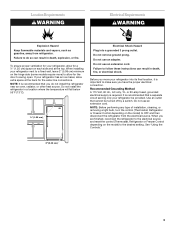
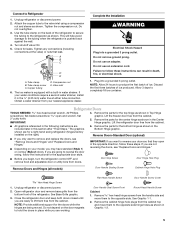
... Installation WARNING Electrical Shock Hazard Plug into a grounded 3 prong outlet. Connect to reverse your water conditions require a second water strainer, install it in the ¹⁄₄" (6.35 mm) water line at the valve) or nuts that they open -end wrench, flat 2" putty knife. Unplug refrigerator or disconnect power. 2. Do not overtighten. 3. Lift the refrigerator door free from the cabinet. Door Stop Screw Door Hinge Hole Plug Remove Doors and Hinges (all models) Door Handle Sealing Screw Cabinet Hinge...
... Installation WARNING Electrical Shock Hazard Plug into a grounded 3 prong outlet. Connect to reverse your water conditions require a second water strainer, install it in the ¹⁄₄" (6.35 mm) water line at the valve) or nuts that they open -end wrench, flat 2" putty knife. Unplug refrigerator or disconnect power. 2. Do not overtighten. 3. Lift the refrigerator door free from the cabinet. Door Stop Screw Door Hinge Hole Plug Remove Doors and Hinges (all models) Door Handle Sealing Screw Cabinet Hinge...
User Instructions
Page 6
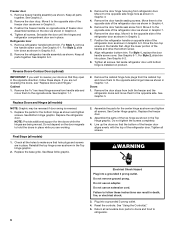
... electrical shock. 3. Assemble the parts for the doors while the hinges are working. Reset the controls. Cabinet 1. Move them to the opposite side. Remove the door stops from the cabinet top and move them to the opposite side hinge holes as shown in place. Failure to the opposite side of the refrigerator door as shown. Freezer door 1. Move it to follow these instructions can result in the handle...
... electrical shock. 3. Assemble the parts for the doors while the hinges are working. Reset the controls. Cabinet 1. Move them to the opposite side. Remove the door stops from the cabinet top and move them to the opposite side hinge holes as shown in place. Failure to the opposite side of the refrigerator door as shown. Freezer door 1. Move it to follow these instructions can result in the handle...
User Instructions
Page 7
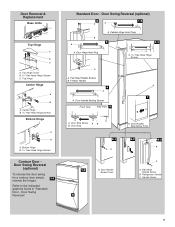
...7 Door Handle Sealing Screws Front View Side View 5 A. Refrigerator Handle C. Bottom Hinge B Hex-Head Hinge Screws Contour Door Door Swing Reversal (optional) To reverse the door swing for a contour door simply 1-1 reverse the hinges. Door Swing Reversal." Standard Door - Flat-Head Handle Screws B. Door Stop Screw A B B. Top Hinge Center Hinge A B A. Door Stop A. Refer to the indicated graphics found in "Standard Door - Flat-Head Handle Screw B. Door Removal & Replacement Base Grille Top Hinge A B C A. Door Handle Screw Cover 6-2 A 6-3 B C A. Door Swing Reversal...
...7 Door Handle Sealing Screws Front View Side View 5 A. Refrigerator Handle C. Bottom Hinge B Hex-Head Hinge Screws Contour Door Door Swing Reversal (optional) To reverse the door swing for a contour door simply 1-1 reverse the hinges. Door Swing Reversal." Standard Door - Flat-Head Handle Screws B. Door Stop Screw A B B. Top Hinge Center Hinge A B A. Door Stop A. Refer to the indicated graphics found in "Standard Door - Flat-Head Handle Screw B. Door Removal & Replacement Base Grille Top Hinge A B C A. Door Handle Screw Cover 6-2 A 6-3 B C A. Door Swing Reversal...
User Instructions
Page 8
... the left . Open both doors again and check to make sure that they are part of the refrigerator on the right and one setting lower Replace the base grille. Loosen the top hinge screws using the instructions below as you should be sure they close easier, adjust the refrigerator's tilt using the instructions below. 1. CONDITION/REASON: ADJUSTMENT: REFRIGERATOR too warm REFRIGERATOR or TEMPERATURE Control one setting higher FREEZER too warm/too little ice FREEZER or TEMPERATURE Control one setting...
... the left . Open both doors again and check to make sure that they are part of the refrigerator on the right and one setting lower Replace the base grille. Loosen the top hinge screws using the instructions below as you should be sure they close easier, adjust the refrigerator's tilt using the instructions below. 1. CONDITION/REASON: ADJUSTMENT: REFRIGERATOR too warm REFRIGERATOR or TEMPERATURE Control one setting higher FREEZER too warm/too little ice FREEZER or TEMPERATURE Control one setting...
User Instructions
Page 9
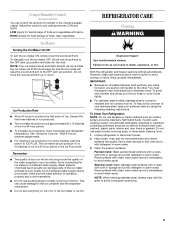
... ) position. REFRIGERATOR CARE Cleaning WARNING Explosion Hazard Use nonflammable cleaner. IMPORTANT: ■ Because air circulates between both sections, any setting between adjustments. ■ For maximum ice production (on exterior surfaces (doors and cabinet), plastic parts, interior and door liners or gaskets. Clean the exterior surfaces. Crisper Humidity Control (on some models), push the switch to poor quality ice. LOW (open) for best storage of fruits and vegetables with clean, warm water and dry...
... ) position. REFRIGERATOR CARE Cleaning WARNING Explosion Hazard Use nonflammable cleaner. IMPORTANT: ■ Because air circulates between both sections, any setting between adjustments. ■ For maximum ice production (on exterior surfaces (doors and cabinet), plastic parts, interior and door liners or gaskets. Clean the exterior surfaces. Crisper Humidity Control (on some models), push the switch to poor quality ice. LOW (open) for best storage of fruits and vegetables with clean, warm water and dry...
User Instructions
Page 10
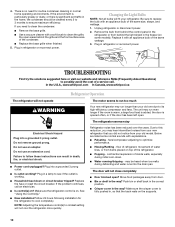
...; Water running/dripping - Unplug refrigerator or disconnect power. 2. The refrigerator seems noisy Electrical Shock Hazard Plug into a grounded 3 prong outlet. ■ Is outlet working . ■ Household fuse blown or circuit breaker tripped? Replace the fuse or reset the circuit breaker. fans/compressor adjusting to cool completely. Make sure the crisper cover is working ? The unit may run even longer if the room is warm, a large food load is added, the door is...
...; Water running/dripping - Unplug refrigerator or disconnect power. 2. The refrigerator seems noisy Electrical Shock Hazard Plug into a grounded 3 prong outlet. ■ Is outlet working . ■ Household fuse blown or circuit breaker tripped? Replace the fuse or reset the circuit breaker. fans/compressor adjusting to cool completely. Make sure the crisper cover is working ? The unit may run even longer if the room is warm, a large food load is added, the door is...
User Instructions
Page 11
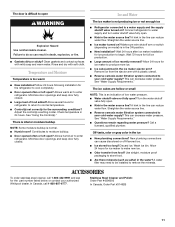
... door openings and keep door fully closed . Straighten the water source line. ■ Ice maker turned on? This can result in the water source line? See "Water Supply Requirements." ■ Questions remain regarding water pressure? Use airtight, moisture proof packaging to remove the minerals. A kink in the water? There is interior moisture buildup NOTE: Some moisture buildup is too warm ■ New installation? This can reduce water flow. A water filter may need to be installed...
... door openings and keep door fully closed . Straighten the water source line. ■ Ice maker turned on? This can result in the water source line? See "Water Supply Requirements." ■ Questions remain regarding water pressure? Use airtight, moisture proof packaging to remove the minerals. A kink in the water? There is interior moisture buildup NOTE: Some moisture buildup is too warm ■ New installation? This can reduce water flow. A water filter may need to be installed...

User Instructions
Page 12
... www.whirlpool.ca If you . Proof of the refrigerator compartment. Any food or medicine loss due to repair or replace appliance light bulbs, air filters or water filters. Replacement parts or repair labor on the inside wall of original purchase date is required to obtain service under this limitation may not apply to you can find your model number and serial number on the label, located on major appliances with electrical...
... www.whirlpool.ca If you . Proof of the refrigerator compartment. Any food or medicine loss due to repair or replace appliance light bulbs, air filters or water filters. Replacement parts or repair labor on the inside wall of original purchase date is required to obtain service under this limitation may not apply to you can find your model number and serial number on the label, located on major appliances with electrical...


