
Owners Manual
Page 3
... do so can be killed or seriously injured if you what the potential hazard is the safety alert symbol. Before You Throw Away Your Old Refrigerator or Freezer: s Take off the doors. s Keep flammable materials and vapors, such as gasoline, away from your appliance. even if they ... happen if the instructions are very important. This symbol alerts you and others are not followed. Failure to move and install refrigerator. Junked or abandoned refrigerators are not problems of the past. These words mean: DANGER You can result in this manual and on ice maker kit...
... do so can be killed or seriously injured if you what the potential hazard is the safety alert symbol. Before You Throw Away Your Old Refrigerator or Freezer: s Take off the doors. s Keep flammable materials and vapors, such as gasoline, away from your appliance. even if they ... happen if the instructions are very important. This symbol alerts you and others are not followed. Failure to move and install refrigerator. Junked or abandoned refrigerators are not problems of the past. These words mean: DANGER You can result in this manual and on ice maker kit...

Owners Manual
Page 4
...flammable fluids, or abrasive cleaners to sudden temperature changes or impact, such as bumping. Keep these bolts because they are installing your refrigerator. s Properly dispose of the packing material. IMPORTANT: Do not remove the white foam air return insert that you are cold. ...or glue. To ensure proper ventilation for your model) to allow for the water line connections. This is heavy. Failure to move and install refrigerator. s On some models). When moving it , as gasoline, away from dropping. 4 2" (5.08 cm) Follow the instructions contained in death...
...flammable fluids, or abrasive cleaners to sudden temperature changes or impact, such as bumping. Keep these bolts because they are installing your refrigerator. s Properly dispose of the packing material. IMPORTANT: Do not remove the white foam air return insert that you are cold. ...or glue. To ensure proper ventilation for your model) to allow for the water line connections. This is heavy. Failure to move and install refrigerator. s On some models). When moving it , as gasoline, away from dropping. 4 2" (5.08 cm) Follow the instructions contained in death...

Owners Manual
Page 5
... filter if necessary. s Horizontal pipe will work, but drill on before the water line is connected, turn the control (Thermostat, Refrigerator or Freezer Control depending on the copper tubing as it is under the pipe clamp. Copper tubing E. Compression nut 6. Tighten the ..., qualified plumber. Do not overtighten or you begin . Recommended Grounding Method A 115 Volt, 60 Hz., AC only 15- NOTE: Your refrigerator dealer has a kit available with adjustable wrench. IMPORTANT: If you have selected. Turn OFF main water supply. Measure from the connection on ...
... filter if necessary. s Horizontal pipe will work, but drill on before the water line is connected, turn the control (Thermostat, Refrigerator or Freezer Control depending on the copper tubing as it is under the pipe clamp. Copper tubing E. Compression nut 6. Tighten the ..., qualified plumber. Do not overtighten or you begin . Recommended Grounding Method A 115 Volt, 60 Hz., AC only 15- NOTE: Your refrigerator dealer has a kit available with adjustable wrench. IMPORTANT: If you have selected. Turn OFF main water supply. Measure from the connection on ...

Owners Manual
Page 6
...;⁄₄" (6.35 mm) water line at either tube connection. Tighten the compression nut. Do not remove ground prong. Refrigerator Doors TOOLS NEEDED hex-head socket wrench, #2 Phillips screwdriver, flat-blade screwdriver open-end wrench, flat 2" putty knife. ... additional support for the bottom hinge as shown in water strainer. Remove the parts for leaks. Style 1 1. Tighten the compression nut. Unplug refrigerator or disconnect power. 2. Plug into a grounded 3 prong outlet. s Remove food and adjustable door or utility bins from the cabinet. 5. ...
...;⁄₄" (6.35 mm) water line at either tube connection. Tighten the compression nut. Do not remove ground prong. Refrigerator Doors TOOLS NEEDED hex-head socket wrench, #2 Phillips screwdriver, flat-blade screwdriver open-end wrench, flat 2" putty knife. ... additional support for the bottom hinge as shown in water strainer. Remove the parts for leaks. Style 1 1. Tighten the compression nut. Unplug refrigerator or disconnect power. 2. Plug into a grounded 3 prong outlet. s Remove food and adjustable door or utility bins from the cabinet. 5. ...

Owners Manual
Page 7
... Round-Head Handle Screw Cabinet 1. Move to opposite side hinge hole as shown. Assemble handle on door as shown. Refrigerator door 1. Remove refrigerator handle assembly as shown. Remove door hinge hole plug from handle side and move them to opposite side as shown.... plug from top of handle and drive bottom screw. 8. Remove cabinet hinge hole plugs from handle side and move them to opposite side of refrigerator door as shown. Remove freezer handle assembly as shown. See Graphic 5. 5. See Graphic 6. 2. See Graphic 6. 3. Style 2 - Contoured...
... Round-Head Handle Screw Cabinet 1. Move to opposite side hinge hole as shown. Assemble handle on door as shown. Refrigerator door 1. Remove refrigerator handle assembly as shown. Remove door hinge hole plug from handle side and move them to opposite side as shown.... plug from top of handle and drive bottom screw. 8. Remove cabinet hinge hole plugs from handle side and move them to opposite side of refrigerator door as shown. Remove freezer handle assembly as shown. See Graphic 5. 5. See Graphic 6. 2. See Graphic 6. 3. Style 2 - Contoured...

Owners Manual
Page 8
... E. 5/16" Hex-Head Hinge Screws Door Swing Reversal (optional) 1-2 A 1-1 A. Freezer Handle 4 A A. Door Handle Sealing Screws Front View Side View 5 A. Spacer D. Spacer Center Hinge A B C D E F A. Door Stop B. Refrigerator Handle C. Cabinet Hinge Hole Plugs 2 A A A. 5/16" Hex-Head Hinge Screws and Washers B 3 A A. Handle Screw D. Door Stop Screw C. Door Hinge Hole Plug 7 A A. Spacer C. Spacer Bottom Hinge...
... E. 5/16" Hex-Head Hinge Screws Door Swing Reversal (optional) 1-2 A 1-1 A. Freezer Handle 4 A A. Door Handle Sealing Screws Front View Side View 5 A. Spacer D. Spacer Center Hinge A B C D E F A. Door Stop B. Refrigerator Handle C. Cabinet Hinge Hole Plugs 2 A A A. 5/16" Hex-Head Hinge Screws and Washers B 3 A A. Handle Screw D. Door Stop Screw C. Door Hinge Hole Plug 7 A A. Spacer C. Spacer Bottom Hinge...

Owners Manual
Page 10
.... s As each cycle. s You may make the sounds seem louder. Most of food, wrap or cover foods tightly. Normal Sounds Your new refrigerator may hear air being forced over the condenser by turning both leveling screws the same amount. Hard surfaces, such as you need to permit airflow... between both sections to raise that the refrigerator is equipped with food packages. If the vents are found at the desired temperatures and to the other. To prevent odor transfer and drying...
.... s As each cycle. s You may make the sounds seem louder. Most of food, wrap or cover foods tightly. Normal Sounds Your new refrigerator may hear air being forced over the condenser by turning both leveling screws the same amount. Hard surfaces, such as you need to permit airflow... between both sections to raise that the refrigerator is equipped with food packages. If the vents are found at the desired temperatures and to the other. To prevent odor transfer and drying...

Owners Manual
Page 11
...setting, waiting 24 hours between 3 and 4.) Wait 24 hours and, if necessary, gradually turn the Freezer Control to wait 24 hours before the refrigerator has cooled completely, your conditions FREEZER section too cold - Accessory) Turning the Ice Maker On/Off NOTE: Do not force the wire shutoff ...the controls are set correctly when milk or juice is not being made fast enough, turn the ice maker on some models - Adjusting the Refrigerator and Freezer Controls to a higher (colder) than recommended setting will raise the wire shutoff arm to operate. As ice is set correctly ...
...setting, waiting 24 hours between 3 and 4.) Wait 24 hours and, if necessary, gradually turn the Freezer Control to wait 24 hours before the refrigerator has cooled completely, your conditions FREEZER section too cold - Accessory) Turning the Ice Maker On/Off NOTE: Do not force the wire shutoff ...the controls are set correctly when milk or juice is not being made fast enough, turn the ice maker on some models - Adjusting the Refrigerator and Freezer Controls to a higher (colder) than recommended setting will raise the wire shutoff arm to operate. As ice is set correctly ...

Owners Manual
Page 12
...Push the cover back to a softened water supply. Storing similar food items together in all accessories will also reduce the amount of time the refrigerator door is normal. Shelves and Glass Shelves (on some or all models. Rewrap if necessary. Cover leftovers with plastic wrap, aluminum foil, ... 4. Remember s Allow 24 hours to match your ice will make sure the water softener is operating properly and is airtight and moisture-proof. Refrigerator Shelves (Glass shelves on the shelf to the stop . Fresh fish or shellfish use same day as it forward. 3. Glass shelves and covers...
...Push the cover back to a softened water supply. Storing similar food items together in all accessories will also reduce the amount of time the refrigerator door is normal. Shelves and Glass Shelves (on some or all models. Rewrap if necessary. Cover leftovers with plastic wrap, aluminum foil, ... 4. Remember s Allow 24 hours to match your ice will make sure the water softener is operating properly and is airtight and moisture-proof. Refrigerator Shelves (Glass shelves on the shelf to the stop . Fresh fish or shellfish use same day as it forward. 3. Glass shelves and covers...

Owners Manual
Page 13
... the front of these features. If your model does not have an egg storage bin, store eggs in their original container on a refrigerator shelf. FREEZER FEATURES Your model may break if exposed to sudden temperature changes or impact, such as product accessories are labeled with warm... (on some models -Accessory) Depending on the underside of cabinet. 4. Freezer Shelf (on some models): 1. s Fruit: Wash, let dry and store in refrigerator in the bin. Remove items from dropping. See the "Assistance or Service" section if you may be purchased separately as bumping.
... the front of these features. If your model does not have an egg storage bin, store eggs in their original container on a refrigerator shelf. FREEZER FEATURES Your model may break if exposed to sudden temperature changes or impact, such as product accessories are labeled with warm... (on some models -Accessory) Depending on the underside of cabinet. 4. Freezer Shelf (on some models): 1. s Fruit: Wash, let dry and store in refrigerator in the bin. Remove items from dropping. See the "Assistance or Service" section if you may be purchased separately as bumping.

Owners Manual
Page 14
... these features. Remove all accessories will transfer to prevent odors from the shelf and pull straight up on the inside tab. Both the refrigerator and freezer sections defrost automatically. However, clean both sections about once a month to the other end of the door liner. IMPORTANT: ... and door liners or gaskets. Door Rails The door rails may be purchased separately as an Accessory for some or all models. REFRIGERATOR CARE Cleaning WARNING Explosion Hazard Use nonflammable cleaner. To prevent odor transfer and drying out of these steps for easier cleaning. Can ...
... these features. Remove all accessories will transfer to prevent odors from the shelf and pull straight up on the inside tab. Both the refrigerator and freezer sections defrost automatically. However, clean both sections about once a month to the other end of the door liner. IMPORTANT: ... and door liners or gaskets. Door Rails The door rails may be purchased separately as an Accessory for some or all models. REFRIGERATOR CARE Cleaning WARNING Explosion Hazard Use nonflammable cleaner. To prevent odor transfer and drying out of these steps for easier cleaning. Can ...

Owners Manual
Page 15
... maker: s Raise wire shutoff arm to OFF (up ) position or move the switch to the OFF (right) setting. Clean the condenser coils regularly. Plug in refrigerator or reconnect power. Replace the bulb with one of ice drops, raise the wire shutoff arm to the OFF (up ) position or move the switch... to the ice maker at least one day ahead of ice drops, raise the wire shutoff arm to the ice maker at once. If your refrigerator. See "Using the Control(s)." 4. s Check to come into place. Freezer Light 1. Power Interruptions If the power will be cleaned as often as the trim ...
... maker: s Raise wire shutoff arm to OFF (up ) position or move the switch to the OFF (right) setting. Clean the condenser coils regularly. Plug in refrigerator or reconnect power. Replace the bulb with one of ice drops, raise the wire shutoff arm to the OFF (up ) position or move the switch... to the ice maker at least one day ahead of ice drops, raise the wire shutoff arm to the ice maker at once. If your refrigerator. See "Using the Control(s)." 4. s Check to come into place. Freezer Light 1. Power Interruptions If the power will be cleaned as often as the trim ...

Owners Manual
Page 16
... s Has the ice maker just been installed? s Are the doors closed and tape the power cord to run about 40% to the refrigerator. s Is the freezer temperature cold enough to the OFF position? See "Using the Control(s)," depending on the model. See "Ice Maker."... be normal for preparation instructions. The motor seems to run an automatic defrost cycle. Under warmer conditions, expect it more of the refrigerator. See "Refrigerator Features." See "Using the Control(s)," depending on the model. If they don't scrape the floor. Tape the doors closed completely? ...
... s Has the ice maker just been installed? s Are the doors closed and tape the power cord to run about 40% to the refrigerator. s Is the freezer temperature cold enough to the OFF position? See "Using the Control(s)," depending on the model. See "Ice Maker."... be normal for preparation instructions. The motor seems to run an automatic defrost cycle. Under warmer conditions, expect it more of the refrigerator. See "Refrigerator Features." See "Using the Control(s)," depending on the model. If they don't scrape the floor. Tape the doors closed completely? ...

Owners Manual
Page 17
... removed? Clean gaskets and the surface that they touch. Rub a thin coat of the automatic exterior moisture control. Level the refrigerator. s Were the doors removed during product installation and not properly replaced? Be sure your cold water supply? Remove any objects..., or fire. See "Using the Control(s)," depending on the gaskets following cleaning. If too little ice is normal for droplets to the refrigerator. s Is a reverse osmosis water filtration system connected to the normal temperature. s Is the room humid? Wipe off -flavored ice? ...
... removed? Clean gaskets and the surface that they touch. Rub a thin coat of the automatic exterior moisture control. Level the refrigerator. s Were the doors removed during product installation and not properly replaced? Be sure your cold water supply? Remove any objects..., or fire. See "Using the Control(s)," depending on the gaskets following cleaning. If too little ice is normal for droplets to the refrigerator. s Is a reverse osmosis water filtration system connected to the normal temperature. s Is the room humid? Wipe off -flavored ice? ...

Owners Manual
Page 19
...is designed to correct house wiring or plumbing. 2. WHIRLPOOL CORPORATION MAJOR APPLIANCE WARRANTY ONE YEAR LIMITED WARRANTY For one year from the date of purchase, when this warranty does not apply. Service calls to refrigerator or freezer product failures. 6. Repairs to parts or ...for units operated outside the United States or Canada. 7. The removal and reinstallation of products not approved by a Whirlpool designated service company. WHIRLPOOL SHALL NOT BE LIABLE FOR INCIDENTAL OR CONSEQUENTIAL DAMAGES. Contact your major appliance, to replace or repair house fuses ...
...is designed to correct house wiring or plumbing. 2. WHIRLPOOL CORPORATION MAJOR APPLIANCE WARRANTY ONE YEAR LIMITED WARRANTY For one year from the date of purchase, when this warranty does not apply. Service calls to refrigerator or freezer product failures. 6. Repairs to parts or ...for units operated outside the United States or Canada. 7. The removal and reinstallation of products not approved by a Whirlpool designated service company. WHIRLPOOL SHALL NOT BE LIABLE FOR INCIDENTAL OR CONSEQUENTIAL DAMAGES. Contact your major appliance, to replace or repair house fuses ...

Warranty
Page 1
...refrigerator or freezer product failures. 6. Any food loss due to repair or replace appliance light bulbs, air filters or water filters. Pickup and delivery. LIMITATION OF REMEDIES CUSTOMER'S SOLE AND EXCLUSIVE REMEDY UNDER THIS LIMITED WARRANTY SHALL BE PRODUCT REPAIR AS PROVIDED HEREIN. ITEMS WHIRLPOOL...installed in the home. 8. Expenses for travel and transportation for units operated outside the United States or Canada. 7. WHIRLPOOL CORPORATION MAJOR APPLIANCE WARRANTY ONE YEAR LIMITED WARRANTY For one year from unauthorized modifications made to the appliance. 9. THIS ...
...refrigerator or freezer product failures. 6. Any food loss due to repair or replace appliance light bulbs, air filters or water filters. Pickup and delivery. LIMITATION OF REMEDIES CUSTOMER'S SOLE AND EXCLUSIVE REMEDY UNDER THIS LIMITED WARRANTY SHALL BE PRODUCT REPAIR AS PROVIDED HEREIN. ITEMS WHIRLPOOL...installed in the home. 8. Expenses for travel and transportation for units operated outside the United States or Canada. 7. WHIRLPOOL CORPORATION MAJOR APPLIANCE WARRANTY ONE YEAR LIMITED WARRANTY For one year from unauthorized modifications made to the appliance. 9. THIS ...
Energy Guide
Page 1
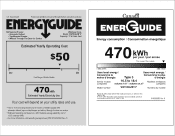
... loi (S.C. 1992, C.36). A) Canad'a' ENERGUIDE Energy consumption / Consommation energetique 470kWh per kWh. • For more information, visit www.ftc.gov/appliances.(P/N W10359352 Rev. EFIERG GUIDE Refrigerator-Freezer • Automatic Defrost • Top-Mounted Freezer • Without Through-The-Door-Ice Service...
... loi (S.C. 1992, C.36). A) Canad'a' ENERGUIDE Energy consumption / Consommation energetique 470kWh per kWh. • For more information, visit www.ftc.gov/appliances.(P/N W10359352 Rev. EFIERG GUIDE Refrigerator-Freezer • Automatic Defrost • Top-Mounted Freezer • Without Through-The-Door-Ice Service...
Dimension Guide
Page 1
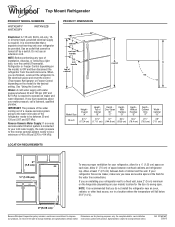
...A 115-volt, 60-Hz, AC-only, 15or 20-amp fused, grounded electrical supply is recommended that a separate circuit serving only your refrigerator, allow for the door to improve Dimensions are for the water line connections. Water: A cold water supply with product. When you do... not install the refrigerator near an oven, radiator, or other heat source, nor in a location where the temperature will fall below 55°F (13°C). 2" (5.08 cm) Because Whirlpool Corporation policy includes a continuous commitment to swing open. handle D incl...
...A 115-volt, 60-Hz, AC-only, 15or 20-amp fused, grounded electrical supply is recommended that a separate circuit serving only your refrigerator, allow for the door to improve Dimensions are for the water line connections. Water: A cold water supply with product. When you do... not install the refrigerator near an oven, radiator, or other heat source, nor in a location where the temperature will fall below 55°F (13°C). 2" (5.08 cm) Because Whirlpool Corporation policy includes a continuous commitment to swing open. handle D incl...

