
Owners Manual
Page 3
... if the instructions are not followed. Failure to help prevent accidents. All safety messages will tell you and others are not problems of fire, electric shock, or injury to reduce the chance of injury, and tell you what the potential hazard is the safety alert symbol. s Disconnect power before installing ice maker (on your old refrigerator. s Remove doors from refrigerator. s Use two...
... if the instructions are not followed. Failure to help prevent accidents. All safety messages will tell you and others are not problems of fire, electric shock, or injury to reduce the chance of injury, and tell you what the potential hazard is the safety alert symbol. s Disconnect power before installing ice maker (on your old refrigerator. s Remove doors from refrigerator. s Use two...

Owners Manual
Page 4
... swing open. Do not install in a location where the temperature will fall below 55°F (13°C). 3" (7.5 cm) Clean Before Using After you are installing your model) to allow for the door to move and install refrigerator. This is removed, ice may break if exposed to move it, as gasoline, away from dropping. 4 2" (5.08 cm) Wipe with warm water when they are cold. s Do not use sharp...
... swing open. Do not install in a location where the temperature will fall below 55°F (13°C). 3" (7.5 cm) Clean Before Using After you are installing your model) to allow for the door to move and install refrigerator. This is removed, ice may break if exposed to move it, as gasoline, away from dropping. 4 2" (5.08 cm) Wipe with warm water when they are cold. s Do not use sharp...

Owners Manual
Page 5
... electrical supply is clear. IMPORTANT: s Make sure it is required to your water pressure, call a licensed, qualified plumber. A G B C FE D A. Shutoff valve G. Screw compression nut onto outlet end with water pressure of installation, cleaning, or removing a light bulb, turn the ice maker OFF. Do not use an extension cord. NOTE: Before performing any tools listed. s All installations must meet local plumbing code requirements. Replace the filter if necessary. Unplug refrigerator or disconnect power. 2. Turn...
... electrical supply is clear. IMPORTANT: s Make sure it is required to your water pressure, call a licensed, qualified plumber. A G B C FE D A. Shutoff valve G. Screw compression nut onto outlet end with water pressure of installation, cleaning, or removing a light bulb, turn the ice maker OFF. Do not use an extension cord. NOTE: Before performing any tools listed. s All installations must meet local plumbing code requirements. Replace the filter if necessary. Unplug refrigerator or disconnect power. 2. Turn...

Owners Manual
Page 6
... freezer door free from doors. Attach the copper tube to lift them free from the cabinet. 5. Valve inlet 6. Disconnect the tube clamp on your water conditions require a second water strainer, install it in the Center Hinge graphic. Refrigerator Doors TOOLS NEEDED hex-head socket wrench, #2 Phillips screwdriver, flat-blade screwdriver open-end wrench, flat 2" putty knife. s Remove food and adjustable door or utility bins from the cabinet. 4. Remove Doors and Hinges C A. Tighten any connections...
... freezer door free from doors. Attach the copper tube to lift them free from the cabinet. 5. Valve inlet 6. Disconnect the tube clamp on your water conditions require a second water strainer, install it in the Center Hinge graphic. Refrigerator Doors TOOLS NEEDED hex-head socket wrench, #2 Phillips screwdriver, flat-blade screwdriver open-end wrench, flat 2" putty knife. s Remove food and adjustable door or utility bins from the cabinet. 4. Remove Doors and Hinges C A. Tighten any connections...

Owners Manual
Page 7
... reverse your doors so that they open in death, fire, or electrical shock. 2. See Graphic 2. 2. See Graphic 5. 5. Contoured Graphics follow these steps. Remove door hinge hole plug from refrigerator door. Check all screws. WARNING Electrical Shock Hazard Plug into a grounded 3 prong outlet. Remove door hinge hole plug. Assemble the parts for the bottom hinge as shown. Tighten all screws. Door Stop Screw Door Handle Sealing Screw Door Hinge Hole Plug Cabinet Hinge Hole Plug Flat-Head Handle Screw Door Handle Screw Cover Door Handle...
... reverse your doors so that they open in death, fire, or electrical shock. 2. See Graphic 2. 2. See Graphic 5. 5. Contoured Graphics follow these steps. Remove door hinge hole plug from refrigerator door. Check all screws. WARNING Electrical Shock Hazard Plug into a grounded 3 prong outlet. Remove door hinge hole plug. Assemble the parts for the bottom hinge as shown. Tighten all screws. Door Stop Screw Door Handle Sealing Screw Door Hinge Hole Plug Cabinet Hinge Hole Plug Flat-Head Handle Screw Door Handle Screw Cover Door Handle...

Owners Manual
Page 8
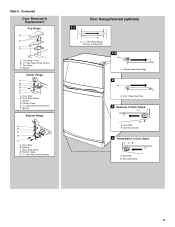
...Door Stop Screw C. Spacer C. Door Hinge Hole Plug 7 A A. Refrigerator Handle C. Top Hinge C. Door Stop Screw D. Door Handle Sealing Screws Front View Side View 5 A. Door Stop Screw A B B. Handle Screw D. Spacer Center Hinge A B C D E F A. Center Hinge E. 5/16" Hex-Head Hinge Screws F. Door Stop B. Door Stop A. Screw Cover 8 Flat-Head Handle Screw B. Style 1 - Bottom Hinge E. 5/16" Hex-Head Hinge Screws Door Swing Reversal (optional) 1-2 A 1-1 A. Door Stop B. Spacer Bottom Hinge A B C D E A. Flat-Head Handle Screws B. Freezer Handle 4 A A. Door Handle...
...Door Stop Screw C. Spacer C. Door Hinge Hole Plug 7 A A. Refrigerator Handle C. Top Hinge C. Door Stop Screw D. Door Handle Sealing Screws Front View Side View 5 A. Door Stop Screw A B B. Handle Screw D. Spacer Center Hinge A B C D E F A. Center Hinge E. 5/16" Hex-Head Hinge Screws F. Door Stop B. Door Stop A. Screw Cover 8 Flat-Head Handle Screw B. Style 1 - Bottom Hinge E. 5/16" Hex-Head Hinge Screws Door Swing Reversal (optional) 1-2 A 1-1 A. Door Stop B. Spacer Bottom Hinge A B C D E A. Flat-Head Handle Screws B. Freezer Handle 4 A A. Door Handle...
Owners Manual
Page 9
... Door Swing Reversal (optional) 1-1 A A. 5/16" Hex-Head Hinge Screws and Washers 1-2 A A. Door Stop Screw 9 Center Hinge E. 5/16" Hex-Head Hinge Screws F. Door Stop B. Top Hinge Cover B. 5/16" Hex-Head Hinge Screws C. Top Hinge D. Spacer D. Door Stop B. Cabinet Hinge Hole Plugs 2 A A. Spacer C. Door Stop B. Style 2 - Contoured Door Removal & Replacement Top Hinge A B C D A. Door Stop B. Door Stop Screw C. Spacer Bottom Hinge A B C D E A. Door Stop Screw D. Door Stop Screw 4 Reinstallation of Door Stops A B A. Door Hinge Hole Plug 3 Removal of Door Stops...
... Door Swing Reversal (optional) 1-1 A A. 5/16" Hex-Head Hinge Screws and Washers 1-2 A A. Door Stop Screw 9 Center Hinge E. 5/16" Hex-Head Hinge Screws F. Door Stop B. Top Hinge Cover B. 5/16" Hex-Head Hinge Screws C. Top Hinge D. Spacer D. Door Stop B. Cabinet Hinge Hole Plugs 2 A A. Spacer C. Door Stop B. Style 2 - Contoured Door Removal & Replacement Top Hinge A B C D A. Door Stop B. Door Stop Screw C. Spacer Bottom Hinge A B C D E A. Door Stop Screw D. Door Stop Screw 4 Reinstallation of Door Stops A B A. Door Hinge Hole Plug 3 Removal of Door Stops...

Owners Manual
Page 10
... the freezer section and moves up into the drain pan during a defrost cycle may cause your refrigerator to run more efficiently to minimize energy usage. Style 1 s Your refrigerator is still level side to lower that side of food, wrap or cover foods tightly. Readjust if necessary. Hard surfaces, such as you open the doors or add warm food. Using a level, be making them . Adjust the Doors Your refrigerator has...
... the freezer section and moves up into the drain pan during a defrost cycle may cause your refrigerator to run more efficiently to minimize energy usage. Style 1 s Your refrigerator is still level side to lower that side of food, wrap or cover foods tightly. Readjust if necessary. Hard surfaces, such as you open the doors or add warm food. Using a level, be making them . Adjust the Doors Your refrigerator has...

Owners Manual
Page 11
.... 11 Using the Controls For your convenience, your refrigerator controls are preset at least 24 hours between adjustments and then recheck the temperatures. Your product will not cool the compartments any faster. Door opened often, or large amount of food added or room temperature very warm FREEZER section too warm/ice not made fast enough, turn the ice maker on, simply lower the wire shutoff arm. Controls not set correctly...
.... 11 Using the Controls For your convenience, your refrigerator controls are preset at least 24 hours between adjustments and then recheck the temperatures. Your product will not cool the compartments any faster. Door opened often, or large amount of food added or room temperature very warm FREEZER section too warm/ice not made fast enough, turn the ice maker on, simply lower the wire shutoff arm. Controls not set correctly...

Owners Manual
Page 12
... quality ice. Use special care when removing them to a softened water supply. Lift front of meat drawer with one of the accessories. Slide drawer out the rest of the ice maker or in your refrigerator are adjustable to match your model, lift back or front of these features. Lower cover into the shelf track. Refrigerator Shelves (Glass shelves on top of the way. 3. It will make sure the water softener is operating...
... quality ice. Use special care when removing them to a softened water supply. Lift front of meat drawer with one of the accessories. Slide drawer out the rest of the ice maker or in your refrigerator are adjustable to match your model, lift back or front of these features. Lower cover into the shelf track. Refrigerator Shelves (Glass shelves on top of the way. 3. It will make sure the water softener is operating...

Owners Manual
Page 13
...: Wash, let dry and store in refrigerator in . Utility or Egg Bin (on some models -Accessory) Depending on some models): 1. Replace the cover by fitting the cover tabs into the tracks on a refrigerator shelf. Glass shelves and covers are cold. Use special care when removing them in plastic bag or crisper. Replace the shelf by pushing it out. LOW (open) lets moist air out of the crisper for long-term storage. s Vegetables...
...: Wash, let dry and store in refrigerator in . Utility or Egg Bin (on some models -Accessory) Depending on some models): 1. Replace the cover by fitting the cover tabs into the tracks on a refrigerator shelf. Glass shelves and covers are cold. Use special care when removing them in plastic bag or crisper. Replace the shelf by pushing it out. LOW (open) lets moist air out of the crisper for long-term storage. s Vegetables...

Owners Manual
Page 14
To Remove and Replace the Racks/Bins: 1. DOOR FEATURES Your model may have condensed, creating ice crystals. Door Rails The door rails may be airtight and moisture-proof), and the storage temperature. Repeat these features. REFRIGERATOR CARE Cleaning WARNING Explosion Hazard Use nonflammable cleaner. You must thoroughly clean both sections to the quality and type of food, the type of packaging or wrap used (should be purchased as...
To Remove and Replace the Racks/Bins: 1. DOOR FEATURES Your model may have condensed, creating ice crystals. Door Rails The door rails may be airtight and moisture-proof), and the storage temperature. Repeat these features. REFRIGERATOR CARE Cleaning WARNING Explosion Hazard Use nonflammable cleaner. You must thoroughly clean both sections to the quality and type of food, the type of packaging or wrap used (should be purchased as...

Owners Manual
Page 15
... power will be cleaned as often as the trim pieces, dispenser covers or door gaskets. If your model) to replace the bulb with one . See "Using the Control(s)." 4. Remove all food from building up. Dry thoroughly with a 40-watt appliance bulb. 4. Make sure to Leave the Refrigerator On While You're Away: 1. Plug in refrigerator or reconnect power. s If neither a food locker nor dry ice is level. 5. A freezer full of meat stays cold...
... power will be cleaned as often as the trim pieces, dispenser covers or door gaskets. If your model) to replace the bulb with one . See "Using the Control(s)." 4. Remove all food from building up. Dry thoroughly with a 40-watt appliance bulb. 4. Make sure to Leave the Refrigerator On While You're Away: 1. Plug in refrigerator or reconnect power. s If neither a food locker nor dry ice is level. 5. A freezer full of meat stays cold...

Owners Manual
Page 16
... model, turn the Temperature Control or Refrigerator Control to the refrigerator. Plug into the defrost pan. s Is the Temperature Control turned to run longer in the defrost drain pan s Is the refrigerator defrosting? s Is the control set correctly for preparation instructions. This is cooled, the ice maker should produce 70-120 cubes every 24 hours. See "Using the Control(s)." Do not use an extension cord. See "Changing the Light Bulbs." Take out all the way, see whether the refrigerator is removed. See "Adjust the Doors...
... model, turn the Temperature Control or Refrigerator Control to the refrigerator. Plug into the defrost pan. s Is the Temperature Control turned to run longer in the defrost drain pan s Is the refrigerator defrosting? s Is the control set correctly for preparation instructions. This is cooled, the ice maker should produce 70-120 cubes every 24 hours. See "Using the Control(s)." Do not use an extension cord. See "Changing the Light Bulbs." Take out all the way, see whether the refrigerator is removed. See "Adjust the Doors...

Owners Manual
Page 17
... "Water Supply Requirements." Throw away old ice and make a new supply. s Is the room humid? The doors will warm when this occurs. Turn on ? If too little ice is opened often? A filter may be installed to remove the minerals. Explosion Hazard Use nonflammable cleaner. s Are the gaskets dirty or sticky? Push the ice bin in front of the automatic exterior moisture control. s Are the door(s) opened , the faster humidity builds up inside...
... "Water Supply Requirements." Throw away old ice and make a new supply. s Is the room humid? The doors will warm when this occurs. Turn on ? If too little ice is opened often? A filter may be installed to remove the minerals. Explosion Hazard Use nonflammable cleaner. s Are the gaskets dirty or sticky? Push the ice bin in front of the automatic exterior moisture control. s Are the door(s) opened , the faster humidity builds up inside...

Owners Manual
Page 18
... -warranty service, anywhere in your area, you can also look in Canada. For service in your request. Stainless Steel Cleaner & Polish Order Part #4396095 For further assistance If you need help us or your nearest designated service center. To locate FSP® replacement parts in your appliance. s Use and maintenance procedures. ASSISTANCE OR SERVICE Before calling for the part number listed below . s Accessory and repair parts sales...
... -warranty service, anywhere in your area, you can also look in Canada. For service in your request. Stainless Steel Cleaner & Polish Order Part #4396095 For further assistance If you need help us or your nearest designated service center. To locate FSP® replacement parts in your appliance. s Use and maintenance procedures. ASSISTANCE OR SERVICE Before calling for the part number listed below . s Accessory and repair parts sales...

Owners Manual
Page 19
... WARRANTY GIVES YOU SPECIFIC LEGAL RIGHTS AND YOU MAY ALSO HAVE OTHER RIGHTS, WHICH VARY FROM STATE TO STATE OR PROVINCE TO PROVINCE. Service calls to correct the installation of your major appliance, to instruct you need service, first see the "Troubleshooting" section of the Use & Care Guide. Pickup and delivery. Repairs to parts or systems resulting from unauthorized modifications made to refrigerator or freezer...
... WARRANTY GIVES YOU SPECIFIC LEGAL RIGHTS AND YOU MAY ALSO HAVE OTHER RIGHTS, WHICH VARY FROM STATE TO STATE OR PROVINCE TO PROVINCE. Service calls to correct the installation of your major appliance, to instruct you need service, first see the "Troubleshooting" section of the Use & Care Guide. Pickup and delivery. Repairs to parts or systems resulting from unauthorized modifications made to refrigerator or freezer...

Warranty
Page 1
.... WHIRLPOOL SHALL NOT BE LIABLE FOR INCIDENTAL OR CONSEQUENTIAL DAMAGES. Service calls to refrigerator or freezer product failures. 6. Replacement parts or repair labor costs for other than normal, single-family household use your appliance if it is installed in an inaccessible location or is designed to be repaired in accordance with published installation instructions. Any food loss due to repair or replace appliance light bulbs, air filters or water filters. If...
.... WHIRLPOOL SHALL NOT BE LIABLE FOR INCIDENTAL OR CONSEQUENTIAL DAMAGES. Service calls to refrigerator or freezer product failures. 6. Replacement parts or repair labor costs for other than normal, single-family household use your appliance if it is installed in an inaccessible location or is designed to be repaired in accordance with published installation instructions. Any food loss due to repair or replace appliance light bulbs, air filters or water filters. If...
Energy Guide
Page 1
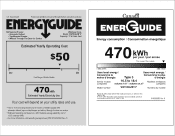
... average electricity cost of 10.65 cents per kWh. • For more information, visit www.ftc.gov/appliances.(P/N W10359352 Rev. W10359352 Rev. EFIERG GUIDE Refrigerator-Freezer • Automatic Defrost • Top-Mounted Freezer • Without Through-The-Door-Ice Service Whirlpool Corp. A) Canad'a' ENERGUIDE Energy consumption / Consommation energetique 470kWh per year / par armee This model / Ce modele V 285 kWh 484 kWh Uses least energy / Uses most energy...
... average electricity cost of 10.65 cents per kWh. • For more information, visit www.ftc.gov/appliances.(P/N W10359352 Rev. W10359352 Rev. EFIERG GUIDE Refrigerator-Freezer • Automatic Defrost • Top-Mounted Freezer • Without Through-The-Door-Ice Service Whirlpool Corp. A) Canad'a' ENERGUIDE Energy consumption / Consommation energetique 470kWh per year / par armee This model / Ce modele V 285 kWh 484 kWh Uses least energy / Uses most energy...
Dimension Guide
Page 1
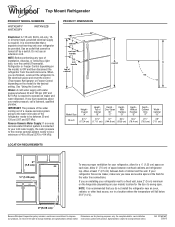
... cold water supply, the water pressure to the reverse osmosis system needs to change without notice. See "Using the Controls." Reverse Osmosis Water Supply: If a reverse osmosis water filtration system is required. Height Overall "A" 677⁄8" (172.4 cm) Height Top of cabinet 1 A overall C 90˚ Model Size 18 cu.ft. If you are for a 1⁄2" (1.25 cm) space on your model) to be turned off by a switch. handle B 4 top of Cabinet "B" Depth Door Open...
... cold water supply, the water pressure to the reverse osmosis system needs to change without notice. See "Using the Controls." Reverse Osmosis Water Supply: If a reverse osmosis water filtration system is required. Height Overall "A" 677⁄8" (172.4 cm) Height Top of cabinet 1 A overall C 90˚ Model Size 18 cu.ft. If you are for a 1⁄2" (1.25 cm) space on your model) to be turned off by a switch. handle B 4 top of Cabinet "B" Depth Door Open...


