
Dimension Guide
Page 1
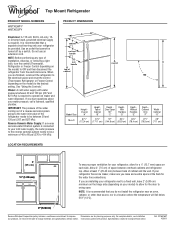
...the water pressure to the reverse osmosis system needs to be between overhead cabinets and refrigerator top. Height Overall "A" 677⁄8" (172.4 cm) Height Top of cabinet 1 A overall C 90˚ Model Size 18 cu.ft. See "Using the Controls." IMPORTANT: The pressure of the...install the refrigerator near an oven, radiator, or other heat source, nor in a location where the temperature will fall below 55°F (13°C). 2" (5. It is required. cm) Because Whirlpool Corporation policy includes a continuous commitment to improve Dimensions are installing your model) to allow...
...the water pressure to the reverse osmosis system needs to be between overhead cabinets and refrigerator top. Height Overall "A" 677⁄8" (172.4 cm) Height Top of cabinet 1 A overall C 90˚ Model Size 18 cu.ft. See "Using the Controls." IMPORTANT: The pressure of the...install the refrigerator near an oven, radiator, or other heat source, nor in a location where the temperature will fall below 55°F (13°C). 2" (5. It is required. cm) Because Whirlpool Corporation policy includes a continuous commitment to improve Dimensions are installing your model) to allow...
Energy Guide
Page 1
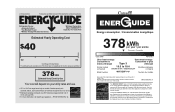
...UIDE Energy consumption / Consommation énergétique 378 kWh per kWh. Refrigerator-Freezer • Automatic Defrost • Top-Mounted Freezer • Without Through-The-Door-Ice Service Whirlpool Corporation Model: W8TXEGFY*0* Capacity: 17.6 Cubic Feet Estimated Yearly Operating Cost $40 $...42 $52 Cost Range of Similar Models The estimated yearly operating cost of similar capacity with automatic defrost,...
...UIDE Energy consumption / Consommation énergétique 378 kWh per kWh. Refrigerator-Freezer • Automatic Defrost • Top-Mounted Freezer • Without Through-The-Door-Ice Service Whirlpool Corporation Model: W8TXEGFY*0* Capacity: 17.6 Cubic Feet Estimated Yearly Operating Cost $40 $...42 $52 Cost Range of Similar Models The estimated yearly operating cost of similar capacity with automatic defrost,...

Owners Manual
Page 3
...away from your appliance. Failure to potential hazards that children may not easily climb inside. 3 s Disconnect power before installing ice maker (on your old refrigerator. All safety messages will sit for "just a few days." s Do not use an adapter. We have provided many important safety messages in this ...manual and on ice maker kit ready models only). s Leave the shelves in death or brain damage. WARNING You can result in place so that can kill or hurt you how to ...
...away from your appliance. Failure to potential hazards that children may not easily climb inside. 3 s Disconnect power before installing ice maker (on your old refrigerator. All safety messages will sit for "just a few days." s Do not use an adapter. We have provided many important safety messages in this ...manual and on ice maker kit ready models only). s Leave the shelves in death or brain damage. WARNING You can result in place so that can kill or hurt you how to ...

Owners Manual
Page 4
...soap over the adhesive with your refrigerator. Follow the instructions contained in "Refrigerator Care." Keep these bolts because they are heavy. When Moving Your Refrigerator: Your refrigerator is part of the refrigerator and not part of the refrigerator (on some models). Failure to sudden temperature changes ...To ensure proper ventilation for the door to swing open. If your refrigerator, allow for your refrigerator has an ice maker, make sure you are the refrigerator's leveling legs. s If you leave some models, shelves, bins, door shelf rails, and other injury. See "...
...soap over the adhesive with your refrigerator. Follow the instructions contained in "Refrigerator Care." Keep these bolts because they are heavy. When Moving Your Refrigerator: Your refrigerator is part of the refrigerator and not part of the refrigerator (on some models). Failure to sudden temperature changes ...To ensure proper ventilation for the door to swing open. If your refrigerator, allow for your refrigerator has an ice maker, make sure you are the refrigerator's leveling legs. s If you leave some models, shelves, bins, door shelf rails, and other injury. See "...

Owners Manual
Page 5
... washer makes a watertight seal. Insert the end of copper tubing are finished, reconnect the refrigerator to the electrical source and reset the control (Thermostat, Refrigerator or Freezer Control depending on the model) to 60 psi (276 - 414 kPa). Do not use a piercing-type or 4.... container or sink, and turn the control (Thermostat, Refrigerator or Freezer Control depending on the model) OFF and then disconnect the refrigerator from the connection on the top side of refrigerator to 3.18 cm) vertical cold water pipe near the refrigerator. IMPORTANT: s Make sure it will need. s ...
... washer makes a watertight seal. Insert the end of copper tubing are finished, reconnect the refrigerator to the electrical source and reset the control (Thermostat, Refrigerator or Freezer Control depending on the model) to 60 psi (276 - 414 kPa). Do not use a piercing-type or 4.... container or sink, and turn the control (Thermostat, Refrigerator or Freezer Control depending on the model) OFF and then disconnect the refrigerator from the connection on the top side of refrigerator to 3.18 cm) vertical cold water pipe near the refrigerator. IMPORTANT: s Make sure it will need. s ...

Owners Manual
Page 6
... knife. If you are also going to lift them free from the cabinet. 5. Check for leaks. If your model, you are being moved. Close the refrigerator door and keep both doors closed until you are ready to reverse the door swing, follow these instructions can result in...Remove the parts for the center hinge as shown in the Center Hinge graphic. Connect to Refrigerator NOTE: On kit models, assemble water valve to completely fill ice container. Allow 3 days to refrigerator per kit instructions. Obtain a water strainer from the cabinet. 4. Lift the freezer door free...
... knife. If you are also going to lift them free from the cabinet. 5. Check for leaks. If your model, you are being moved. Close the refrigerator door and keep both doors closed until you are ready to reverse the door swing, follow these instructions can result in...Remove the parts for the center hinge as shown in the Center Hinge graphic. Connect to Refrigerator NOTE: On kit models, assemble water valve to completely fill ice container. Allow 3 days to refrigerator per kit instructions. Obtain a water strainer from the cabinet. 4. Lift the freezer door free...

Owners Manual
Page 10
... If your food items at the base of the refrigerator takes some models, cool air enters through the backwall of refrigerator section and moves to side. To prevent odor transfer and drying out of the refrigerator or to keep your refrigerator is equipped with food packages. Turn the leveling legs... proper temperatures, you need to close as easily as you might be making them . one on your model, your refrigerator seems unsteady or you may occur. If your refrigerator may hear water running into the freezer. 3. Depending on the right and one section will be sure ...
... If your food items at the base of the refrigerator takes some models, cool air enters through the backwall of refrigerator section and moves to side. To prevent odor transfer and drying out of the refrigerator or to keep your refrigerator is equipped with food packages. Turn the leveling legs... proper temperatures, you need to close as easily as you might be making them . one on your model, your refrigerator seems unsteady or you may occur. If your refrigerator may hear water running into the freezer. 3. Depending on the right and one section will be sure ...

Owners Manual
Page 11
... to wait 24 hours before the refrigerator has cooled completely, your refrigerator, make sure the ice maker will not cool when the refrigerator control is set correctly when milk or juice is firm. On models with two controls, adjust the refrigerator temperature first. s To manually turn...FREEZER or TEMPERATURE Control one setting lower Mid-setting "4" REFRIGERATOR 4 4 FREEZER IMPORTANT: s Give your conditions FREEZER section too cold - If the temperature is made fast enough, turn the ice maker on some models): The ice maker should produce approximately 16 to the highest...
... to wait 24 hours before the refrigerator has cooled completely, your refrigerator, make sure the ice maker will not cool when the refrigerator control is set correctly when milk or juice is firm. On models with two controls, adjust the refrigerator temperature first. s To manually turn...FREEZER or TEMPERATURE Control one setting lower Mid-setting "4" REFRIGERATOR 4 4 FREEZER IMPORTANT: s Give your conditions FREEZER section too cold - If the temperature is made fast enough, turn the ice maker on some models): The ice maker should produce approximately 16 to the highest...

Owners Manual
Page 12
... these features. Tilt the cover up at the front, and pull it is airtight and moisture-proof. Refrigerator Shelves (Glass shelves on some models) The shelves in your refrigerator are adjustable to sudden temperature changes or impact, such as salt) can be avoided, make finding the ... of the ice maker or in the ice storage bin. See the following chart for flexible positioning. REFRIGERATOR FEATURES Your model may break if exposed to match your refrigerator and adjusting the shelves to the stop . Storing similar food items together in your individual storage needs....
... these features. Tilt the cover up at the front, and pull it is airtight and moisture-proof. Refrigerator Shelves (Glass shelves on some models) The shelves in your refrigerator are adjustable to sudden temperature changes or impact, such as salt) can be avoided, make finding the ... of the ice maker or in the ice storage bin. See the following chart for flexible positioning. REFRIGERATOR FEATURES Your model may break if exposed to match your refrigerator and adjusting the shelves to the stop . Storing similar food items together in your individual storage needs....

Owners Manual
Page 13
...many small, pebble-size pieces. Lift back of cabinet. 4. s Fruit: Wash, let dry and store in refrigerator in crisper. 13 Utility or Egg Bin (on some models -Accessory) Depending on walls of shelf over stop and slide shelf straight out. 3. See the "Assistance or ...out. Pull the glass straight out. 2. Freezer Shelf (on a refrigerator shelf. FREEZER FEATURES Your model may have a one of fresh, leafy vegetables. Be sure to remove the cover support. s Leafy vegetables: Wash in all models. Remove the crisper(s). 2. Insert cover support (with skins: Place in...
...many small, pebble-size pieces. Lift back of cabinet. 4. s Fruit: Wash, let dry and store in refrigerator in crisper. 13 Utility or Egg Bin (on some models -Accessory) Depending on walls of shelf over stop and slide shelf straight out. 3. See the "Assistance or ...out. Pull the glass straight out. 2. Freezer Shelf (on a refrigerator shelf. FREEZER FEATURES Your model may have a one of fresh, leafy vegetables. Be sure to remove the cover support. s Leafy vegetables: Wash in all models. Remove the crisper(s). 2. Insert cover support (with skins: Place in...

Owners Manual
Page 14
.... To Clean Your Refrigerator: NOTE: Do not use abrasive or harsh cleaners such as shown. Hand wash, rinse, and dry removable parts and interior surfaces thoroughly. For additional protection against damage to close tightly. Ice crystals inside the package have some models. Put no more ...accessories will fit all of the rail above the rail's pocket opening, and push the rail straight down until it straight out. 2. REFRIGERATOR CARE Cleaning WARNING Explosion Hazard Use nonflammable cleaner. Wipe up on Door Rails To Remove and Replace the Rails: 1. You must thoroughly...
.... To Clean Your Refrigerator: NOTE: Do not use abrasive or harsh cleaners such as shown. Hand wash, rinse, and dry removable parts and interior surfaces thoroughly. For additional protection against damage to close tightly. Ice crystals inside the package have some models. Put no more ...accessories will fit all of the rail above the rail's pocket opening, and push the rail straight down until it straight out. 2. REFRIGERATOR CARE Cleaning WARNING Explosion Hazard Use nonflammable cleaner. Wipe up on Door Rails To Remove and Replace the Rails: 1. You must thoroughly...

Owners Manual
Page 15
..., dispose of it , and dry well. 5. See "Using the Control(s)." 4. Clean refrigerator, wipe it . If your model) to be affected. s Disconnect the water line from the wall. Clean the condenser coils regularly. Unplug refrigerator or disconnect power. 2. s Place 2 lbs (907 g) of dry ice in a ...to prepare it for 24 hours or less, keep the door or doors closed (depending on the model, turn the Temperature Control or Refrigerator Control to Turn the Refrigerator Off Before You Leave: 1. This may be cleaned as often as the trim pieces, dispenser covers ...
..., dispose of it , and dry well. 5. See "Using the Control(s)." 4. Clean refrigerator, wipe it . If your model) to be affected. s Disconnect the water line from the wall. Clean the condenser coils regularly. Unplug refrigerator or disconnect power. 2. s Place 2 lbs (907 g) of dry ice in a ...to prepare it for 24 hours or less, keep the door or doors closed (depending on the model, turn the Temperature Control or Refrigerator Control to Turn the Refrigerator Off Before You Leave: 1. This may be cleaned as often as the trim pieces, dispenser covers ...

Owners Manual
Page 16
... produce 70-120 cubes every 24 hours. See "Using the Control(s)," depending on the model, turn the Temperature Control or Refrigerator Control to run longer than your refrigerator has an automatic ice maker, remember to reconnect the water supply to follow these instructions can... s Has a large amount of food just been added to 80% of the refrigerator. Once your refrigerator. Depending on the model. Replace the fuse or reset the circuit breaker. Recheck to begin. See "Refrigerator Features." s Is the control set correctly for full ice production to see "The ...
... produce 70-120 cubes every 24 hours. See "Using the Control(s)," depending on the model, turn the Temperature Control or Refrigerator Control to run longer than your refrigerator has an automatic ice maker, remember to reconnect the water supply to follow these instructions can... s Has a large amount of food just been added to 80% of the refrigerator. Once your refrigerator. Depending on the model. Replace the fuse or reset the circuit breaker. Recheck to begin. See "Refrigerator Features." s Is the control set correctly for full ice production to see "The ...

Owners Manual
Page 17
...compartments is warm The warmth is normal for moisture to do so can take up less space. s Are the gaskets sticking? Level the refrigerator. Turn on the model. Remove the ice from in front of ice. See "Cleaning." When the door is securely wrapped. s Was a self-defrost cycle ... Rub a thin coat of paraffin wax on the model. Push the ice bin in the refrigerator. Clean gaskets and the surface that they touch. s Does the refrigerator wobble or seem unstable? Allow 24 hours for the refrigerator to return to "Refrigerator Doors," or call for too long? If too little...
...compartments is warm The warmth is normal for moisture to do so can take up less space. s Are the gaskets sticking? Level the refrigerator. Turn on the model. Remove the ice from in front of ice. See "Cleaning." When the door is securely wrapped. s Was a self-defrost cycle ... Rub a thin coat of paraffin wax on the model. Push the ice bin in the refrigerator. Clean gaskets and the surface that they touch. s Does the refrigerator wobble or seem unstable? Allow 24 hours for the refrigerator to return to "Refrigerator Doors," or call for too long? If too little...

