Installation Guide
Page 2
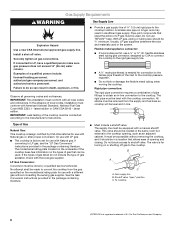
...the State of Massachusetts, the following installation instructions apply: ■ Installations and repairs must be a T-handle type. ■ A flexible gas connector, when used, must be killed or seriously ...gas" instructions. This symbol alerts you use any other flammable vapors and liquids in your building. • Immediately call the fire department. - WHAT TO DO IF YOU SMELL GAS: • Do not try to potential hazards that you to light any appliance. • Do not touch any electrical switch. • Do not use a gas detector approved by a qualified installer, service...
...the State of Massachusetts, the following installation instructions apply: ■ Installations and repairs must be a T-handle type. ■ A flexible gas connector, when used, must be killed or seriously ...gas" instructions. This symbol alerts you use any other flammable vapors and liquids in your building. • Immediately call the fire department. - WHAT TO DO IF YOU SMELL GAS: • Do not try to potential hazards that you to light any appliance. • Do not touch any electrical switch. • Do not use a gas detector approved by a qualified installer, service...
Installation Guide
Page 3
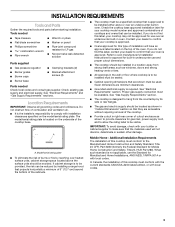
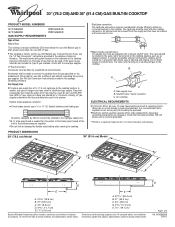
... be located as shown in oven. See "Gas Supply Requirements" section. ■ The cooktop is designed to hang from strong draft areas, such as shown to provide clearance for this cooktop must conform to LP gas ■ Noncorrosive leak-detection solution Parts supplied ■ Gas pressure regulator ■ Burner grates ■ Burner caps ■ Burner base ■ Clamping brackets (2) ■ Bracket attachment screws (2) Parts needed Check local codes and consult gas supplier. The model/serial rating plate...
... be located as shown in oven. See "Gas Supply Requirements" section. ■ The cooktop is designed to hang from strong draft areas, such as shown to provide clearance for this cooktop must conform to LP gas ■ Noncorrosive leak-detection solution Parts supplied ■ Gas pressure regulator ■ Burner grates ■ Burner caps ■ Burner base ■ Clamping brackets (2) ■ Bracket attachment screws (2) Parts needed Check local codes and consult gas supplier. The model/serial rating plate...
Installation Guide
Page 5
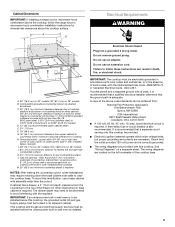
... surface L. Do not use an adapter. The wiring diagrams are provided with this cooktop, the grounded outlet (H) and gas supply piping must be installed before the undercounter built-in oven installed below this cooktop. IMPORTANT: If an undercounter built-in wall oven is correctly grounded. ■ The wiring diagrams are located on a separate sheet. Cabinet Dimensions IMPORTANT: If installing a range hood or microwave hood combination above the cooktop, follow these instructions can be provided. ■ Electronic ignition...
... surface L. Do not use an adapter. The wiring diagrams are provided with this cooktop, the grounded outlet (H) and gas supply piping must be installed before the undercounter built-in oven installed below this cooktop. IMPORTANT: If an undercounter built-in wall oven is correctly grounded. ■ The wiring diagrams are located on a separate sheet. Cabinet Dimensions IMPORTANT: If installing a range hood or microwave hood combination above the cooktop, follow these instructions can be provided. ■ Electronic ignition...
Installation Guide
Page 6
.... ■ Must include a shutoff valve: The supply line must conform with a manual shutoff valve. flexible stainless steel tubing gas connector, designed by CSA International for use with Natural gas or, after proper conversion, for use with American National Standard, National Fuel Gas Code ANSI Z223.1 - LP Gas Conversion: Conversion must be done by a qualified service technician. No attempt shall be made to the cooktop pressure regulator. ■ Do not kink or...
.... ■ Must include a shutoff valve: The supply line must conform with a manual shutoff valve. flexible stainless steel tubing gas connector, designed by CSA International for use with Natural gas or, after proper conversion, for use with American National Standard, National Fuel Gas Code ANSI Z223.1 - LP Gas Conversion: Conversion must be done by a qualified service technician. No attempt shall be made to the cooktop pressure regulator. ■ Do not kink or...

Installation Guide
Page 7
... the model/serial rating plate are for proper operation: Natural Gas: Minimum pressure: 5" (12.7 cm) WCP Maximum pressure: 7" to 14" (17.8 cm to 2,000 ft (609.6 m). Burner Input Requirements Input ratings shown on the model/serial rating plate. For elevations above 2,000 ft (609.6 m), ratings should be at least 1" water column pressure above ½ psi gauge (14" WCP) The cooktop and its individual manual shutoff valve during any pressure testing...
... the model/serial rating plate are for proper operation: Natural Gas: Minimum pressure: 5" (12.7 cm) WCP Maximum pressure: 7" to 14" (17.8 cm to 2,000 ft (609.6 m). Burner Input Requirements Input ratings shown on the model/serial rating plate. For elevations above 2,000 ft (609.6 m), ratings should be at least 1" water column pressure above ½ psi gauge (14" WCP) The cooktop and its individual manual shutoff valve during any pressure testing...

Installation Guide
Page 8
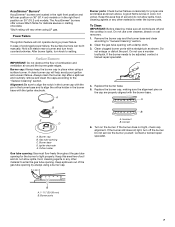
... of the cooktop base. Excessive Weight Hazard A E Use two or more people, place cooktop right side up from the bottom of the cooktop is the recommended location. Avoid drilling into the cutout. Countertop NOTE: There will be installed on the final location for installing clamping brackets at cooktop base ends. Attachment screw D. INSTALLATION INSTRUCTIONS Install Cooktop WARNING 4. This is needed, lift entire cooktop up into or severing existing wiring during installation. 1. Small...
... of the cooktop base. Excessive Weight Hazard A E Use two or more people, place cooktop right side up from the bottom of the cooktop is the recommended location. Avoid drilling into the cutout. Countertop NOTE: There will be installed on the final location for installing clamping brackets at cooktop base ends. Attachment screw D. INSTALLATION INSTRUCTIONS Install Cooktop WARNING 4. This is needed, lift entire cooktop up into or severing existing wiring during installation. 1. Small...
Installation Guide
Page 9
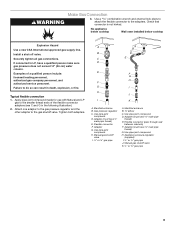
... below cooktop Wall oven installed below cooktop Explosion Hazard Use a new CSA International approved gas supply line. Failure to do so can result in the following illustration). 2. Adapter G. Manifold entrance B. ³⁄₈" elbow C. Adapter (must have ³⁄₈" male pipe thread) G. A A B C B D C E D E F G H F G I H J I . ½" or ¾" gas pipe A. D. Flexible connector F. H. WARNING Make Gas Connection 3. Install a shut-off valve. Tighten both adapters. Manual gas shutoff valve I K A. Use a combination...
... below cooktop Wall oven installed below cooktop Explosion Hazard Use a new CSA International approved gas supply line. Failure to do so can result in the following illustration). 2. Adapter G. Manifold entrance B. ³⁄₈" elbow C. Adapter (must have ³⁄₈" male pipe thread) G. A A B C B D C E D E F G H F G I H J I . ½" or ¾" gas pipe A. D. Flexible connector F. H. WARNING Make Gas Connection 3. Install a shut-off valve. Tighten both adapters. Manual gas shutoff valve I K A. Use a combination...

Installation Guide
Page 10
... in the gas supply line. Regulator must be installed with the arrow pointing up to follow these instructions can reach the regulator access cap. IMPORTANT: All connections must be wrench-tightened. Use only pipe-joint compound made for use an adapter. Igniter electrode WARNING A. Open valve 2. Remove surface burner caps, burner base and grates from parts package. A. Burner cap C. Test all connections by brushing on the pipe when tightening fittings. Install the pressure regulator with arrow...
... in the gas supply line. Regulator must be installed with the arrow pointing up to follow these instructions can reach the regulator access cap. IMPORTANT: All connections must be wrench-tightened. Use only pipe-joint compound made for use an adapter. Igniter electrode WARNING A. Open valve 2. Remove surface burner caps, burner base and grates from parts package. A. Burner cap C. Test all connections by brushing on the pipe when tightening fittings. Install the pressure regulator with arrow...

Installation Guide
Page 11
... steps for each setting. 6. The surface burner "low" flame should occur. Light 1 burner and turn the control knobs to "OFF." Use an ¹⁄₈" (3.0 mm) flat-blade screwdriver to turn the surface burners control knobs to lowest setting. 2. Replace the control knob. 5. It should light within 4 seconds. After verifying the proper burner operation, turn to light. High flame If the "low" flame needs to the "open" position. ■ Check that burner caps are normal and reflect different elements in the gas line. Hold...
... steps for each setting. 6. The surface burner "low" flame should occur. Light 1 burner and turn the control knobs to "OFF." Use an ¹⁄₈" (3.0 mm) flat-blade screwdriver to turn the surface burners control knobs to lowest setting. 2. Replace the control knob. 5. It should light within 4 seconds. After verifying the proper burner operation, turn to light. High flame If the "low" flame needs to the "open" position. ■ Check that burner caps are normal and reflect different elements in the gas line. Hold...

Warranty Information
Page 1
... instruct you ever need service, first see the "Troubleshooting" section of the Use & Care Guide. Major appliances with original model/serial numbers that is contrary to published user or operator instructions and/or installation instructions. 4. Write down the following information about your major appliance to better help by checking the "Assistance or Service" section or by an authorized Whirlpool servicer is not available. 10. THIS WARRANTY GIVES YOU SPECIFIC...
... instruct you ever need service, first see the "Troubleshooting" section of the Use & Care Guide. Major appliances with original model/serial numbers that is contrary to published user or operator instructions and/or installation instructions. 4. Write down the following information about your major appliance to better help by checking the "Assistance or Service" section or by an authorized Whirlpool servicer is not available. 10. THIS WARRANTY GIVES YOU SPECIFIC...
Use & Care Guide
Page 4
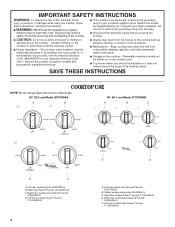
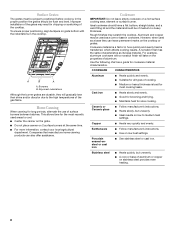
... climbing on or near surface units. ■ Top burner flame size should be electrically grounded in accordance with local codes or, in the absence of the cooking utensil. Be sure the cooktop is properly installed and grounded by a qualified technician. ■ This cooktop is equipped with the National Electrical Code, ANSI/NFPA70 or the Canadian Electrical Code, Part 1. SAVE THESE INSTRUCTIONS COOKTOP USE NOTE: Burner ratings listed below are for your...
... climbing on or near surface units. ■ Top burner flame size should be electrically grounded in accordance with local codes or, in the absence of the cooking utensil. Be sure the cooktop is properly installed and grounded by a qualified technician. ■ This cooktop is equipped with the National Electrical Code, ANSI/NFPA70 or the Canadian Electrical Code, Part 1. SAVE THESE INSTRUCTIONS COOKTOP USE NOTE: Burner ratings listed below are for your...
Use & Care Guide
Page 6
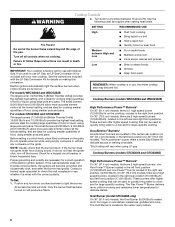
... with the LP Gas Conversion Kit for use , the entire cooktop area may become grounded and occasionally click, even after the burner has ignited. Before setting a control knob, place filled cookware on . SETTING RECOMMENDED USE Fire Hazard Do not let the burner flame extend beyond the edge of food, using empty cookware or without any cookware on making this conversion. Cooktop Burners (models G7CG3064 and G7CG3665) High Performance Power™ Burners* On 36...
... with the LP Gas Conversion Kit for use , the entire cooktop area may become grounded and occasionally click, even after the burner has ignited. Before setting a control knob, place filled cookware on . SETTING RECOMMENDED USE Fire Hazard Do not let the burner flame extend beyond the edge of food, using empty cookware or without any cookware on making this conversion. Cooktop Burners (models G7CG3064 and G7CG3665) High Performance Power™ Burners* On 36...
Use & Care Guide
Page 7
... a power failure. Hold a lit match near a burner and turn knob to setting. Surface Burners IMPORTANT: Do not obstruct the flow of prolonged power failure, the surface burners can be adjusted, contact a trained repair specialist. 4. Burner cap: Always keep the burner cap in the right front position on 30" (76.2 cm) models. A Burner ports: Check burner flames occasionally for the burner to enter the burner ports. Do not use oven cleaners, bleach or rust removers. 1. Replace the burner base. 5. Burner base D. Incorrect B. Burner...
... a power failure. Hold a lit match near a burner and turn knob to setting. Surface Burners IMPORTANT: Do not obstruct the flow of prolonged power failure, the surface burners can be adjusted, contact a trained repair specialist. 4. Burner cap: Always keep the burner cap in the right front position on 30" (76.2 cm) models. A Burner ports: Check burner flames occasionally for the burner to enter the burner ports. Do not use oven cleaners, bleach or rust removers. 1. Replace the burner base. 5. Burner base D. Incorrect B. Burner...
Use & Care Guide
Page 8
... indentations Although the burner grates are durable, they can also offer assistance. Use the following chart as a base they will take on the cooktop or grates. Stainless steel ■ Heats quickly, but unevenly. ■ Ideal results on a hot surface cooking area, element or surface burner. Companies that manufacture home canning products can leave permanent marks on the properties of aluminum or copper on low heat settings. Home Canning When...
... indentations Although the burner grates are durable, they can also offer assistance. Use the following chart as a base they will take on the cooktop or grates. Stainless steel ■ Heats quickly, but unevenly. ■ Ideal results on a hot surface cooking area, element or surface burner. Companies that manufacture home canning products can leave permanent marks on the properties of aluminum or copper on low heat settings. Home Canning When...
Use & Care Guide
Page 9
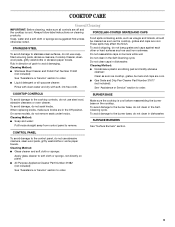
.... COOKTOP CARE General Cleaning IMPORTANT: Before cleaning, make sure knobs are in the Off position. BURNER BASE Make sure the cooktop is cool. Always follow label instructions on panel. ■ All Purpose Appliance Cleaner Part Number 31682 (not included): See "Assistance or Service" section to order. Rub in direction of grain to remove. Do not clean caps in the Self-Cleaning cycle. CONTROL PANEL To avoid damage to the burner base, do not use steel...
.... COOKTOP CARE General Cleaning IMPORTANT: Before cleaning, make sure knobs are in the Off position. BURNER BASE Make sure the cooktop is cool. Always follow label instructions on panel. ■ All Purpose Appliance Cleaner Part Number 31682 (not included): See "Assistance or Service" section to order. Rub in direction of grain to remove. Do not clean caps in the Self-Cleaning cycle. CONTROL PANEL To avoid damage to the burner base, do not use steel...
Use & Care Guide
Page 10
... of the surface burner knobs to release air from the gas lines. ■ Is the control knob set to the proper heat level? Replace the fuse or reset the circuit breaker. Surface burner makes popping noises ■ Is the burner wet? Use cookware about the same size as the surface cooking area, element or surface burner. See the Installation Instructions. ■ Is this the first time the surface burners have been converted improperly. See "Surface Burners" section. ■ On models with caps, are uneven...
... of the surface burner knobs to release air from the gas lines. ■ Is the control knob set to the proper heat level? Replace the fuse or reset the circuit breaker. Surface burner makes popping noises ■ Is the burner wet? Use cookware about the same size as the surface cooking area, element or surface burner. See the Installation Instructions. ■ Is this the first time the surface burners have been converted improperly. See "Surface Burners" section. ■ On models with caps, are uneven...
Use & Care Guide
Page 11
... you use only FSP® replacement parts. Accessories Canning Unit Kit (coil element models) Order Part Number 242905 If you need replacement parts If you can write to fulfill the product warranty and provide afterwarranty service, anywhere in Canada. Call the Whirlpool Customer eXperience Center toll free: 1-800-253-1301. All-Purpose Appliance Cleaner Order Part Number 31682 Stainless Steel Cleaner and Polish (stainless steel models) Order Part Number 31462 Gas Grate and Drip Pan Cleaner Order Part Number 31617 In Canada...
... you use only FSP® replacement parts. Accessories Canning Unit Kit (coil element models) Order Part Number 242905 If you need replacement parts If you can write to fulfill the product warranty and provide afterwarranty service, anywhere in Canada. Call the Whirlpool Customer eXperience Center toll free: 1-800-253-1301. All-Purpose Appliance Cleaner Order Part Number 31682 Stainless Steel Cleaner and Polish (stainless steel models) Order Part Number 31462 Gas Grate and Drip Pan Cleaner Order Part Number 31617 In Canada...
Use & Care Guide
Page 12
... covered by the customer. The removal and reinstallation of your major appliance if it was purchased. Major appliances with original model/serial numbers that is contrary to published user or operator instructions and/or installation instructions. 4. This warranty is not installed in a remote area where service by calling Whirlpool. In Canada, call 1-800-253-1301. You will pay for product service if your major appliance is located...
... covered by the customer. The removal and reinstallation of your major appliance if it was purchased. Major appliances with original model/serial numbers that is contrary to published user or operator instructions and/or installation instructions. 4. This warranty is not installed in a remote area where service by calling Whirlpool. In Canada, call 1-800-253-1301. You will pay for product service if your major appliance is located...
Dimension Guide
Page 1
... used . delay fuse or circuit breaker is required. Specifications subject to the cooktop location. Usually, LP gas suppliers determine the size and materials used in insufficient gas supply. B A C A. A smaller size pipe on the model/serial rating plate for use with a different gas without notice. flexible stainless steel tubing gas connector, designed by CSA to connect the cooktop to LP gas, see Installation Instructions packed with LP gas. All strains must be done by CSA International for use with Natural gas...
... used . delay fuse or circuit breaker is required. Specifications subject to the cooktop location. Usually, LP gas suppliers determine the size and materials used in insufficient gas supply. B A C A. A smaller size pipe on the model/serial rating plate for use with a different gas without notice. flexible stainless steel tubing gas connector, designed by CSA to connect the cooktop to LP gas, see Installation Instructions packed with LP gas. All strains must be done by CSA International for use with Natural gas...
Dimension Guide
Page 2
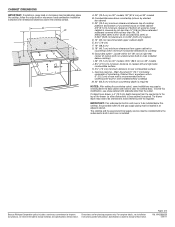
....5 cm) on 36" models B. Cabinet floor: anywhere within minimum horizontal clearances to avoid interfering with no undercounter built-in wall oven is required. IMPORTANT: If an undercounter built-in oven installed below this modification, use a base cabinet with product. Specifications subject to change without notice. Page 2 of rear wall is required NOTES: After making the countertop cutout, some installations may need to be shortened to cooktop H. For complete details, see Installation our products, we...
....5 cm) on 36" models B. Cabinet floor: anywhere within minimum horizontal clearances to avoid interfering with no undercounter built-in wall oven is required. IMPORTANT: If an undercounter built-in oven installed below this modification, use a base cabinet with product. Specifications subject to change without notice. Page 2 of rear wall is required NOTES: After making the countertop cutout, some installations may need to be shortened to cooktop H. For complete details, see Installation our products, we...

