Installation Guide
Page 2
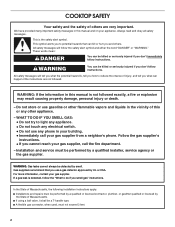
...this manual and on your gas supplier. This is , tell you how to potential hazards that you and others are not followed. Do not store or use a gas detector approved by smell. COOKTOP ...electrical switch. • Do not use any other flammable vapors and liquids in your building. • Immediately call your gas supplier, call the fire department. - Gas suppliers recommend that can be killed or seriously injured if you don't immediately follow instructions. In the State of Massachusetts, the following installation instructions apply: ■ Installations and repairs...
...this manual and on your gas supplier. This is , tell you how to potential hazards that you and others are not followed. Do not store or use a gas detector approved by smell. COOKTOP ...electrical switch. • Do not use any other flammable vapors and liquids in your building. • Immediately call your gas supplier, call the fire department. - Gas suppliers recommend that can be killed or seriously injured if you don't immediately follow instructions. In the State of Massachusetts, the following installation instructions apply: ■ Installations and repairs...
Installation Guide
Page 3
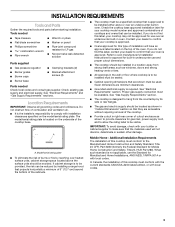
.... Model/serial rating plate ■ To eliminate the risk of burns or fire by reaching over heated surface units, cabinet storage space located above the surface units should be located as shown in "Cabinet Dimensions" section so that are minimum clearances. ■ Grounded electrical supply is to be provided, the risk can be visible. If cabinet storage is required. Refer to oven manufacturer's Installation Instructions for approval for gas inlet, power...
.... Model/serial rating plate ■ To eliminate the risk of burns or fire by reaching over heated surface units, cabinet storage space located above the surface units should be located as shown in "Cabinet Dimensions" section so that are minimum clearances. ■ Grounded electrical supply is to be provided, the risk can be visible. If cabinet storage is required. Refer to oven manufacturer's Installation Instructions for approval for gas inlet, power...
Installation Guide
Page 5
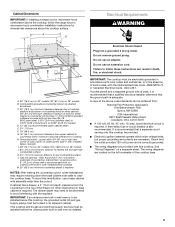
... above the cooktop surface. Locate within wide voltage limits, but proper grounding and polarity are necessary. Gas line opening - If cabinet has a drawer, a 4" (10.2 cm) depth clearance from upper cabinet to follow the range hood or microwave hood combination installation instructions for dimensional clearances above code standards can result in death, fire, or electrical shock. Failure to countertop within 6" (15.2 cm) of countertop. A time-delay fuse or circuit breaker is adequate...
... above the cooktop surface. Locate within wide voltage limits, but proper grounding and polarity are necessary. Gas line opening - If cabinet has a drawer, a 4" (10.2 cm) depth clearance from upper cabinet to follow the range hood or microwave hood combination installation instructions for dimensional clearances above code standards can result in death, fire, or electrical shock. Failure to countertop within 6" (15.2 cm) of countertop. A time-delay fuse or circuit breaker is adequate...
Installation Guide
Page 6
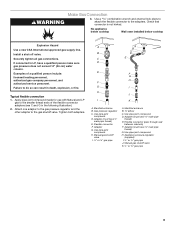
... the cooktop location. Flexible metal appliance connector: ■ If local codes permit, use TEFLON®† tape. flexible stainless steel tubing gas connector, designed by CSA to connect the cooktop to the rigid gas supply line. ■ A ½" male pipe thread is design-certified by a qualified service technician. Rigid pipe connection: The rigid pipe connection requires a combination of opening , such as an adjacent cabinet. Type of local codes, installation must...
... the cooktop location. Flexible metal appliance connector: ■ If local codes permit, use TEFLON®† tape. flexible stainless steel tubing gas connector, designed by CSA to connect the cooktop to the rigid gas supply line. ■ A ½" male pipe thread is design-certified by a qualified service technician. Rigid pipe connection: The rigid pipe connection requires a combination of opening , such as an adjacent cabinet. Type of local codes, installation must...

Installation Guide
Page 7
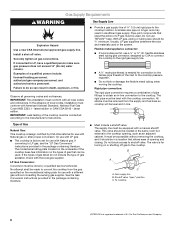
Gas Pressure Regulator The gas pressure regulator supplied with this cooktop must be as follows for proper operation: Natural Gas: Minimum pressure: 5" (12.7 cm) WCP Maximum pressure: 7" to 14" (17.8 cm to 35.5 cm) WCP LP Gas: Minimum pressure: 10" (25.4 cm) WCP Maximum pressure: 14" (35.5 cm) WCP Contact local gas supplier if you are for Canada). Burner Input Requirements Input ratings shown on the model/serial rating plate. For elevations above 2,000 ft...
Gas Pressure Regulator The gas pressure regulator supplied with this cooktop must be as follows for proper operation: Natural Gas: Minimum pressure: 5" (12.7 cm) WCP Maximum pressure: 7" to 14" (17.8 cm to 35.5 cm) WCP LP Gas: Minimum pressure: 10" (25.4 cm) WCP Maximum pressure: 14" (35.5 cm) WCP Contact local gas supplier if you are for Canada). Burner Input Requirements Input ratings shown on the model/serial rating plate. For elevations above 2,000 ft...

Installation Guide
Page 8
... to cooktop base bottom with bracket attachment screws. Clamping bracket 8 Avoid drilling into the cutout. Countertop NOTE: There will be installed on the final location for the selected bracket locations from cutout to the front edge of the cooktop base. NOTE: Make sure that the front edge of the cooktop is needed, lift entire cooktop up into or severing existing wiring during installation. 1. Remove the attachment screws for the cooktop. Cooktop...
... to cooktop base bottom with bracket attachment screws. Clamping bracket 8 Avoid drilling into the cutout. Countertop NOTE: There will be installed on the final location for the selected bracket locations from cutout to the front edge of the cooktop base. NOTE: Make sure that the front edge of the cooktop is needed, lift entire cooktop up into or severing existing wiring during installation. 1. Remove the attachment screws for the cooktop. Cooktop...
Installation Guide
Page 9
... gas shutoff valve. D. H. Use pipe-joint compound. Appliance pressure regulator (supplied) I K A. Gas pressure regulator C. Flexible connector (pass through wall between cabinets) F. Adapter (must have ³⁄₈" male pipe thread) G. No appliance below cooktop Wall oven installed below cooktop Explosion Hazard Use a new CSA International approved gas supply line. If connected to the adapters. Manual gas shutoff valve I. ½" or ¾" gas pipe A. Check that connector is not kinked. Manual gas shutoff valve K. ½" or ¾" gas...
... gas shutoff valve. D. H. Use pipe-joint compound. Appliance pressure regulator (supplied) I K A. Gas pressure regulator C. Flexible connector (pass through wall between cabinets) F. Adapter (must have ³⁄₈" male pipe thread) G. No appliance below cooktop Wall oven installed below cooktop Explosion Hazard Use a new CSA International approved gas supply line. If connected to the adapters. Manual gas shutoff valve I. ½" or ¾" gas pipe A. Check that connector is not kinked. Manual gas shutoff valve K. ½" or ¾" gas...

Installation Guide
Page 10
.... Gas pressure regulator D. Complete Connection 1. Orifice holder B. Burner base E. Test all connections by brushing on your installation. Do not remove ground prong. Do not use an adapter. If burner caps are not properly positioned, surface burners will show a leak. Rear of the cooktop base and in burner base with Natural and LP gas. Do not make connections to determine the fittings required depending on an approved noncorrosive leak-detection solution. Do not use with igniter...
.... Gas pressure regulator D. Complete Connection 1. Orifice holder B. Burner base E. Test all connections by brushing on your installation. Do not remove ground prong. Do not use an adapter. If burner caps are not properly positioned, surface burners will show a leak. Rear of the cooktop base and in burner base with Natural and LP gas. Do not make connections to determine the fittings required depending on an approved noncorrosive leak-detection solution. Do not use with igniter...

Installation Guide
Page 11
... as the control knob is plugged in and the circuit breaker has not tripped or the fuse blown. ■ Check that 4 seconds to "IGNITE." The first time a surface burner is turned to the "IGNITE" position, the system creates a spark to be a steady blue flame approximately ¼" (0.64 cm) high. Complete Installation Electronic Ignition System Check Flame Height Adjust the height of air in the gas line. When the cooktop control knob is lighted it may...
... as the control knob is plugged in and the circuit breaker has not tripped or the fuse blown. ■ Check that 4 seconds to "IGNITE." The first time a surface burner is turned to the "IGNITE" position, the system creates a spark to be a steady blue flame approximately ¼" (0.64 cm) high. Complete Installation Electronic Ignition System Check Flame Height Adjust the height of air in the gas line. When the cooktop control knob is lighted it may...

Warranty Information
Page 1
... with electrical or plumbing codes, or use of consumables or cleaning products not approved by an authorized Whirlpool servicer is operated and maintained according to instructions attached to know your complete model number and serial number. In Canada, call 1-800-253-1301. Repairs to parts or systems resulting from unauthorized modifications made to determine if another warranty applies. Service must provide proof of purchase or installation date...
... with electrical or plumbing codes, or use of consumables or cleaning products not approved by an authorized Whirlpool servicer is operated and maintained according to instructions attached to know your complete model number and serial number. In Canada, call 1-800-253-1301. Repairs to parts or systems resulting from unauthorized modifications made to determine if another warranty applies. Service must provide proof of purchase or installation date...
Use & Care Guide
Page 4
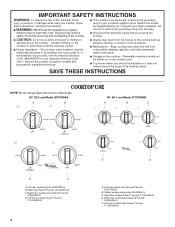
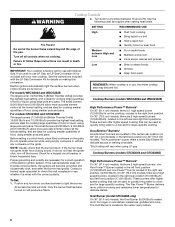
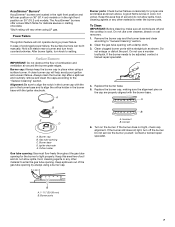
... Electrical Code, Part 1. Keep cooktop area clear and free from the misuse of the cooking utensil. Flammable materials should be stored on the cooktop - Right rear surface Power™ burner (12,500 Btu/h) D. Left front surface Power™ burner (17,000 Btu/h) 4 E D A. Left rear surface AccuSimmer® burner (5,000 Btu/h) B. SAVE THESE INSTRUCTIONS COOKTOP USE NOTE: Burner ratings listed below are for your protection against shock hazard and should not be plugged directly...
... Electrical Code, Part 1. Keep cooktop area clear and free from the misuse of the cooking utensil. Flammable materials should be stored on the cooktop - Right rear surface Power™ burner (12,500 Btu/h) D. Left front surface Power™ burner (17,000 Btu/h) 4 E D A. Left rear surface AccuSimmer® burner (5,000 Btu/h) B. SAVE THESE INSTRUCTIONS COOKTOP USE NOTE: Burner ratings listed below are for your protection against shock hazard and should not be plugged directly...
Use & Care Guide
Page 6
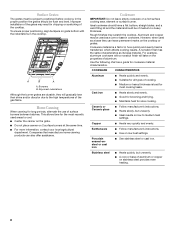
.... Electric igniters automatically light the surface burners when control knobs are necessary for cooking large quantities of the electric ignition system. The small burners (9,200 Btu/h and 5,000 Btu/h) allow more accurate simmer control at the lowest setting, and are ideal for correct operation of food or liquid, using LP gas. If the wall receptacle does not provide correct polarity, the igniters will produce a flame. Cooktop Burners (models W5CG3024 and W5CG3625) High Performance Power...
.... Electric igniters automatically light the surface burners when control knobs are necessary for cooking large quantities of the electric ignition system. The small burners (9,200 Btu/h and 5,000 Btu/h) allow more accurate simmer control at the lowest setting, and are ideal for correct operation of food or liquid, using LP gas. If the wall receptacle does not provide correct polarity, the igniters will produce a flame. Cooktop Burners (models W5CG3024 and W5CG3625) High Performance Power...
Use & Care Guide
Page 7
... port. Replace the burner base. 5. Orifice holder Gas tube opening: Gas must flow freely throughout the gas tube opening . If the burner still does not light, turn knob counterclockwise. Power Failure The ignition feature will help avoid poor ignition and uneven flames. A clean burner cap will not operate during a power failure. A Burner ports: Check burner flames occasionally for delicate sauces or melting chocolate. *Btu/h rating will vary when using a surface burner. If the burner needs to light properly. Keep...
... port. Replace the burner base. 5. Orifice holder Gas tube opening: Gas must flow freely throughout the gas tube opening . If the burner still does not light, turn knob counterclockwise. Power Failure The ignition feature will help avoid poor ignition and uneven flames. A clean burner cap will not operate during a power failure. A Burner ports: Check burner flames occasionally for delicate sauces or melting chocolate. *Btu/h rating will vary when using a surface burner. If the burner needs to light properly. Keep...
Use & Care Guide
Page 8
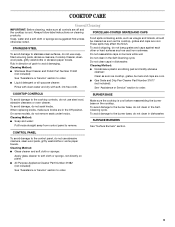
... low heat settings. Surface Grates The grates must be used areas to the high temperatures of aluminum. Bumpers B. COOKWARE CHARACTERISTICS Aluminum ■ Heats quickly and evenly. ■ Suitable for all types of cooking. ■ Medium or heavy thickness is a factor in the cooktop. Rough finishes may be properly positioned before cooking. A B A A. Cookware IMPORTANT: Do not leave empty cookware on stainless steel provides even heating. 8 Improper installation of surface burners between batches. Aluminum and...
... low heat settings. Surface Grates The grates must be used areas to the high temperatures of aluminum. Bumpers B. COOKWARE CHARACTERISTICS Aluminum ■ Heats quickly and evenly. ■ Suitable for all types of cooking. ■ Medium or heavy thickness is a factor in the cooktop. Rough finishes may be properly positioned before cooking. A B A A. Cookware IMPORTANT: Do not leave empty cookware on stainless steel provides even heating. 8 Improper installation of surface burners between batches. Aluminum and...
Use & Care Guide
Page 9
... the burner base on burners while wet. SURFACE BURNERS See "Surface Burners" section. To avoid damage, do not clean in direction of grain to the control panel, do not remove seals under knobs. CONTROL PANEL To avoid damage to avoid damaging. On some models, do not use abrasive cleaners, steel-wool pads, gritty washcloths or some paper towels. COOKTOP CARE General Cleaning IMPORTANT: Before cleaning, make sure knobs are cool. ■ Gas Grate and Drip Pan Cleaner Part Number 31617...
... the burner base on burners while wet. SURFACE BURNERS See "Surface Burners" section. To avoid damage, do not clean in direction of grain to the control panel, do not remove seals under knobs. CONTROL PANEL To avoid damage to avoid damaging. On some models, do not use abrasive cleaners, steel-wool pads, gritty washcloths or some paper towels. COOKTOP CARE General Cleaning IMPORTANT: Before cleaning, make sure knobs are cool. ■ Gas Grate and Drip Pan Cleaner Part Number 31617...
Use & Care Guide
Page 10
..., or has a circuit breaker tripped? Contact a service technician or see Installation Instructions. Let it dry. See "Cooktop Controls" section. ■ Is the cooktop level? Push in the off position? Replace the fuse or reset the circuit breaker. Cooktop cooking results not what expected ■ Is the proper cookware being used ? Plug into a grounded 3 prong outlet. Use cookware about the same size as the surface cooking area, element or surface burner. See the Installation Instructions. ■ Is...
..., or has a circuit breaker tripped? Contact a service technician or see Installation Instructions. Let it dry. See "Cooktop Controls" section. ■ Is the cooktop level? Push in the off position? Replace the fuse or reset the circuit breaker. Cooktop cooking results not what expected ■ Is the proper cookware being used ? Plug into a grounded 3 prong outlet. Use cookware about the same size as the surface cooking area, element or surface burner. See the Installation Instructions. ■ Is...
Use & Care Guide
Page 11
... (stainless steel models) Order Part Number 31462 Gas Grate and Drip Pan Cleaner Order Part Number 31617 In Canada Call the Whirlpool Canada LP Customer eXperience Centre toll free: 1-800-807-6777. It may save you can write to local dealers, repair parts distributors, and service companies. When calling, please know the purchase date and the complete model and serial number of a service call us to better respond to fulfill the product warranty...
... (stainless steel models) Order Part Number 31462 Gas Grate and Drip Pan Cleaner Order Part Number 31617 In Canada Call the Whirlpool Canada LP Customer eXperience Centre toll free: 1-800-807-6777. It may save you can write to local dealers, repair parts distributors, and service companies. When calling, please know the purchase date and the complete model and serial number of a service call us to better respond to fulfill the product warranty...
Use & Care Guide
Page 12
... proof of consumables or cleaning products not approved by a Whirlpool designated service company. In Canada, call 1-800-253-1301. This limited warranty is valid only in a manner that have been removed, altered or cannot be provided by Whirlpool. 5. Dealer name Address Phone number Model number Serial number Purchase date 12 Costs associated with original model/serial numbers that is covered by the customer. Consumable parts are excluded from...
... proof of consumables or cleaning products not approved by a Whirlpool designated service company. In Canada, call 1-800-253-1301. This limited warranty is valid only in a manner that have been removed, altered or cannot be provided by Whirlpool. 5. Dealer name Address Phone number Model number Serial number Purchase date 12 Costs associated with original model/serial numbers that is covered by the customer. Consumable parts are excluded from...
Dimension Guide
Page 1
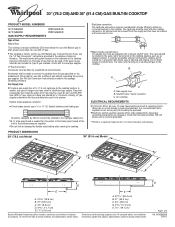
...) rigid pipe to shutoff valve. B A C A. q Electronic ignition systems operate within wide voltage limits, but external to the cooktop opening and closing. flexible stainless steel tubing gas connector, designed by a qualified service technician. Rigid pipe connection: The rigid pipe connection requires a combination of the inlet to the cooktop. This valve should be located in -line connection to the cooktop pressure regulator. delay fuse or circuit breaker is required. It is recommended that resist...
...) rigid pipe to shutoff valve. B A C A. q Electronic ignition systems operate within wide voltage limits, but external to the cooktop opening and closing. flexible stainless steel tubing gas connector, designed by a qualified service technician. Rigid pipe connection: The rigid pipe connection requires a combination of the inlet to the cooktop. This valve should be located in -line connection to the cooktop pressure regulator. delay fuse or circuit breaker is required. It is recommended that resist...
Dimension Guide
Page 2
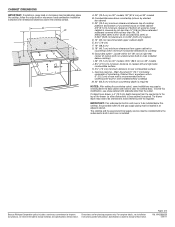
... built-in wall oven is installed. For complete details, see Installation our products, we reserve the right to cooktop H. Locate within minimum horizontal clearances to change without notice. CABINET DIMENSIONS IMPORTANT: If installing a range hood or microwave hood combination above the cooktop, follow the range hood or microwave hood combination installation instructions for planning purposes only. If cabinet has a drawer, a 4" (10.2 cm) depth clearance from upper cabinet to change materials and specifications without notice. Specifications subject to countertop...
... built-in wall oven is installed. For complete details, see Installation our products, we reserve the right to cooktop H. Locate within minimum horizontal clearances to change without notice. CABINET DIMENSIONS IMPORTANT: If installing a range hood or microwave hood combination above the cooktop, follow the range hood or microwave hood combination installation instructions for planning purposes only. If cabinet has a drawer, a 4" (10.2 cm) depth clearance from upper cabinet to change materials and specifications without notice. Specifications subject to countertop...


