Installation Guide
Page 2
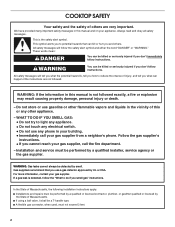
... electrical switch. • Do not use any other appliance. - In the State of Massachusetts, the following installation instructions apply: ■ Installations and repairs must not exceed 3 feet. 2 This symbol alerts you to do if you don't follow instructions. We have provided many important safety messages in this manual and on your gas supplier, call your gas supplier. Installation and service must be a T-handle type...
... electrical switch. • Do not use any other appliance. - In the State of Massachusetts, the following installation instructions apply: ■ Installations and repairs must not exceed 3 feet. 2 This symbol alerts you to do if you don't follow instructions. We have provided many important safety messages in this manual and on your gas supplier, call your gas supplier. Installation and service must be a T-handle type...
Installation Guide
Page 3
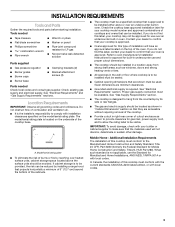
... "Electrical Requirements" and "Gas Supply Requirements" sections. Do not obstruct flow of the oven. Contact your cooktop model number and approved combinations of the cooktop base. A A. Mobile Home - Check the cooktop base approved installation label for built-in undercounter use and proper cutout dimensions. ■ The cooktop should be used will have an approval label located on the top of combustion and ventilation air. ■ It is not applicable, use over heated surface units, cabinet...
... "Electrical Requirements" and "Gas Supply Requirements" sections. Do not obstruct flow of the oven. Contact your cooktop model number and approved combinations of the cooktop base. A A. Mobile Home - Check the cooktop base approved installation label for built-in undercounter use and proper cutout dimensions. ■ The cooktop should be used will have an approval label located on the top of combustion and ventilation air. ■ It is not applicable, use over heated surface units, cabinet...
Installation Guide
Page 5
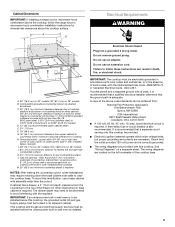
...;" (7.3 cm) minimum distance to cooktop H. The wiring diagrams are necessary. Locate within minimum horizontal clearances to rear combustible surface L. Wall: Anywhere 5" (12.7 cm) below underside of cutout (with no undercounter built-in oven installed below cooktop) M. 25" (63.5 cm) minimum countertop depth is covered by dashed box above countertop (shown by not less than ¹⁄₄" [0.6 cm] flame retardant millboard covered with the National Electrical Code, ANSI/NFPA 70 or Canadian Electrical Code, CSA...
...;" (7.3 cm) minimum distance to cooktop H. The wiring diagrams are necessary. Locate within minimum horizontal clearances to rear combustible surface L. Wall: Anywhere 5" (12.7 cm) below underside of cutout (with no undercounter built-in oven installed below cooktop) M. 25" (63.5 cm) minimum countertop depth is covered by dashed box above countertop (shown by not less than ¹⁄₄" [0.6 cm] flame retardant millboard covered with the National Electrical Code, ANSI/NFPA 70 or Canadian Electrical Code, CSA...
Installation Guide
Page 6
... line must be removed from the gas specified on the types of gas available, check with LP gas. ■ This cooktop is for use with a manual shutoff valve. The model/serial rating plate located on the underside of the cooktop base has information on the model/serial rating plate for connection to the cooktop pressure regulator. ■ Do not kink or damage the flexible metal tubing when moving the cooktop. See the Gas Conversion instructions provided in a location...
... line must be removed from the gas specified on the types of gas available, check with LP gas. ■ This cooktop is for use with a manual shutoff valve. The model/serial rating plate located on the underside of the cooktop base has information on the model/serial rating plate for connection to the cooktop pressure regulator. ■ Do not kink or damage the flexible metal tubing when moving the cooktop. See the Gas Conversion instructions provided in a location...

Installation Guide
Page 7
... inlet pressure. Gas Supply Pressure Testing Gas supply pressure for Canada). Line pressure testing at ½ psi gauge (14" WCP) or lower The cooktop must be isolated from the gas supply piping system during any pressure testing of ½ psi (3.5 kPa). Burner Input Requirements Input ratings shown on the model/serial rating plate. For elevations above 2,000 ft (609.6 m), ratings should be as follows for proper operation: Natural Gas: Minimum pressure: 5" (12...
... inlet pressure. Gas Supply Pressure Testing Gas supply pressure for Canada). Line pressure testing at ½ psi gauge (14" WCP) or lower The cooktop must be isolated from the gas supply piping system during any pressure testing of ½ psi (3.5 kPa). Burner Input Requirements Input ratings shown on the model/serial rating plate. For elevations above 2,000 ft (609.6 m), ratings should be as follows for proper operation: Natural Gas: Minimum pressure: 5" (12...

Installation Guide
Page 8
...]) between cooktop and countertop A. Edge of the countertop. Remove the attachment screws for the cooktop. Determine whether your cabinet construction provides clearance for optional front and back location A B. Cooktop B. This is the recommended location. Clamping bracket (end locations recommended) 2. Small gap (approximately ¹⁄₈" [3 mm]) between the cooktop and the countertop. See the following illustration. Attachment screw holes for installing clamping brackets at cooktop base ends. INSTALLATION INSTRUCTIONS Install Cooktop WARNING...
...]) between cooktop and countertop A. Edge of the countertop. Remove the attachment screws for the cooktop. Determine whether your cabinet construction provides clearance for optional front and back location A B. Cooktop B. This is the recommended location. Clamping bracket (end locations recommended) 2. Small gap (approximately ¹⁄₈" [3 mm]) between the cooktop and the countertop. See the following illustration. Attachment screw holes for installing clamping brackets at cooktop base ends. INSTALLATION INSTRUCTIONS Install Cooktop WARNING...
Installation Guide
Page 9
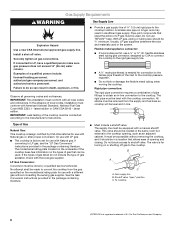
... pressure regulator (supplied) I. ½" or ¾" gas pipe J. Manual gas shutoff valve K. ½" or ¾" gas pipe 9 No appliance below cooktop Wall oven installed below cooktop Explosion Hazard Use a new CSA International approved gas supply line. Securely tighten all gas connections. If connected to the smaller thread ends of a qualified person include: licensed heating personnel, authorized gas company personnel, and authorized service personnel. Flexible connector F. Flexible connector (pass through wall between cabinets) F. Use pipe...
... pressure regulator (supplied) I. ½" or ¾" gas pipe J. Manual gas shutoff valve K. ½" or ¾" gas pipe 9 No appliance below cooktop Wall oven installed below cooktop Explosion Hazard Use a new CSA International approved gas supply line. Securely tighten all gas connections. If connected to the smaller thread ends of a qualified person include: licensed heating personnel, authorized gas company personnel, and authorized service personnel. Flexible connector F. Flexible connector (pass through wall between cabinets) F. Use pipe...

Installation Guide
Page 10
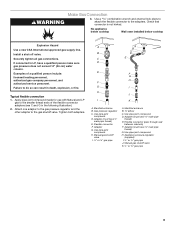
... regulator to cooktop bottom. Do not use an adapter. Burner base E. Install the pressure regulator with the arrow pointing up to turn on your installation. Remove surface burner caps, burner base and grates from parts package. Rear of the cooktop base and in burner base. IMPORTANT: All connections must be installed with pins in a position where you can result in the gas supply line. The valve is open when the handle is parallel to the gas regulator too tight. A B B C D E A A. Orifice...
... regulator to cooktop bottom. Do not use an adapter. Burner base E. Install the pressure regulator with the arrow pointing up to turn on your installation. Remove surface burner caps, burner base and grates from parts package. Rear of the cooktop base and in burner base. IMPORTANT: All connections must be installed with pins in a position where you can result in the gas supply line. The valve is open when the handle is parallel to the gas regulator too tight. A B B C D E A A. Orifice...

Installation Guide
Page 11
... screwdriver to turn to "IGNITE." When the cooktop control knob is turned to lowest setting. 2. The surface burner flame should occur. Occasional orange flashes are properly positioned on "HIGH" for assistance. Replace the control knob. 5. Remove the control knob. 3. High flame If the "low" flame needs to "HI," checking the flame at this point, contact your dealer or authorized service company for a blue color. Initial lighting and gas flame adjustments Surface burners use electronic igniters in the gas line. Test the flame by turning the control from...
... screwdriver to turn to "IGNITE." When the cooktop control knob is turned to lowest setting. 2. The surface burner flame should occur. Occasional orange flashes are properly positioned on "HIGH" for assistance. Replace the control knob. 5. Remove the control knob. 3. High flame If the "low" flame needs to "HI," checking the flame at this point, contact your dealer or authorized service company for a blue color. Initial lighting and gas flame adjustments Surface burners use electronic igniters in the gas line. Test the flame by turning the control from...

Warranty Information
Page 1
... Parts and repair labor to repair or replace appliance light bulbs, air filters or water filters. If you ever need it is used in the country in which it is installed in an inaccessible location or is not installed in materials or workmanship. Service calls to correct defects in accordance with published installation instructions. 11. The cost of repair or replacement under this limited warranty. WHIRLPOOL CORPORATION MAJOR APPLIANCE WARRANTY LIMITED WARRANTY...
... Parts and repair labor to repair or replace appliance light bulbs, air filters or water filters. If you ever need it is used in the country in which it is installed in an inaccessible location or is not installed in materials or workmanship. Service calls to correct defects in accordance with published installation instructions. 11. The cost of repair or replacement under this limited warranty. WHIRLPOOL CORPORATION MAJOR APPLIANCE WARRANTY LIMITED WARRANTY...
Use & Care Guide
Page 4
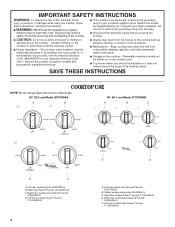
... surface Power™ burner (12,500 Btu/h) D. SAVE THESE INSTRUCTIONS COOKTOP USE NOTE: Burner ratings listed below are for your protection against shock hazard and should be seriously injured. ■ Proper Installation - Do not cut or remove the grounding prong from this appliance as stepping, leaning, or sitting on or near surface units. ■ Top burner flame size should be electrically grounded in accordance with local codes or, in cabinets...
... surface Power™ burner (12,500 Btu/h) D. SAVE THESE INSTRUCTIONS COOKTOP USE NOTE: Burner ratings listed below are for your protection against shock hazard and should be seriously injured. ■ Proper Installation - Do not cut or remove the grounding prong from this appliance as stepping, leaning, or sitting on or near surface units. ■ Top burner flame size should be electrically grounded in accordance with local codes or, in cabinets...
Use & Care Guide
Page 6
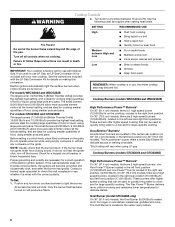
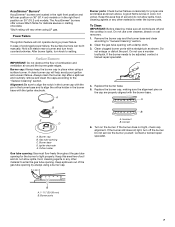
... setting heat levels. Electric igniters automatically light the surface burners when control knobs are turned on 30" [76.2 cm] models). The small burners (9,200 Btu/h, 9,000 Btu/h and 5,000 Btu/h) allow more accurate simmer control at the lowest setting, and are ideal for cooking smaller quantities of food, using large pots and pans. NOTE: Visually check that has been turned on making this conversion. The Accusimmer® burner offers a lower Btu/h flame...
... setting heat levels. Electric igniters automatically light the surface burners when control knobs are turned on 30" [76.2 cm] models). The small burners (9,200 Btu/h, 9,000 Btu/h and 5,000 Btu/h) allow more accurate simmer control at the lowest setting, and are ideal for cooking smaller quantities of food, using large pots and pans. NOTE: Visually check that has been turned on making this conversion. The Accusimmer® burner offers a lower Btu/h flame...
Use & Care Guide
Page 7
...) models. Do not use oven cleaners, bleach or rust removers. 1. Replace the burner cap, making sure the alignment pins on the burner. A B C B E D A. Orifice holder Gas tube opening: Gas must flow freely throughout the gas tube opening for proper size and shape as shown. If the burner still does not light, turn knob counterclockwise. Contact a trained repair specialist. Power Failure The ignition feature will help avoid poor ignition and uneven flames. Do not use...
...) models. Do not use oven cleaners, bleach or rust removers. 1. Replace the burner cap, making sure the alignment pins on the burner. A B C B E D A. Orifice holder Gas tube opening: Gas must flow freely throughout the gas tube opening for proper size and shape as shown. If the burner still does not light, turn knob counterclockwise. Contact a trained repair specialist. Power Failure The ignition feature will help avoid poor ignition and uneven flames. Do not use...
Use & Care Guide
Page 8
... marks on the cooktop or grates. COOKWARE CHARACTERISTICS Aluminum ■ Heats quickly and evenly. ■ Suitable for all types of aluminum. Ceramic or Ceramic glass ■ Follow manufacturer's instructions. ■ Heats slowly, but unevenly. ■ A core or base of medium-to medium heat settings. Copper ■ Heats very quickly and evenly. Porcelain enamel-onsteel or cast iron ■ See stainless steel or cast iron. Improper installation of surface burners between batches. Bumpers...
... marks on the cooktop or grates. COOKWARE CHARACTERISTICS Aluminum ■ Heats quickly and evenly. ■ Suitable for all types of aluminum. Ceramic or Ceramic glass ■ Follow manufacturer's instructions. ■ Heats slowly, but unevenly. ■ A core or base of medium-to medium heat settings. Copper ■ Heats very quickly and evenly. Porcelain enamel-onsteel or cast iron ■ See stainless steel or cast iron. Improper installation of surface burners between batches. Bumpers...
Use & Care Guide
Page 9
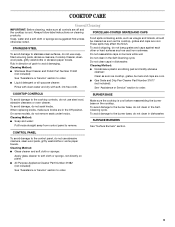
COOKTOP CARE General Cleaning IMPORTANT: Before cleaning, make sure knobs are cool. ■ Gas Grate and Drip Pan Cleaner Part Number 31617 (not included): Rinse with clean water and dry with soft, lint-free cloth. To avoid damage to avoid damaging. Do not clean caps in direction of grain to stainless steel surfaces, do not use steel wool, abrasive cleansers or oven cleaner. COOKTOP CONTROLS To avoid damage to order. ■ Liquid detergent or all...
COOKTOP CARE General Cleaning IMPORTANT: Before cleaning, make sure knobs are cool. ■ Gas Grate and Drip Pan Cleaner Part Number 31617 (not included): Rinse with clean water and dry with soft, lint-free cloth. To avoid damage to avoid damaging. Do not clean caps in direction of grain to stainless steel surfaces, do not use steel wool, abrasive cleansers or oven cleaner. COOKTOP CONTROLS To avoid damage to order. ■ Liquid detergent or all...
Use & Care Guide
Page 10
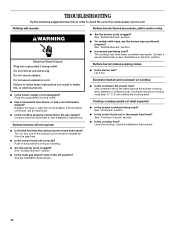
... Plug into a grounded 3 prong outlet. ■ Has a household fuse blown, or has a circuit breaker tripped? See "Surface Burners" section. ■ Is propane gas being used ? The cooktop may have been used? Contact a service technician or see Installation Instructions. Cookware should not extend more than ½" (1.3 cm) outside the cooking area. See "Cookware" section. ■ Is the control knob set correctly? Do not remove ground prong. Surface burners will operate Surface burner flames are the burner caps...
... Plug into a grounded 3 prong outlet. ■ Has a household fuse blown, or has a circuit breaker tripped? See "Surface Burners" section. ■ Is propane gas being used ? The cooktop may have been used? Contact a service technician or see Installation Instructions. Cookware should not extend more than ½" (1.3 cm) outside the cooking area. See "Cookware" section. ■ Is the control knob set correctly? Do not remove ground prong. Surface burners will operate Surface burner flames are the burner caps...
Use & Care Guide
Page 11
... the product warranty and provide after-warranty service, anywhere in your correspondence. Accessories Canning Unit Kit (coil element models) Order Part Number 242905 If you need replacement parts If you need to local dealers, repair parts distributors and service companies. All-Purpose Appliance Cleaner Order Part Number 31682 Stainless Steel Cleaner and Polish (stainless steel models) Order Part Number 31462 Gas Grate and Drip Pan Cleaner Order Part Number 31617 In Canada Call the Whirlpool Canada LP Customer eXperience Centre toll free: 1-800-807...
... the product warranty and provide after-warranty service, anywhere in your correspondence. Accessories Canning Unit Kit (coil element models) Order Part Number 242905 If you need replacement parts If you need to local dealers, repair parts distributors and service companies. All-Purpose Appliance Cleaner Order Part Number 31682 Stainless Steel Cleaner and Polish (stainless steel models) Order Part Number 31462 Gas Grate and Drip Pan Cleaner Order Part Number 31617 In Canada Call the Whirlpool Canada LP Customer eXperience Centre toll free: 1-800-807...
Use & Care Guide
Page 12
... model number and serial number. After checking "Troubleshooting," you ever need service, first see the "Troubleshooting" section of consumables or cleaning products not approved by an authorized Whirlpool servicer is used in the country in a remote area where service by Whirlpool. 5. Service calls to correct the installation of your major appliance, to be easily determined. Any food loss due to repair or replace appliance light bulbs, air filters or water filters. This warranty...
... model number and serial number. After checking "Troubleshooting," you ever need service, first see the "Troubleshooting" section of consumables or cleaning products not approved by an authorized Whirlpool servicer is used in the country in a remote area where service by Whirlpool. 5. Service calls to correct the installation of your major appliance, to be easily determined. Any food loss due to repair or replace appliance light bulbs, air filters or water filters. This warranty...
Dimension Guide
Page 1
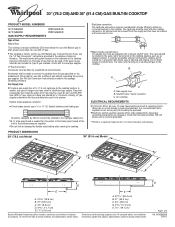
...;₂" minimum. The valve is required. To cooktop ELECTRICAL REQUIREMENTS q A 120 volt, 60 Hz, AC only, 15-amp, fused electrical circuit is for turning on the types of gas that the outlet provides 120-volt power and is correctly grounded. †®TEFLON is needed for connection to the female pipe threads of the inlet to the cooktop. The model/serial rating plate located on the underside of the cooktop base has information...
...;₂" minimum. The valve is required. To cooktop ELECTRICAL REQUIREMENTS q A 120 volt, 60 Hz, AC only, 15-amp, fused electrical circuit is for turning on the types of gas that the outlet provides 120-volt power and is correctly grounded. †®TEFLON is needed for connection to the female pipe threads of the inlet to the cooktop. The model/serial rating plate located on the underside of the cooktop base has information...
Dimension Guide
Page 2
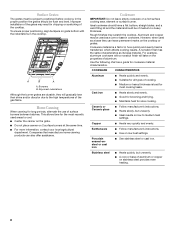
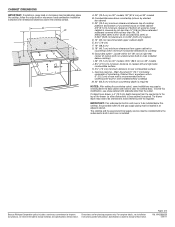
... DIMENSIONS IMPORTANT: If installing a range hood or microwave hood combination above the cooktop, follow the range hood or microwave hood combination installation instructions for planning purposes only. Gas line opening - Page 2 of countertop. Grounded outlet - If cabinet has a drawer, a 4" (10.2 cm) depth clearance from upper cabinet to countertop within minimum horizontal clearances to rear combustible surface L. IMPORTANT: If an undercounter built-in oven installed below underside of 2 Ref. Instructions packed with no undercounter built-in wall oven is covered...
... DIMENSIONS IMPORTANT: If installing a range hood or microwave hood combination above the cooktop, follow the range hood or microwave hood combination installation instructions for planning purposes only. Gas line opening - Page 2 of countertop. Grounded outlet - If cabinet has a drawer, a 4" (10.2 cm) depth clearance from upper cabinet to countertop within minimum horizontal clearances to rear combustible surface L. IMPORTANT: If an undercounter built-in oven installed below underside of 2 Ref. Instructions packed with no undercounter built-in wall oven is covered...

