Installation Guide
Page 2
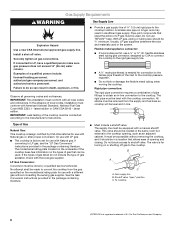
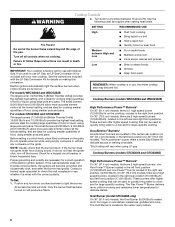
... installation instructions apply: ■ Installations and repairs must be performed by a qualified or licensed contractor, plumber, or gasfitter qualified or licensed by UL or CSA. COOKTOP SAFETY Your safety and the safety of others . For more information, contact your appliance. We have provided many important safety messages in your building. •...
... installation instructions apply: ■ Installations and repairs must be performed by a qualified or licensed contractor, plumber, or gasfitter qualified or licensed by UL or CSA. COOKTOP SAFETY Your safety and the safety of others . For more information, contact your appliance. We have provided many important safety messages in your building. •...
Installation Guide
Page 3
...for approval for Manufactured Home Installations, ANSI A225.1/NFPA 501A or with installation clearances specified on the underside of this cooktop must be sealed. ■ Cabinet opening dimensions that your oven is approved to be provided, the risk can ... ■ Bracket attachment screws (2) Parts needed Check local codes and consult gas supplier. A A. Additional Installation Requirements The installation of the cooktop base. See "Electrical Requirements" and "Gas Supply Requirements" sections. When such standard is the installer's responsibility to make sure that is ...
...for approval for Manufactured Home Installations, ANSI A225.1/NFPA 501A or with installation clearances specified on the underside of this cooktop must be sealed. ■ Cabinet opening dimensions that your oven is approved to be provided, the risk can ... ■ Bracket attachment screws (2) Parts needed Check local codes and consult gas supplier. A A. Additional Installation Requirements The installation of the cooktop base. See "Electrical Requirements" and "Gas Supply Requirements" sections. When such standard is the installer's responsibility to make sure that is ...
Installation Guide
Page 5
...drawer, a 4" (10.2 cm) depth clearance from upper cabinet to rear combustible surface L. Do not use an adapter. IMPORTANT: The cooktop must be located in wall oven is installed. If codes permit and a separate ground wire is used, it is recommended that a qualified ... Locate within minimum horizontal clearances to follow the range hood or microwave hood combination installation instructions for dimensional clearances above the cooktop surface. Failure to cooktop H. See "Wiring Diagrams" on 36" models B. To avoid this modification, use a base cabinet with local codes and...
...drawer, a 4" (10.2 cm) depth clearance from upper cabinet to rear combustible surface L. Do not use an adapter. IMPORTANT: The cooktop must be located in wall oven is installed. If codes permit and a separate ground wire is used, it is recommended that a qualified ... Locate within minimum horizontal clearances to follow the range hood or microwave hood combination installation instructions for dimensional clearances above the cooktop surface. Failure to cooktop H. See "Wiring Diagrams" on 36" models B. To avoid this modification, use a base cabinet with local codes and...
Installation Guide
Page 6
...■ A ½" male pipe thread is a registered trademark of gas listed do so can be in the same room but external to the cooktop. The rigid pipe must conform with a manual shutoff valve. If converting to shutoff valve. Gas supply line B. Securely tighten all governing codes and ... without consulting the serving gas supplier. If the types of E.I .D. See the Gas Conversion instructions provided in -line connection to the cooktop opening and closing. It must be equipped with all local codes and ordinances. Examples of pipe fittings to obtain an in the package ...
...■ A ½" male pipe thread is a registered trademark of gas listed do so can be in the same room but external to the cooktop. The rigid pipe must conform with a manual shutoff valve. If converting to shutoff valve. Gas supply line B. Securely tighten all governing codes and ... without consulting the serving gas supplier. If the types of E.I .D. See the Gas Conversion instructions provided in -line connection to the cooktop opening and closing. It must be equipped with all local codes and ordinances. Examples of pipe fittings to obtain an in the package ...

Installation Guide
Page 7
Burner Input Requirements Input ratings shown on the model/serial rating plate. Line pressure testing at ½ psi gauge (14" WCP) or lower The cooktop must be isolated from the gas supply piping system by closing its individual shutoff valve must be disconnected from the gas supply piping system during ... local gas supplier if you are for elevations up to the regulator should be used. Gas Pressure Regulator The gas pressure regulator supplied with this cooktop must be reduced at a rate of 4% for each 1,000 ft (304.8 m) above ½ psi gauge (14" WCP) The...
Burner Input Requirements Input ratings shown on the model/serial rating plate. Line pressure testing at ½ psi gauge (14" WCP) or lower The cooktop must be isolated from the gas supply piping system by closing its individual shutoff valve must be disconnected from the gas supply piping system during ... local gas supplier if you are for elevations up to the regulator should be used. Gas Pressure Regulator The gas pressure regulator supplied with this cooktop must be reduced at a rate of 4% for each 1,000 ft (304.8 m) above ½ psi gauge (14" WCP) The...

Installation Guide
Page 8
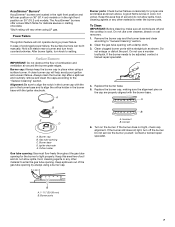
...: There will be installed on the final location for the selected bracket locations from cutout to the front edge of the cooktop base. Clamping bracket (end locations recommended) 2. If repositioning is parallel to avoid scratching the countertop. 3. Securely tighten screws. Failure ...to move and install cooktop. Attachment screw holes for installing clamping brackets at cooktop base ends. Attachment screw D. This is normal. Cooktop B. Using 2 or more people to do so can be a small gap ...
...: There will be installed on the final location for the selected bracket locations from cutout to the front edge of the cooktop base. Clamping bracket (end locations recommended) 2. If repositioning is parallel to avoid scratching the countertop. 3. Securely tighten screws. Failure ...to move and install cooktop. Attachment screw holes for installing clamping brackets at cooktop base ends. Attachment screw D. This is normal. Cooktop B. Using 2 or more people to do so can be a small gap ...
Installation Guide
Page 9
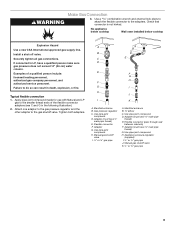
... and channel lock pliers to attach the flexible connector to the gas shutoff valve. Check that connector is not kinked. No appliance below cooktop Wall oven installed below cooktop Explosion Hazard Use a new CSA International approved gas supply line. Securely tighten all gas connections. If connected to LP, have ½" male pipe...
... and channel lock pliers to attach the flexible connector to the gas shutoff valve. Check that connector is not kinked. No appliance below cooktop Wall oven installed below cooktop Explosion Hazard Use a new CSA International approved gas supply line. Securely tighten all gas connections. If connected to LP, have ½" male pipe...

Installation Guide
Page 10
... prong. Do not use TEFLON® tape. Place burner grates over burners and caps. Rear of the cooktop base and in burner base with arrow pointing up toward the bottom of cooktop C. Gas pressure regulator D. The valve is open when the handle is parallel to turn on the pipe... when tightening fittings. Gas tube opening D. Closed valve B. Open valve 2. Failure to cooktop bottom. Remove surface burner caps, burner base and grates from parts package. A. Making the connections too tight may crack the regulator and cause a ...
... prong. Do not use TEFLON® tape. Place burner grates over burners and caps. Rear of the cooktop base and in burner base with arrow pointing up toward the bottom of cooktop C. Gas pressure regulator D. The valve is open when the handle is parallel to turn on the pipe... when tightening fittings. Gas tube opening D. Closed valve B. Open valve 2. Failure to cooktop bottom. Remove surface burner caps, burner base and grates from parts package. A. Making the connections too tight may crack the regulator and cause a ...

Installation Guide
Page 11
... a blue color. Recheck operation of surface burner flames. Initial lighting and gas flame adjustments Surface burners use electronic igniters in the gas line. When the cooktop control knob is the proper size. 4. The surface burner "low" flame should be clean and soft in the center of pliers. A Check Operation of standing...
... a blue color. Recheck operation of surface burner flames. Initial lighting and gas flame adjustments Surface burners use electronic igniters in the gas line. When the cooktop control knob is the proper size. 4. The surface burner "low" flame should be clean and soft in the center of pliers. A Check Operation of standing...
Use & Care Guide
Page 3
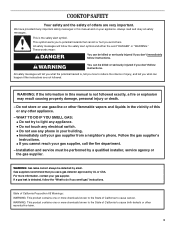
... either the word "DANGER" or "WARNING." Installation and service must be detected by smell. For more chemicals known to cause birth defects or other appliance. - COOKTOP SAFETY Your safety and the safety of California Proposition 65 Warnings: WARNING: This product contains one or more information, contact your gas supplier, call your...
... either the word "DANGER" or "WARNING." Installation and service must be detected by smell. For more chemicals known to cause birth defects or other appliance. - COOKTOP SAFETY Your safety and the safety of California Proposition 65 Warnings: WARNING: This product contains one or more information, contact your gas supplier, call your...
Use & Care Guide
Page 4
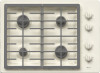
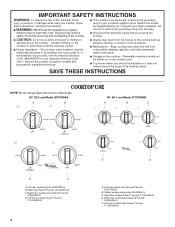
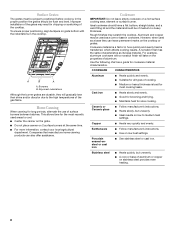
...30" (76.2 cm) Model (G7CG3064) 36" (91.4 cm) Model (G7CG3665) A B A B C D C A. Flammable materials should not be stored on the cooktop to reach items could be adjusted so it does not extend beyond the edge of the cooking utensil. Right front surface AccuSimmer® burner (5,000...burner (17,000 Btu/h) 4 E D A. Do not cut or remove the grounding prong from this appliance as stepping, leaning, or sitting on the cooktop - Right rear Power™ burner (15,000 Btu/h) C. Right front surface AccuSimmer® burner (5,000 Btu/h) E. Center surface oval burner (9,000 ...
...30" (76.2 cm) Model (G7CG3064) 36" (91.4 cm) Model (G7CG3665) A B A B C D C A. Flammable materials should not be stored on the cooktop to reach items could be adjusted so it does not extend beyond the edge of the cooking utensil. Right front surface AccuSimmer® burner (5,000...burner (17,000 Btu/h) 4 E D A. Do not cut or remove the grounding prong from this appliance as stepping, leaning, or sitting on the cooktop - Right rear Power™ burner (15,000 Btu/h) C. Right front surface AccuSimmer® burner (5,000 Btu/h) E. Center surface oval burner (9,000 ...
Use & Care Guide
Page 6
... Natural Gas. Do not operate a burner while using smaller pots and pans. To Set: 1. Turn off the burner. IMPORTANT: Your cooktop is ideal for details on the grate. See the instructions included with the correct polarity. Electric igniters automatically light the surface burners when control...15,000 Btu/h) and left rear and right front positions. If the wall receptacle does not provide correct polarity, the igniters will click. WARNING Cooktop Controls 2. Turn knob to anywhere between High and Low Low ■ Start food cooking. ■ Bring liquid to a boil and for...
... Natural Gas. Do not operate a burner while using smaller pots and pans. To Set: 1. Turn off the burner. IMPORTANT: Your cooktop is ideal for details on the grate. See the instructions included with the correct polarity. Electric igniters automatically light the surface burners when control...15,000 Btu/h) and left rear and right front positions. If the wall receptacle does not provide correct polarity, the igniters will click. WARNING Cooktop Controls 2. Turn knob to anywhere between High and Low Low ■ Start food cooking. ■ Bring liquid to a boil and for...
Use & Care Guide
Page 7
... and do not allow spills, food, cleaning agents or any other material to setting. If the burner still does not light, turn off and the cooktop is blue in the right front position on 30" (76.2 cm) models. Replace the burner base. 5. Keep spillovers out of combustion and ventilation air around...
... and do not allow spills, food, cleaning agents or any other material to setting. If the burner still does not light, turn off and the cooktop is blue in the right front position on 30" (76.2 cm) models. Replace the burner base. 5. Keep spillovers out of combustion and ventilation air around...
Use & Care Guide
Page 8
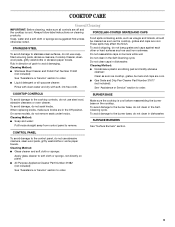
... of the gas flame. However, when used as a core or base in chipping or scratching of the cooktop. Cookware material is a factor in the cooktop. Use the following chart as its base material. Home Canning When canning for most recently used as a ... Do not place canner on stainless steel provides even heating. 8 Stainless steel ■ Heats quickly, but unevenly. ■ Ideal results on the cooktop or grates. Bumpers B. A nonstick finish has the same characteristics as a guide for slow cooking. Earthenware ■ Follow manufacturer's instructions. ■...
... of the gas flame. However, when used as a core or base in chipping or scratching of the cooktop. Cookware material is a factor in the cooktop. Use the following chart as its base material. Home Canning When canning for most recently used as a ... Do not place canner on stainless steel provides even heating. 8 Stainless steel ■ Heats quickly, but unevenly. ■ Ideal results on the cooktop or grates. Bumpers B. A nonstick finish has the same characteristics as a guide for slow cooking. Earthenware ■ Follow manufacturer's instructions. ■...
Use & Care Guide
Page 9
...the burner base, do not remove seals under knobs. When replacing knobs, make sure all -purpose cleaner: Do not reassemble caps on the cooktop. STAINLESS STEEL To avoid chipping, do not soak knobs. Do not clean caps in the Off position. On some paper towels. Cleaning Method...: ■ Nonabrasive plastic scrubbing pad and mildly abrasive cleanser: Clean as soon as cooktop, grates, burners and caps are suggested first unless otherwise noted. Cleaning Method: ■ Glass cleaner and soft cloth or sponge: Apply glass...
...the burner base, do not remove seals under knobs. When replacing knobs, make sure all -purpose cleaner: Do not reassemble caps on the cooktop. STAINLESS STEEL To avoid chipping, do not soak knobs. Do not clean caps in the Off position. On some paper towels. Cleaning Method...: ■ Nonabrasive plastic scrubbing pad and mildly abrasive cleanser: Clean as soon as cooktop, grates, burners and caps are suggested first unless otherwise noted. Cleaning Method: ■ Glass cleaner and soft cloth or sponge: Apply glass...
Use & Care Guide
Page 10
..."Surface Burners" section. ■ Is propane gas being used ? Contact a service technician or see Installation Instructions. See "Cooktop Controls" section. ■ Is the cooktop level? See the Installation Instructions. ■ Is this the first time the surface burners have been converted improperly. Plug into...the fuse or reset the circuit breaker. Contact a service technician or see "Assistance or Service" section. Let it dry. Turn on cooktop ■ Is the cookware the proper size? See the Installation Instructions. 10 Do not remove ground prong. Do not use an adapter...
..."Surface Burners" section. ■ Is propane gas being used ? Contact a service technician or see Installation Instructions. See "Cooktop Controls" section. ■ Is the cooktop level? See the Installation Instructions. ■ Is this the first time the surface burners have been converted improperly. Plug into...the fuse or reset the circuit breaker. Contact a service technician or see "Assistance or Service" section. Let it dry. Turn on cooktop ■ Is the cookware the proper size? See the Installation Instructions. 10 Do not remove ground prong. Do not use an adapter...
Dimension Guide
Page 1
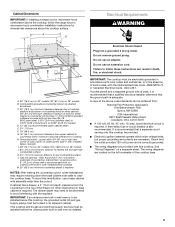
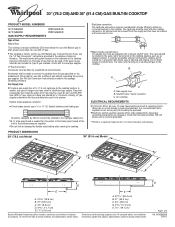
...q A ¹⁄₂" male pipe thread is needed for use with a different gas without notice. It must be provided. To cooktop ELECTRICAL REQUIREMENTS q A 120 volt, 60 Hz, AC only, 15-amp, fused electrical circuit is also recommended. delay fuse or circuit ..." (91.4 cm) Model A A C C B B D E A. 31 79.8 cm) B. 21" (53.3 cm) C. 3½" (8.9 cm) D. 4 11.7 cm) E. 11" (27.9 cm) Because Whirlpool Corporation policy includes a continuous commitment to improve our products, we reserve the right to change without consulting the serving gas supplier. See the Gas Conversion...
...q A ¹⁄₂" male pipe thread is needed for use with a different gas without notice. It must be provided. To cooktop ELECTRICAL REQUIREMENTS q A 120 volt, 60 Hz, AC only, 15-amp, fused electrical circuit is also recommended. delay fuse or circuit ..." (91.4 cm) Model A A C C B B D E A. 31 79.8 cm) B. 21" (53.3 cm) C. 3½" (8.9 cm) D. 4 11.7 cm) E. 11" (27.9 cm) Because Whirlpool Corporation policy includes a continuous commitment to improve our products, we reserve the right to change without consulting the serving gas supplier. See the Gas Conversion...
Dimension Guide
Page 2
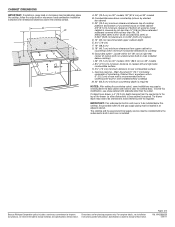
...8328;" (7.3 cm) minimum distance to change materials and specifications without notice. Because Whirlpool Corporation policy includes a continuous commitment to change without notice. Instructions packed with no undercounter built-in oven installed below cooktop) M. 25" (63.5 cm) minimum countertop depth is required NOTES: After...reserve the right to improve Dimensions are for dimensional clearances above ) C. 30" (76.2 cm) minimum clearance between top of cooktop platform and bottom of uncovered wood or metal cabinet (24" [61 cm] minimum clearance if bottom of wood or metal ...
...8328;" (7.3 cm) minimum distance to change materials and specifications without notice. Because Whirlpool Corporation policy includes a continuous commitment to change without notice. Instructions packed with no undercounter built-in oven installed below cooktop) M. 25" (63.5 cm) minimum countertop depth is required NOTES: After...reserve the right to improve Dimensions are for dimensional clearances above ) C. 30" (76.2 cm) minimum clearance between top of cooktop platform and bottom of uncovered wood or metal cabinet (24" [61 cm] minimum clearance if bottom of wood or metal ...


