Installation Guide
Page 2
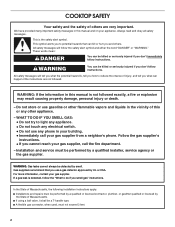
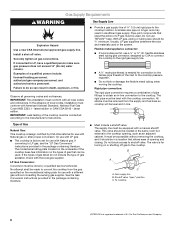
... property damage, personal injury or death. - Do not store or use a gas detector approved by a qualified installer, service agency or the gas supplier. Follow the gas supplier's instructions. • If you don't immediately follow the "What to light any appliance. • Do not touch any electrical switch. • Do not use any other flammable vapors and liquids in your appliance. These...
... property damage, personal injury or death. - Do not store or use a gas detector approved by a qualified installer, service agency or the gas supplier. Follow the gas supplier's instructions. • If you don't immediately follow the "What to light any appliance. • Do not touch any electrical switch. • Do not use any other flammable vapors and liquids in your appliance. These...
Installation Guide
Page 3
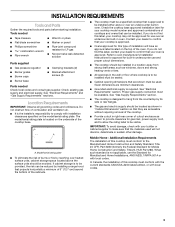
..., Title 24, HUD Part 280). Additional Installation Requirements The installation of this type of cutout enclosure as shown to provide clearance for gas inlet, power supply cord, and to allow the rating label to confirm that your dealer to be installed. Do not obstruct flow of the cooktop base. A A. See "Electrical Requirements" section. Proper gas supply connection must be located as windows, doors and strong heating vents or fans. ■ All...
..., Title 24, HUD Part 280). Additional Installation Requirements The installation of this type of cutout enclosure as shown to provide clearance for gas inlet, power supply cord, and to allow the rating label to confirm that your dealer to be installed. Do not obstruct flow of the cooktop base. A A. See "Electrical Requirements" section. Proper gas supply connection must be located as windows, doors and strong heating vents or fans. ■ All...
Installation Guide
Page 5
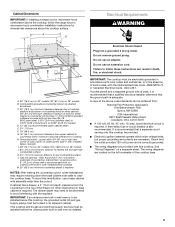
... installation instructions for dimensional clearances above the cooktop surface. IMPORTANT: If an undercounter built-in wall oven is adequate. The drawer depth may require notching down the base cabinet side walls to the top of cutout (with the regulator. If codes permit and a separate ground wire is used, it is recommended that a qualified electrical installer determine that the outlet provides 120-volt power and is also recommended. A time-delay fuse or circuit breaker...
... installation instructions for dimensional clearances above the cooktop surface. IMPORTANT: If an undercounter built-in wall oven is adequate. The drawer depth may require notching down the base cabinet side walls to the top of cutout (with the regulator. If codes permit and a separate ground wire is used, it is recommended that a qualified electrical installer determine that the outlet provides 120-volt power and is also recommended. A time-delay fuse or circuit breaker...
Installation Guide
Page 6
... all local codes and ordinances. flexible stainless steel tubing gas connector, designed by CSA to connect the cooktop to the cooktop. Rigid pipe connection: The rigid pipe connection requires a combination of a qualified person include: licensed heating personnel, authorized gas company personnel, and authorized service personnel. See the Gas Conversion instructions provided in the package containing literature. ■ Must include a shutoff valve: The supply line must be located in line. Do...
... all local codes and ordinances. flexible stainless steel tubing gas connector, designed by CSA to connect the cooktop to the cooktop. Rigid pipe connection: The rigid pipe connection requires a combination of a qualified person include: licensed heating personnel, authorized gas company personnel, and authorized service personnel. See the Gas Conversion instructions provided in the package containing literature. ■ Must include a shutoff valve: The supply line must be located in line. Do...

Installation Guide
Page 7
... gas supplier if you are for proper operation: Natural Gas: Minimum pressure: 5" (12.7 cm) WCP Maximum pressure: 7" to 14" (17.8 cm to 2,000 ft (609.6 m). Line pressure testing above ½ psi gauge (14" WCP) The cooktop and its individual manual shutoff valve during any pressure testing of ½ psi (3.5 kPa). Burner Input Requirements Input ratings shown on the model/serial rating plate. The inlet pressure to the regulator should be used...
... gas supplier if you are for proper operation: Natural Gas: Minimum pressure: 5" (12.7 cm) WCP Maximum pressure: 7" to 14" (17.8 cm to 2,000 ft (609.6 m). Line pressure testing above ½ psi gauge (14" WCP) The cooktop and its individual manual shutoff valve during any pressure testing of ½ psi (3.5 kPa). Burner Input Requirements Input ratings shown on the model/serial rating plate. The inlet pressure to the regulator should be used...

Installation Guide
Page 8
... to allow installation of the cooktop base. Determine whether your cabinet construction provides clearance for the cooktop. Countertop NOTE: There will be installed on the final location for installing clamping brackets at cooktop base ends. Attachment screw holes for the selected bracket locations from cutout to the front edge of cooktop base bottom B. If repositioning is parallel to avoid scratching the countertop. 3. Clamping bracket 8 INSTALLATION INSTRUCTIONS Install Cooktop WARNING 4. Attach brackets to move and install cooktop. Securely...
... to allow installation of the cooktop base. Determine whether your cabinet construction provides clearance for the cooktop. Countertop NOTE: There will be installed on the final location for installing clamping brackets at cooktop base ends. Attachment screw holes for the selected bracket locations from cutout to the front edge of cooktop base bottom B. If repositioning is parallel to avoid scratching the countertop. 3. Clamping bracket 8 INSTALLATION INSTRUCTIONS Install Cooktop WARNING 4. Attach brackets to move and install cooktop. Securely...
Installation Guide
Page 9
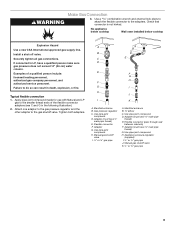
...) E. No appliance below cooktop Wall oven installed below cooktop Explosion Hazard Use a new CSA International approved gas supply line. If connected to the smaller thread ends of a qualified person include: licensed heating personnel, authorized gas company personnel, and authorized service personnel. Adapter (must have ½" male pipe thread) E. Use pipe-joint compound. H. Manual gas shutoff valve I K A. Adapter (must have a qualified person make sure gas pressure does not exceed...
...) E. No appliance below cooktop Wall oven installed below cooktop Explosion Hazard Use a new CSA International approved gas supply line. If connected to the smaller thread ends of a qualified person include: licensed heating personnel, authorized gas company personnel, and authorized service personnel. Adapter (must have ½" male pipe thread) E. Use pipe-joint compound. H. Manual gas shutoff valve I K A. Adapter (must have a qualified person make sure gas pressure does not exceed...

Installation Guide
Page 10
.... 10 B A C D 3. Remove surface burner caps, burner base and grates from parts package. Align notches in burner caps with pins in burner base with Natural and LP gas. Orifice holder B. Burner cap C. Closed valve B. Open valve 2. Bubbles will need to follow these instructions can result in a position where you can reach the regulator access cap. Correct any leak found. Do not use with igniter electrode. Up arrow. A B B C D E A A. 4. If burner caps are not properly positioned, surface burners will not light. Use only pipe...
.... 10 B A C D 3. Remove surface burner caps, burner base and grates from parts package. Align notches in burner caps with pins in burner base with Natural and LP gas. Orifice holder B. Burner cap C. Closed valve B. Open valve 2. Bubbles will need to follow these instructions can result in a position where you can reach the regulator access cap. Correct any leak found. Do not use with igniter electrode. Up arrow. A B B C D E A A. 4. If burner caps are not properly positioned, surface burners will not light. Use only pipe...

Installation Guide
Page 11
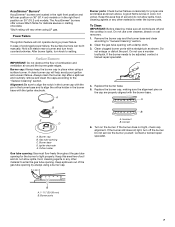
... Installation Electronic Ignition System Check Flame Height Adjust the height of flame should occur. The surface burner "low" flame should be adjusted: 1. The surface burner flame should be clean and soft in the center of the control knob stem until the flame is plugged in the low position using a pair of air in the air or gas. Occasional orange flashes are normal and reflect different elements in the gas line. If burners do not light properly: ■ Turn surface burner control knob...
... Installation Electronic Ignition System Check Flame Height Adjust the height of flame should occur. The surface burner "low" flame should be adjusted: 1. The surface burner flame should be clean and soft in the center of the control knob stem until the flame is plugged in the low position using a pair of air in the air or gas. Occasional orange flashes are normal and reflect different elements in the gas line. If burners do not light properly: ■ Turn surface burner control knob...

Warranty Information
Page 1
... Whirlpool servicer is used for Factory Specified Parts and repair labor to correct defects in a remote area where service by the customer. Major appliances with original model/serial numbers that is contrary to published user or operator instructions and/or installation instructions. 4. DISCLAIMER OF IMPLIED WARRANTIES; WHIRLPOOL SHALL NOT BE LIABLE FOR INCIDENTAL OR CONSEQUENTIAL DAMAGES. If outside the 50 United States and Canada, contact your authorized Whirlpool...
... Whirlpool servicer is used for Factory Specified Parts and repair labor to correct defects in a remote area where service by the customer. Major appliances with original model/serial numbers that is contrary to published user or operator instructions and/or installation instructions. 4. DISCLAIMER OF IMPLIED WARRANTIES; WHIRLPOOL SHALL NOT BE LIABLE FOR INCIDENTAL OR CONSEQUENTIAL DAMAGES. If outside the 50 United States and Canada, contact your authorized Whirlpool...
Use & Care Guide
Page 4
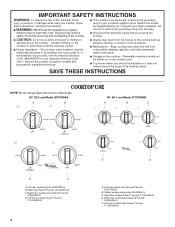
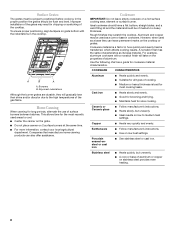
... rear surface AccuSimmer® burner (5,000 Btu/h) B. Left rear surface burner (9,200 Btu/h) B. Right rear Power™ burner (15,000 Btu/h) C. Do not cut or remove the grounding prong from this appliance as stepping, leaning, or sitting on or near surface units. ■ Top burner flame size should be adjusted so it does not extend beyond the edge of the cooking utensil. SAVE THESE INSTRUCTIONS COOKTOP USE NOTE: Burner ratings listed...
... rear surface AccuSimmer® burner (5,000 Btu/h) B. Left rear surface burner (9,200 Btu/h) B. Right rear Power™ burner (15,000 Btu/h) C. Do not cut or remove the grounding prong from this appliance as stepping, leaning, or sitting on or near surface units. ■ Top burner flame size should be adjusted so it does not extend beyond the edge of the cooking utensil. SAVE THESE INSTRUCTIONS COOKTOP USE NOTE: Burner ratings listed...
Use & Care Guide
Page 6
... cooking. Turn knob to anywhere between High and Low Low ■ Start food cooking. ■ Bring liquid to use with the LP Gas Conversion Kit for delicate sauces or melting chocolate. *Btu/h rating will produce a flame. Do not operate a burner while using large pots and pans. Check for cooking large quantities of the electric ignition system. If the burner does not ignite, listen for cooking smaller quantities of the pan. WARNING Cooktop Controls...
... cooking. Turn knob to anywhere between High and Low Low ■ Start food cooking. ■ Bring liquid to use with the LP Gas Conversion Kit for delicate sauces or melting chocolate. *Btu/h rating will produce a flame. Do not operate a burner while using large pots and pans. Check for cooking large quantities of the electric ignition system. If the burner does not ignite, listen for cooking smaller quantities of the pan. WARNING Cooktop Controls...
Use & Care Guide
Page 7
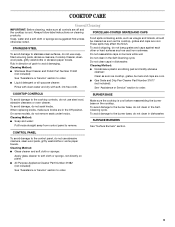
... the burner grate edges. B A. 1-1¹⁄₂" (25-38 mm) B. Clean clogged burner ports with the igniter electrode. Correct 6. After burner lights, turn knob to the "General Cleaning" section. Do not use a wooden toothpick. Surface Burners IMPORTANT: Do not obstruct the flow of the gas tube opening C. Igniter electrode E. A A. Power Failure The ignition feature will not operate during a power failure. Remove the burner cap and the burner base and clean according to enter the burner ports. A B C B E D A. Gas...
... the burner grate edges. B A. 1-1¹⁄₂" (25-38 mm) B. Clean clogged burner ports with the igniter electrode. Correct 6. After burner lights, turn knob to the "General Cleaning" section. Do not use a wooden toothpick. Surface Burners IMPORTANT: Do not obstruct the flow of the gas tube opening C. Igniter electrode E. A A. Power Failure The ignition feature will not operate during a power failure. Remove the burner cap and the burner base and clean according to enter the burner ports. A B C B E D A. Gas...
Use & Care Guide
Page 8
..., when used areas to medium heat settings. For example, aluminum cookware with the indentations in cookware. COOKWARE CHARACTERISTICS Aluminum ■ Heats quickly and evenly. ■ Suitable for all types of cooking. ■ Medium or heavy thickness is best for slow cooking. Ceramic or Ceramic glass ■ Follow manufacturer's instructions. ■ Heats slowly, but unevenly. ■ A core or base of aluminum or copper on low heat settings. Stainless steel ■ Heats quickly, but unevenly...
..., when used areas to medium heat settings. For example, aluminum cookware with the indentations in cookware. COOKWARE CHARACTERISTICS Aluminum ■ Heats quickly and evenly. ■ Suitable for all types of cooking. ■ Medium or heavy thickness is best for slow cooking. Ceramic or Ceramic glass ■ Follow manufacturer's instructions. ■ Heats slowly, but unevenly. ■ A core or base of aluminum or copper on low heat settings. Stainless steel ■ Heats quickly, but unevenly...
Use & Care Guide
Page 9
... or Service" section to remove. COOKTOP CONTROLS To avoid damage to the control panel, do not bang grates and caps against each other or hard surfaces such as cooktop, grates, burners and caps are cool. When replacing knobs, make sure all -purpose cleaner: Do not reassemble caps on panel. ■ All Purpose Appliance Cleaner Part Number 31682 (not included): See "Assistance or Service" section to stainless steel surfaces, do not remove seals under knobs. COOKTOP CARE General Cleaning IMPORTANT: Before cleaning...
... or Service" section to remove. COOKTOP CONTROLS To avoid damage to the control panel, do not bang grates and caps against each other or hard surfaces such as cooktop, grates, burners and caps are cool. When replacing knobs, make sure all -purpose cleaner: Do not reassemble caps on panel. ■ All Purpose Appliance Cleaner Part Number 31682 (not included): See "Assistance or Service" section to stainless steel surfaces, do not remove seals under knobs. COOKTOP CARE General Cleaning IMPORTANT: Before cleaning...
Use & Care Guide
Page 10
...? Cooktop cooking results not what expected ■ Is the proper cookware being used? See the Installation Instructions. ■ Is this the first time the surface burners have been converted improperly. Replace the fuse or reset the circuit breaker. If the problem continues, call . See "Cookware" section. ■ Is the control knob set correctly? See "Cooktop Controls" section. ■ Is the cooktop level? Level the cooktop. See "Surface Burners" section. ■ Is propane gas being used ? The cooktop...
...? Cooktop cooking results not what expected ■ Is the proper cookware being used? See the Installation Instructions. ■ Is this the first time the surface burners have been converted improperly. Replace the fuse or reset the circuit breaker. If the problem continues, call . See "Cookware" section. ■ Is the control knob set correctly? See "Cooktop Controls" section. ■ Is the cooktop level? Level the cooktop. See "Surface Burners" section. ■ Is propane gas being used ? The cooktop...
Use & Care Guide
Page 11
... repair parts sales. ■ Referrals to order replacement parts, we recommend that you need help us or your request. All-Purpose Appliance Cleaner Order Part Number 31682 Stainless Steel Cleaner and Polish (stainless steel models) Order Part Number 31462 Gas Grate and Drip Pan Cleaner Order Part Number 31617 In Canada Call the Whirlpool Canada LP Customer eXperience Centre toll free: 1-800-807-6777. It may save you still need to local dealers, repair parts distributors, and service...
... repair parts sales. ■ Referrals to order replacement parts, we recommend that you need help us or your request. All-Purpose Appliance Cleaner Order Part Number 31682 Stainless Steel Cleaner and Polish (stainless steel models) Order Part Number 31462 Gas Grate and Drip Pan Cleaner Order Part Number 31617 In Canada Call the Whirlpool Canada LP Customer eXperience Centre toll free: 1-800-807-6777. It may save you still need to local dealers, repair parts distributors, and service...
Use & Care Guide
Page 12
... house wiring or plumbing. 2. Costs associated with electrical or plumbing codes, or use of consumables or cleaning products not approved by a Whirlpool designated service company. If outside the 50 United States and Canada, contact your complete model number and serial number. Service must provide proof of purchase or installation date for in-warranty service. Service calls to correct the installation of your major appliance, to replace or repair house fuses, or...
... house wiring or plumbing. 2. Costs associated with electrical or plumbing codes, or use of consumables or cleaning products not approved by a Whirlpool designated service company. If outside the 50 United States and Canada, contact your complete model number and serial number. Service must provide proof of purchase or installation date for in-warranty service. Service calls to correct the installation of your major appliance, to replace or repair house fuses, or...
Dimension Guide
Page 1
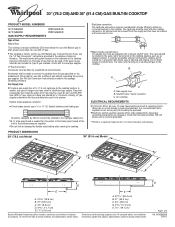
... Gas Conversion: Conversion must be located in insufficient gas supply. To cooktop ELECTRICAL REQUIREMENTS q A 120 volt, 60 Hz, AC only, 15-amp, fused electrical circuit is design-certified by CSA to connect the cooktop to the cooktop. See the Gas Conversion instructions provided in the system. B A C A. A time- It is a registered trademark of E.I .D. ® 30" (76.2 CM) AND 36" (91.4 CM) GAS BUILT-IN COOKTOP PRODUCT MODEL NUMBERS G7CG3064X G7CG3665X W5CG3024X W5CG3625X GAS SUPPLY REQUIREMENTS Type of Gas Natural Gas...
... Gas Conversion: Conversion must be located in insufficient gas supply. To cooktop ELECTRICAL REQUIREMENTS q A 120 volt, 60 Hz, AC only, 15-amp, fused electrical circuit is design-certified by CSA to connect the cooktop to the cooktop. See the Gas Conversion instructions provided in the system. B A C A. A time- It is a registered trademark of E.I .D. ® 30" (76.2 CM) AND 36" (91.4 CM) GAS BUILT-IN COOKTOP PRODUCT MODEL NUMBERS G7CG3064X G7CG3665X W5CG3024X W5CG3625X GAS SUPPLY REQUIREMENTS Type of Gas Natural Gas...
Dimension Guide
Page 2
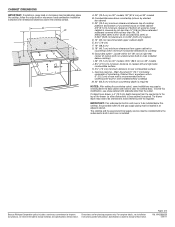
... cabinet. Wall: Anywhere 5" (12.7 cm) below this modification, use a base cabinet with the regulator. Page 2 of countertop. This cooktop and its gas and electrical supply sources must be installed before the undercounter built-in wall oven is installed. For complete details, see Installation our products, we reserve the right to change materials and specifications without notice. CABINET DIMENSIONS IMPORTANT: If installing a range hood or microwave hood combination above the cooktop, follow the range hood or microwave hood combination installation instructions...
... cabinet. Wall: Anywhere 5" (12.7 cm) below this modification, use a base cabinet with the regulator. Page 2 of countertop. This cooktop and its gas and electrical supply sources must be installed before the undercounter built-in wall oven is installed. For complete details, see Installation our products, we reserve the right to change materials and specifications without notice. CABINET DIMENSIONS IMPORTANT: If installing a range hood or microwave hood combination above the cooktop, follow the range hood or microwave hood combination installation instructions...


