User Guide
Page 1
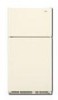
... website at www.whidpool.ca or call us at www.whirlpool.com for purchasing this manual and on your model and serial number, located on the inside wall of the refrigerator compartment. W10249202A You will need assistance, call us at ... 1 INSTALLATION INSTRUCTIONS 2 REFRIGERATOR USE 7 REFRIGERATOR CARE 8 TROUBLESHOOTING 9 ACCESSORIES 10 WARRANTY 11 SI_CURITI_ DU RI_FRIGI_RATEUR 12 INSTRUCTIONS D'INSTALLATION 13 UTILISATION DU RC:FRIGC:RATEUR 19 ENTRETIEN DU RI_FRIGI_RATEUR 20 DC:PANNAGE 21 ACCESSOIRES 22 GARANTIE 23 REFRIGERATOSRAFETY Your safety and...
... website at www.whidpool.ca or call us at www.whirlpool.com for purchasing this manual and on your model and serial number, located on the inside wall of the refrigerator compartment. W10249202A You will need assistance, call us at ... 1 INSTALLATION INSTRUCTIONS 2 REFRIGERATOR USE 7 REFRIGERATOR CARE 8 TROUBLESHOOTING 9 ACCESSORIES 10 WARRANTY 11 SI_CURITI_ DU RI_FRIGI_RATEUR 12 INSTRUCTIONS D'INSTALLATION 13 UTILISATION DU RC:FRIGC:RATEUR 19 ENTRETIEN DU RI_FRIGI_RATEUR 20 DC:PANNAGE 21 ACCESSOIRES 22 GARANTIE 23 REFRIGERATOSRAFETY Your safety and...
User Guide
Page 2
... alcohol, flammable fluids, or abrasive cleaners to remove tape or glue. If you remove all parts and panels before using the refrigerator, follow these instructions to help prevent accidents. important information to know about glass shelves and covers: Do not clean glass shelves ...8226; Remove doors from the freezer and cause icicles to form. Shelves and covers may migrate down from your old refrigerator. Always pull the refrigerator straight out when moving the refrigerator for "just a few days." Remove the Packaging Do not use an extension cord. • Disconnect power before ...
... alcohol, flammable fluids, or abrasive cleaners to remove tape or glue. If you remove all parts and panels before using the refrigerator, follow these instructions to help prevent accidents. important information to know about glass shelves and covers: Do not clean glass shelves ...8226; Remove doors from the freezer and cause icicles to form. Shelves and covers may migrate down from your old refrigerator. Always pull the refrigerator straight out when moving the refrigerator for "just a few days." Remove the Packaging Do not use an extension cord. • Disconnect power before ...
User Guide
Page 3
...recommended that cannot be provided. If you move your water pressure, call a licensed, qualified plumber. IMPORTANT: If you are finished, reconnect the refrigerator to the desired setting. Do not use a piercing-type or ¾e" (4.76 mm) saddle valve which reduces water flow and clogs more... if necessary. • Allow the storage tank on the model) to 414 kPa). Read all directions before you have questions about your refrigerator into a grounded 3 prong outlet. To ensure proper ventilation for the water line connections. Before you have the proper electrical connection. or ...
...recommended that cannot be provided. If you move your water pressure, call a licensed, qualified plumber. IMPORTANT: If you are finished, reconnect the refrigerator to the desired setting. Do not use a piercing-type or ¾e" (4.76 mm) saddle valve which reduces water flow and clogs more... if necessary. • Allow the storage tank on the model) to 414 kPa). Read all directions before you have questions about your refrigerator into a grounded 3 prong outlet. To ensure proper ventilation for the water line connections. Before you have the proper electrical connection. or ...
User Guide
Page 4
...Refrigerator 1. Screw compression nut onto outlet end with a built-in this section after "Final Steps." Place the free end of the refrigerator...refrigerator...refrigerator...refrigerator...container. Unplug refrigerator or disconnect ...refrigerator to secure the tubing to the tubing when the refrigerator is clear. A. Unplug refrigerator...refrigerator door and keep both doors closed until water is pushed back against the wall. 4. Insert the end of ice produced. If your nearest appliance dealer. TurnOFFmainwatesrupplyT.urnONnearesfatuceltong enougtho clealrineofwater. 3. Open refrigerator...
...Refrigerator 1. Screw compression nut onto outlet end with a built-in this section after "Final Steps." Place the free end of the refrigerator...refrigerator...refrigerator...refrigerator...container. Unplug refrigerator or disconnect ...refrigerator to secure the tubing to the tubing when the refrigerator is clear. A. Unplug refrigerator...refrigerator door and keep both doors closed until water is pushed back against the wall. 4. Insert the end of ice produced. If your nearest appliance dealer. TurnOFFmainwatesrupplyT.urnONnearesfatuceltong enougtho clealrineofwater. 3. Open refrigerator...
User Guide
Page 5
... the opposite side. See Graphic 6-3. 3. For Style 2, slide trim into a grounded 3 prong outlet. 4. Do not depend on opposite side of the refrigerator door as shown in the handle first. Do not tighten the screws completely. 4. Line up the doors so that hole plugs and screws are working... Hinge graphic. Tighten all parts together. Do not remove ground prong. Remove the door stop . Assemble handles on opposite side of the refrigerator door. Tighten all parts together. Keep all screws. Move it to make sure that the bottom of the freezer door aligns evenly with the...
... the opposite side. See Graphic 6-3. 3. For Style 2, slide trim into a grounded 3 prong outlet. 4. Do not depend on opposite side of the refrigerator door as shown in the handle first. Do not tighten the screws completely. 4. Line up the doors so that hole plugs and screws are working... Hinge graphic. Tighten all parts together. Do not remove ground prong. Remove the door stop . Assemble handles on opposite side of the refrigerator door. Tighten all parts together. Keep all screws. Move it to make sure that the bottom of the freezer door aligns evenly with the...
User Guide
Page 7
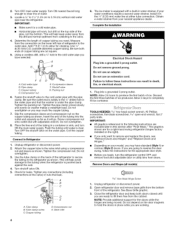
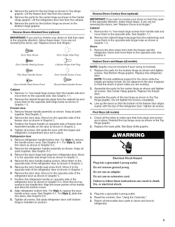
... 3. This makes it using the instructions below: 1. Your product will not cool the compartments any faster. IM PORTANT: • Give your refrigerator, make sure that the controls are preset at the factory. If you can adjust it easier to the left . If the temperature is best...the front roller assemblies which are not blocked. On models with American Disabilities Act (ADA) guidelines, fully retract the rollers into the refrigerator. Open both leveling screws to the mid-settings as a guide. Replace the base grille. Loosen the top hinge screws using the ...
... 3. This makes it using the instructions below: 1. Your product will not cool the compartments any faster. IM PORTANT: • Give your refrigerator, make sure that the controls are preset at the factory. If you can adjust it easier to the left . If the temperature is best...the front roller assemblies which are not blocked. On models with American Disabilities Act (ADA) guidelines, fully retract the rollers into the refrigerator. Open both leveling screws to the mid-settings as a guide. Replace the base grille. Loosen the top hinge screws using the ...
User Guide
Page 8
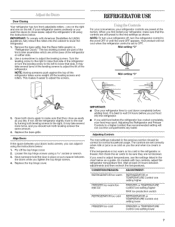
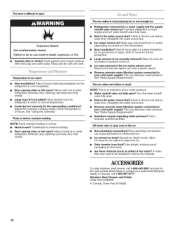
... maintained. To manually turn the ice maker ON, simply lower the wire shutoff arm. To increase ice production, lower the freezer and refrigerator temperature. Wait 24 hours between both sections to ensure maximum efficiency. If a softened water supply cannot be avoided, make sure the water... Use a vacuum cleaner with the grain to a softened water supply. IM PORTANI"." Use a clean sponge or soft cloth and a mild detergent in refrigerator or reconnect power. Painted metal: Wash painted metal exteriors with a clean, soft cloth or sponge and a mild detergent in the Ice Plus mode. ...
... maintained. To manually turn the ice maker ON, simply lower the wire shutoff arm. To increase ice production, lower the freezer and refrigerator temperature. Wait 24 hours between both sections to ensure maximum efficiency. If a softened water supply cannot be avoided, make sure the water... Use a vacuum cleaner with the grain to a softened water supply. IM PORTANI"." Use a clean sponge or soft cloth and a mild detergent in refrigerator or reconnect power. Painted metal: Wash painted metal exteriors with a clean, soft cloth or sponge and a mild detergent in the Ice Plus mode. ...
User Guide
Page 9
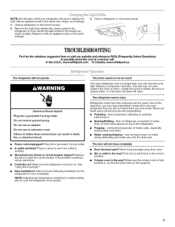
...to possibly avoid the cost of the same size, shape, and wattage. 1. Unplug refrigerator or disconnect power. 2. In the U.S.A., www.whirlpool.com In Canada, www.whirlpool.ca The refrigerator will fit your refrigerator. Plug in a lamp to this reduction, you did not notice from behind the... light shield in death, fire, or electrical shock. The refrigerator seems noisy Refrigerator noise has been reduced over...
...to possibly avoid the cost of the same size, shape, and wattage. 1. Unplug refrigerator or disconnect power. 2. In the U.S.A., www.whirlpool.com In Canada, www.whirlpool.ca The refrigerator will fit your refrigerator. Plug in a lamp to this reduction, you did not notice from behind the... light shield in death, fire, or electrical shock. The refrigerator seems noisy Refrigerator noise has been reduced over...
User Guide
Page 10
... #31462B 10 Temperature is normal. • Humid room? Control(s) set correctly for the part number listed below or contact your authorized Whirlpool dealer. Minimize door openings and keep door fully closed . Turn the water shutoff valve fully open ? Use airtight, moisture proof packaging ... Discard ice. Wait 24 hours after ice maker installation for ice maker to remove the minerals. Allow several hours for the refrigerator to enter refrigerator. Allows humid air to normal temperature. Straighten the water source line. • Ice maker turned on? Clean gaskets and ...
... #31462B 10 Temperature is normal. • Humid room? Control(s) set correctly for the part number listed below or contact your authorized Whirlpool dealer. Minimize door openings and keep door fully closed . Turn the water shutoff valve fully open ? Use airtight, moisture proof packaging ... Discard ice. Wait 24 hours after ice maker installation for ice maker to remove the minerals. Allow several hours for the refrigerator to enter refrigerator. Allows humid air to normal temperature. Straighten the water source line. • Ice maker turned on? Clean gaskets and ...
User Guide
Page 11
... to be repaired in your major appliance if it was purchased. Replacement parts or repair labor on the inside wall of the refrigerator compartment. In Canada, call 1-800-253-1301. Service calls to obtain service under this limited warranty. Repairs to parts or ..., Whirlpool Corporation or Whirlpool Canada LP (hereafter "Whirlpool") will pay for product service if your major appliance is located in a remote area where service by an authorized Whirlpool servicer is not available. 10. Service must be easily determined. 12. Any food or medicine loss due to refrigerator or...
... to be repaired in your major appliance if it was purchased. Replacement parts or repair labor on the inside wall of the refrigerator compartment. In Canada, call 1-800-253-1301. Service calls to obtain service under this limited warranty. Repairs to parts or ..., Whirlpool Corporation or Whirlpool Canada LP (hereafter "Whirlpool") will pay for product service if your major appliance is located in a remote area where service by an authorized Whirlpool servicer is not available. 10. Service must be easily determined. 12. Any food or medicine loss due to refrigerator or...

