User Guide
Page 1
Para obtener acceso a "lnstrucciones para el usuario del refrigerador" en espa_ol, o para obtener informaci6n adicional acerca de su producto, visite: www.whirlpool.com. Tableof Contents/ Tabledes matibres REFRIGERATOR SAFETY 1 INSTALLATION INSTRUCTIONS 2 REFRIGERATOR USE 7 REFRIGERATOR CARE 8 TROUBLESHOOTING 9 ACCESSORIES 10 WARRANTY 11 SI_CURITI_ DU RI_FRIGI_RATEUR 12 INSTRUCTIONS D'INSTALLATION 13 UTILISATION DU RC:FRIGC:RATEUR 19 ENTRETIEN DU RI_FRIGI_RATEUR 20 DC:PANNAGE 21 ACCESSOIRES 22 GARANTIE 23 REFRIGERATOSRAFETY Your safety and the...
Para obtener acceso a "lnstrucciones para el usuario del refrigerador" en espa_ol, o para obtener informaci6n adicional acerca de su producto, visite: www.whirlpool.com. Tableof Contents/ Tabledes matibres REFRIGERATOR SAFETY 1 INSTALLATION INSTRUCTIONS 2 REFRIGERATOR USE 7 REFRIGERATOR CARE 8 TROUBLESHOOTING 9 ACCESSORIES 10 WARRANTY 11 SI_CURITI_ DU RI_FRIGI_RATEUR 12 INSTRUCTIONS D'INSTALLATION 13 UTILISATION DU RC:FRIGC:RATEUR 19 ENTRETIEN DU RI_FRIGI_RATEUR 20 DC:PANNAGE 21 ACCESSOIRES 22 GARANTIE 23 REFRIGERATOSRAFETY Your safety and the...
User Guide
Page 2
... the control panel on ice maker kit ready models only). • Remove doors from your old refrigerator. Failure to do so can result in "Refrigerator Care." For more people to move and install refrigerator. [] Disconnect power before operating. [] Use nonflammable cleaner. [] Keep flammable materials and vapors, such as bumping. Tempered glass is removed, ice may not easily climb inside of your refrigerator. important information to know about glass shelves and covers: Do not clean glass shelves or covers...
... the control panel on ice maker kit ready models only). • Remove doors from your old refrigerator. Failure to do so can result in "Refrigerator Care." For more people to move and install refrigerator. [] Disconnect power before operating. [] Use nonflammable cleaner. [] Keep flammable materials and vapors, such as bumping. Tempered glass is removed, ice may not easily climb inside of your refrigerator. important information to know about glass shelves and covers: Do not clean glass shelves or covers...
User Guide
Page 3
... water supply coming out of a reverse osmosis system going to the water inlet valve of installation, cleaning, or removing a light bulb, turn the ice maker OFR Connect to refill after heavy usage. If a reverse osmosis water filtration system is required to OFF and then disconnect the refrigerator from refrigerator. Read all directions before starting installation. When installing your cold water supply, the water pressure to the reverse osmosis system needs to be turned off by a switch. Do not use...
... water supply coming out of a reverse osmosis system going to the water inlet valve of installation, cleaning, or removing a light bulb, turn the ice maker OFR Connect to refill after heavy usage. If a reverse osmosis water filtration system is required to OFF and then disconnect the refrigerator from refrigerator. Read all directions before starting installation. When installing your cold water supply, the water pressure to the reverse osmosis system needs to be turned off by a switch. Do not use...
User Guide
Page 4
... to the valve inlet using a compression nut and sleeve as shown. Tube clamp screw C. The ice maker is equipped with adjustable wrench. Complete the Installation Electrical Shock Hazard Plug into a grounded 3 prong outlet. TOOLS NEEDED: 5/le"hex-head socket wrench, #2 Phillips screwdriver, flat-blade screwdriver, 5/le" open-end wrench, flat 2" putty knife. The graphics shown are working. Unplug refrigerator or disconnect power. 2. Copper tubing D. Tighten...
... to the valve inlet using a compression nut and sleeve as shown. Tube clamp screw C. The ice maker is equipped with adjustable wrench. Complete the Installation Electrical Shock Hazard Plug into a grounded 3 prong outlet. TOOLS NEEDED: 5/le"hex-head socket wrench, #2 Phillips screwdriver, flat-blade screwdriver, 5/le" open-end wrench, flat 2" putty knife. The graphics shown are working. Unplug refrigerator or disconnect power. 2. Copper tubing D. Tighten...
User Guide
Page 5
... opposite side hinge hole as shown in Graphic 3. 4. Remove the door stop . Align the lower portion of freezer door. Set aside refrigerator door until the hinges and refrigerator compartment door are not reversing the doors, see "Replace Doors and Hinges." NOTE: Provide additional support for the center hinge as shown in the Top Hinge graphic. Line up the doors so that hole plugs and screws are working. 2. See "Using the Control(s)." 5. See Graphic 1-1. 2. Remove the refrigerator handle assembly as shown...
... opposite side hinge hole as shown in Graphic 3. 4. Remove the door stop . Align the lower portion of freezer door. Set aside refrigerator door until the hinges and refrigerator compartment door are not reversing the doors, see "Replace Doors and Hinges." NOTE: Provide additional support for the center hinge as shown in the Top Hinge graphic. Line up the doors so that hole plugs and screws are working. 2. See "Using the Control(s)." 5. See Graphic 1-1. 2. Remove the refrigerator handle assembly as shown...
User Guide
Page 6
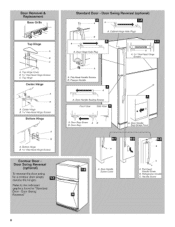
Top Hinge Cover B. _6" Hex-Head Hinge Screws C. Cabinet Hinge Hole Plugs A. Bottom Hinge B. _6" Hex-Head Hinge Screws A. Door Handle Screw Cover A. Top Hinge Center Hinge A. Center Hinge B. _6" Hex-Head Hinge Screws Bottom Hinge A. Door Handle Sealing Screws Front View Side View _J -v I A. Door Handle Seal Screw Front A. BaseGrille Top Hinge A B A. Flat-Head Handle Screws B. Door Stop Screw B. Flat-Head Handle Screw B, C. Handle Screw 6 Freezer Handle A. Door Stop AB . ,,o A.
Top Hinge Cover B. _6" Hex-Head Hinge Screws C. Cabinet Hinge Hole Plugs A. Bottom Hinge B. _6" Hex-Head Hinge Screws A. Door Handle Screw Cover A. Top Hinge Center Hinge A. Center Hinge B. _6" Hex-Head Hinge Screws Bottom Hinge A. Door Handle Sealing Screws Front View Side View _J -v I A. Door Handle Seal Screw Front A. BaseGrille Top Hinge A B A. Flat-Head Handle Screws B. Door Stop Screw B. Flat-Head Handle Screw B, C. Handle Screw 6 Freezer Handle A. Door Stop AB . ,,o A.
User Guide
Page 7
... left to adjust the screws. The two leveling screws are part of the front roller assemblies which are set to adjust the tilt of the refrigerator takes some weight off the top hinge cover. 2. Your product will not cool the compartments any faster. Pry off the leveling screws and rollers. Replace the top hinge cover. CONDITION/REASON: ADJUSTMENT: REFRIGERATOR too warm REFRIGERATOR or TEMPERATURE Control one setting higher FREEZER too warm/too little ice REFRIGERATOR too cold FREEZER...
... left to adjust the screws. The two leveling screws are part of the front roller assemblies which are set to adjust the tilt of the refrigerator takes some weight off the top hinge cover. 2. Your product will not cool the compartments any faster. Pry off the leveling screws and rollers. Replace the top hinge cover. CONDITION/REASON: ADJUSTMENT: REFRIGERATOR too warm REFRIGERATOR or TEMPERATURE Control one setting higher FREEZER too warm/too little ice REFRIGERATOR too cold FREEZER...
User Guide
Page 8
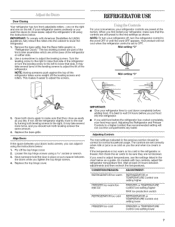
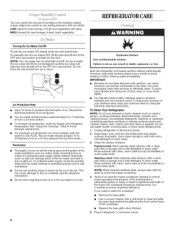
... dry removable parts and interior surfaces thoroughly. Clean the exterior surfaces. To manually turn the ice maker ON, simply lower the wire shutoff arm. However, clean both sections to the OFF (arm up ) position and listen for routine condenser cleaning in a 24-hour period. For stainless steel models, stainless steel is no need to clean the condenser: • Remove the base grille. • Use a vacuum cleaner with clean, warm water and...
... dry removable parts and interior surfaces thoroughly. Clean the exterior surfaces. To manually turn the ice maker ON, simply lower the wire shutoff arm. However, clean both sections to the OFF (arm up ) position and listen for routine condenser cleaning in a 24-hour period. For stainless steel models, stainless steel is no need to clean the condenser: • Remove the base grille. • Use a vacuum cleaner with clean, warm water and...
User Guide
Page 9
... years. New installation? fans/compressor adjusting to follow these instructions can result in the freezer (on the supports. NOTE: Not all bulbs will not operate Electrical Shock Hazard Plug into a grounded 3 prong outlet. Remove the bulb from behind the light shield in death, fire, or electrical shock. Power cord unplugged? Is outlet working . Due to replace the bulb with an appliance bulb of a service call an electrician. may run too much Your new refrigerator may...
... years. New installation? fans/compressor adjusting to follow these instructions can result in the freezer (on the supports. NOTE: Not all bulbs will not operate Electrical Shock Hazard Plug into a grounded 3 prong outlet. Remove the bulb from behind the light shield in death, fire, or electrical shock. Power cord unplugged? Is outlet working . Due to replace the bulb with an appliance bulb of a service call an electrician. may run too much Your new refrigerator may...
User Guide
Page 10
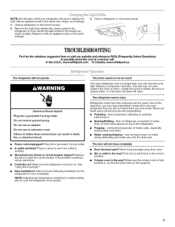
... indication of food added? A kink in the line can decrease water pressure. Are there minerals (such as sulfur) in the water source line? A water filter may need to be installed to enter refrigerator. Rinse and dry with mild soap and warm water. Allow several hours for ice maker to make new ice. Contributes to moisture buildup. • Door opened often or left open Explosion Hazard Use nonflammable cleaner. Connect refrigerator to water supply and turn water shutoff valve fully open...
... indication of food added? A kink in the line can decrease water pressure. Are there minerals (such as sulfur) in the water source line? A water filter may need to be installed to enter refrigerator. Rinse and dry with mild soap and warm water. Allow several hours for ice maker to make new ice. Contributes to moisture buildup. • Door opened often or left open Explosion Hazard Use nonflammable cleaner. Connect refrigerator to water supply and turn water shutoff valve fully open...
User Guide
Page 11
... state to state or province to province. Service calls to refrigerator or freezer product failures. 7. Consumable parts are excluded from accident, alteration, misuse, abuse, fire, flood, acts of stainless steel surfaces. Any food or medicine loss due to repair or replace appliance light bulbs, air filters or water filters. Discoloration, rust, or oxidation of God, improper installation, installation not in the U.S.A., call 1-800-807-6777...
... state to state or province to province. Service calls to refrigerator or freezer product failures. 7. Consumable parts are excluded from accident, alteration, misuse, abuse, fire, flood, acts of stainless steel surfaces. Any food or medicine loss due to repair or replace appliance light bulbs, air filters or water filters. Discoloration, rust, or oxidation of God, improper installation, installation not in the U.S.A., call 1-800-807-6777...


