
Owners Manual
Page 13
... pad: Apply glass cleaner to soft cloth or sponge, not directly on some models, do not use soap-filled scouring pads, abrasive cleaners, Cooktop Polishing Creme,... as vinegar and tomato, should be cleaned as soon as the entire range is cool. COOKTOP CONTROLS To avoid damage to remove. Cleaning Method: ... wet scouring pad. Do not soak knobs. For more information, see "Coil Elements and Burner Bowls." Food spills should be cleaned when oven cools.... discolor and become harder to the rack guides will help them slide. ■ Steel-wool pad BROILER PAN AND GRID Do not clean ...
... pad: Apply glass cleaner to soft cloth or sponge, not directly on some models, do not use soap-filled scouring pads, abrasive cleaners, Cooktop Polishing Creme,... as vinegar and tomato, should be cleaned as soon as the entire range is cool. COOKTOP CONTROLS To avoid damage to remove. Cleaning Method: ... wet scouring pad. Do not soak knobs. For more information, see "Coil Elements and Burner Bowls." Food spills should be cleaned when oven cools.... discolor and become harder to the rack guides will help them slide. ■ Steel-wool pad BROILER PAN AND GRID Do not clean ...

Owners Manual
Page 14
...first stop position. 3. Fit the ends of an unnecessary service call. Oven Door For normal range use the door handle to lift door. 3. However, if removal is necessary, make sure ... cooking area, element or surface burner. See "Cook & Hold" section. ■ On some models) Remove all stored items from socket. 4. Lift up evenly until the door is completely seated on... correctly? To Replace: 1. Turn bulb counterclockwise to the proper heat level? To Remove: 1. Slide the door down on the top corners of the oven counterclockwise to completely seat door on the hinges...
...first stop position. 3. Fit the ends of an unnecessary service call. Oven Door For normal range use the door handle to lift door. 3. However, if removal is necessary, make sure ... cooking area, element or surface burner. See "Cook & Hold" section. ■ On some models) Remove all stored items from socket. 4. Lift up evenly until the door is completely seated on... correctly? To Replace: 1. Turn bulb counterclockwise to the proper heat level? To Remove: 1. Slide the door down on the top corners of the oven counterclockwise to completely seat door on the hinges...

Owners Manual
Page 15
...locate the Whirlpool designated service...Is the range level? Adjust... Call the Whirlpool Customer eXperience Center... build every new WHIRLPOOL® appliance. ...Whirlpool designated service technicians are made with any questions or concerns at: Whirlpool...nearest Whirlpool designated service center. Check to Whirlpool Corporation... with the same precision used ? See "Self- See "Bakeware" section. ■ Are the racks positioned properly? When calling, please know the purchase date and the complete model..." flashing in models, does the ...range. See "Positioning Racks ...
...locate the Whirlpool designated service...Is the range level? Adjust... Call the Whirlpool Customer eXperience Center... build every new WHIRLPOOL® appliance. ...Whirlpool designated service technicians are made with any questions or concerns at: Whirlpool...nearest Whirlpool designated service center. Check to Whirlpool Corporation... with the same precision used ? See "Self- See "Bakeware" section. ■ Are the racks positioned properly? When calling, please know the purchase date and the complete model..." flashing in models, does the ...range. See "Positioning Racks ...
Dimension Guide
Page 1
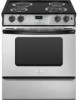
...Slide-In Electric Range PRODUCT MODEL NUMBERS RY160LXT OVERALL DIMENSIONS Electrical: When a 4-wire or 3-wire, single phase A 120/240 volt, 60 Hz, AC only electrical supply is available (or, if specified on the model/serial rating plate, when a 4-wire or 3-wire single phase 120/208 volt 60 Hz, AC only electrical... C B D E A. 13" (33 cm) upper cabinet depth B. 30" (76.2 cm) min. Cabinet door or hinge should not extend into ...-13-07 front of the line. Nothing located in * C. Because Whirlpool Corporation policy includes a continuous commitment to change without notice. from floor....
...Slide-In Electric Range PRODUCT MODEL NUMBERS RY160LXT OVERALL DIMENSIONS Electrical: When a 4-wire or 3-wire, single phase A 120/240 volt, 60 Hz, AC only electrical supply is available (or, if specified on the model/serial rating plate, when a 4-wire or 3-wire single phase 120/208 volt 60 Hz, AC only electrical... C B D E A. 13" (33 cm) upper cabinet depth B. 30" (76.2 cm) min. Cabinet door or hinge should not extend into ...-13-07 front of the line. Nothing located in * C. Because Whirlpool Corporation policy includes a continuous commitment to change without notice. from floor....

Installation Instructions
Page 3
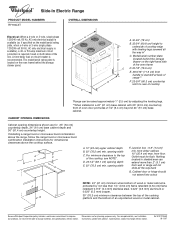
...cm) upper cabinet depth B. 30" (76.2 cm) min. from either cabinet, 10" (25.4 cm) max. Use a 3-wire, UL listed, 40-amp power supply cord (pigtail); Electrical Connection To properly install your range, you are in doubt as specified on the model/serial number rating plate. (The model/serial number rating plate is ... investigated for it will not slide all local codes and ordinances. This range is available, a 40- NOTE: 24" (61 cm) minimum when bottom of wood or metal cabinet is located on both sides of the cooktop, see NOTE*. See "Electrical Connection." ■ Allow 2...
...cm) upper cabinet depth B. 30" (76.2 cm) min. from either cabinet, 10" (25.4 cm) max. Use a 3-wire, UL listed, 40-amp power supply cord (pigtail); Electrical Connection To properly install your range, you are in doubt as specified on the model/serial number rating plate. (The model/serial number rating plate is ... investigated for it will not slide all local codes and ordinances. This range is available, a 40- NOTE: 24" (61 cm) minimum when bottom of wood or metal cabinet is located on both sides of the cooktop, see NOTE*. See "Electrical Connection." ■ Allow 2...


