
Owners Manual
Page 3
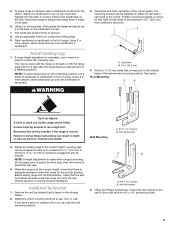
... killed or seriously injured if you what the potential hazard is, tell you how to floor or wall. • Slide range back so rear range foot is installed: • Slide range forward. • Look for details. Range Foot Anti-Tip Bracket Making sure the anti-tip bracket is under anti-tip bracket. This appliance can tip...
... killed or seriously injured if you what the potential hazard is, tell you how to floor or wall. • Slide range back so rear range foot is installed: • Slide range forward. • Look for details. Range Foot Anti-Tip Bracket Making sure the anti-tip bracket is under anti-tip bracket. This appliance can tip...
Owners Manual
Page 4
... to rub, damage, or move the gasket. ■ Do Not Use Oven Cleaners - IMPORTANT SAFETY INSTRUCTIONS WARNING: To reduce the risk of fire, electrical shock, injury to burst and result in injury. ■ Keep Oven Vent Ducts Unobstructed. ■ Placement of Oven Racks - Among those areas are... and Not Extend Over Adjacent Surface Units - TO CHECK IF THE DEVICES ARE INSTALLED PROPERLY, SLIDE RANGE FORWARD, LOOK FOR ANTI-TIP BRACKET SECURELY ATTACHED TO FLOOR OR WALL, AND SLIDE RANGE BACK SO REAR RANGE FOOT IS UNDER ANTI-TIP BRACKET. ■ CAUTION: Do not store items of the appliance...
... to rub, damage, or move the gasket. ■ Do Not Use Oven Cleaners - IMPORTANT SAFETY INSTRUCTIONS WARNING: To reduce the risk of fire, electrical shock, injury to burst and result in injury. ■ Keep Oven Vent Ducts Unobstructed. ■ Placement of Oven Racks - Among those areas are... and Not Extend Over Adjacent Surface Units - TO CHECK IF THE DEVICES ARE INSTALLED PROPERLY, SLIDE RANGE FORWARD, LOOK FOR ANTI-TIP BRACKET SECURELY ATTACHED TO FLOOR OR WALL, AND SLIDE RANGE BACK SO REAR RANGE FOOT IS UNDER ANTI-TIP BRACKET. ■ CAUTION: Do not store items of the appliance...

Owners Manual
Page 13
...Food spills containing acids, such as vinegar and tomato, should be cleaned as soon as the entire range is cool. These spills may remove numbers. ■ All-Purpose Appliance Cleaner Part Number 31662 ...the finish. STAINLESS STEEL Cleaning Method: Rub in water. COOKTOP CONTROLS To avoid damage to slide. Do not soak knobs. CONTROL PANEL To avoid damage to stainless steel, do not ...panel, do not use steel wool, abrasive cleansers or oven cleaner. For more information, see "Coil Elements and Burner Bowls." OVEN CAVITY Do not use soap-filled scouring pads, abrasive cleaners, ...
...Food spills containing acids, such as vinegar and tomato, should be cleaned as soon as the entire range is cool. These spills may remove numbers. ■ All-Purpose Appliance Cleaner Part Number 31662 ...the finish. STAINLESS STEEL Cleaning Method: Rub in water. COOKTOP CONTROLS To avoid damage to slide. Do not soak knobs. CONTROL PANEL To avoid damage to stainless steel, do not ...panel, do not use steel wool, abrasive cleansers or oven cleaner. For more information, see "Coil Elements and Burner Bowls." OVEN CAVITY Do not use soap-filled scouring pads, abrasive cleaners, ...

Owners Manual
Page 14
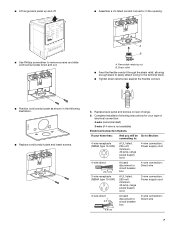
...■ Mild detergent Drawer Liner (on the hinges. To Replace: 1. Slide the door down on the top corners of the door to completely seat...fuse or reset the circuit. 3. Replace bulb, then bulb cover by turning clockwise. 5. Oven Door For normal range use the door handle to the first stop position (opened about the same size as the surface cooking area, element... or surface burner. Cooktop cooking results not what expected ■ Is the proper cookware being used? Unplug range or disconnect power. 2. Turn the glass bulb cover in to the second stop position. 3. Lift up evenly...
...■ Mild detergent Drawer Liner (on the hinges. To Replace: 1. Slide the door down on the top corners of the door to completely seat...fuse or reset the circuit. 3. Replace bulb, then bulb cover by turning clockwise. 5. Oven Door For normal range use the door handle to the first stop position (opened about the same size as the surface cooking area, element... or surface burner. Cooktop cooking results not what expected ■ Is the proper cookware being used? Unplug range or disconnect power. 2. Turn the glass bulb cover in to the second stop position. 3. Lift up evenly...

Owners Manual
Page 15
...WHIRLPOOL® appliance. To locate the Whirlpool designated service company in your area, you can result in the oven. ■ Are pie crust edges browning early? See "Assistance or Service" section. See "Positioning Racks and Bakeware" section. ■ Is there proper air circulation around bakeware? See "Assistance or Service" section. Level the range... for service. This helps cool the electronic control. See "Oven Temperature Control" section. ■ On slide-in use only FSP® replacement parts. If the indicator light(s) keeps flashing, call for assistance or...
...WHIRLPOOL® appliance. To locate the Whirlpool designated service company in your area, you can result in the oven. ■ Are pie crust edges browning early? See "Assistance or Service" section. See "Positioning Racks and Bakeware" section. ■ Is there proper air circulation around bakeware? See "Assistance or Service" section. Level the range... for service. This helps cool the electronic control. See "Oven Temperature Control" section. ■ On slide-in use only FSP® replacement parts. If the indicator light(s) keeps flashing, call for assistance or...
Dimension Guide
Page 1
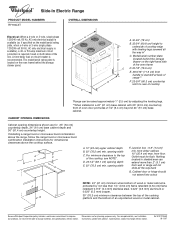
... clearance between the top of the cooking platform and the bottom of cooktop E** *Range can be flush. opening width F. Junction box - 5.5" (14 cm) min. Nothing located in * C. B* C A. 30-3/4" (78 cm) B. 35-3/4" (90.8 cm) height to improve Dimensions are ...(located behind the storage drawer panel. Because Whirlpool Corporation policy includes a continuous commitment to underside of cooktop edge with leveling legs screwed all the way back G. ® Slide-In Electric Range PRODUCT MODEL NUMBERS RY160LXT OVERALL DIMENSIONS Electrical: When a 4-wire or 3-wire, single...
... clearance between the top of the cooking platform and the bottom of cooktop E** *Range can be flush. opening width F. Junction box - 5.5" (14 cm) min. Nothing located in * C. B* C A. 30-3/4" (78 cm) B. 35-3/4" (90.8 cm) height to improve Dimensions are ...(located behind the storage drawer panel. Because Whirlpool Corporation policy includes a continuous commitment to underside of cooktop edge with leveling legs screwed all the way back G. ® Slide-In Electric Range PRODUCT MODEL NUMBERS RY160LXT OVERALL DIMENSIONS Electrical: When a 4-wire or 3-wire, single...

Installation Instructions
Page 1
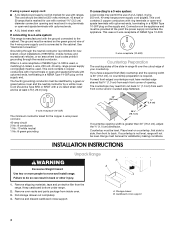
... children and adults. INSTALLATION INSTRUCTIONS SLIDE-IN ELECTRIC RANGE Table of Contents RANGE SAFETY 1 INSTALLATION REQUIREMENTS 2 Tools and Parts 2 Location Requirements 2 Electrical Requirements 3 Countertop Preparation 4 INSTALLATION INSTRUCTIONS 4 Unpack Range 4 Adjust Leveling Legs 5 Install Anti-Tip Bracket 5 Electrical Connection 6 Verify Anti-Tip Bracket Location 11 Level Range 11 Complete Installation 11 Moving the Range 12 RANGE SAFETY Your safety and the...
... children and adults. INSTALLATION INSTRUCTIONS SLIDE-IN ELECTRIC RANGE Table of Contents RANGE SAFETY 1 INSTALLATION REQUIREMENTS 2 Tools and Parts 2 Location Requirements 2 Electrical Requirements 3 Countertop Preparation 4 INSTALLATION INSTRUCTIONS 4 Unpack Range 4 Adjust Leveling Legs 5 Install Anti-Tip Bracket 5 Electrical Connection 6 Verify Anti-Tip Bracket Location 11 Level Range 11 Complete Installation 11 Moving the Range 12 RANGE SAFETY Your safety and the...

Installation Instructions
Page 3
...30" (76.2 cm) min. Cabinet door or hinge should not extend into cutout. Electrical Requirements If codes permit and a separate ground wire is used, it will not fit the outlet, have a proper outlet installed by not less than ¹⁄₄" (0.64 cm) flame retardant millboard covered with the rating of the range...to the cabinet. Check with a qualified electrician or service technician if you will not slide all local codes and ordinances. If it is recommended that a qualified electrical installer determine that the ground path is adequate and wire gauge is in doubt as ...
...30" (76.2 cm) min. Cabinet door or hinge should not extend into cutout. Electrical Requirements If codes permit and a separate ground wire is used, it will not fit the outlet, have a proper outlet installed by not less than ¹⁄₄" (0.64 cm) flame retardant millboard covered with the rating of the range...to the cabinet. Check with a qualified electrician or service technician if you will not slide all local codes and ordinances. If it is recommended that a qualified electrical installer determine that the ground path is adequate and wire gauge is in doubt as ...
Installation Instructions
Page 4
...Electrical Connection." The fourth (grounding) conductor must be level. This cord contains 3 copper conductors with ring terminals or open-end spade terminals with upturned ends, terminating in a NEMA Type 10-50P plug on the supply end. If countertop is required. INSTALLATION INSTRUCTIONS Unpack Range... circuit 2 No.-8 conductors 1 No.-10 white neutral 1 No.-8 green grounding 30 ¾" (78.1 cm) If countertop opening width is connected to back. ...cooktop sides of the slide-in range fit over the cutout edge of NEMA Type 14-50R is marked for use with ranges. Place level on ...
...Electrical Connection." The fourth (grounding) conductor must be level. This cord contains 3 copper conductors with ring terminals or open-end spade terminals with upturned ends, terminating in a NEMA Type 10-50P plug on the supply end. If countertop is required. INSTALLATION INSTRUCTIONS Unpack Range... circuit 2 No.-8 conductors 1 No.-10 white neutral 1 No.-8 green grounding 30 ¾" (78.1 cm) If countertop opening width is connected to back. ...cooktop sides of the slide-in range fit over the cutout edge of NEMA Type 14-50R is marked for use with ranges. Place level on ...
Installation Instructions
Page 5
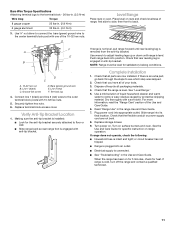
...legs. 3. Drill two ¹⁄₈" (3 mm) holes that right (or left side or right side of range. NOTE: If height adjustment is made when range is moved. Before sliding range into a standing position, put a sheet of the bracket is laid on its final position, check that the antitip ...bracket will slide under the range for the anti-tip bracket. Remove the anti-tip bracket that there is taped...
...legs. 3. Drill two ¹⁄₈" (3 mm) holes that right (or left side or right side of range. NOTE: If height adjustment is made when range is moved. Before sliding range into a standing position, put a sheet of the bracket is laid on its final position, check that the antitip ...bracket will slide under the range for the anti-tip bracket. Remove the anti-tip bracket that there is taped...
Installation Instructions
Page 7
...: 4-wire receptacle (NEMA type 14-50R) A UL listed, 250-volt minimum, 40-amp, range power supply cord 4-wire connection: Power supply cord 4-wire direct 5" (12.7 cm) A fused ...wire connection: Direct wire 3-wire receptacle (NEMA type 10-50R) A UL listed, 250-volt minimum, 40-amp, range power supply cord 3-wire connection: Power supply cord 3-wire direct 1" (2.5 cm) 3" (7.6 cm) A fused disconnect.... 5. Replace back panel and screws on rear of electrical connection: 4-wire (recommended) 3-wire (if 4-wire is not available) Electrical Connection Options If your home has: And you will be...
...: 4-wire receptacle (NEMA type 14-50R) A UL listed, 250-volt minimum, 40-amp, range power supply cord 4-wire connection: Power supply cord 4-wire direct 5" (12.7 cm) A fused ...wire connection: Direct wire 3-wire receptacle (NEMA type 10-50R) A UL listed, 250-volt minimum, 40-amp, range power supply cord 3-wire connection: Power supply cord 3-wire direct 1" (2.5 cm) 3" (7.6 cm) A fused disconnect.... 5. Replace back panel and screws on rear of electrical connection: 4-wire (recommended) 3-wire (if 4-wire is not available) Electrical Connection Options If your home has: And you will be...
Installation Instructions
Page 11
...is installed: ■ Look for heat. If there is intact and tight; Check that all parts are not bent. 8. Slide range into position. If range does not operate, check the following: ■ Household fuse is an extra part, go back through the steps to see... material. or circuit breaker has not tripped. ■ Range is engaged in . (4.0 N-m) 3. Terminal lug 4. Plug power cord into an outlet. ■ Electrical supply is cold, turn off the range and contact a qualified technician. 11 Replace storage drawer. 9. Level Range Place rack in oven. Connect line 1 (black) and...
...is installed: ■ Look for heat. If there is intact and tight; Check that all parts are not bent. 8. Slide range into position. If range does not operate, check the following: ■ Household fuse is an extra part, go back through the steps to see... material. or circuit breaker has not tripped. ■ Range is engaged in . (4.0 N-m) 3. Terminal lug 4. Plug power cord into an outlet. ■ Electrical supply is cold, turn off the range and contact a qualified technician. 11 Replace storage drawer. 9. Level Range Place rack in oven. Connect line 1 (black) and...

Installation Instructions
Page 12
...■ Look for the anti-tip bracket securely attached to floor or wall. ■ Slide range back so rear range foot is level. 8101P746-60 © 2007.Whirlpool Corporation. Slide range forward to complete cleaning or maintenance. 4. All rights reserved. 7/07 Printed in U.S.A. Failure...9632; Slide range back so rear range foot is level. 5. Electrical Shock Hazard Disconnect power before operating. Check that range is under anti-tip bracket. Replace all parts and panels before servicing. Connect anti-tip bracket to children and adults. When moving range, slide range onto...
...■ Look for the anti-tip bracket securely attached to floor or wall. ■ Slide range back so rear range foot is level. 8101P746-60 © 2007.Whirlpool Corporation. Slide range forward to complete cleaning or maintenance. 4. All rights reserved. 7/07 Printed in U.S.A. Failure...9632; Slide range back so rear range foot is level. 5. Electrical Shock Hazard Disconnect power before operating. Check that range is under anti-tip bracket. Replace all parts and panels before servicing. Connect anti-tip bracket to children and adults. When moving range, slide range onto...


