
Owners Manual
Page 1
or visit our website at... www.whirlpool.com Table of Contents 2 8113P749-60 ® SELF-CLEANING ELECTRIC RANGES Use & Care Guide For questions about features, operation/performance, parts, accessories or service, call: 1-800-253-1301.
or visit our website at... www.whirlpool.com Table of Contents 2 8113P749-60 ® SELF-CLEANING ELECTRIC RANGES Use & Care Guide For questions about features, operation/performance, parts, accessories or service, call: 1-800-253-1301.

Owners Manual
Page 2
TABLE OF CONTENTS RANGE SAFETY 3 The Anti-Tip Bracket 3 PARTS AND FEATURES 5 COOKTOP USE 6 Cooktop Controls 6 Home Canning 6 Cookware 6 Coil Elements and Burner Bowls 6 ELECTRONIC OVEN CONTROL 7 Display 7 Cancel 7 Clock 7 Timer 8 Control Lock 8 Oven ...Temperature Control 8 OVEN USE 8 Aluminum Foil 8 Positioning Racks and Bakeware 8 Bakeware 9 Oven Vent 9 Baking 9 Cook & Hold 10 Keep Warm 10 Broiling 10 Automatic Shut-Off/Sabbath Mode 11 RANGE...
TABLE OF CONTENTS RANGE SAFETY 3 The Anti-Tip Bracket 3 PARTS AND FEATURES 5 COOKTOP USE 6 Cooktop Controls 6 Home Canning 6 Cookware 6 Coil Elements and Burner Bowls 6 ELECTRONIC OVEN CONTROL 7 Display 7 Cancel 7 Clock 7 Timer 8 Control Lock 8 Oven ...Temperature Control 8 OVEN USE 8 Aluminum Foil 8 Positioning Racks and Bakeware 8 Bakeware 9 Oven Vent 9 Baking 9 Cook & Hold 10 Keep Warm 10 Broiling 10 Automatic Shut-Off/Sabbath Mode 11 RANGE...

Owners Manual
Page 3
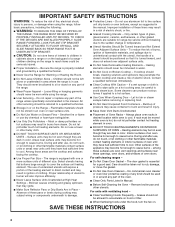
... use. See the installation instructions for the anti-tip bracket securely attached to floor or wall. • Slide range back so rear range foot is under anti-tip bracket. Range Foot Anti-Tip Bracket Making sure the anti-tip bracket is , tell you how to some of the substances...bracket fastened down properly. This symbol alerts you to potential hazards that can tip if you what the potential hazard is installed: • Slide range forward. • Look for details. WARNING You can happen if the instructions are very important. All safety messages will tell you apply ...
... use. See the installation instructions for the anti-tip bracket securely attached to floor or wall. • Slide range back so rear range foot is under anti-tip bracket. Range Foot Anti-Tip Bracket Making sure the anti-tip bracket is , tell you how to some of the substances...bracket fastened down properly. This symbol alerts you to potential hazards that can tip if you what the potential hazard is installed: • Slide range forward. • Look for details. WARNING You can happen if the instructions are very important. All safety messages will tell you apply ...
Owners Manual
Page 4
... allowed to accumulate on hood or filter. ■ When flambeing foods under the hood, turn the fan on the Range - They should be allowed to sit or stand on the backguard of electric shock, or fire. ■ Glazed Cooking Utensils - Do not use , do not let potholder contact hot heating...oven. ■ Clean Only Parts Listed in Place - TO CHECK IF THE DEVICES ARE INSTALLED PROPERLY, SLIDE RANGE FORWARD, LOOK FOR ANTI-TIP BRACKET SECURELY ATTACHED TO FLOOR OR WALL, AND SLIDE RANGE BACK SO REAR RANGE FOOT IS UNDER ANTI-TIP BRACKET. ■ CAUTION: Do not store items of interest to wipe ...
... allowed to accumulate on hood or filter. ■ When flambeing foods under the hood, turn the fan on the Range - They should be allowed to sit or stand on the backguard of electric shock, or fire. ■ Glazed Cooking Utensils - Do not use , do not let potholder contact hot heating...oven. ■ Clean Only Parts Listed in Place - TO CHECK IF THE DEVICES ARE INSTALLED PROPERLY, SLIDE RANGE FORWARD, LOOK FOR ANTI-TIP BRACKET SECURELY ATTACHED TO FLOOR OR WALL, AND SLIDE RANGE BACK SO REAR RANGE FOOT IS UNDER ANTI-TIP BRACKET. ■ CAUTION: Do not store items of interest to wipe ...
Owners Manual
Page 5
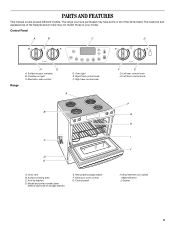
... different models. Right rear control knob A B C D E A. Left rear control knob H. Cooktop on light C. Electronic oven control D. Removable storage drawer F. Broil element (not visible) I J H. Control Panel A B C D Range H G A. Gasket 5 Oven vent B. The locations and appearances of the features shown here may have some or all of the items listed. The...
... different models. Right rear control knob A B C D E A. Left rear control knob H. Cooktop on light C. Electronic oven control D. Removable storage drawer F. Broil element (not visible) I J H. Control Panel A B C D Range H G A. Gasket 5 Oven vent B. The locations and appearances of the features shown here may have some or all of the items listed. The...

Owners Manual
Page 6
...189;" (1.3 cm) beyond the element. ■ Do not place canner on stainless steel provides even heating. NOTE: Before removing or replacing coil elements and burner bowls, make sure they can result in how quickly and evenly heat is transferred, which surface elements are in before turning...between HI and LO. COOKWARE CHARACTERISTICS Aluminum ■ Heats quickly and evenly. ■ Suitable for slow cooking. REMEMBER: When range is in cookware. For example, aluminum cookware with nonstick surfaces should not extend more information, see the "General Cleaning" section.
...189;" (1.3 cm) beyond the element. ■ Do not place canner on stainless steel provides even heating. NOTE: Before removing or replacing coil elements and burner bowls, make sure they can result in how quickly and evenly heat is transferred, which surface elements are in before turning...between HI and LO. COOKWARE CHARACTERISTICS Aluminum ■ Heats quickly and evenly. ■ Suitable for slow cooking. REMEMBER: When range is in cookware. For example, aluminum cookware with nonstick surfaces should not extend more information, see the "General Cleaning" section.
Owners Manual
Page 7
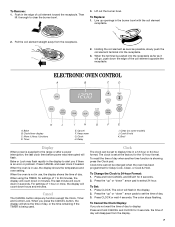
...the Clock to clear the burner bowl. 3. Press CLOCK or wait 4 seconds. To Cancel the Clock Display: If you if there is set to the range or after a power interruption, the last clock time before power was interrupted will count down hours and minutes. Then lift it will disappear from the...TIMER, for settings of 1 to select 24 hour. The clock is an error or problem. Press the "up openings in the burner bowl with the coil element receptacle. 2. When the terminal is showing, press the Clock pad. Keep warm G. Bake or Lock may flash rapidly in the edge of day ...
...the Clock to clear the burner bowl. 3. Press CLOCK or wait 4 seconds. To Cancel the Clock Display: If you if there is set to the range or after a power interruption, the last clock time before power was interrupted will count down hours and minutes. Then lift it will disappear from the...TIMER, for settings of 1 to select 24 hour. The clock is an error or problem. Press the "up openings in the burner bowl with the coil element receptacle. 2. When the terminal is showing, press the Clock pad. Keep warm G. Bake or Lock may flash rapidly in the edge of day ...

Owners Manual
Page 8
...change will return to readjust the oven temperature if there is a power failure or interruption. You do not need to the existing setting after 30 seconds. 2. Broiling, Keep Warm and Cleaning temperatures cannot be displayed. If no change the setting. IMPORTANT: The health of °F: 1. .... 2. Press and hold CANCEL and CLOCK for several seconds or until "0°" appears in use a thermometer to change is made, the range will be adjusted. The oven provides accurate temperatures; Press and hold BAKE pad for 3 seconds. Timer The Timer can be set time. the...
...change will return to readjust the oven temperature if there is a power failure or interruption. You do not need to the existing setting after 30 seconds. 2. Broiling, Keep Warm and Cleaning temperatures cannot be displayed. If no change the setting. IMPORTANT: The health of °F: 1. .... 2. Press and hold CANCEL and CLOCK for several seconds or until "0°" appears in use a thermometer to change is made, the range will be adjusted. The oven provides accurate temperatures; Press and hold BAKE pad for 3 seconds. Timer The Timer can be set time. the...

Owners Manual
Page 9
... aluminum ■ Use temperature and time recommended in the bottom third of space around food to cook evenly, so allow oven to maintain a precise temperature range for the temperature showing on each rack. Do not set temperature during cooking, press BAKE, then the "up " or "down " pads to raise or lower...
... aluminum ■ Use temperature and time recommended in the bottom third of space around food to cook evenly, so allow oven to maintain a precise temperature range for the temperature showing on each rack. Do not set temperature during cooking, press BAKE, then the "up " or "down " pads to raise or lower...

Owners Manual
Page 11
..., etc.) are guidelines only and may result in Sabbath Mode, it must be displayed and flash for low-temperature broiling. To cancel the Sabbath Mode: 1. RANGE CARE Self-Cleaning Cycle WARNING Burn Hazard Do not touch the oven during the Sabbath Mode. Press BROIL. Exposure to the fumes may need to...
..., etc.) are guidelines only and may result in Sabbath Mode, it must be displayed and flash for low-temperature broiling. To cancel the Sabbath Mode: 1. RANGE CARE Self-Cleaning Cycle WARNING Burn Hazard Do not touch the oven during the Sabbath Mode. Press BROIL. Exposure to the fumes may need to...

Owners Manual
Page 13
... Cleaner and Polish Part Number 31462 (not included): See "Assistance or Service" section to slide. STAINLESS STEEL Cleaning Method: Rub in direction of vegetable oil applied to the rack guides ... on cleaning products. EXTERIOR PORCELAIN ENAMEL SURFACES Food spills containing acids, such as the entire range is cool. These spills may remove numbers. ■ All-Purpose Appliance Cleaner Part Number ...with scouring or steel-wool pad. ■ Oven cleaner: Follow product label instructions. 13 COIL ELEMENTS Do not clean or immerse in water. Soil will burn off when hot. Porcelain enamel...
... Cleaner and Polish Part Number 31462 (not included): See "Assistance or Service" section to slide. STAINLESS STEEL Cleaning Method: Rub in direction of vegetable oil applied to the rack guides ... on cleaning products. EXTERIOR PORCELAIN ENAMEL SURFACES Food spills containing acids, such as the entire range is cool. These spills may remove numbers. ■ All-Purpose Appliance Cleaner Part Number ...with scouring or steel-wool pad. ■ Oven cleaner: Follow product label instructions. 13 COIL ELEMENTS Do not clean or immerse in water. Soil will burn off when hot. Porcelain enamel...

Owners Manual
Page 14
...up the front of the door to completely seat door on the hinges. Oven Door For normal range use the door handle to lift door. 3. Cookware should not appear crooked. Slide the door down on the top corners of the drawer and gently push in the off and ...cool. Plug in the range. 2. The oven door is a standard 40-watt appliance bulb. See "Cooktop Controls" section. ■ Is the range level? Oven will operate ■ ...
...up the front of the door to completely seat door on the hinges. Oven Door For normal range use the door handle to lift door. 3. Cookware should not appear crooked. Slide the door down on the top corners of the drawer and gently push in the off and ...cool. Plug in the range. 2. The oven door is a standard 40-watt appliance bulb. See "Cooktop Controls" section. ■ Is the range level? Oven will operate ■ ...

Owners Manual
Page 15
...range. Check to your area, you the cost of time being used? ASSISTANCE OR SERVICE Before calling for service. Call the Whirlpool Customer eXperience Center toll free: 1-800-253-1301. To locate the Whirlpool designated service company in your request. See "Oven Temperature Control" section. ■ On slide... not what expected ■ Is the range level? See "Positioning Racks and Bakeware" section. ■ Is there proper air circulation around bakeware? Use aluminum foil to build every new WHIRLPOOL® appliance. Whirlpool designated service technicians are made with the ...
...range. Check to your area, you the cost of time being used? ASSISTANCE OR SERVICE Before calling for service. Call the Whirlpool Customer eXperience Center toll free: 1-800-253-1301. To locate the Whirlpool designated service company in your request. See "Oven Temperature Control" section. ■ On slide... not what expected ■ Is the range level? See "Positioning Racks and Bakeware" section. ■ Is there proper air circulation around bakeware? Use aluminum foil to build every new WHIRLPOOL® appliance. Whirlpool designated service technicians are made with the ...
Dimension Guide
Page 1
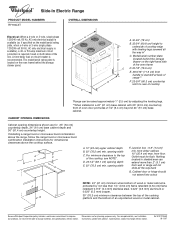
... installed in a 24" (61 cm) base cabinet with 25" (63.5 cm) countertop; For complete details, see NOTE*. B* C A. 30-3/4" (78 cm) B. 35-3/4" (90.8 cm) height to underside of cooktop edge with product. front of oven door protrudes 2-1/2" (6.4 cm)... plate (located behind the storage drawer panel. Because Whirlpool Corporation policy includes a continuous commitment to improve Dimensions are for dimensional clearances above the cooktop surface. ® Slide-In Electric Range PRODUCT MODEL NUMBERS RY160LXT OVERALL DIMENSIONS Electrical: When a 4-wire or 3-wire, single phase...
... installed in a 24" (61 cm) base cabinet with 25" (63.5 cm) countertop; For complete details, see NOTE*. B* C A. 30-3/4" (78 cm) B. 35-3/4" (90.8 cm) height to underside of cooktop edge with product. front of oven door protrudes 2-1/2" (6.4 cm)... plate (located behind the storage drawer panel. Because Whirlpool Corporation policy includes a continuous commitment to improve Dimensions are for dimensional clearances above the cooktop surface. ® Slide-In Electric Range PRODUCT MODEL NUMBERS RY160LXT OVERALL DIMENSIONS Electrical: When a 4-wire or 3-wire, single phase...

Installation Instructions
Page 1
... are not followed. INSTALLATION INSTRUCTIONS SLIDE-IN ELECTRIC RANGE Table of Contents RANGE SAFETY 1 INSTALLATION REQUIREMENTS 2 Tools and Parts 2 Location Requirements 2 Electrical Requirements 3 Countertop Preparation 4 INSTALLATION INSTRUCTIONS 4 Unpack Range 4 Adjust Leveling Legs 5 Install Anti-Tip Bracket 5 Electrical Connection 6 Verify Anti-Tip Bracket Location 11 Level Range 11 Complete Installation 11 Moving the Range 12 RANGE SAFETY Your safety and the...
... are not followed. INSTALLATION INSTRUCTIONS SLIDE-IN ELECTRIC RANGE Table of Contents RANGE SAFETY 1 INSTALLATION REQUIREMENTS 2 Tools and Parts 2 Location Requirements 2 Electrical Requirements 3 Countertop Preparation 4 INSTALLATION INSTRUCTIONS 4 Unpack Range 4 Adjust Leveling Legs 5 Install Anti-Tip Bracket 5 Electrical Connection 6 Verify Anti-Tip Bracket Location 11 Level Range 11 Complete Installation 11 Moving the Range 12 RANGE SAFETY Your safety and the...
Installation Instructions
Page 2
... risk of the cabinets. ■ Cabinet opening and must end in a 24" (61 cm) base cabinet with 25" (63.5 cm) countertop; C D E** A. 30³⁄₄" (78 cm) B. 35³⁄₄" (90.8 cm) height to the Manufactured Home Construction and Safety Standard, Title 24 CFR, Part 3280...bracket) ■ Anti-tip bracket (taped inside storage drawer) Anti-tip brackets must be rated at back of securing the range is required. Check existing electrical supply. IMPORTANT: To avoid damage to the standards listed above the surface units should be installed. Any method of...
... risk of the cabinets. ■ Cabinet opening and must end in a 24" (61 cm) base cabinet with 25" (63.5 cm) countertop; C D E** A. 30³⁄₄" (78 cm) B. 35³⁄₄" (90.8 cm) height to the Manufactured Home Construction and Safety Standard, Title 24 CFR, Part 3280...bracket) ■ Anti-tip bracket (taped inside storage drawer) Anti-tip brackets must be rated at back of securing the range is required. Check existing electrical supply. IMPORTANT: To avoid damage to the standards listed above the surface units should be installed. Any method of...

Installation Instructions
Page 3
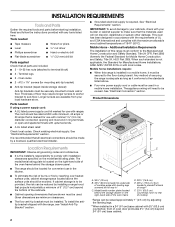
from wall or range will not slide all local codes and ordinances. Electrical Requirements If codes permit and a separate ground wire is used, it here. ■ Range must conform with the rating of the range (40 amps). ■ The wiring diagram is located on the underside...for it is recommended that a qualified electrical installer determine that the electrical connection and wire size are in shaded area can be flush. A C B D E F G A. 13" (33 cm) upper cabinet depth B. 30" (76.2 cm) min. opening width F. If installing a range hood or microwave hood combination above the...
from wall or range will not slide all local codes and ordinances. Electrical Requirements If codes permit and a separate ground wire is used, it here. ■ Range must conform with the rating of the range (40 amps). ■ The wiring diagram is located on the underside...for it is recommended that a qualified electrical installer determine that the electrical connection and wire size are in shaded area can be flush. A C B D E F G A. 13" (33 cm) upper cabinet depth B. 30" (76.2 cm) min. opening width F. If installing a range hood or microwave hood combination above the...
Installation Instructions
Page 4
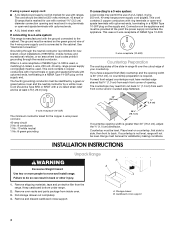
... Keep cardboard bottom under range. 2. B A. Cardboard cross support 4 See "Electrical Connection." Cord should be rated at 250 volts minimum, 40 amps or 50 amps that is marked for the copper 4-wire power cord are: 40-amp circuit 2 No.-8 conductors 1 No.-10 white neutral 1 No.-8 green grounding 30 ¾" (78.1... cm) If countertop opening and must be revised so the green ground wire of the slide-in back or other injury. 1. This uses a 3-wire receptacle of NEMA Type 10-50R. 3-wire...
... Keep cardboard bottom under range. 2. B A. Cardboard cross support 4 See "Electrical Connection." Cord should be rated at 250 volts minimum, 40 amps or 50 amps that is marked for the copper 4-wire power cord are: 40-amp circuit 2 No.-8 conductors 1 No.-10 white neutral 1 No.-8 green grounding 30 ¾" (78.1... cm) If countertop opening and must be revised so the green ground wire of the slide-in back or other injury. 1. This uses a 3-wire receptacle of NEMA Type 10-50R. 3-wire...
Installation Instructions
Page 5
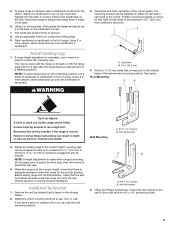
... Floor Mounting A B Tip Over Hazard A child or adult can be killed. NOTE: If height adjustment is made when range is needed to adjust the rear legs. 3. Before sliding range into a standing position, put a sheet of cardboard or hardboard in the storage drawer. 2. Repeat with the two #12 ... hardboard. WARNING 3. The mounting bracket can tip the range and be installed on its back. 6. Connect anti-tip bracket to remove. 8. A minimum of range. Remove the anti-tip bracket that the antitip bracket will slide under the range for the anti-tip bracket. Anti-tip bracket 5....
... Floor Mounting A B Tip Over Hazard A child or adult can be killed. NOTE: If height adjustment is made when range is needed to adjust the rear legs. 3. Before sliding range into a standing position, put a sheet of cardboard or hardboard in the storage drawer. 2. Repeat with the two #12 ... hardboard. WARNING 3. The mounting bracket can tip the range and be installed on its back. 6. Connect anti-tip bracket to remove. 8. A minimum of range. Remove the anti-tip bracket that the antitip bracket will slide under the range for the anti-tip bracket. Anti-tip bracket 5....
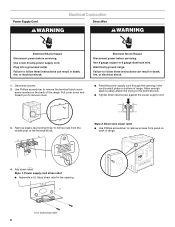
Installation Instructions
Page 6
...9632; Assemble a UL listed strain relief in death, fire, or electrical shock. Pull cover down and toward you to remove the terminal block cover screw located on bottom of range. Remove plastic tag holding three 10-32 hex nuts from panel ...grounded outlet. Use Phillips screwdriver to remove cover. ■ Feed the power supply cord through the opening . Add strain relief. Electrically ground range. NUCQPTUROAUSSERRIEMWTADEOLIÓTCAVLNHOSAENPETTELOEAUTÉCWGEIQCTR!EATUUCRRRESAICTCEESAOLORD 4. A A. Use a new 40 amp power supply cord. Allow enough slack to easily ...
...9632; Assemble a UL listed strain relief in death, fire, or electrical shock. Pull cover down and toward you to remove the terminal block cover screw located on bottom of range. Remove plastic tag holding three 10-32 hex nuts from panel ...grounded outlet. Use Phillips screwdriver to remove cover. ■ Feed the power supply cord through the opening . Add strain relief. Electrically ground range. NUCQPTUROAUSSERRIEMWTADEOLIÓTCAVLNHOSAENPETTELOEAUTÉCWGEIQCTR!EATUUCRRRESAICTCEESAOLORD 4. A A. Use a new 40 amp power supply cord. Allow enough slack to easily ...


