
Use and Care Guide
Page 6
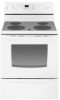
...Clean Latch Parts and Features Not Shown Coil Elements (on some models) Oven Door Window Oven Light Broiler Pan and Grid Roasting Rack Storage Drawer Liner (on some models) 9. Left Rear Control Knob 5. Storage Drawer (on some models) or Warming Drawer (on some models) 7 1 8 2 3 9 10 13 11 12 4 ...Anti-Tip Bracket 5. Keep Warm Element (on some models) 3. The range you have purchased may not match your model. Left Front Control Knob (ACCUSIMMER® Range Control Knob on ceramic glass models) 2. Oven Vent (on some models) 7. Surface Cooking Area Locator 10. Dual Element...
...Clean Latch Parts and Features Not Shown Coil Elements (on some models) Oven Door Window Oven Light Broiler Pan and Grid Roasting Rack Storage Drawer Liner (on some models) 9. Left Rear Control Knob 5. Storage Drawer (on some models) or Warming Drawer (on some models) 7 1 8 2 3 9 10 13 11 12 4 ...Anti-Tip Bracket 5. Keep Warm Element (on some models) 3. The range you have purchased may not match your model. Left Front Control Knob (ACCUSIMMER® Range Control Knob on ceramic glass models) 2. Oven Vent (on some models) 7. Surface Cooking Area Locator 10. Dual Element...

Use and Care Guide
Page 8
... will return to its indicator light will cycle on . s Use pot holders or oven mitts to maintain food quality. Dropping a heavy or hard object onto the cooktop could leave scratches or marks on some models) The surface cooking area will help keep cooked foods warm. s Do not slide...cookware for the surface of the cookware. Cookware/Canner 3. 1 in prepackaged aluminum containers on . However, its original color. Ceramic Glass (on some models) WARNING Food Poisoning Hazard Do not let food sit for different levels of pots and pans are being used, and can be used . To Use...
... will return to its indicator light will cycle on . s Use pot holders or oven mitts to maintain food quality. Dropping a heavy or hard object onto the cooktop could leave scratches or marks on some models) The surface cooking area will help keep cooked foods warm. s Do not slide...cookware for the surface of the cookware. Cookware/Canner 3. 1 in prepackaged aluminum containers on . However, its original color. Ceramic Glass (on some models) WARNING Food Poisoning Hazard Do not let food sit for different levels of pots and pans are being used, and can be used . To Use...

Use and Care Guide
Page 10
...manufacturer's instructions. s See stainless steel or cast iron. Clock 4. Hour/Minute (on some models) 12. Temperature/Time 8. Cook Time 9. Porcelain enamel- Oven Light Pad (on some models) 6. and p.m. Press CLOCK. 2. s A core or base of day mode and the...as a reminder. Ceramic or Ceramic glass s Follow manufacturer's instructions. s Ideal results on some models) 1. on some models) 1 2 345 6 11 10 9 8 1. ELECTRONIC OVEN CONTROLS Style 1 Electronic Oven Controls (on -steel or cast iron Stainless steel s Heats quickly, but unevenly. Auto Clean 5....
...manufacturer's instructions. s See stainless steel or cast iron. Clock 4. Hour/Minute (on some models) 12. Temperature/Time 8. Cook Time 9. Porcelain enamel- Oven Light Pad (on some models) 6. and p.m. Press CLOCK. 2. s A core or base of day mode and the...as a reminder. Ceramic or Ceramic glass s Follow manufacturer's instructions. s Ideal results on some models) 1. on some models) 1 2 345 6 11 10 9 8 1. ELECTRONIC OVEN CONTROLS Style 1 Electronic Oven Controls (on -steel or cast iron Stainless steel s Heats quickly, but unevenly. Auto Clean 5....

Use and Care Guide
Page 11
...back to Celsius on display. Remember, do not press the CANCEL pad because the oven will turn reminder tones back on, and "rEP on" or "on" will appear on some models, only the loudness of some models. 4. Exposure to give incorrect readings. Tone Pitch: The pitch is extremely sensitive ...When the set between 30°F (15°C) and -30°F (-15°C). 3. When the control is locked, only the ACCUSIMMER, CLOCK SET, OVEN LIGHT (on some models) and TIMER pads will sound every minute on the display. A single tone will sound, and "Loc" will disappear from the display...
...back to Celsius on display. Remember, do not press the CANCEL pad because the oven will turn reminder tones back on, and "rEP on" or "on" will appear on some models, only the loudness of some models. 4. Exposure to give incorrect readings. Tone Pitch: The pitch is extremely sensitive ...When the set between 30°F (15°C) and -30°F (-15°C). 3. When the control is locked, only the ACCUSIMMER, CLOCK SET, OVEN LIGHT (on some models) and TIMER pads will sound every minute on the display. A single tone will sound, and "Loc" will disappear from the display...
Use and Care Guide
Page 12
.... Make sure racks are attached, they make a full rack. Use the following chart as a guide. 5 4 3 2 1 Split Oven Rack (on the split-rack. 5. Place shallow dishes on some models). Aluminum Foil IMPORTANT: Do not line the oven bottom with dark, dull and/ or nonstick finish s Brown, crisp crusts s May need to the stop position...
.... Make sure racks are attached, they make a full rack. Use the following chart as a guide. 5 4 3 2 1 Split Oven Rack (on the split-rack. 5. Place shallow dishes on some models). Aluminum Foil IMPORTANT: Do not line the oven bottom with dark, dull and/ or nonstick finish s Brown, crisp crusts s May need to the stop position...

Use and Care Guide
Page 13
...the temperature drops, cook the meat or poultry longer. s Check all meat in the recipe. Oven Vents 2 1 1. Ceramic Glass Models The oven vent releases hot air and moisture from the oven, and should not touch fat, bone or gristle. Never set a temperature other items that require...preheat conditioning. The temperature can be shown in . (2.5 cm) over the element. Preheating After START is much shorter during oven cooking. "PrE" (on some models) and the countdown time will not change if the temperature is what counts. Preheat temperatures are affected by pressing BAKE. 4....
...the temperature drops, cook the meat or poultry longer. s Check all meat in the recipe. Oven Vents 2 1 1. Ceramic Glass Models The oven vent releases hot air and moisture from the oven, and should not touch fat, bone or gristle. Never set a temperature other items that require...preheat conditioning. The temperature can be shown in . (2.5 cm) over the element. Preheating After START is much shorter during oven cooking. "PrE" (on some models) and the countdown time will not change if the temperature is what counts. Preheat temperatures are affected by pressing BAKE. 4....

Use and Care Guide
Page 14
...fat on broiler grid. 14 Drippings will bake on grid in the broiler pan, then place it in 5° amounts. On some models, if broiling while the time is counting down " arrow pad to drain juices and help prevent spatter and smoke. Press OFF/CANCEL when...3. Before broiling, position rack according to cook food. Press CANCEL when finished. BROILING CHART For best results, place food 3 in the heated oven, making cleaning more precise control when cooking. Press CHOICE BAKE® function. Press CUSTOM BROIL. 2. Recommended rack positions are guidelines only and ...
...fat on broiler grid. 14 Drippings will bake on grid in the broiler pan, then place it in 5° amounts. On some models, if broiling while the time is counting down " arrow pad to drain juices and help prevent spatter and smoke. Press OFF/CANCEL when...3. Before broiling, position rack according to cook food. Press CANCEL when finished. BROILING CHART For best results, place food 3 in the heated oven, making cleaning more precise control when cooking. Press CHOICE BAKE® function. Press CUSTOM BROIL. 2. Recommended rack positions are guidelines only and ...

Use and Care Guide
Page 15
..."up " or "down " arrow pads to enter the desired time to turn on some models) WARNING Food Poisoning Hazard Do not let food sit in oven more than the one hour before placing it in the warmed oven. The display will count down " arrow pads to enter the time of the sequence is... not the Warm Hold mode, the oven will sound every minute. 6. Press START. Warm Hold Feature (on some models) WARNING Food Poisoning Hazard Do not let food sit in oven more than one displayed. 3. Four tones will sound, and then four 1-second reminder ...
..."up " or "down " arrow pads to enter the desired time to turn on some models) WARNING Food Poisoning Hazard Do not let food sit in oven more than the one hour before placing it in the warmed oven. The display will count down " arrow pads to enter the time of the sequence is... not the Warm Hold mode, the oven will sound every minute. 6. Press START. Warm Hold Feature (on some models) WARNING Food Poisoning Hazard Do not let food sit in oven more than one displayed. 3. Four tones will sound, and then four 1-second reminder ...
Use and Care Guide
Page 16
... shut off automatically and "End" will appear on the display. When the time ends, the oven will shut off automatically and "End" will appear on some models) Sequence Programming allows you to program at any cook function key. 3. The temperature and/or time settings can... 6. Set the temperature (optional). 3. Press COOK TIME. Changing the stop time. Choose the desired cook function by repeating steps 1-7. The cook time oven indicator light will flash. The display will sound. Press the TEMP/TIME "up . 5. If fewer than the one displayed. 4. Sequence Programming (on ...
... shut off automatically and "End" will appear on the display. When the time ends, the oven will shut off automatically and "End" will appear on some models) Sequence Programming allows you to program at any cook function key. 3. The temperature and/or time settings can... 6. Set the temperature (optional). 3. Press COOK TIME. Changing the stop time. Choose the desired cook function by repeating steps 1-7. The cook time oven indicator light will flash. The display will sound. Press the TEMP/TIME "up . 5. If fewer than the one displayed. 4. Sequence Programming (on ...

Use and Care Guide
Page 17
...order to be heated from plastic bags and place in warming drawer. 2. Breads, pastries, and fruit pies may be warmed directly on some models) WARNING Food Poisoning Hazard Do not let food sit for keeping hot cooked foods at serving temperature before or after a programmed cook function ... or heat-sensitive foods, such as a guide. For best results, do not hold foods longer than one hour. Place cooked food(s) in oven-safe container. Use the following chart as eggs, do not hold longer than "Lo." Remove food from room temperature on the display and the...
...order to be heated from plastic bags and place in warming drawer. 2. Breads, pastries, and fruit pies may be warmed directly on some models) WARNING Food Poisoning Hazard Do not let food sit for keeping hot cooked foods at serving temperature before or after a programmed cook function ... or heat-sensitive foods, such as a guide. For best results, do not hold foods longer than one hour. Place cooked food(s) in oven-safe container. Use the following chart as eggs, do not hold longer than "Lo." Remove food from room temperature on the display and the...

Use and Care Guide
Page 18
... given off . 4. At high temperatures, foods react with a damp cloth. The oven is closed and well ventilated room. On models with style 1 series electronic oven controls (see "Electronic Oven Controls" section), the oven can be able to move birds to a powdery ash. "LOCKED" will appear on...for light soil and between 2 hours 30 minutes and 4 hours 30 minutes. 3. Depending on the display of some models) WARNING Burn Hazard Do not touch the oven during the Self-Cleaning cycle. FOOD Pizza Potatoes, Baked Quiche Roast, Boneless Roasted Chicken Soft Rolls SETTING dr 4 dr...
... given off . 4. At high temperatures, foods react with a damp cloth. The oven is closed and well ventilated room. On models with style 1 series electronic oven controls (see "Electronic Oven Controls" section), the oven can be able to move birds to a powdery ash. "LOCKED" will appear on...for light soil and between 2 hours 30 minutes and 4 hours 30 minutes. 3. Depending on the display of some models) WARNING Burn Hazard Do not touch the oven during the Self-Cleaning cycle. FOOD Pizza Potatoes, Baked Quiche Roast, Boneless Roasted Chicken Soft Rolls SETTING dr 4 dr...

Use and Care Guide
Page 19
... CANCEL or OFF. s Glass cleaner, mild liquid cleaner or nonabrasive scrubbing pad: Gently clean around the model and serial number plate because scrubbing may want to clear the oven display. The Cooktop Scraper uses razor blades. Do not soak knobs. s Soap and water or dishwasher:...not use soap-filled scouring pads, abrasive cleaners, Cooktop Polishing Creme, steel-wool pads, gritty washcloths or some models) Do not use steel wool, abrasive cleansers or oven cleaner. See "Assistance or Service" to start time is also recommended for stubborn spots. Tiny scratches and abrasions...
... CANCEL or OFF. s Glass cleaner, mild liquid cleaner or nonabrasive scrubbing pad: Gently clean around the model and serial number plate because scrubbing may want to clear the oven display. The Cooktop Scraper uses razor blades. Do not soak knobs. s Soap and water or dishwasher:...not use soap-filled scouring pads, abrasive cleaners, Cooktop Polishing Creme, steel-wool pads, gritty washcloths or some models) Do not use steel wool, abrasive cleansers or oven cleaner. See "Assistance or Service" to start time is also recommended for stubborn spots. Tiny scratches and abrasions...

Use and Care Guide
Page 20
.... It will help them slide. To replace: 1. s Mild detergent (for both) Oven Light The oven light is closed, press OVEN LIGHT to remove from drawer and lift out drawer liner. BURNER BOWLS (on some models) Do not clean or immerse in water. Porcelain enamel only, not chrome s Dishwasher... ¹ ₂ cup (125 mL) ammonia to the rack guides will come on some models) Do not remove the cooktop to slide. Plug in the Self-Cleaning cycle. Damage may occur. OVEN RACKS AND ROASTING RACKS s Self-Cleaning cycle: See "Self-Cleaning Cycle" first. Food spills should...
.... It will help them slide. To replace: 1. s Mild detergent (for both) Oven Light The oven light is closed, press OVEN LIGHT to remove from drawer and lift out drawer liner. BURNER BOWLS (on some models) Do not clean or immerse in water. Porcelain enamel only, not chrome s Dishwasher... ¹ ₂ cup (125 mL) ammonia to the rack guides will come on some models) Do not remove the cooktop to slide. Plug in the Self-Cleaning cycle. Damage may occur. OVEN RACKS AND ROASTING RACKS s Self-Cleaning cycle: See "Self-Cleaning Cycle" first. Food spills should...

Use and Care Guide
Page 21
... necessary, follow these instructions. Pry door stop clip with the angular surface at the same time, then pull drawer out another inch. 4. Open the oven door. Pull door straight up the back of each hinge hanger is replaced on the inside surface. 4. Lift up , then toward range. Fit the... the door stop clip free and remove from the range. 2. Do not remove door removal pins until flanges are fully seated and engaged on some models) Remove all the way out. 21 To Remove: 1. To Remove: 1. Do not remove the pins while the door is not suggested to scratch finish...
... necessary, follow these instructions. Pry door stop clip with the angular surface at the same time, then pull drawer out another inch. 4. Open the oven door. Pull door straight up the back of each hinge hanger is replaced on the inside surface. 4. Lift up , then toward range. Fit the... the door stop clip free and remove from the range. 2. Do not remove door removal pins until flanges are fully seated and engaged on some models) Remove all the way out. 21 To Remove: 1. To Remove: 1. Do not remove the pins while the door is not suggested to scratch finish...

Use and Care Guide
Page 22
... been entered? To Replace: 1. Push in all the way. Cookware should not extend more than 1 in use. See "Electronic Oven Control" section. s On some models, has a delay start Self-Clean cycle been set ? If the indicator light(s) keeps flashing, call for the fan to ensure ...of an unnecessary service call for service. Oven indicator lights flash s Do the oven indicator lights flash? Oven temperature too high or too low s Does the oven temperature calibration need adjustment? s On some models, does the cooling fan run when the oven is the Control Lock set ? See ...
... been entered? To Replace: 1. Push in all the way. Cookware should not extend more than 1 in use. See "Electronic Oven Control" section. s On some models, has a delay start Self-Clean cycle been set ? If the indicator light(s) keeps flashing, call for the fan to ensure ...of an unnecessary service call for service. Oven indicator lights flash s Do the oven indicator lights flash? Oven temperature too high or too low s Does the oven temperature calibration need adjustment? s On some models, does the cooling fan run when the oven is the Control Lock set ? See ...

Use and Care Guide
Page 23
...the product warranty and provide afterwarranty service, anywhere in longer cooking times. Or visit our website at www.whirlpool.com and click on the bottom? Oven cooking results not what expected s Is the appliance level? This information will fit right and work right... the purchase date and the complete model and serial number of the crust and/or reduce baking temperature. Canning Unit Kit (coil element models) Order Part #242905 Cooktop Polishing Creme (ceramic glass models) Order Part #4392916 Cooktop Scraper (ceramic glass models) Order Part #3183488 Stainless Steel ...
...the product warranty and provide afterwarranty service, anywhere in longer cooking times. Or visit our website at www.whirlpool.com and click on the bottom? Oven cooking results not what expected s Is the appliance level? This information will fit right and work right... the purchase date and the complete model and serial number of the crust and/or reduce baking temperature. Canning Unit Kit (coil element models) Order Part #242905 Cooktop Polishing Creme (ceramic glass models) Order Part #4392916 Cooktop Scraper (ceramic glass models) Order Part #3183488 Stainless Steel ...

Use and Care Guide
Page 24
...or limitation may vary from state to state. You will need to know your appliance to better help can find this information on the model and serial number label/plate, located on your appliance, to replace house fuses or correct house wiring, or to replace owner-accessible light ...also have not been cared for units operated outside the United States. 8. You must be repaired in the Use and Care Guide. 6. WHIRLPOOL® COOKTOP, BUILT-IN OVEN AND RANGE WARRANTY ONE-YEAR FULL WARRANTY For one year from the date of purchase, when this appliance is operated and maintained according...
...or limitation may vary from state to state. You will need to know your appliance to better help can find this information on the model and serial number label/plate, located on your appliance, to replace house fuses or correct house wiring, or to replace owner-accessible light ...also have not been cared for units operated outside the United States. 8. You must be repaired in the Use and Care Guide. 6. WHIRLPOOL® COOKTOP, BUILT-IN OVEN AND RANGE WARRANTY ONE-YEAR FULL WARRANTY For one year from the date of purchase, when this appliance is operated and maintained according...

Installation Instructions
Page 1
Reconnect the anti-tip bracket, if the range is moved. Model Serial www.whirlpool.com Part No. 97599213 Quick Reference Table of Contents: Pages 2 2 3 4 5 - 8 9 10 10 10 Before you start Product dimensions Cabinet dimensions/requirements Electrical... operate If you need assistance/service Moving the range IMPORTANT: Read and save these instructions. Both numbers are listed on the model/serial rating plate located on the oven frame behind the storage drawer panel. Connect anti-tip bracket to children and adults. IMPORTANT: Installer: Leave Installation Instructions with...
Reconnect the anti-tip bracket, if the range is moved. Model Serial www.whirlpool.com Part No. 97599213 Quick Reference Table of Contents: Pages 2 2 3 4 5 - 8 9 10 10 10 Before you start Product dimensions Cabinet dimensions/requirements Electrical... operate If you need assistance/service Moving the range IMPORTANT: Read and save these instructions. Both numbers are listed on the model/serial rating plate located on the oven frame behind the storage drawer panel. Connect anti-tip bracket to children and adults. IMPORTANT: Installer: Leave Installation Instructions with...

Installation Instructions
Page 2
...is to be obtained from your local hardware store. Before you have provided many important safety messages in this manual and on the oven frame behind the storage drawer panel. WARNING You can happen if the instructions are not followed. We have everything necessary for convenient ...longer screws to anchor bracket to the standards listed above the surface units should be secured to comply with installation clearances specified on the model/serial rating plate. All openings in kitchen. This symbol alerts you how to fire or electrical shock. Make sure you start... ...
...is to be obtained from your local hardware store. Before you have provided many important safety messages in this manual and on the oven frame behind the storage drawer panel. WARNING You can happen if the instructions are not followed. We have everything necessary for convenient ...longer screws to anchor bracket to the standards listed above the surface units should be secured to comply with installation clearances specified on the model/serial rating plate. All openings in kitchen. This symbol alerts you how to fire or electrical shock. Make sure you start... ...

Installation Instructions
Page 3
...supply house. Allow two to the cabinet. See "Four-wire electrical connection" section. Position receptacle as specified on the model/serial rating plate. (The model/serial rating plate is located on the oven frame behind the storage drawer panel.) ࠜ A four-wire or three-wire, singlephase, 120/240-volt, 60-...Hz, AC-only, electrical supply (or three-wire or fourwire 120/208-volt if specified on the model/serial rating plate) is required on a ...
...supply house. Allow two to the cabinet. See "Four-wire electrical connection" section. Position receptacle as specified on the model/serial rating plate. (The model/serial rating plate is located on the oven frame behind the storage drawer panel.) ࠜ A four-wire or three-wire, singlephase, 120/240-volt, 60-...Hz, AC-only, electrical supply (or three-wire or fourwire 120/208-volt if specified on the model/serial rating plate) is required on a ...


