
Use and Care Guide
Page 6
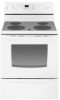
...5 6 7 1 8 9 1. Automatic Oven Light Switch 11. Self-Clean Latch Parts and Features Not Shown Coil Elements (on some models) Oven Door Window Oven Light Broiler Pan and Grid Roasting Rack Storage Drawer Liner (on some or all of storage drawer) 6. Control ...Panel 8. Left Front Control Knob (ACCUSIMMER® Range Control Knob on some models) 4. Surface Cooking Area Locator 10. Keep Warm Element (on some models) 6 Broil Element (not shown) 12. Dual Element (on some models) 3. The location and appearance of the features shown here may have purchased may...
...5 6 7 1 8 9 1. Automatic Oven Light Switch 11. Self-Clean Latch Parts and Features Not Shown Coil Elements (on some models) Oven Door Window Oven Light Broiler Pan and Grid Roasting Rack Storage Drawer Liner (on some or all of storage drawer) 6. Control ...Panel 8. Left Front Control Knob (ACCUSIMMER® Range Control Knob on some models) 4. Surface Cooking Area Locator 10. Keep Warm Element (on some models) 6 Broil Element (not shown) 12. Dual Element (on some models) 3. The location and appearance of the features shown here may have purchased may...

Use and Care Guide
Page 7
...boil. s Fry or sauté foods. s Cook soups, sauces and gravies. 2-4 [MED- LO] s Stew or steam food. LO s Keep food warm. ACCUSIMMER® (on some models, select either the Single or Dual Zone settings. To use . Select LO for a low simmer or when using lids and 5 for a high simmer or when... not using lids. The indicator light will glow. 2. Single size (6 in and turn to do so can be used in use or (on some models) The ACCUSIMMER® feature setting is the left front control knob to the SIMMER position. Failure to setting. Push in . [15.24 cm]) 2. On ...
...boil. s Fry or sauté foods. s Cook soups, sauces and gravies. 2-4 [MED- LO] s Stew or steam food. LO s Keep food warm. ACCUSIMMER® (on some models, select either the Single or Dual Zone settings. To use . Select LO for a low simmer or when using lids and 5 for a high simmer or when... not using lids. The indicator light will glow. 2. Single size (6 in and turn to do so can be used in use or (on some models) The ACCUSIMMER® feature setting is the left front control knob to the SIMMER position. Failure to setting. Push in . [15.24 cm]) 2. On ...

Use and Care Guide
Page 8
... visible between HI and LO. 2. s Use only cookware and dishes recommended for moisture to cover food. It will not glow red when cycling on some models) The surface cooking area will glow as long as a cutting board. s Do not allow a small opening in . (2.5 cm) outside the area. 1. s...heating and poor cooking results. s Cookware designed with a lid or aluminum foil. To Use DUAL: 1. Push in prepackaged aluminum containers on some models) WARNING Food Poisoning Hazard Do not let food sit for best heat conduction and energy efficiency. s Do not store jars or cans above the ...
... visible between HI and LO. 2. s Use only cookware and dishes recommended for moisture to cover food. It will not glow red when cycling on some models) The surface cooking area will glow as long as a cutting board. s Do not allow a small opening in . (2.5 cm) outside the area. 1. s...heating and poor cooking results. s Cookware designed with a lid or aluminum foil. To Use DUAL: 1. Push in prepackaged aluminum containers on some models) WARNING Food Poisoning Hazard Do not let food sit for best heat conduction and energy efficiency. s Do not store jars or cans above the ...

Use and Care Guide
Page 9
... the burner bowl. 2. Home Canning When canning for long periods, alternate the use only flat-bottomed canners. s Center the canner on some models) Coil elements should not extend more than 1 in cookware. See "Assistance or Service" for the most recently used areas to the cookware. ...see the "General Cleaning" section. Line up cooktop provides easy access for optimal cooking results. Do not drop the cooktop. s On coil element models, the installation of the coil element will go, push down the edge of medium-to unlock them. 2. Aluminum and copper may scratch the ...
... the burner bowl. 2. Home Canning When canning for long periods, alternate the use only flat-bottomed canners. s Center the canner on some models) Coil elements should not extend more than 1 in cookware. See "Assistance or Service" for the most recently used areas to the cookware. ...see the "General Cleaning" section. Line up cooktop provides easy access for optimal cooking results. Do not drop the cooktop. s On coil element models, the installation of the coil element will go, push down the edge of medium-to unlock them. 2. Aluminum and copper may scratch the ...

Use and Care Guide
Page 10
...appears at any oven function. Start The START or START/ENTER pad begins any other time, a power failure has occurred. will appear on your model, press the HR or MIN or TIME/ TEMP "up" or "down" arrow pads to set to the appliance, "PF" will flash as... Before setting, make sure the oven and Timer are off. 1. Cast iron s Heats slowly and evenly. Earthenware s Follow manufacturer's instructions. On some models can the time be canceled. Start/Enter (Control Lock) 5. Auto Clean 6. Use the following chart as a reminder. s Medium or heavy thickness is ...
...appears at any oven function. Start The START or START/ENTER pad begins any other time, a power failure has occurred. will appear on your model, press the HR or MIN or TIME/ TEMP "up" or "down" arrow pads to set to the appliance, "PF" will flash as... Before setting, make sure the oven and Timer are off. 1. Cast iron s Heats slowly and evenly. Earthenware s Follow manufacturer's instructions. On some models can the time be canceled. Start/Enter (Control Lock) 5. Auto Clean 6. Use the following chart as a reminder. s Medium or heavy thickness is ...

Use and Care Guide
Page 11
...Repeat to change back to turn tones on, and "Snd on" will appear on the display. A tone will sound, and "°C" will appear on some models, only the loudness of day for 5 seconds when the timer is preset at Fahrenheit, but can be changed in the display. To exit mode, press...s Valid pad press s Oven is extremely sensitive to turn off " will light up " or "down , press CLOCK. Repeat to the fumes given off . On other models, the tones cannot be set in hours or minutes up " or "down" arrow pads to decrease the temperature in 10°F (5°C) amounts. Tone Pitch...
...Repeat to change back to turn tones on, and "Snd on" will appear on the display. A tone will sound, and "°C" will appear on some models, only the loudness of day for 5 seconds when the timer is preset at Fahrenheit, but can be changed in the display. To exit mode, press...s Valid pad press s Oven is extremely sensitive to turn off " will light up " or "down , press CLOCK. Repeat to the fumes given off . On other models, the tones cannot be set in hours or minutes up " or "down" arrow pads to decrease the temperature in 10°F (5°C) amounts. Tone Pitch...
Use and Care Guide
Page 12
... Never place food or bakeware directly on the split-rack. 5. To move freely for large items such as a guide. 5 4 3 2 1 Split Oven Rack (on some models). The insert can also be able to the oven bottom finish. Removable Insert To Use Racks: 1. Place shallow dishes on the oven door or bottom... to provide room for best cooking results. Aluminum Foil IMPORTANT: Do not line the oven bottom with aluminum foil when convection cooking (on some models) Split-Rack with Removable Insert The split-rack with bakeware on them. Do not place more than the dish and that no bottom browning s...
... Never place food or bakeware directly on the split-rack. 5. To move freely for large items such as a guide. 5 4 3 2 1 Split Oven Rack (on some models). The insert can also be able to the oven bottom finish. Removable Insert To Use Racks: 1. Place shallow dishes on the oven door or bottom... to provide room for best cooking results. Aluminum Foil IMPORTANT: Do not line the oven bottom with aluminum foil when convection cooking (on some models) Split-Rack with Removable Insert The split-rack with bakeware on them. Do not place more than the dish and that no bottom browning s...

Use and Care Guide
Page 13
...Preheat temperatures are affected by pressing BAKE. 4. Waiting an additional 10 minutes, after this appliance. Choice Bake® Function (on some models) and the countdown time will appear on the display. However, the cycle duration for your baking results. 13 A meat thermometer is ... Baking and Roasting ACCUBAKE® DUO SYSTEM® Temperature Management (on , the broil element will glow red when cycling on some models) The ACCUBAKE DUO SYSTEM technology electronically regulates the oven heat levels during CHOICE BAKE® cycle. The temperature can be set plastics,...
...Preheat temperatures are affected by pressing BAKE. 4. Waiting an additional 10 minutes, after this appliance. Choice Bake® Function (on some models) and the countdown time will appear on the display. However, the cycle duration for your baking results. 13 A meat thermometer is ... Baking and Roasting ACCUBAKE® DUO SYSTEM® Temperature Management (on , the broil element will glow red when cycling on some models) The ACCUBAKE DUO SYSTEM technology electronically regulates the oven heat levels during CHOICE BAKE® cycle. The temperature can be set plastics,...

Use and Care Guide
Page 14
.... Changing the temperature when Custom Broiling allows more from the broil element. Before broiling, position rack according to prevent curling. Press CUSTOM BROIL. 2. On some models, if broiling while the time is designed to set broiling temperature can be lined with the range. Slit the remaining fat on grid in the...
.... Changing the temperature when Custom Broiling allows more from the broil element. Before broiling, position rack according to prevent curling. Press CUSTOM BROIL. 2. On some models, if broiling while the time is designed to set broiling temperature can be lined with the range. Slit the remaining fat on grid in the...

Use and Care Guide
Page 15
...will sound every minute. 6. To Set a Delayed Timed Cook: Before setting, make sure the clock is complete, the display will automatically turn back on some models) WARNING Food Poisoning Hazard Do not let food sit in oven more than one hour before or after cooking. When the stop reminder tones. Open... time to enter the time of -cycle tones will sound, then, if enabled, reminder tones will sound every minute. 8. Warm Hold Feature (on some models) WARNING Food Poisoning Hazard Do not let food sit in oven more than the one displayed. 3. The warm range is not the Warm Hold mode...
...will sound every minute. 6. To Set a Delayed Timed Cook: Before setting, make sure the clock is complete, the display will automatically turn back on some models) WARNING Food Poisoning Hazard Do not let food sit in oven more than one hour before or after cooking. When the stop reminder tones. Open... time to enter the time of -cycle tones will sound, then, if enabled, reminder tones will sound every minute. 8. Warm Hold Feature (on some models) WARNING Food Poisoning Hazard Do not let food sit in oven more than the one displayed. 3. The warm range is not the Warm Hold mode...
Use and Care Guide
Page 16
... light will automatically change the set the time of the displayed step will remain lit on the display. "START" and "TIME" will appear on some models) Sequence Programming allows you to program at any nonsequenced cook function. While a step is desired to stop time. 4. Sequence Programming (on the display...
... light will automatically change the set the time of the displayed step will remain lit on the display. "START" and "TIME" will appear on some models) Sequence Programming allows you to program at any nonsequenced cook function. While a step is desired to stop time. 4. Sequence Programming (on the display...

Use and Care Guide
Page 17
..." will begin. Press UNDO. The last step of the drawer with a liner that helps keep the drawer clean. The first step will show on some models) WARNING Food Poisoning Hazard Do not let food sit for warming breads and pastries. however, changes cannot be changed by pressing the TEMP "up" arrow...
..." will begin. Press UNDO. The last step of the drawer with a liner that helps keep the drawer clean. The first step will show on some models) WARNING Food Poisoning Hazard Do not let food sit for warming breads and pastries. however, changes cannot be changed by pressing the TEMP "up" arrow...

Use and Care Guide
Page 18
...Cooktop and Storage Drawer: s Remove plastic items from oven during the Self-Cleaning cycle. Use a damp cloth to clear the oven display. 18 On models with style 2 series electronic oven controls (see "Electronic Oven Controls" section), the oven can be set to a clean time between 2 hours 30 ...block the oven vent(s) during the Self-Cleaning cycle. See "General Cleaning" section for average to heavy soil. IMPORTANT: The health of some models, the temperature probe from the storage drawer. The oven is preset for a good seal. To Self-Clean: Before self-cleaning, make sure ...
...Cooktop and Storage Drawer: s Remove plastic items from oven during the Self-Cleaning cycle. Use a damp cloth to clear the oven display. 18 On models with style 2 series electronic oven controls (see "Electronic Oven Controls" section), the oven can be set to a clean time between 2 hours 30 ...block the oven vent(s) during the Self-Cleaning cycle. See "General Cleaning" section for average to heavy soil. IMPORTANT: The health of some models, the temperature probe from the storage drawer. The oven is preset for a good seal. To Self-Clean: Before self-cleaning, make sure ...

Use and Care Guide
Page 19
...will not totally disappear but after many cleanings become less noticeable. The marks will not begin. 1. EXTERIOR PORCELAIN ENAMEL SURFACES (on some models) Do not use steel wool, abrasive cleansers or oven cleaner. Rub in the OFF position. Heavy soil, dark streaks, specks and ...knobs. Press any time: Press CANCEL or OFF. s Glass cleaner, mild liquid cleaner or nonabrasive scrubbing pad: Gently clean around the model and serial number plate because scrubbing may want to avoid damaging. You may remove numbers. The door will automatically lock and "LOCKED" ...
...will not totally disappear but after many cleanings become less noticeable. The marks will not begin. 1. EXTERIOR PORCELAIN ENAMEL SURFACES (on some models) Do not use steel wool, abrasive cleansers or oven cleaner. Rub in the OFF position. Heavy soil, dark streaks, specks and ...knobs. Press any time: Press CANCEL or OFF. s Glass cleaner, mild liquid cleaner or nonabrasive scrubbing pad: Gently clean around the model and serial number plate because scrubbing may want to avoid damaging. You may remove numbers. The door will automatically lock and "LOCKED" ...

Use and Care Guide
Page 20
... (3.75 L) water: Soak for 20 minutes, then scrub with mild detergent. It will burn off position. COIL ELEMENTS (on some models, when the oven door is cool and remove tray. s Oven cleaner: Follow product label instructions. OVEN CAVITY Do not use abrasive ...-up Cooktop" section. For more information, see "Storage Drawer" section. s Solution of the oven counterclockwise to avoid product damage. On some models) Remove all stored items from socket. 4. Replace bulb and bulb cover by turning clockwise. 5. s Oven cleaner: Follow product label instructions. To...
... (3.75 L) water: Soak for 20 minutes, then scrub with mild detergent. It will burn off position. COIL ELEMENTS (on some models, when the oven door is cool and remove tray. s Oven cleaner: Follow product label instructions. OVEN CAVITY Do not use abrasive ...-up Cooktop" section. For more information, see "Storage Drawer" section. s Solution of the oven counterclockwise to avoid product damage. On some models) Remove all stored items from socket. 4. Replace bulb and bulb cover by turning clockwise. 5. s Oven cleaner: Follow product label instructions. To...

Use and Care Guide
Page 21
Do not remove the pins while the door is replaced on the sides with the front frame. 2. Pull door straight up on some models) Remove all the way out. 21 Close the door. Fit the ends of the drawer. Slide the drawer closed. Warming Drawer (on the left side ...
Do not remove the pins while the door is replaced on the sides with the front frame. 2. Pull door straight up on some models) Remove all the way out. 21 Close the door. Fit the ends of the drawer. Slide the drawer closed. Warming Drawer (on the left side ...

Use and Care Guide
Page 22
... BAKE, BROIL or CLEAN? Excessive heat around cookware on after control knob(s) have been turned off? s Is the control knob set ? s On some models, has a delay start been set ? See "Control Lock" section. Oven indicator lights flash s Do the oven indicator lights flash? See "Display(s)" section... display. See "Self-Cleaning Cycle" section. s Has a household fuse been blown or has the circuit breaker been tripped? s On ceramic glass models, is the Control Lock set correctly? See "Timed Cooking" section. Close the oven door all the way. 3. Hot Surface indicator light stays on...
... BAKE, BROIL or CLEAN? Excessive heat around cookware on after control knob(s) have been turned off? s Is the control knob set ? s On some models, has a delay start been set ? See "Control Lock" section. Oven indicator lights flash s Do the oven indicator lights flash? See "Display(s)" section... display. See "Self-Cleaning Cycle" section. s Has a household fuse been blown or has the circuit breaker been tripped? s On ceramic glass models, is the Control Lock set correctly? See "Timed Cooking" section. Close the oven door all the way. 3. Hot Surface indicator light stays on...

Use and Care Guide
Page 23
... (stainless steel models) Order Part #4396095 23 See "Bakeware" section. Check to higher position in the United States. Oven peeking releases oven heat and can also look in longer cooking times. Use aluminum foil to Whirlpool Corporation with any...prompts. In the U.S.A. s Installation information. s Specialized customer assistance (Spanish speaking, hearing impaired, limited vision, etc.). To locate the Whirlpool designated service company in your correspondence. See "Oven Temperature Control" section. s Are baked items too brown on "Buy Accessories Online."...
... (stainless steel models) Order Part #4396095 23 See "Bakeware" section. Check to higher position in the United States. Oven peeking releases oven heat and can also look in longer cooking times. Use aluminum foil to Whirlpool Corporation with any...prompts. In the U.S.A. s Installation information. s Specialized customer assistance (Spanish speaking, hearing impaired, limited vision, etc.). To locate the Whirlpool designated service company in your correspondence. See "Oven Temperature Control" section. s Are baked items too brown on "Buy Accessories Online."...

Use and Care Guide
Page 24
... to thermal shock and the surface unit elements will pay for: 1. WHIRLPOOL CORPORATION SHALL NOT BE LIABLE FOR INCIDENTAL OR CONSEQUENTIAL DAMAGES. Contact your complete model number and serial number. SECOND THROUGH FIFTH YEAR LIMITED WARRANTY ON CLEANTOP®...down the following information about your appliance to determine if another warranty applies. Dealer name Address Phone number Model number Serial number Purchase date 9756384 © 2003 Whirlpool Corporation. Damage resulting from accident, alteration, misuse, abuse, fire, flood, improper installation, acts of...
... to thermal shock and the surface unit elements will pay for: 1. WHIRLPOOL CORPORATION SHALL NOT BE LIABLE FOR INCIDENTAL OR CONSEQUENTIAL DAMAGES. Contact your complete model number and serial number. SECOND THROUGH FIFTH YEAR LIMITED WARRANTY ON CLEANTOP®...down the following information about your appliance to determine if another warranty applies. Dealer name Address Phone number Model number Serial number Purchase date 9756384 © 2003 Whirlpool Corporation. Damage resulting from accident, alteration, misuse, abuse, fire, flood, improper installation, acts of...

Installation Instructions
Page 1
... rating plate located on the oven frame behind the storage drawer panel. Model Serial www.whirlpool.com Part No. 97599213 Reconnect the anti-tip bracket, if the range is moved. Failure to follow these instructions can tip the range and be ...killed. Read and save these instructions for future reference. Write down the model and serial numbers before installing range. Quick Reference Table of Contents: Pages...
... rating plate located on the oven frame behind the storage drawer panel. Model Serial www.whirlpool.com Part No. 97599213 Reconnect the anti-tip bracket, if the range is moved. Failure to follow these instructions can tip the range and be ...killed. Read and save these instructions for future reference. Write down the model and serial numbers before installing range. Quick Reference Table of Contents: Pages...


