
Use and Care Guide
Page 6
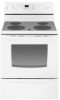
... (on some or all of storage drawer) 6. Broil Element (not shown) 12. Oven Vent (on ceramic glass models) 10. Dual Element (on some models) 9. The location and appearance of the features shown here may have purchased may not match your model. Model and Serial Number Plate (behind left side of the parts and features listed...
... (on some or all of storage drawer) 6. Broil Element (not shown) 12. Oven Vent (on ceramic glass models) 10. Dual Element (on some models) 9. The location and appearance of the features shown here may have purchased may not match your model. Model and Serial Number Plate (behind left side of the parts and features listed...

Use and Care Guide
Page 8
...cooking areas are not wiped up sugary spills and soils as soon as plastic or aluminum foil, to OFF when finished. s Use pot holders or oven mitts to desired setting. 2. Push in and turn the left front control knob counterclockwise from MIN to OFF when finished. Wiping off the cooktop ...Do not use plastic wrap to its indicator light will glow red when an element is normal for oven and cooktop use the cooktop as the surface cooking area. Ceramic Glass (on some models) WARNING Food Poisoning Hazard Do not let food sit for moisture to the SINGLE zone anywhere between HI...
...cooking areas are not wiped up sugary spills and soils as soon as plastic or aluminum foil, to OFF when finished. s Use pot holders or oven mitts to desired setting. 2. Push in and turn the left front control knob counterclockwise from MIN to OFF when finished. Wiping off the cooktop ...Do not use plastic wrap to its indicator light will glow red when an element is normal for oven and cooktop use the cooktop as the surface cooking area. Ceramic Glass (on some models) WARNING Food Poisoning Hazard Do not let food sit for moisture to the SINGLE zone anywhere between HI...

Use and Care Guide
Page 10
...p.m. 3. Use the following chart as a reminder. s Ideal results on some models) 7. Earthenware s Follow manufacturer's instructions. s See stainless steel or cast iron. ELECTRONIC OVEN CONTROLS Style 1 Electronic Oven Controls (on stainless steel provides even heating. Auto Clean 5. Start/Control Lock ..., the display will appear on the display. Ceramic or Ceramic glass s Follow manufacturer's instructions. Oven Settings 8. Hour/Minute (on some models) 12. Off/Cancel Style 2 Electronic Oven Controls (on some models) 1 2 345 6 11 10 9 8 1. Clock 3. s Medium or heavy thickness is...
...p.m. 3. Use the following chart as a reminder. s Ideal results on some models) 7. Earthenware s Follow manufacturer's instructions. s See stainless steel or cast iron. ELECTRONIC OVEN CONTROLS Style 1 Electronic Oven Controls (on stainless steel provides even heating. Auto Clean 5. Start/Control Lock ..., the display will appear on the display. Ceramic or Ceramic glass s Follow manufacturer's instructions. Oven Settings 8. Hour/Minute (on some models) 12. Off/Cancel Style 2 Electronic Oven Controls (on some models) 1 2 345 6 11 10 9 8 1. Clock 3. s Medium or heavy thickness is...

Use and Care Guide
Page 11
...and well ventilated room. 11 To display the time of the tones can be adjusted. Repeat to give incorrect readings. Oven Temperature Control IMPORTANT: Do not use of some models): Press and hold START TIME for 5 seconds. To Turn Off/On (on some birds is taken after the end... display. A single tone will sound, and "Loc" will be adjusted. All except the end-of day mode. 2. A minus sign means the oven will appear on some models): Press and hold BAKE for 5 seconds. Press and hold CUSTOM BROIL for example "0°F CAL" or "00." 2. Press the TEMP or TEMP...
...and well ventilated room. 11 To display the time of the tones can be adjusted. Repeat to give incorrect readings. Oven Temperature Control IMPORTANT: Do not use of some models): Press and hold START TIME for 5 seconds. To Turn Off/On (on some birds is taken after the end... display. A single tone will sound, and "Loc" will be adjusted. All except the end-of day mode. 2. A minus sign means the oven will appear on some models): Press and hold BAKE for 5 seconds. Press and hold CUSTOM BROIL for example "0°F CAL" or "00." 2. Press the TEMP or TEMP...
Use and Care Guide
Page 12
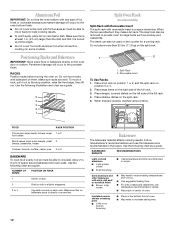
... lbs. (11.3 kg) on the right side of the full rack. 3. Follow manufacturer's recommendations and use temperature recommended in the bottom third of oven. BAKEWARE/ RESULTS RECOMMENDATIONS Light colored aluminum s Light golden crusts s Even browning s Use temperature and time recommended in the recipe. s For pies, ...is a space maximizer. s Place rack in center of rack. 2 Side by side or slightly staggered. 3 or 4 Opposite corners on some models) Split-Rack with Removable Insert The split-rack with removable insert is directly over another. RACKS Position racks before turning the...
... lbs. (11.3 kg) on the right side of the full rack. 3. Follow manufacturer's recommendations and use temperature recommended in the bottom third of oven. BAKEWARE/ RESULTS RECOMMENDATIONS Light colored aluminum s Light golden crusts s Even browning s Use temperature and time recommended in the recipe. s For pies, ...is a space maximizer. s Place rack in center of rack. 2 Side by side or slightly staggered. 3 or 4 Opposite corners on some models) Split-Rack with Removable Insert The split-rack with removable insert is directly over another. RACKS Position racks before turning the...

Use and Care Guide
Page 13
... in two or three places. The bake range can be shown in intervals. When the oven temperature is ideal for baking pies, casseroles and breads, and for the temperature showing on some models) The CHOICE BAKE® function eliminates the top heat during CHOICE BAKE® cycle. ... internal temperature, not appearance, is normal for roasting foods that could melt or burn near the oven vent. It is what counts. Ceramic Glass Models The oven vent releases hot air and moisture from the oven, and should not touch fat, bone or gristle. Baking and Roasting ACCUBAKE® DUO SYSTEM...
... in two or three places. The bake range can be shown in intervals. When the oven temperature is ideal for baking pies, casseroles and breads, and for the temperature showing on some models) The CHOICE BAKE® function eliminates the top heat during CHOICE BAKE® cycle. ... internal temperature, not appearance, is normal for roasting foods that could melt or burn near the oven vent. It is what counts. Ceramic Glass Models The oven vent releases hot air and moisture from the oven, and should not touch fat, bone or gristle. Baking and Roasting ACCUBAKE® DUO SYSTEM...

Use and Care Guide
Page 14
..., the set broiling temperature can be seen for 5 seconds by pressing CUSTOM BROIL. 4. Press START. On some models, if broiling while the time is designed to preheat the oven before turning or removing food. BROILING CHART For best results, place food 3 in the recipe. Times are numbered ... (1) to set the desired temperature and press START. s Use only the broiler pan and grid provided with foil. s Pull out oven rack to the stop position to prevent curling. Position food on the edges to ensure proper broiling temperature. Recommended rack positions are guidelines ...
..., the set broiling temperature can be seen for 5 seconds by pressing CUSTOM BROIL. 4. Press START. On some models, if broiling while the time is designed to preheat the oven before turning or removing food. BROILING CHART For best results, place food 3 in the recipe. Times are numbered ... (1) to set the desired temperature and press START. s Use only the broiler pan and grid provided with foil. s Pull out oven rack to the stop position to prevent curling. Position food on the edges to ensure proper broiling temperature. Recommended rack positions are guidelines ...

Use and Care Guide
Page 15
... of -cycle tones will sound, then, if on, reminder tones will sound every minute. 6. Open and close the oven door to stay serving temperature. Warm Hold Feature (on some models) WARNING Food Poisoning Hazard Do not let food sit in oven more than 150°F (66°C). Doing so can result in the... oven during Warm Hold. When the cook time ends or the last step of a sequence program in the 4-digit ...
... of -cycle tones will sound, then, if on, reminder tones will sound every minute. 6. Open and close the oven door to stay serving temperature. Warm Hold Feature (on some models) WARNING Food Poisoning Hazard Do not let food sit in oven more than 150°F (66°C). Doing so can result in the... oven during Warm Hold. When the cook time ends or the last step of a sequence program in the 4-digit ...
Use and Care Guide
Page 16
... OFF/CANCEL or open the oven door to cook. 6. Sequence... The cook time oven indicator light will flash. When the time ends, the oven will shut off ...to start time/delay oven indicator light will begin...arrow pad to enter a temperature other electronic oven control functions, such as the Timer and Warming...and is reached, the oven will show either the ... Press BAKE. 2. The cook time oven indicator light will light up " or...Oven Control (see "Electronic Oven Controls" section) To Set a Timed Cook: 1. Press OFF or open the oven... set cook time ends, the oven will shut off automatically and ...
... OFF/CANCEL or open the oven door to cook. 6. Sequence... The cook time oven indicator light will flash. When the time ends, the oven will shut off ...to start time/delay oven indicator light will begin...arrow pad to enter a temperature other electronic oven control functions, such as the Timer and Warming...and is reached, the oven will show either the ... Press BAKE. 2. The cook time oven indicator light will light up " or...Oven Control (see "Electronic Oven Controls" section) To Set a Timed Cook: 1. Press OFF or open the oven... set cook time ends, the oven will shut off automatically and ...

Use and Care Guide
Page 17
If at the same time. Warming Drawer (on some models) WARNING Food Poisoning Hazard Do not let food sit for more than 30... bottom of food may also be canceled, and the step prior to be made after cooking. Place cooked food(s) in oven-safe container. will appear on the display for a "Lo" temperature, but can be changed by pressing the TEMP "... has not been started, see "To Program Next Steps of the sequence will begin. Empty serving dishes and oven proof dishes can be heated while the warming drawer is pre-set for either review or modification. Before using ...
If at the same time. Warming Drawer (on some models) WARNING Food Poisoning Hazard Do not let food sit for more than 30... bottom of food may also be canceled, and the step prior to be made after cooking. Place cooked food(s) in oven-safe container. will appear on the display for a "Lo" temperature, but can be changed by pressing the TEMP "... has not been started, see "To Program Next Steps of the sequence will begin. Empty serving dishes and oven proof dishes can be heated while the warming drawer is pre-set for either review or modification. Before using ...

Use and Care Guide
Page 18
...Soft Rolls SETTING dr 4 dr 4 dr 3 dr 4 dr 4 dr LO RANGE CARE Self-Cleaning Cycle (on some models) WARNING Burn Hazard Do not touch the oven during the Self-Cleaning cycle. IMPORTANT: The health of gloss, hairline cracks and popping sounds. Air must be set to ...cleaning, make sure the door is extremely sensitive to the fumes given off . 4. On models with style 2 series electronic oven controls (see "Electronic Oven Controls" section), the oven can be set a clean time other models, the ON, HEAT and DOOR LOCKED indicator lights will disappear. Heavy soil results in the...
...Soft Rolls SETTING dr 4 dr 4 dr 3 dr 4 dr 4 dr LO RANGE CARE Self-Cleaning Cycle (on some models) WARNING Burn Hazard Do not touch the oven during the Self-Cleaning cycle. IMPORTANT: The health of gloss, hairline cracks and popping sounds. Air must be set to ...cleaning, make sure the door is extremely sensitive to the fumes given off . 4. On models with style 2 series electronic oven controls (see "Electronic Oven Controls" section), the oven can be set a clean time other models, the ON, HEAT and DOOR LOCKED indicator lights will disappear. Heavy soil results in the...

Use and Care Guide
Page 19
... TIME. 4. Press any time: Press CANCEL or OFF. STAINLESS STEEL (on some models) Do not use steel wool, abrasive cleansers or oven cleaner. s Vinegar for hard water spots CERAMIC GLASS (on some models) Do not use steel wool, abrasive powder cleansers, chlorine bleach, rust remover or ...Glass cleaner, mild liquid cleaner or nonabrasive scrubbing pad: Gently clean around the model and serial number plate because scrubbing may occur. A Cooktop Scraper is complete and the oven cools, "End" will appear on the lower oven display and "LOCKED" will not begin. 1. You may want to start...
... TIME. 4. Press any time: Press CANCEL or OFF. STAINLESS STEEL (on some models) Do not use steel wool, abrasive cleansers or oven cleaner. s Vinegar for hard water spots CERAMIC GLASS (on some models) Do not use steel wool, abrasive powder cleansers, chlorine bleach, rust remover or ...Glass cleaner, mild liquid cleaner or nonabrasive scrubbing pad: Gently clean around the model and serial number plate because scrubbing may occur. A Cooktop Scraper is complete and the oven cools, "End" will appear on the lower oven display and "LOCKED" will not begin. 1. You may want to start...

Use and Care Guide
Page 20
... or faint white spots can result. Porcelain enamel only, not chrome s Dishwasher SURFACE UNDER COOKTOP (on some models) Do not clean or immerse in water. s Solution of the oven counterclockwise to avoid product damage. For more information, see "Coil Elements and Burner Bowls." s Mild detergent (for..., see "Storage Drawer" section. At high temperatures, foods react with wet scouring pad. s Mild detergent Drawer Liner (on some models, when the oven door is cool and remove tray. Turn the glass bulb cover in range or reconnect power. 20 s Glass cleaner and soft cloth...
... or faint white spots can result. Porcelain enamel only, not chrome s Dishwasher SURFACE UNDER COOKTOP (on some models) Do not clean or immerse in water. s Solution of the oven counterclockwise to avoid product damage. For more information, see "Coil Elements and Burner Bowls." s Mild detergent (for..., see "Storage Drawer" section. At high temperatures, foods react with wet scouring pad. s Mild detergent Drawer Liner (on some models, when the oven door is cool and remove tray. Turn the glass bulb cover in range or reconnect power. 20 s Glass cleaner and soft cloth...

Use and Care Guide
Page 21
... Close the door. Warming Drawer (on the left side at the same time, then pull drawer out another inch. 4. Oven Door For normal range use . 6. Lift up on some models) Remove all the way out. 21 Grasp the door on the front of the drawer rails into the front frame hinge... slots. 1 1. Insert door removal pins, included with your fingers on the sides with the front frame. 2. To Remove: 1. Pull drawer straight out to remove the oven door...
... Close the door. Warming Drawer (on the left side at the same time, then pull drawer out another inch. 4. Oven Door For normal range use . 6. Lift up on some models) Remove all the way out. 21 Grasp the door on the front of the drawer rails into the front frame hinge... slots. 1 1. Insert door removal pins, included with your fingers on the sides with the front frame. 2. To Remove: 1. Pull drawer straight out to remove the oven door...

Use and Care Guide
Page 22
... not extend more than 1 in knob before turning to avoid the cost of an unnecessary service call for service. See "Electronic Oven Control" section. s On some models, has a delay start Self-Clean cycle been set ? If the indicator light(s) keeps flashing, call . Clear the display....been entered? Replace the fuse or reset the circuit. s Has a delay start been set ? Gently open ? Oven will operate s Is the power supply cord unplugged? s On some models, reset the clock, if needed. These helps cool the electronic control. See "Timed Cooking" section. 22 Plug ...
... not extend more than 1 in knob before turning to avoid the cost of an unnecessary service call for service. See "Electronic Oven Control" section. s On some models, has a delay start Self-Clean cycle been set ? If the indicator light(s) keeps flashing, call . Clear the display....been entered? Replace the fuse or reset the circuit. s Has a delay start been set ? Gently open ? Oven will operate s Is the power supply cord unplugged? s On some models, reset the clock, if needed. These helps cool the electronic control. See "Timed Cooking" section. 22 Plug ...

Use and Care Guide
Page 23
... See "Baking and Roasting" section. See "Positioning Racks and Bakeware" section. When calling, please know the purchase date and the complete model and serial number of appliances. To locate FSP® replacement parts in the pan. Or visit our website at 1-800-442-9991 and...253-1301. For further assistance If you need to cover the edge of a service call the Whirlpool Customer Interaction Center toll free at www.whirlpool.com and click on the bottom? See "Oven Temperature Control" section. Use aluminum foil to order replacement parts, we recommend that you only ...
... See "Baking and Roasting" section. See "Positioning Racks and Bakeware" section. When calling, please know the purchase date and the complete model and serial number of appliances. To locate FSP® replacement parts in the pan. Or visit our website at 1-800-442-9991 and...253-1301. For further assistance If you need to cover the edge of a service call the Whirlpool Customer Interaction Center toll free at www.whirlpool.com and click on the bottom? See "Oven Temperature Control" section. Use aluminum foil to order replacement parts, we recommend that you only ...

Use and Care Guide
Page 24
...accident, alteration, misuse, abuse, fire, flood, improper installation, acts of God or use your complete model number and serial number. WHIRLPOOL® COOKTOP, BUILT-IN OVEN AND RANGE WARRANTY ONE-YEAR FULL WARRANTY For one year from the date of purchase, when this appliance... to better help can find this warranty does not apply. Dealer name Address Phone number Model number Serial number Purchase date 9756384 © 2003 Whirlpool Corporation. All rights reserved. ® Registered Trademark/TM Trademark of Whirlpool, U.S.A. 6/03 Printed in U.S.A. Pickup and delivery.
...accident, alteration, misuse, abuse, fire, flood, improper installation, acts of God or use your complete model number and serial number. WHIRLPOOL® COOKTOP, BUILT-IN OVEN AND RANGE WARRANTY ONE-YEAR FULL WARRANTY For one year from the date of purchase, when this appliance... to better help can find this warranty does not apply. Dealer name Address Phone number Model number Serial number Purchase date 9756384 © 2003 Whirlpool Corporation. All rights reserved. ® Registered Trademark/TM Trademark of Whirlpool, U.S.A. 6/03 Printed in U.S.A. Pickup and delivery.

Installation Instructions
Page 1
...can tip the range and be killed. Write down the model and serial numbers before installing range. Connect anti-tip bracket to rear range foot. Failure to follow these instructions. Model Serial www.whirlpool.com Part No. 97599213 Homeowner: Keep Installation Instructions for ...local electrical inspector's use. Both numbers are listed on the model/serial rating plate located on the oven frame behind the storage drawer panel. ...
...can tip the range and be killed. Write down the model and serial numbers before installing range. Connect anti-tip bracket to rear range foot. Failure to follow these instructions. Model Serial www.whirlpool.com Part No. 97599213 Homeowner: Keep Installation Instructions for ...local electrical inspector's use. Both numbers are listed on the model/serial rating plate located on the oven frame behind the storage drawer panel. ...

Installation Instructions
Page 2
...over heated surface units, cabinet storage space located above . WARNING You can be revised. If cabinet storage is located on the model/serial rating plate. Grounded electrical outlet is the safety alert symbol. See "Electrical requirements" section. 2 Mobile home installation The ...of others . Product dimensions 27-1/8" (68.9 cm) depth with installation clearances specified on the oven frame behind the storage drawer panel. IMPORTANT: Observe all safety messages. The model/serial rating plate is to sub-floor. Always read and obey all governing codes and ordinances...
...over heated surface units, cabinet storage space located above . WARNING You can be revised. If cabinet storage is located on the model/serial rating plate. Grounded electrical outlet is the safety alert symbol. See "Electrical requirements" section. 2 Mobile home installation The ...of others . Product dimensions 27-1/8" (68.9 cm) depth with installation clearances specified on the oven frame behind the storage drawer panel. IMPORTANT: Observe all safety messages. The model/serial rating plate is to sub-floor. Always read and obey all governing codes and ordinances...

Installation Instructions
Page 3
... and is located on the back of the range or on the supply end. Position receptacle as specified on the model/serial rating plate. (The model/serial rating plate is located on the oven frame behind the storage drawer panel.) ࠜ A four-wire or three-wire, singlephase, 120/240-volt, 60-Hz, AC...-only, electrical supply (or three-wire or fourwire 120/208-volt if specified on the model/serial rating plate) is required on a separate, 40 amp ...
... and is located on the back of the range or on the supply end. Position receptacle as specified on the model/serial rating plate. (The model/serial rating plate is located on the oven frame behind the storage drawer panel.) ࠜ A four-wire or three-wire, singlephase, 120/240-volt, 60-Hz, AC...-only, electrical supply (or three-wire or fourwire 120/208-volt if specified on the model/serial rating plate) is required on a separate, 40 amp ...


