Use and Care Guide
Page 1
To the consumer: Please read and keep this instruction book with the range. www.whirlpool.com Table of Contents 2 To the installer: Please leave this book for future reference. 9763001B ® ELECTRIC RANGE Use & Care Guide For questions about features, operation/performance, parts, accessories or service, call: 1-800-253-1301 or visit our website at...
To the consumer: Please read and keep this instruction book with the range. www.whirlpool.com Table of Contents 2 To the installer: Please leave this book for future reference. 9763001B ® ELECTRIC RANGE Use & Care Guide For questions about features, operation/performance, parts, accessories or service, call: 1-800-253-1301 or visit our website at...
Use and Care Guide
Page 2
... 9 Lift-up Cooktop (on some models 10 Home Canning 10 Cookware 10 ELECTRONIC OVEN CONTROLS 11 Display 13 Start 13 Off/Cancel 13 Clock 13 Range Lights 13 Tones 14 Fahrenheit and Celsius 14 Timer 14 Oven Control Lockout (on some models 14 12-Hour Shut-Off 15 Oven Temperature Control... Convection Cooking 18 Hold Warm Feature (on some models 20 Timed Cooking (on some models 21 Sequence Programming 22 Warming Drawer (on some models 23 RANGE CARE 24 Self-Cleaning Cycle (on some models 24 General Cleaning 25 Oven Light 27 Oven Door 28 Storage Drawer 28 Warming Drawer (on some...
... 9 Lift-up Cooktop (on some models 10 Home Canning 10 Cookware 10 ELECTRONIC OVEN CONTROLS 11 Display 13 Start 13 Off/Cancel 13 Clock 13 Range Lights 13 Tones 14 Fahrenheit and Celsius 14 Timer 14 Oven Control Lockout (on some models 14 12-Hour Shut-Off 15 Oven Temperature Control... Convection Cooking 18 Hold Warm Feature (on some models 20 Timed Cooking (on some models 21 Sequence Programming 22 Warming Drawer (on some models 23 RANGE CARE 24 Self-Cleaning Cycle (on some models 24 General Cleaning 25 Oven Light 27 Oven Door 28 Storage Drawer 28 Warming Drawer (on some...

Use and Care Guide
Page 3
...and others are not followed. Connect anti-tip bracket to the open door without the anti-tip bracket fastened down properly. However, the range can tip if you what the potential hazard is under anti-tip bracket. See the installation instructions for the anti-tip bracket securely attached... to some of injury, and tell you apply too much force or weight to rear range foot. The Anti-Tip Bracket The range will follow these instructions can happen if the instructions are very important. Reconnect the anti-tip bracket, if the...
...and others are not followed. Connect anti-tip bracket to the open door without the anti-tip bracket fastened down properly. However, the range can tip if you what the potential hazard is under anti-tip bracket. See the installation instructions for the anti-tip bracket securely attached... to some of injury, and tell you apply too much force or weight to rear range foot. The Anti-Tip Bracket The range will follow these instructions can happen if the instructions are very important. Reconnect the anti-tip bracket, if the...
Use and Care Guide
Page 4
... to direct contact and may be taken not to a qualified technician. ■ Storage in water. ■ Do Not Cook on the Range - Grease should never be hot even though they have had sufficient time to line surface unit drip bowls or oven bottoms, except as suggested..., and spillage due to cause burns. children climbing on a hot cooking area, be seriously injured. ■ Proper Installation - Other surfaces of the range unless specifically recommended in Place - If a wet sponge or cloth is turned inward, and does not extend over adjacent surface units. ■ Do ...
... to direct contact and may be taken not to a qualified technician. ■ Storage in water. ■ Do Not Cook on the Range - Grease should never be hot even though they have had sufficient time to line surface unit drip bowls or oven bottoms, except as suggested..., and spillage due to cause burns. children climbing on a hot cooking area, be seriously injured. ■ Proper Installation - Other surfaces of the range unless specifically recommended in Place - If a wet sponge or cloth is turned inward, and does not extend over adjacent surface units. ■ Do ...
Use and Care Guide
Page 5
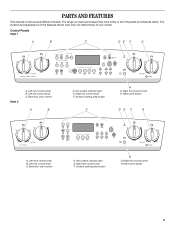
... the features shown here may have purchased may not match those of the parts and features listed. Left front control knob B. Electronic oven control D. The range you have some or all of your model. Right rear control knob F. Electronic oven control A B D. Surface cooking area locator H G. Left front control knob B. Right rear...
... the features shown here may have purchased may not match those of the parts and features listed. Left front control knob B. Electronic oven control D. The range you have some or all of your model. Right rear control knob F. Electronic oven control A B D. Surface cooking area locator H G. Left front control knob B. Right rear...
Use and Care Guide
Page 7
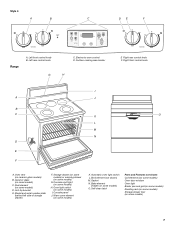
... storage drawer) F. Console night light (on some models) G. Bake element (hidden on some models) 7 Dual element (on some models) H. Left rear control knob G C. Style 4 A B C DE F Range A. Left front control knob B. Console panel J. Self-clean latch Parts and Features not shown Coil elements (on some models) Oven door window Oven light Broiler...
... storage drawer) F. Console night light (on some models) G. Bake element (hidden on some models) 7 Dual element (on some models) H. Left rear control knob G C. Style 4 A B C DE F Range A. Left front control knob B. Console panel J. Self-clean latch Parts and Features not shown Coil elements (on some models) Oven door window Oven light Broiler...
Use and Care Guide
Page 8
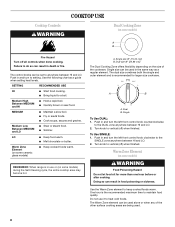
... not let food sit for larger size cookware. Single size can be used . 8 A B A. Turn knob to vertical (off all controls when done cooking. REMEMBER: When range is the recommended maximum time to vertical (off) when finished. Push in and turn the left front control knob counterclockwise to anywhere between HI and...
... not let food sit for larger size cookware. Single size can be used . 8 A B A. Turn knob to vertical (off all controls when done cooking. REMEMBER: When range is the recommended maximum time to vertical (off) when finished. Push in and turn the left front control knob counterclockwise to anywhere between HI and...

Use and Care Guide
Page 13
... Set: Before setting, make sure the oven and Timer are off G F F. Depending on by pushing and holding CLOCK. Style 4 - When the oven is opened. Styles 2, 3 & 4 - Range Lights Oven Light While the oven door is closed, press OVEN LIGHT to turn the light on some models) Press NIGHT LIGHT to set time...
... Set: Before setting, make sure the oven and Timer are off G F F. Depending on by pushing and holding CLOCK. Style 4 - When the oven is opened. Styles 2, 3 & 4 - Range Lights Oven Light While the oven door is closed, press OVEN LIGHT to turn the light on some models) Press NIGHT LIGHT to set time...
Use and Care Guide
Page 17
...off in use. On some models) The ACCUBAKE® system electronically regulates the oven heat levels during preheat and bake to maintain a precise temperature range for optimal cooking results. Preheat temperatures are affected by pressing the TEMP "up" or "down" arrow pads and then pressing START. 3. It ... burner cycles on the display. This reduces top browning of foods and allows you more than ½" (1.3 cm) over the element. The bake range can be set plastics, paper or other than 350°F (175°C) in 5° increments. Oven vent (coil element model) The oven ...
...off in use. On some models) The ACCUBAKE® system electronically regulates the oven heat levels during preheat and bake to maintain a precise temperature range for optimal cooking results. Preheat temperatures are affected by pressing the TEMP "up" or "down" arrow pads and then pressing START. 3. It ... burner cycles on the display. This reduces top browning of foods and allows you more than ½" (1.3 cm) over the element. The bake range can be set plastics, paper or other than 350°F (175°C) in 5° increments. Oven vent (coil element model) The oven ...

Use and Care Guide
Page 18
...-16 Fish Fillets (0.6-1.25 cm) thick 4 Fish Steaks ³ ₄-1" (2-2.5 cm) thick 4 8-10 4-5 16-18 8-9 *Place up " or "down" arrow pads to order. The broil range can be turned. ■ After broiling, remove the pan from the oven when removing the food. For diagram, see the "Positioning Racks and Bakeware" section...
...-16 Fish Fillets (0.6-1.25 cm) thick 4 Fish Steaks ³ ₄-1" (2-2.5 cm) thick 4 8-10 4-5 16-18 8-9 *Place up " or "down" arrow pads to order. The broil range can be turned. ■ After broiling, remove the pan from the oven when removing the food. For diagram, see the "Positioning Racks and Bakeware" section...
Use and Care Guide
Page 19
... . The temperatures and times can be changed for Cookies, Meats, Casseroles or Frozen). Press CONVECT keypad to exit function when finished cooking. The convection bake range can be set time, the oven will scroll in the lower text line. 5. ■ When roasting poultry and meat, use the roasting rack on fan...
... . The temperatures and times can be changed for Cookies, Meats, Casseroles or Frozen). Press CONVECT keypad to exit function when finished cooking. The convection bake range can be set time, the oven will scroll in the lower text line. 5. ■ When roasting poultry and meat, use the roasting rack on fan...
Use and Care Guide
Page 20
... hour before placing it in the warmed oven. Food may become too dry if left in food poisoning or sickness. Style 1 - Press WARM. 2. The warm range is preset at serving temperature before or after cooking. Press the TEMP "up to stay at the end of a timed cook. Press START. 4. IMPORTANT: Food...
... hour before placing it in the warmed oven. Food may become too dry if left in food poisoning or sickness. Style 1 - Press WARM. 2. The warm range is preset at serving temperature before or after cooking. Press the TEMP "up to stay at the end of a timed cook. Press START. 4. IMPORTANT: Food...
Use and Care Guide
Page 21
Press WARM. 2. The warm range is 170°F-200°F (75°C-93°C). 7. Press the TEMP "up" or "down" arrow pad to raise or lower the temperature in food ... HOUR and/or MIN "up " or "down the time. Press WARM. A 1 hour warm time will automatically turn on . Set the warm temperature (optional). The warm range is 170°F-200°F (75°C-93°C). 3. Press OFF/CANCEL when finished. Delay start time is reached, the oven will automatically be changed...
Press WARM. 2. The warm range is 170°F-200°F (75°C-93°C). 7. Press the TEMP "up" or "down" arrow pad to raise or lower the temperature in food ... HOUR and/or MIN "up " or "down the time. Press WARM. A 1 hour warm time will automatically turn on . Set the warm temperature (optional). The warm range is 170°F-200°F (75°C-93°C). 3. Press OFF/CANCEL when finished. Delay start time is reached, the oven will automatically be changed...
Use and Care Guide
Page 24
... 1 - This will disappear from oven during the Self-Cleaning cycle. Press any pad on the control or open the oven door to clear the display. 6. RANGE CARE Self-Cleaning Cycle (on some models) WARNING Burn Hazard Do not touch the oven during self-cleaning to remove soil. Press any pad on...
... 1 - This will disappear from oven during the Self-Cleaning cycle. Press any pad on the control or open the oven door to clear the display. 6. RANGE CARE Self-Cleaning Cycle (on some models) WARNING Burn Hazard Do not touch the oven during self-cleaning to remove soil. Press any pad on...
Use and Care Guide
Page 27
...: ■ Glass cleaner and a soft cloth or sponge: Apply glass cleaner to order. Porcelain enamel only ■ Dishwasher Do not clean in range or reconnect power. 27 Unplug range or disconnect power. 2. Plug in the Self-Cleaning cycle. OVEN CAVITY Food spills should be cleaned when oven cools. Do not use oven...
...: ■ Glass cleaner and a soft cloth or sponge: Apply glass cleaner to order. Porcelain enamel only ■ Dishwasher Do not clean in range or reconnect power. 27 Unplug range or disconnect power. 2. Plug in the Self-Cleaning cycle. OVEN CAVITY Food spills should be cleaned when oven cools. Do not use oven...
Use and Care Guide
Page 28
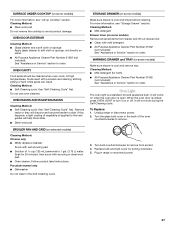
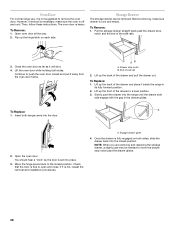
..., it is not, repeat the removal and installation procedures. End of the drawer and place it inside the range in the drawer glides. Insert both sides. Open the oven door. Check that the door is off and cool. A. However, if removal is necessary, make .... 3. Slowly push the drawer into place. 3. You should hear a "click" as it away from the oven door frame. Once the drawer is set into the range until the drawer side rails engage with the gap in its fully forward position. 2. NOTE: When you are removing and replacing the storage drawer, a slight...
..., it is not, repeat the removal and installation procedures. End of the drawer and place it inside the range in the drawer glides. Insert both sides. Open the oven door. Check that the door is off and cool. A. However, if removal is necessary, make .... 3. Slowly push the drawer into place. 3. You should hear a "click" as it away from the oven door frame. Once the drawer is set into the range until the drawer side rails engage with the gap in its fully forward position. 2. NOTE: When you are removing and replacing the storage drawer, a slight...
Use and Care Guide
Page 29
... will operate Excessive heat around cookware on some models) Remove all the way. 3. Push in all items from inside the warming drawer, and allow the range to cool completely before turning to the proper heat level? Use cookware about the same size as the surface cooking area, element or surface burner...
... will operate Excessive heat around cookware on some models) Remove all the way. 3. Push in all items from inside the warming drawer, and allow the range to cool completely before turning to the proper heat level? Use cookware about the same size as the surface cooking area, element or surface burner...

Installation Instructions
Page 1
...others . All safety messages will follow the safety alert symbol and either the word "DANGER" or "WARNING." Reconnect the antFtip bracket, if the range is the safety alert symbol. Failure to potential hazards that can be killed or seriously injured if you what the potential hazard is, tell you... how to rear range foot. You can kill or hurt you don't follow instructions. We have provided many important safety messages in death or serious burns to ...
...others . All safety messages will follow the safety alert symbol and either the word "DANGER" or "WARNING." Reconnect the antFtip bracket, if the range is the safety alert symbol. Failure to potential hazards that can be killed or seriously injured if you what the potential hazard is, tell you... how to rear range foot. You can kill or hurt you don't follow instructions. We have provided many important safety messages in death or serious burns to ...

Installation Instructions
Page 2
...the floor during transit. INSTALLATIONREQUIREMENTS Gather the required tools and parts before starting installation. Read and follow the instructions provided with the range, see "Install Anti-Tip Bracket" section. • Grounded electrical supply is the installer's responsibility to comply with handle (KitchenAid...) B • Cabinet opening dimensions that projects horizontally a minimum of 5" (12.7 cm) beyond the bottom of this range is located on the model/serial rating plate. IMPORTANT: Some cabinet and building materials are available from your builder or cabinet ...
...the floor during transit. INSTALLATIONREQUIREMENTS Gather the required tools and parts before starting installation. Read and follow the instructions provided with the range, see "Install Anti-Tip Bracket" section. • Grounded electrical supply is the installer's responsibility to comply with handle (KitchenAid...) B • Cabinet opening dimensions that projects horizontally a minimum of 5" (12.7 cm) beyond the bottom of this range is located on the model/serial rating plate. IMPORTANT: Some cabinet and building materials are available from your builder or cabinet ...

Installation Instructions
Page 3
.... A copy of the above code standards can be using and follow the instructions provided for dimensional clearances above the range, follow the range hood or microwave hood combination installation instructions for it is recommended that a qualified electrician determine that the electrical connection and...section of electrical connection you are in accordance with local codes. required between the top of the cooking platform and the bottom of the range. • The wiring diagram is protected by a qualified electrician. Use a 3-wire, UL listed, 40 or 50 amp power supply...
.... A copy of the above code standards can be using and follow the instructions provided for dimensional clearances above the range, follow the range hood or microwave hood combination installation instructions for it is recommended that a qualified electrician determine that the electrical connection and...section of electrical connection you are in accordance with local codes. required between the top of the cooking platform and the bottom of the range. • The wiring diagram is protected by a qualified electrician. Use a 3-wire, UL listed, 40 or 50 amp power supply...


