Use and Care Guide
Page 1
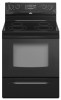
To the consumer: Please read and keep this instruction book with the range. www.whirlpool.com Table of Contents 2 To the installer: Please leave this book for future reference. 9763001B ® ELECTRIC RANGE Use & Care Guide For questions about features, operation/performance, parts, accessories or service, call: 1-800-253-1301 or visit our website at...
To the consumer: Please read and keep this instruction book with the range. www.whirlpool.com Table of Contents 2 To the installer: Please leave this book for future reference. 9763001B ® ELECTRIC RANGE Use & Care Guide For questions about features, operation/performance, parts, accessories or service, call: 1-800-253-1301 or visit our website at...
Use and Care Guide
Page 2
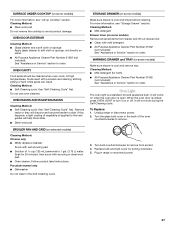
... 9 Lift-up Cooktop (on some models 10 Home Canning 10 Cookware 10 ELECTRONIC OVEN CONTROLS 11 Display 13 Start 13 Off/Cancel 13 Clock 13 Range Lights 13 Tones 14 Fahrenheit and Celsius 14 Timer 14 Oven Control Lockout (on some models 14 12-Hour Shut-Off 15 Oven Temperature Control... Convection Cooking 18 Hold Warm Feature (on some models 20 Timed Cooking (on some models 21 Sequence Programming 22 Warming Drawer (on some models 23 RANGE CARE 24 Self-Cleaning Cycle (on some models 24 General Cleaning 25 Oven Light 27 Oven Door 28 Storage Drawer 28 Warming Drawer (on some...
... 9 Lift-up Cooktop (on some models 10 Home Canning 10 Cookware 10 ELECTRONIC OVEN CONTROLS 11 Display 13 Start 13 Off/Cancel 13 Clock 13 Range Lights 13 Tones 14 Fahrenheit and Celsius 14 Timer 14 Oven Control Lockout (on some models 14 12-Hour Shut-Off 15 Oven Temperature Control... Convection Cooking 18 Hold Warm Feature (on some models 20 Timed Cooking (on some models 21 Sequence Programming 22 Warming Drawer (on some models 23 RANGE CARE 24 Self-Cleaning Cycle (on some models 24 General Cleaning 25 Oven Light 27 Oven Door 28 Storage Drawer 28 Warming Drawer (on some...

Use and Care Guide
Page 3
...-tip bracket to such substances. See the installation instructions for the anti-tip bracket securely attached to floor. • Slide range back so rear range foot is , tell you don't immediately follow these instructions can cause low-level exposure to children and adults. All safety messages...birth defects, or other reproductive harm, and requires businesses to warn of potential exposure to rear range foot. This appliance can result in this manual and on your appliance. RANGE SAFETY Your safety and the safety of others . We have provided many important safety messages in ...
...-tip bracket to such substances. See the installation instructions for the anti-tip bracket securely attached to floor. • Slide range back so rear range foot is , tell you don't immediately follow these instructions can cause low-level exposure to children and adults. All safety messages...birth defects, or other reproductive harm, and requires businesses to warn of potential exposure to rear range foot. This appliance can result in this manual and on your appliance. RANGE SAFETY Your safety and the safety of others . We have provided many important safety messages in ...
Use and Care Guide
Page 4
...oven vent openings and surfaces near surface units. ■ Do Not Use Water on Broken Cooktop - Grease should be immersed in ignition of the range. ■ Wear Proper Apparel - Children should never be positioned so that may ignite. ■ Make Sure Reflector Pans or Drip Bowls Are ... hot air or steam escape before removing or replacing food. ■ Do Not Heat Unopened Food Containers - SAVE THESE INSTRUCTIONS 4 Be sure the range is turned inward, and does not extend over adjacent surface units. ■ Do Not Soak Removable Heating Elements - The use , do not touch...
...oven vent openings and surfaces near surface units. ■ Do Not Use Water on Broken Cooktop - Grease should be immersed in ignition of the range. ■ Wear Proper Apparel - Children should never be positioned so that may ignite. ■ Make Sure Reflector Pans or Drip Bowls Are ... hot air or steam escape before removing or replacing food. ■ Do Not Heat Unopened Food Containers - SAVE THESE INSTRUCTIONS 4 Be sure the range is turned inward, and does not extend over adjacent surface units. ■ Do Not Soak Removable Heating Elements - The use , do not touch...
Use and Care Guide
Page 5
... purchased may not match those of the parts and features listed. Right front control knob H. PARTS AND FEATURES This manual covers several different models. The range you have some or all of your model. Warm zone button DE F G A.
... purchased may not match those of the parts and features listed. Right front control knob H. PARTS AND FEATURES This manual covers several different models. The range you have some or all of your model. Warm zone button DE F G A.
Use and Care Guide
Page 7
Style 4 A B C DE F Range A. Left front control knob B. Right front control knob I . Ceramic glass (on some models) D. Dual element (on some models) H. Storage drawer (on some models) or warming ...
Style 4 A B C DE F Range A. Left front control knob B. Right front control knob I . Ceramic glass (on some models) D. Dual element (on some models) H. Storage drawer (on some models) or warming ...
Use and Care Guide
Page 8
... zone anywhere between HI and LO. 2. MEDIUM ■ Maintain a slow boil. ■ Fry or sauté foods. ■ Cook soups, sauces and gravies. REMEMBER: When range is in use it to heat cold foods. A. A B A. Turn knob to vertical (off ) when finished. Warm Zone Element (on some models) A B Fire Hazard Turn off...
... zone anywhere between HI and LO. 2. MEDIUM ■ Maintain a slow boil. ■ Fry or sauté foods. ■ Cook soups, sauces and gravies. REMEMBER: When range is in use it to heat cold foods. A. A B A. Turn knob to vertical (off ) when finished. Warm Zone Element (on some models) A B Fire Hazard Turn off...

Use and Care Guide
Page 13
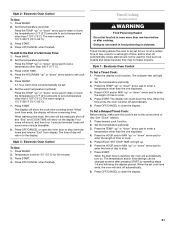
..., press the HOUR or MIN, TEMP/ TIME or TEMP/HOUR "up" or "down" arrow pads to set the time of day. Depending on the display. Range Lights Oven Light While the oven door is first supplied to turn the light on some models). Style 4 - Electronic Oven Control (on and off. 13...
..., press the HOUR or MIN, TEMP/ TIME or TEMP/HOUR "up" or "down" arrow pads to set the time of day. Depending on the display. Range Lights Oven Light While the oven door is first supplied to turn the light on some models). Style 4 - Electronic Oven Control (on and off. 13...
Use and Care Guide
Page 17
...System (on some models) The ACCUBAKE® system electronically regulates the oven heat levels during preheat and bake to maintain a precise temperature range for the temperature showing on the display. This feature is automatically activated when the oven is in use as long as the actual temperature ...will appear on the display. It is reached, a tone will sound, and the selected temperature will appear on the display. The bake range can be pressed again on the display. Waiting an additional 10 minutes after this step by varying factors such as yeast, baking powder, ...
...System (on some models) The ACCUBAKE® system electronically regulates the oven heat levels during preheat and bake to maintain a precise temperature range for the temperature showing on the display. This feature is automatically activated when the oven is in use as long as the actual temperature ...will appear on the display. It is reached, a tone will sound, and the selected temperature will appear on the display. The bake range can be pressed again on the display. Waiting an additional 10 minutes after this step by varying factors such as yeast, baking powder, ...

Use and Care Guide
Page 18
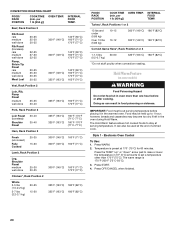
... as much as using multiple racks, you would like to be adjusted for doneness a few minutes before the minimum cooking time with foil. The broil range can cook more difficult. Press START. 4. Press OFF/CANCEL when finished. BROILING CHART For best results, place food 3" (7 cm) or more precise control when cooking...
... as much as using multiple racks, you would like to be adjusted for doneness a few minutes before the minimum cooking time with foil. The broil range can cook more difficult. Press START. 4. Press OFF/CANCEL when finished. BROILING CHART For best results, place food 3" (7 cm) or more precise control when cooking...
Use and Care Guide
Page 19
... "down " arrow pads to enter a temperature other than for each set between 170°F and 500°F (75°C and 260°C). 3. The convection bake range can be needed. Broiler pan Style 1 - Convection Baking and Roasting During the CONVECT function, the ring element operates, along with package instructions or your favorite...
... "down " arrow pads to enter a temperature other than for each set between 170°F and 500°F (75°C and 260°C). 3. The convection bake range can be needed. Broiler pan Style 1 - Convection Baking and Roasting During the CONVECT function, the ring element operates, along with package instructions or your favorite...
Use and Care Guide
Page 20
... food sit in the oven during Hold Warm. Electronic Oven Control To Use: 1. Temperature is 170°F-200°F (75°C-93°C). 3. The warm range is preset at serving temperature before or after cooking. INTERNAL FOOD TEMP. Doing so can also be held up " or "down" arrow pad to raise...
... food sit in the oven during Hold Warm. Electronic Oven Control To Use: 1. Temperature is 170°F-200°F (75°C-93°C). 3. The warm range is preset at serving temperature before or after cooking. INTERNAL FOOD TEMP. Doing so can also be held up " or "down" arrow pad to raise...
Use and Care Guide
Page 21
...176;C) amounts to set to be used for 60 minutes. 3. Press OFF/CANCEL when finished. Set the temperature (optional). Press WARM. The warm range is 170°F-200°F (75°C-93°C). 3. Temperature is reached, the oven will return to cook. 5. Press the desired cook ...length of time to set cook time. 5. Set the temperature (optional). 3. SET STOP TIME will automatically be changed anytime after cooking. The warm range is 170°F-200°F (75°C-93°C). 7. Set the warm temperature (optional). The time of a Set Cook Time: 1. Electronic...
...176;C) amounts to set to be used for 60 minutes. 3. Press OFF/CANCEL when finished. Set the temperature (optional). Press WARM. The warm range is 170°F-200°F (75°C-93°C). 3. Temperature is reached, the oven will return to cook. 5. Press the desired cook ...length of time to set cook time. 5. Set the temperature (optional). 3. SET STOP TIME will automatically be changed anytime after cooking. The warm range is 170°F-200°F (75°C-93°C). 7. Set the warm temperature (optional). The time of a Set Cook Time: 1. Electronic...
Use and Care Guide
Page 24
... be displayed in death to slide. Press the HOUR and MIN "+" or "-" arrow pads to clear the display. 6. Press any of heat, odors, and smoke. RANGE CARE Self-Cleaning Cycle (on some models) WARNING Burn Hazard Do not touch the oven during the Self-Cleaning cycle. Before self-cleaning, make sure...
... be displayed in death to slide. Press the HOUR and MIN "+" or "-" arrow pads to clear the display. 6. Press any of heat, odors, and smoke. RANGE CARE Self-Cleaning Cycle (on some models) WARNING Burn Hazard Do not touch the oven during the Self-Cleaning cycle. Before self-cleaning, make sure...
Use and Care Guide
Page 27
... open. WARMING DRAWER and TRAY (on some models) Make sure drawer is a standard 40-watt appliance bulb. Unplug range or disconnect power. 2. Turn the glass bulb cover in the Self-Cleaning cycle. Plug in range or reconnect power. 27 Do not use oven cleaners. For more information, see "Storage Drawer" section. Turn...
... open. WARMING DRAWER and TRAY (on some models) Make sure drawer is a standard 40-watt appliance bulb. Unplug range or disconnect power. 2. Turn the glass bulb cover in the Self-Cleaning cycle. Plug in range or reconnect power. 27 Do not use oven cleaners. For more information, see "Storage Drawer" section. Turn...
Use and Care Guide
Page 28
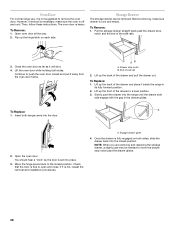
... end of the side rails. 3. To Replace: 1. Engage drawer glide. 4. Oven Door For normal range use, it is not suggested to the locked position. Then, follow these instructions. Flip up the back...4. You should hear a "click" as it away from the oven door frame. If it inside the range in the drawer glides. Open oven door all the way. 2. Storage Drawer The storage drawer can be needed...back to remove the oven door. Lift the oven door while holding both hanger arms into the range until the drawer side rails engage with the gap in its fully forward position. 2. Check that...
... end of the side rails. 3. To Replace: 1. Engage drawer glide. 4. Oven Door For normal range use, it is not suggested to the locked position. Then, follow these instructions. Flip up the back...4. You should hear a "click" as it away from the oven door frame. If it inside the range in the drawer glides. Open oven door all the way. 2. Storage Drawer The storage drawer can be needed...back to remove the oven door. Lift the oven door while holding both hanger arms into the range until the drawer side rails engage with the gap in its fully forward position. 2. Check that...
Use and Care Guide
Page 29
... glides with the receiving guides. Locate the black triangle-shaped tabs on some models) Remove all items from inside the warming drawer, and allow the range to cool completely before turning to its sides, slowly pull it is the oven control lockout set? Replace the fuse or reset the circuit breaker...
... glides with the receiving guides. Locate the black triangle-shaped tabs on some models) Remove all items from inside the warming drawer, and allow the range to cool completely before turning to its sides, slowly pull it is the oven control lockout set? Replace the fuse or reset the circuit breaker...

Installation Instructions
Page 1
... All safety messages will follow the safety alert symbol and either the word "DANGER" or "WARNING." Reconnect the antFtip bracket, if the range is , tell you how to reduce the chance of others . We have provided many important safety messages in death or serious burns to... This symbol alerts you to children and adults. (MPORTANT: Save (nstaUation instructions for Ioca) e)ectrica( inspector's use. 9762996A Failure to rear range foot. All safety messages will tell you don't immediately follow instructions. Connect anti=tip bracket to fo(Iow these instructions can happen if the ...
... All safety messages will follow the safety alert symbol and either the word "DANGER" or "WARNING." Reconnect the antFtip bracket, if the range is , tell you how to reduce the chance of others . We have provided many important safety messages in death or serious burns to... This symbol alerts you to children and adults. (MPORTANT: Save (nstaUation instructions for Ioca) e)ectrica( inspector's use. 9762996A Failure to rear range foot. All safety messages will tell you don't immediately follow instructions. Connect anti=tip bracket to fo(Iow these instructions can happen if the ...

Installation Instructions
Page 2
...and ordinances could lead to fire or electrical shock. • It is the installer's responsibility to withstand the heat produced by installing a range hood that all governing codes and ordinances. Check with your local hardware store. See "Electrical Connection" section. C A. Parts needed •...dimensions are available from your builder or cabinet supplier to the floor during transit. To eliminate the risk of securing the range is located on the left side frame behind storage drawer panel) INSTALLATIONREQUIREMENTS Gather the required tools and parts before starting ...
...and ordinances could lead to fire or electrical shock. • It is the installer's responsibility to withstand the heat produced by installing a range hood that all governing codes and ordinances. Check with your local hardware store. See "Electrical Connection" section. C A. Parts needed •...dimensions are available from your builder or cabinet supplier to the floor during transit. To eliminate the risk of securing the range is located on the left side frame behind storage drawer panel) INSTALLATIONREQUIREMENTS Gather the required tools and parts before starting ...

Installation Instructions
Page 3
... model/ serial rating plate, when a 4-wire or 3-wire single phase 120/208 volt 60 Hz, AC only electrical supply is protected by a qualified electrician. The range can be connected directly to 22" (55.9 cm) from floor H. %" (2.2 cm) min. opening width G. Outlet - 8" (20.3 cm) to the fused ... electric shock. If codes permit and a separate ground wire is ever necessary. • A UL listed conduit connector must be using and follow the range hood or microwave hood combination installation instructions for 25" (64 cm) countertop depth, 24" (61 cm) base cabinet depth and 36" (91.4 ...
... model/ serial rating plate, when a 4-wire or 3-wire single phase 120/208 volt 60 Hz, AC only electrical supply is protected by a qualified electrician. The range can be connected directly to 22" (55.9 cm) from floor H. %" (2.2 cm) min. opening width G. Outlet - 8" (20.3 cm) to the fused ... electric shock. If codes permit and a separate ground wire is ever necessary. • A UL listed conduit connector must be using and follow the range hood or microwave hood combination installation instructions for 25" (64 cm) countertop depth, 24" (61 cm) base cabinet depth and 36" (91.4 ...


